AWS Partner Network (APN) Blog
Using a Telefonica Data Bridge to Connect Narrow Band IoT Devices to AWS IoT Core
By Javier García Puga & Luis Peña, IoT Technology at Telefonica
By Rodrigo Merino, Mgr. EMEA Specialist SA, IoT at AWS
 |
Due to its long range, low battery consumption, and low cost, LPWAN is a narrow band (NB) telecommunications channel that’s projected to be one of the main carriers of Internet of Things (IoT) device communications.
According to a 2019 study by the GSM Association (GSMA), there will be 3.5 billion cellular IoT connections by 2025. Of those, 1.9 billion will be licensed LPWAN (Low Power Wide Area Network) connections.
It makes good sense to communicate with your IoT devices across an LPWAN. It also makes good sense to use AWS IoT Core to manage your IoT device communications.
AWS IoT Core can support billions of devices and trillions of messages, and can process and route those messages to Amazon Web Services (AWS) endpoints and other devices reliably and securely.
To maintain that security, AWS IoT Core requires X.509 certificates for authentication. Unfortunately, the X.509 standard consumes battery power, negating LPWAN’s advantage in that area.
Ideally, we would use both AWS IoT Core to manage IoT devices, and LPWAN to communicate between them. But how?
Telefonica developed a data bridge to enable IoT devices to connect securely to AWS IoT Core, while preserving the long range, low cost, and low power advantages of their LPWAN connections.
Telefonica is an AWS Partner Network (APN) Advanced Consulting Partner and telecommunications operator that provides communication, information, and entertainment solutions.
In this post, we’ll compare the power consumption of different protocols used for IoT communications, describe our data bridge solution, and show you how to set it up.
Comparing the Power Consumption of Different Protocols
Telefonica’s data bridge solution, which we describe later in this post, uses UDP and TCP protocols, both of which consume very little power. Currently, AWS IoT Core uses MQTT + TLS or HTTPS protocols, both of which require x.509 certificates for authentication.
To validate our approach, we tested at Telefonica labs how different protocols affected the power consumption of IoT devices. We obtained the results shown in Figure 1 below.
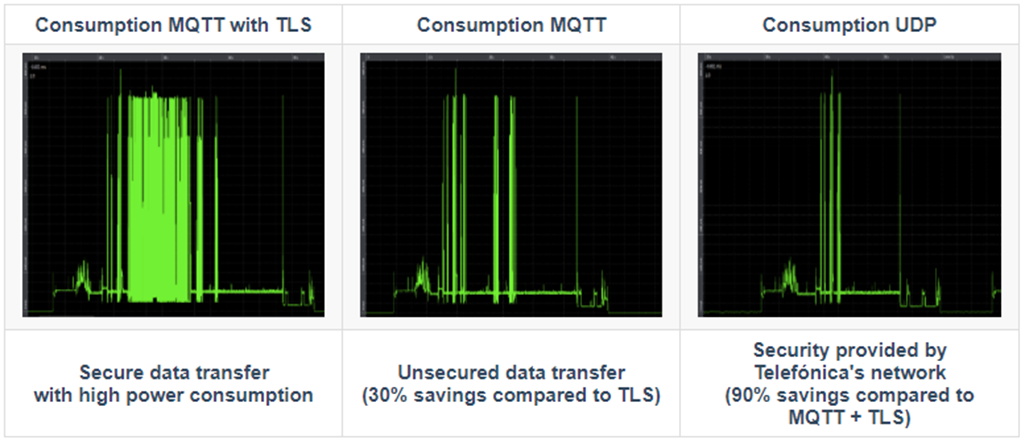
Figure 1 – IoT battery power consumed by different protocols.
According to our lab tests, you can virtually double the battery life of your IoT devices by communicating across UDP or TCP protocols:
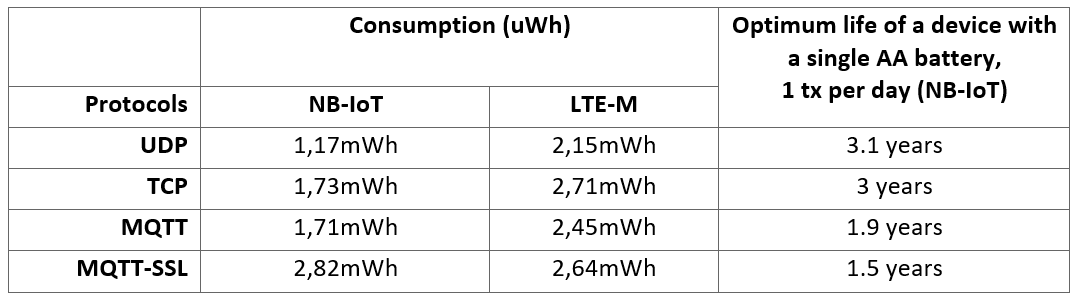
Figure 2 – Battery life of a device using different communication protocols.
We even dug a little deeper, and identified the ways in which the X.509 certificates required for authentication in MQTT + TLS protocols consume battery power, and compared it to UDP.

Figure 3 – Data consumption MQTT+TLS vs UDP.
Therefore, we are trying to simplify all these hazzle without compromising the data security.
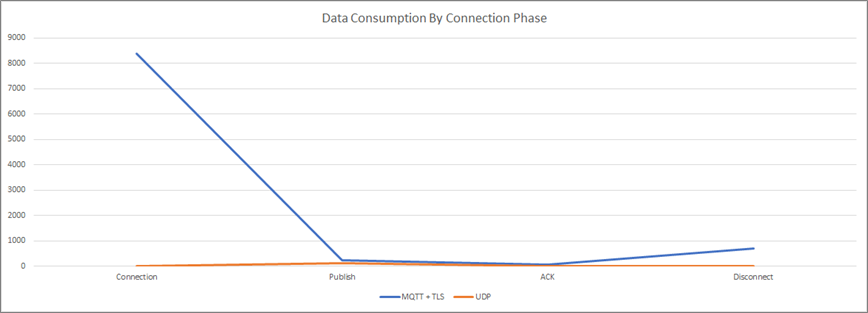
Figure 4 – Graph showing consumption MQTT+TLS vs UDP by connection phase.
Data Bridge Solution
Telefonica approached the design of the data bridge with two principal requirements: preserve the battery life of IoT devices, and ensure that messages between them and AWS IoT Core were delivered without fail.
Figure 5 provides a high-level architecture of the data bridge between IoT devices, the Telefonica KITE platform, and AWS IoT Core.
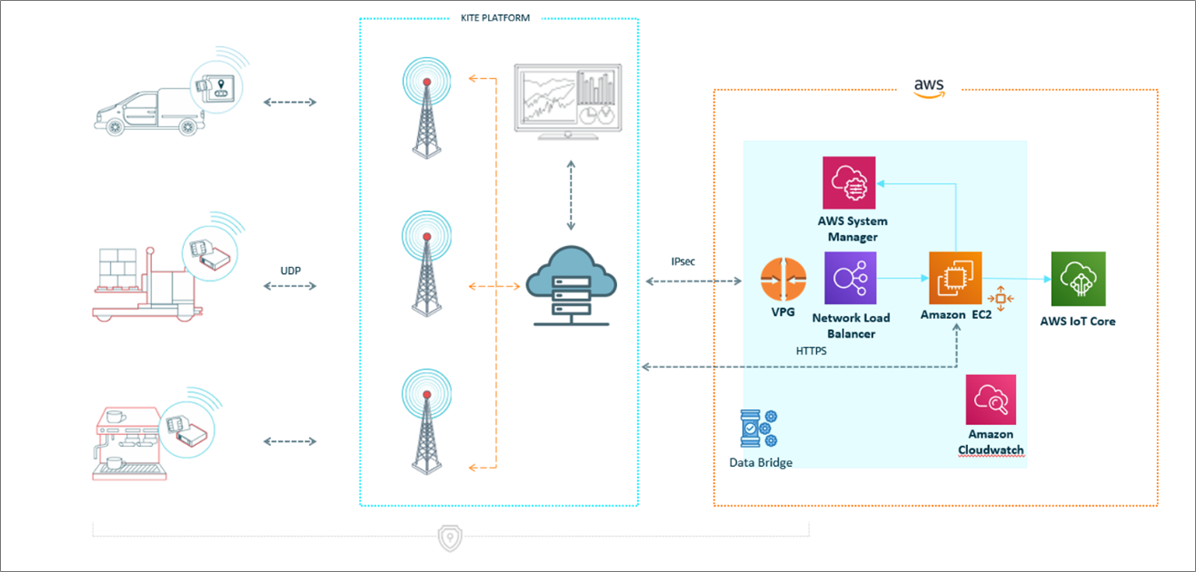
Figure 5 – High-level architecture of Telefonica’s data bridge.
The KITE platform from Telefonica, in the middle of the diagram above, provides remote management of IoT devices. Its enhanced security capabilities allow only authorized communications, and alerts you when it detects unusual behavior.
The data bridge solution has five main components:
- AWS Systems Manager to view operational data from your AWS services and automate operational tasks across your AWS resources.
- Amazon Virtual Private Cloud (Amazon VPC) to provision a logically isolated section of the AWS Cloud where you can launch AWS resources in a virtual network that you define.
- Amazon Elastic Compute Cloud (Amazon EC2) to provide secure, resizable compute capacity to process the communications between the IoT devices and AWS IoT Core.
- Network Load Balancer (NLB) to automatically distribute incoming traffic across the Amazon EC2 instances.
- Amazon CloudWatch to monitor and observe the data bridge, respond to system-wide performance changes, optimize resource utilization, and get a unified view of its operational health.
For security between each IoT device and AWS IoT Core, the data bridge employs Internet Protocol Security (IPsec) to authenticate and encrypt the packets of data flowing through a Telefonica LTE cellular network that terminates in AWS. The KITE platform uses UDP-based protocols to authenticate the individual IoT devices.
You can deploy the Telefonica data bridge on-premises or on a private or public cloud, provided it’s reachable by an IPsec provided by Telefonica.
How it Works
In brief, when NB-IoT devices send data securely through Telefonica’s LTE cellular network, the data bridge processes it and passes it to AWS IoT Core, where you can use AWS tools to consolidate, further process, and analyze the data.
Some of the more useful features in the KITE platform are its custom fields. Each IoT SIM is assigned its own custom fields, and you can use them to specify anything you want.
In the setup procedure described later in this post, you will use the first custom field to map a physical device to its representation on the cloud, which is also referred to as the device shadow. You’ll use the second custom field to specify the MQTT topic where you want to publish the data.

Figure 6 – Custom fields in Telefonica’s KITE platform.
Once setup is complete, Telefonica’s data bridge starts listening on a port you specifically allocate to IoT devices, and waits for a UDP datagram or Constrained Application Protocol (CoAP) message from an IoT SIM card.
Once it receives the message, the data bridge obtains the IP source address of the SIM card and gets all the data linked to that SIM through the KITE platform’s RESTful API.
As Telefonica’s data bridge parses this information, it obtains the SIM’s custom fields, which contain the device cloud name (device shadow name) and the topic (topic to publish) you specified during setup.
Depending on the topic format, the bridge uses AWS IoT Core as a standard MQTT Broker to route messages. If the topic matches the shadow’s topic structure, it updates the shadow name related to it.
If you want to send a command to the device, you can add a field to the shadow device’s AWS JavaScript object notation (JSON) description, and next time the device reports data it will receive your command.
You can also use the KITE platform to check the details related to your connectivity plan (IMEI, data consumption, limits, alerts), and manage all the SIM cards in your IoT devices.
How to Set Up the Data Bridge
To set up the data bridge, first gather the following data:
- Data bridge configuration details, using this AWS CloudFormation template on GitHub.
- KITE platform certificate files, provided by your Telefonica agent.
- Particulars of the IPsec service, also provided by Telefonica.
- From your AWS account:
- Amazon EC2 Key Pair
- Access to the AWS Systems Manager Parameter Store
- Access to AWS CloudFormation
Once you have that data, carry out the following steps.
Step 1: Configure the IPsec Tunnel Between Telefonica and AWS
An IPsec tunnel is a direct connection between the mobile network of your IoT SIM pool and the data bridge deployed on AWS.
This connection creates a new network (VPN) and guarantees the security of your data by allowing communication only between the devices that belong to this network.
Step 2: Generate an Amazon EC2 Key Pair
Generate a key pair for secure access to the Amazon EC2 instance where the code will be deployed.
- On the Amazon EC2 console, use the left-hand panel to navigate to Network & Security, and then select Key Pairs.
- Choose the Create Key Pair tab, and enter a key pair name.
A new .pem file is created. You will use this file to connect to the Amazon EC2 instance using an SSH client.
Step 3: Store the KITE Certificates in the Parameter Store
AWS System Manager includes a Parameter Store, which securely stores certificates and passwords. Use it to store the Telefonica KITE certificates, following these steps:
- In the left-hand navigation panel of the AWS Console, scroll to Shared Resources and select Parameter Store.
- Within the screen that appears, select Create Parameter.
- A parameter details screen appears, and you can copy the contents of the KITE certificate file into the value field for each of these files:
- your_customer_certificate.cer with the name cer_file
- your_customer_certificate.key with the name key_file
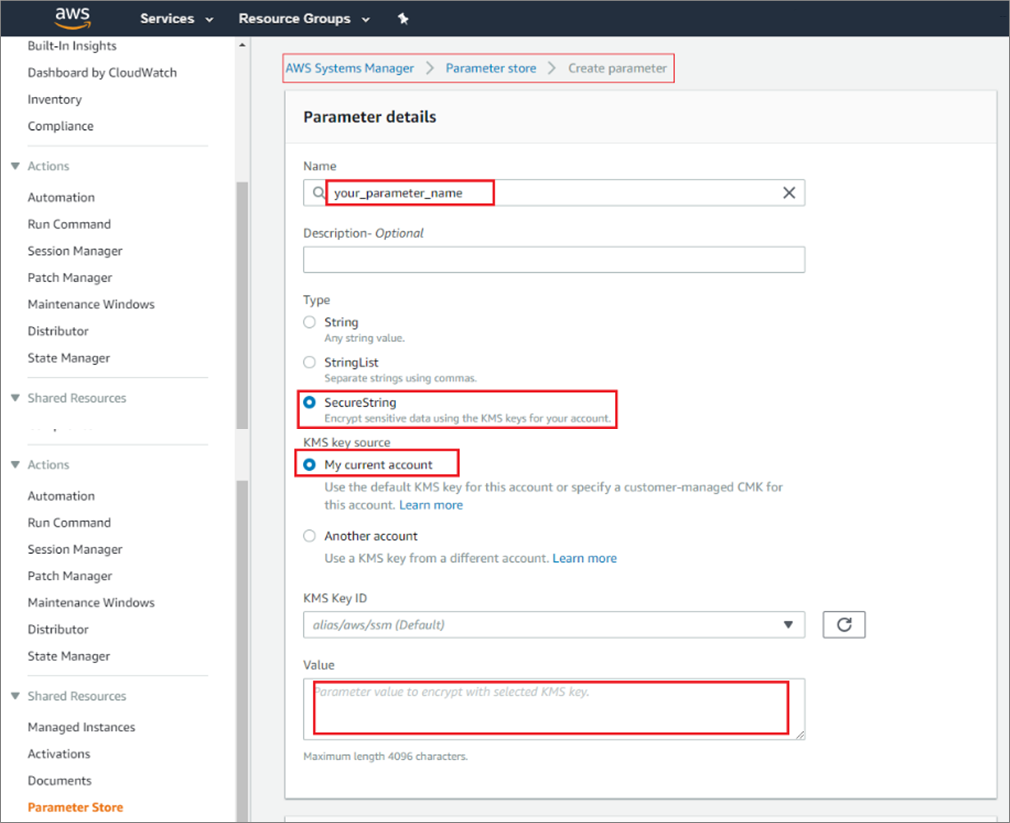
Figure 7 – Store Telefónica KITE certificates in the Parameter Store.
- Next, select the Create Parameter button at the bottom of the page.
Step 4: Enter Data Bridge Configuration Details into AWS CloudFormation
AWS CloudFormation provides a common language for you to describe and provision all of the infrastructure resources in your cloud environment. It allows you to use a simple text file to build and rebuild your infrastructure.
- Open the CloudFormation template you downloaded from Github and filled in as part of the prerequisites.
- In the CloudFormation console, click Create Stack.
- Paste the contents of your CloudFormation template into the fields.
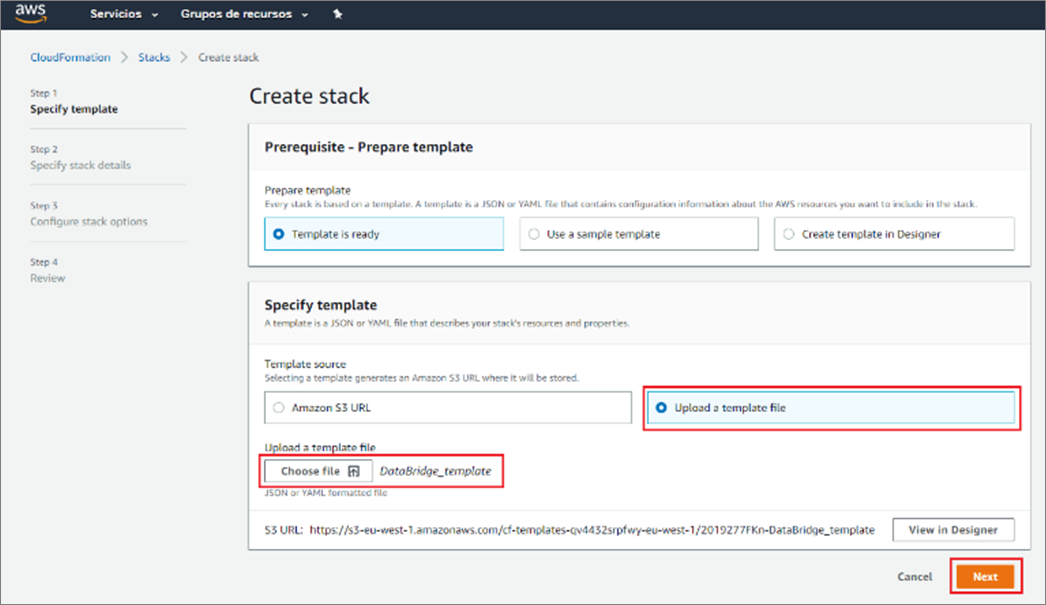
Figure 8 – Launch the CloudFormation template for the DataBridge solution.
- Edit the default values in each field to reflect your configuration:
- Choose a name for your stack.
- Select the IPsec source IP addresses.
- Enable the port for receiving CoAP requests
- Enter the configuration of the IPsec Tunnels.
- Choose the size and number of instances.
- Select your Amazon EC2 Key Pair and Parameters Store names created in the previous steps.
- Configure the Kite URL and the Access Point Name of your IoT SIM cards.
- Edit the Amazon VPC and AWS Subnet range.
Continue selecting Next until the blue Capabilities text box appears.
- Select the Capabilities checkbox to create associated AWS Identity and Access Management (IAM) resources.
- Select Create Stack, wait until all resources are created, and then review the data bridge stack output.

Figure 9 – Creation of the DataBridge solution as output from the CloudFormation template.
The DNS value is the address where the IoT devices will send their data, and Figure 10 below shows the resulting system.
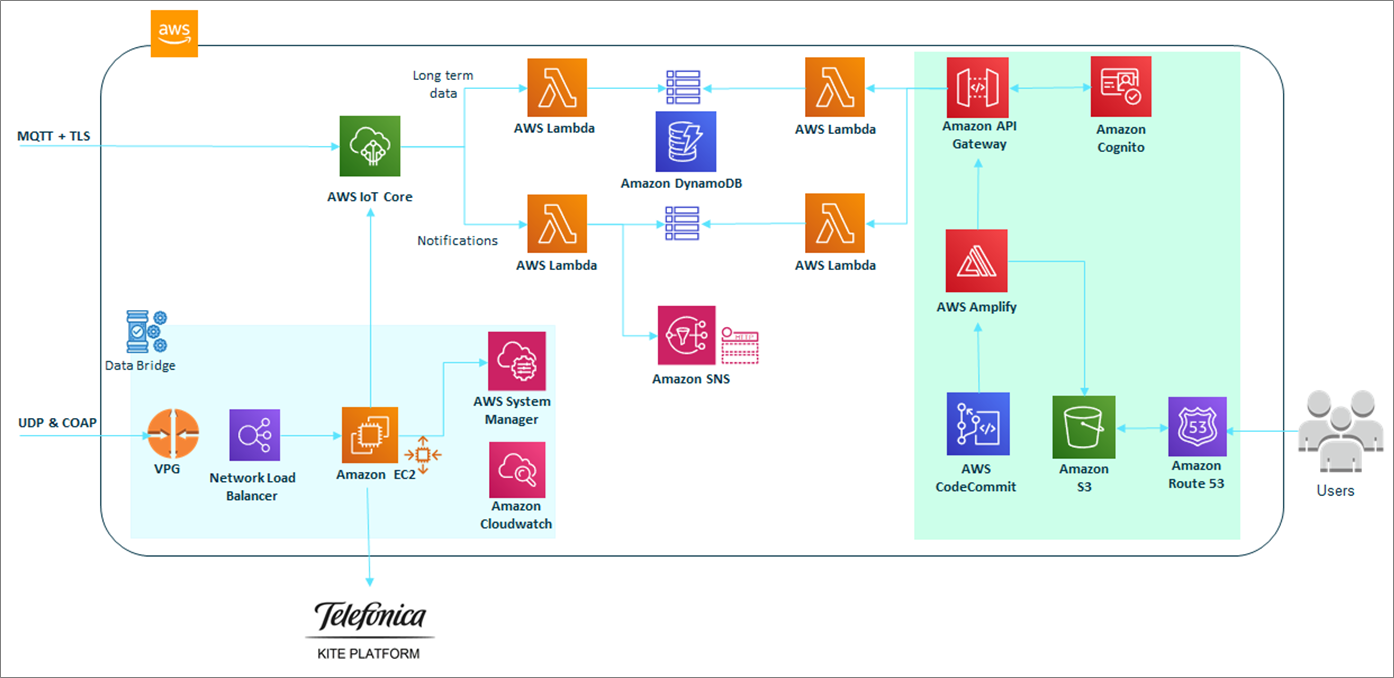
Figure 10 – System built by the data bridge setup process.
Step 5: Download the IPsec Configuration
Although the data bridge is now built, to configure the IPsec connection to Telefonica’s network you need the configuration file you used for the IPsec tunnel. You can download it from AWS console.
- Go to the Amazon VPC console and select Virtual Private Network.
- Choose Site-to-Site VPN Connections.
- From the new screen, select the Download Configuration tab. The screen displays the primary and redundant VPN files.

Figure 11 – Go to Site-to-Site VPN connections.
- Select the first file, and in the pop-up window enter the requested information and select Download.
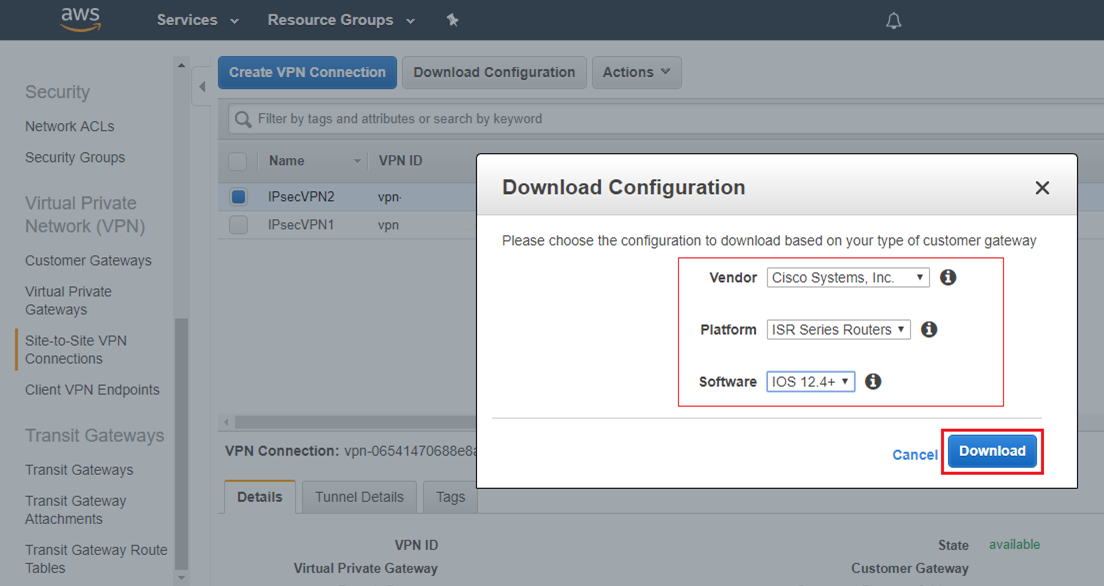
Figure 12 – Download the configuration of the IPsec connection.
- Repeat this process for the second file.
- Send these files to Telefonica through your Telefonica agent.
Once you send the generated files to Telefonica, it configures your IPsec connection for you.
Customer Use Case: AEInnova Data Bridge
AEInnova is developing a battery-free industrial wireless sensor network (WSN) within a full solution for wireless monitoring. Its multisensory hardware, called INDUEYE, has the potential to use almost every type of industrial sensor, including vibration, temperature, and pressure sensors.
INDUEYE is powered by thermoelectric technology, which uses the waste heat from industrial processes to generate the required electricity to power the whole system. This includes the communications and data processing on the node, and energy management is a critical issue since the nodes do not use batteries.
AEInnova clients are usually companies that have huge industrial plants with restrictions such as dangerous areas (ATEX areas and hazardous zones). AEInnova must also keep in mind that nodes are going to be widely dispersed and need a long coverage range.
The challenge in those environments is gathering data from a variety of sensors—often installed in harsh and sometimes dangerous environments—within complex installations that have many blind points and interferences, where other wireless systems are not suitable.
WSN IoT devices based on short-range communication protocols are not a good solution for big industrial facilities like this. Its deployment is conditioned to support a more complex and expensive infrastructure. The main challenge is to monitor these industrial processes with the minimum of energy, guaranteeing data security.
Telefonica’s telecom infrastructure receives the data through a private client Access Point Name using NB-IoT communications. The infrastructure uses a secure IPSEC tunnel to transfer the data from the client Access Point Name to AEInnova’s AWS account.
Once the nodes are validated by the KITE platform, they can publish in the IoT Core and different Lambda functions are triggered depending on the origin of the data.

Figure 13 – AEInnova IoT infrastructure based on Telefonica’s data bridge.
Thanks to the collaboration with Telefonica, AEInnova could develop a highly competitive system with the capacity to deploy thousands of nodes easily and at a reasonable cost without further maintenance. It’s also environmentally friendly, eliminating high contaminant lithium batteries from the devices.
“Telefonica helped us to develop the communication system through its IoT Activation program,” says Alejandro Santolaria, IT Manager at AEInnova. “The program allowed us to use ‘The Thinx’ lab in Barcelona, one of the most advanced IoT laboratories, to perform the necessary communication and system tests from the node to the dashboard.
“Telefonica provided highly-qualified technical support to guide us in the implementation of a secure infrastructure on AWS by using the data bridge and KITE platform.”
Summary
In this post, we analyzed how NB-IoT is projected to be one the main communications technologies for IoT devices, due to its long range, low energy consumption, and low cost.
Telefonica developed a data bridge to enable IoT devices to connect securely to AWS IoT Core, while preserving the long range, low cost, and low power advantages of their LPWAN connections.
We approached this design with two principal requirements: reduce the energy consumption of IoT devices, and ensure messages between them and AWS IoT Core were delivered securely and without fail. This allowed us to use IoT devices across LPWAN networks without compromising security or functionality.
.

.
Telefonica – APN Partner Spotlight
Telefonica is an APN Advanced Consulting Partner and telecommunications operator that provides communication, information, and entertainment solutions.
Contact Telefonica | Practice Overview
*Already worked with Telefonica? Rate this Partner
*To review an APN Partner, you must be an AWS customer that has worked with them directly on a project.