AWS News Blog
Elastic Load Balancing adds Support for Proxy Protocol
My colleague Lesley Mbogo is a Senior Product Manager on the Elastic Load Balancing team. She sent along the post below to tell you all about an important new feature — support for the Proxy Protocol.
— Jeff;
Starting today, Elastic Load Balancing (ELB) supports Proxy Protocol version 1. You can now identify the originating IP address of a client connecting to your servers using TCP load balancing. Client connection information, such as IP address and port, is typically lost when requests are proxied through a load balancer. This is because the load balancer sends requests to the server on behalf of the client, making your load balancer appear as though it is the requesting client. Having the originating client IP address is useful if you need more information about visitors to your applications. For example, you may want to gather connection statistics, analyze traffic logs, or manage whitelists of IP addresses.
Until today, ELB allowed you to obtain the clients IP address only if you used HTTP(S) load balancing, which adds this information in the X-Forwarded-For headers. Since X-Forwarded-For is used in HTTP headers only, you could not obtain the clients IP address if the ELB was configured for TCP load balancing. Many of you told us that you wanted similar functionality for TCP traffic, so we added support for Proxy Protocol. It simply prepends a human readable header with the clients connection information to the TCP data sent to your server. The advantage of Proxy Protocol is that it can be used with any protocol layer above TCP, since it has no knowledge of the higher-level protocol that is used on top of the connection. Proxy Protocol is useful when you are serving non-HTTP traffic. Alternatively, you can use it if you are sending HTTPS requests and do not want to terminate the SSL connection on the load balancer. For more information, please visit the Elastic Load Balancing Guide.
Creating a Simple Web Application Running Behind an ELB with Proxy Protocol
Id like to show you how we can use the Proxy Protocol feature in a simple Node.js application running behind an ELB. This application retrieves the client IP address and port number from the Proxy Protocol header in the TCP connection and outputs the information in an HTML response.
Well use AWS Elastic Beanstalk to quickly deploy and manage the application. Elastic Beanstalk automatically provisions an environment that includes Elastic Load Balancing, a set of EC2 instances with all the necessary software, and more. Elastic Beanstalk supports many languages and platforms; for this example, we chose to use Node.js.
Our sample application (elb-pp-app.zip, click to download) is a simple Node.js server bundled in a zip archive. Inside elb-pp-app.zip youll find the following files:
- server.js a simple Node.js server that receives and responds to TCP connections from the ELB.
- package.json declares the node-proxy-protocol package dependency that parses the Proxy Protocol header inserted by the ELB. Elastic Beanstalk installs these dependencies automatically.
- .ebextensions/ – a directory containing two YAML files that we created to customize our environment. Elastic Beanstalk automatically detects these files and applies the customizations.
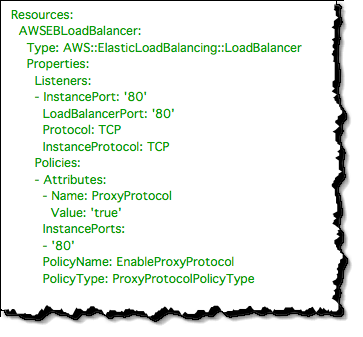
The first file, .ebextensions/01_elb.config, configures the ELB to listen for TCP connections on port 80 and forward requests to back-end instances on port 80, and finally enables Proxy Protocol. To enable Proxy Protocol for an existing ELB in your account, please see the Elastic Load Balancing Guide.
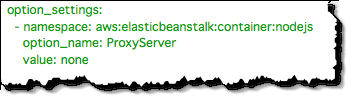
The second file, .ebextensions/02_container.config, customizes Node.js to listen to requests directly on port 80. The Node.js container can be configured to proxy traffic locally through Apache or Nginx before sending requests to our application. Weve however chosen to disable this feature and allow our Node.js application to act as the server because neither Apache nor Nginx currently support the Proxy Protocol header inserted by the ELB. To learn more about customizing your environment resources, visit the Elastic Beanstalk Developer Guide.
We are now ready to deploy the sample application to Elastic Beanstalk using the AWS Management Console.
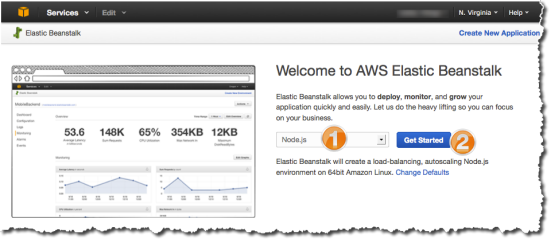
- Log into the Elastic Beanstalk Console, choose Node.js, and then click Get Started.
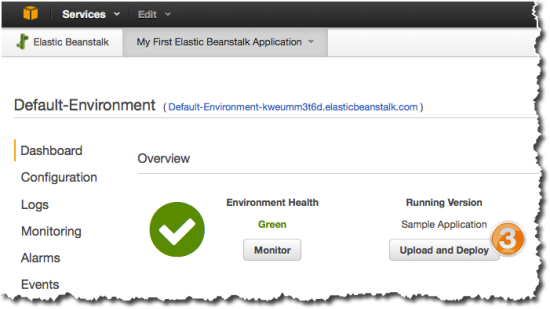
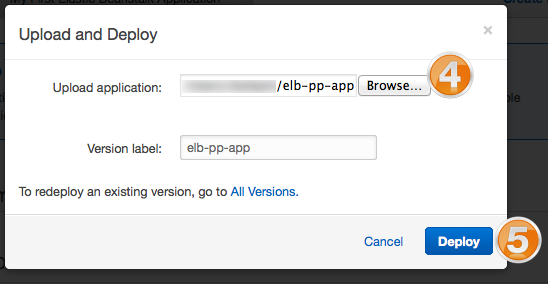
- Wait for the default environment to spin up and turn green, then click Upload and Deploy to upload the Node.js application. (Beanstalk creates a sample application in the default environment, so we need to upload our new version).
- Choose the elb-pp-app.zip file that you downloaded, and deploy the new version in the default environment.
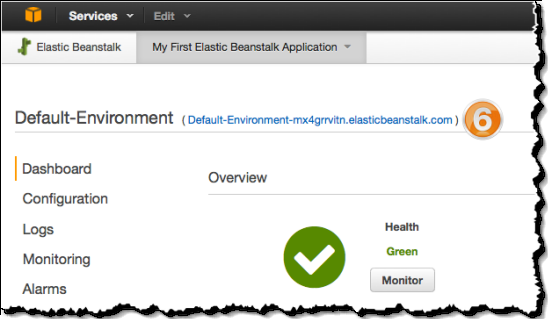
- Wait for the application to deploy and for the default environment to update. When the environment turns green, click the environments URL to access the Node.js application.
- The Node.js application parses the Proxy Protocol data from the ELB and responds with HTML output showing your original Source IP and Port, as well as the IP of the ELB that proxied the request to the application.

I hope that you find this useful. If you have any feature requests for Elastic Load Balancing, please leave a note in the EC2 forum.