AWS Big Data Blog
Connect to and run ETL jobs across multiple VPCs using a dedicated AWS Glue VPC
Many organizations use a setup that includes multiple VPCs based on the Amazon VPC service, with databases isolated in separate VPCs for security, auditing, and compliance purposes. This blog post shows how you can use AWS Glue to perform extract, transform, load (ETL) and crawler operations for databases located in multiple VPCs.
The solution presented here uses a dedicated AWS Glue VPC and subnet to perform the following operations on databases located in different VPCs:
- Scenario 1: Ingest data from an Amazon RDS for MySQL database, transform it in AWS Glue, and output the results to an Amazon Redshift data warehouse.
- Scenario 2: Ingest data from an Amazon RDS for MySQL database, transform it in AWS Glue, and output the results to an Amazon RDS for PostgreSQL database.
In this blog post, we’ll go through the steps needed to build an ETL pipeline that consumes from one source in one VPC and outputs it to another source in a different VPC. We’ll set up in multiple VPCs to reproduce a situation where your database instances are in multiple VPCs for isolation related to security, audit, or other purposes.
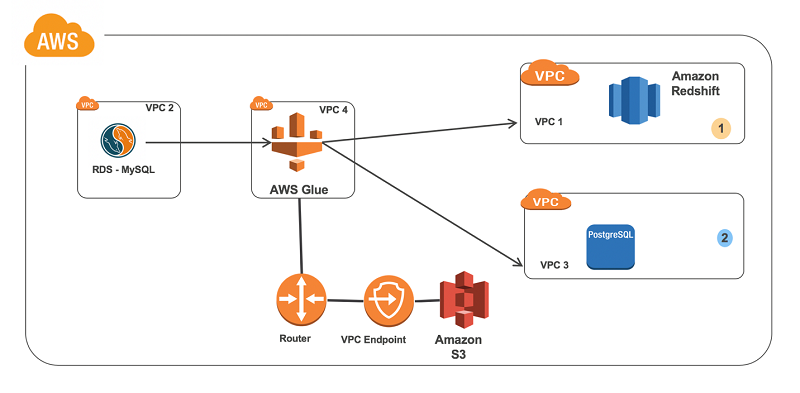
For this solution, we create a VPC dedicated to AWS Glue. Next, we set up VPC peering between the AWS Glue VPC and all of the other database VPCs. Then we configure an Amazon S3 endpoint, route tables, security groups, and IAM so that AWS Glue can function properly. Lastly, we create AWS Glue connections and an AWS Glue job to perform the task at hand.
Step 1: Set up a VPC
To simulate these scenarios, we create four VPCs with their respective IPv4 CIDR ranges. (Note: CIDR ranges can’t overlap when you use VPC peering.)
| VPC 1 | Amazon Redshift | 172.31.0.0/16 |
| VPC 2 | Amazon RDS for MySQL | 172.32.0.0/16 |
| VPC 3 | Amazon RDS for PostgreSQL | 172.33.0.0/16 |
| VPC 4 | AWS Glue | 172.30.0.0/16 |
Key configuration notes:
- The AWS Glue VPC needs at least one private subnet for AWS Glue to use.
- Ensure that DNS hostnames are enabled for all of your VPCs (unless you plan to refer to your databases by IP address later on, which isn’t recommended).
Step 2: Set up a VPC peering connection
Next, we peer our VPCs together to ensure that AWS Glue can communicate with all of the database targets and sources. This approach is necessary because AWS Glue resources are created with private addresses only. Thus, they can’t use an internet gateway to communicate with public addresses, such as public database endpoints. If your database endpoints are public, you can alternatively use a network address translation (NAT) gateway with AWS Glue rather than peer across VPCs.
Create the following peering connections.
| Requester | Accepter | |
| Peer 1 | 172.30.0.0/16- VPC 4 | 172.31.0.0/16- VPC 1 |
| Peer 2 | 172.30.0.0/16- VPC 4 | 172.32.0.0/16 -VPC 2 |
| Peer 3 | 172.30.0.0/16- VPC 4 | 172.33.0.0/16- VPC 3 |
These peering connections can be across separate AWS Regions if needed. The database VPCs are not peered together; they are all peered with the AWS Glue VPC instead. We do this because AWS Glue connects to each database from its own VPC. The databases don’t connect to each other.
Key configuration notes:
- Create a VPC peering connection, as described in the Amazon VPC documentation. Select the AWS Glue VPC as the requester and the VPC for your database as the accepter.
- Accept the VPC peering request. If you are peering to a different AWS Region, switch to that AWS Region to accept the request.
Important: Enable Domain Name Service (DNS) settings for each of the peering connections. Doing this ensures that AWS Glue can retrieve the private IP address of your database endpoints. Otherwise, AWS Glue resolves your database endpoints to public IP addresses. AWS Glue can’t connect to public IP addresses without a NAT gateway.

Step 3: Create an Amazon S3 endpoint for the AWS Glue subnet
We need to add an Amazon S3 endpoint to the AWS Glue VPC (VPC 4). During setup, associate the endpoint with the route table that your private subnet uses. For more details on creating an S3 endpoint for AWS Glue, see Amazon VPC Endpoints for Amazon S3 in the AWS Glue documentation.
AWS Glue uses S3 to store your scripts and temporary data to load into Amazon Redshift.
Step 4: Create a route table configuration
Add the following routes to the route tables used by the respective services’ subnets. These routes are configured along with existing settings.
| VPC 4—AWS Glue | Destination | Target |
| Route table | 172.33.0.0/16- VPC 3 | Peer 3 |
| 172.31.0.0/16- VPC 1 | Peer 1 | |
| 172.32.0.0/16- VPC 2 | Peer 2 |
| VPC 1—Amazon Redshift | Destination | Target |
| Route table | 172.30.0.0/16- VPC 4 | Peer 1 |
| VPC 2—Amazon RDS MySQL | Destination | Target |
| Route table | 172.30.0.0/16- VPC 4 | Peer 2 |
| VPC 3—Amazon RDS PostgreSQL | Destination | Target |
| Route table | 172.30.0.0/16- VPC 4 | Peer 3 |
Key configuration notes:
- The route table for the AWS Glue VPC has peering connections to all VPCs. It has these so that AWS Glue can initiate connections to all of the databases.
- All of the database VPCs have a peering connection back to the AWS Glue VPC. They have these connections to allow return traffic to reach AWS Glue.
- Ensure that your S3 endpoint is present in the route table for the AWS Glue VPC.
Step 5: Update the database security groups
Each database’s security group must allow traffic to its listening port (3306, 5432, 5439, and so on) from the AWS Glue VPC for AWS Glue to be able to connect to it. It’s also a good idea to restrict the range of source IP addresses as much as possible.
There are two ways to accomplish this. If your AWS Glue job will be in the same AWS Region as the resource, you can define the source as the security group that you use for AWS Glue. If you are using AWS Glue to connect across AWS Regions, specify the IP range from the private subnet in the AWS Glue VPC instead. The examples following use a security group as our AWS Glue job, and data sources are all in the same AWS Region.
In addition to configuring the database’s security groups, AWS Glue requires a special security group that allows all inbound traffic from itself. Because it isn’t secure to allow traffic from 0.0.0.0/0, we create a self-referencing rule that simply allows all traffic originating from the security group. You can create a new security group for this purpose, or you can modify an existing security group. In the example following, we create a new security group to use later when AWS Glue connections are created.
The security group Amazon RDS for MySQL needs to allow traffic from AWS Glue:

Amazon RDS for PostgreSQL allows traffic to its listening port from the same:

Amazon Redshift does it as so:

AWS Glue does it as so:

Step 6: Set up IAM
Make sure that you have an AWS Glue IAM role with access to Amazon S3. You might want to provide your own policy for access to specific Amazon S3 resources. Data sources require s3:ListBucket and s3:GetObject permissions. Data targets require s3:ListBucket, s3:PutObject, and s3:DeleteObject permissions. For more information on creating an Amazon S3 policy for your resources, see Policies and Permissions in the IAM documentation.
The role should look like this:

Or you can create an S3 policy that’s more restricted to suit your use case.
Step 7: Set up an AWS Glue connection
The Amazon RDS for MySQL connection in AWS Glue should look like this:

The Amazon Redshift connection should look like this:

The Amazon RDS for PostgreSQL connection should look like this:

Step 8: Set up an AWS Glue job
Key configuration notes:
- Create a crawler to import table metadata from the source database (Amazon RDS for MySQL) into the AWS Glue Data Catalog. The scenario includes a database in the catalog named gluedb, to which the crawler adds the sample tables from the source Amazon RDS for MySQL database.
- Use either the source connection or destination connection to create a sample job as shown following. (This step is required for the AWS Glue job to establish a network connection and create the necessary elastic network interfaces with the databases’ VPCs and peered connections.)
- This scenario uses pyspark code and performs the load operation from Amazon RDS for MySQL to Amazon Redshift. The ingest from Amazon RDS for MySQL to Amazon RDS for PostgreSQL includes a similar job.
- After running the job, verify that the table exists in the target database and that the counts match.
The following screenshots show the steps to create a job in the AWS Glue Management Console.

![]()


Following are some of examples of loading data from source tables to target instances. These are simple one-to-one mappings, with no transformations applied. Notice that the data sources and data sink (target) connection configuration access multiple VPCs from a single AWS Glue job.
Sample script 1 (Amazon RDS for MySQL to Amazon Redshift)
Sample script 2: Amazon RDS for MySQL to Amazon RDS for PostgreSQL (can also change with other RDS endpoint)
Summary
In this blog post, you learn how to configure AWS Glue to run in a separate VPC so that it can execute jobs for databases located in multiple VPCs.
The benefits of doing this include the following:
- A separate VPC and dedicated pool on the running AWS Glue job, isolated from database and compute nodes.
- Dedicated ETL developer access to a single VPC for better security control and provisioning.
Additional Reading
If you found this post useful, be sure to check out Restrict access to your AWS Glue Data Catalog with resource-level IAM permissions and resource-based policies, and Using Amazon Redshift Spectrum, Amazon Athena, and AWS Glue with Node.js in Production.
About the Author
 Nivas Shankar is a Senior Big Data Consultant at Amazon Web Services. He helps and works closely with enterprise customers building big data applications on the AWS platform. He holds a Masters degree in physics and is highly passionate about theoretical physics concepts. He enjoys spending time with his wife and two adorable kids. In his spare time, he takes his kids to tennis and football practice.
 Ian Eberhart is a Cloud Support Engineer on the Big Data team for AWS Premium Support. He works with customers on a daily basis to find solutions for moving and sorting their data on the AWS platform. In his spare time, Ian enjoys seeing independent and weird movies, riding his bike, and hiking in the mountains.