AWS Big Data Blog
How to export an Amazon DynamoDB table to Amazon S3 using AWS Step Functions and AWS Glue
| February 2023 Update: Console access to the AWS Data Pipeline service will be removed on April 30, 2023. On this date, you will no longer be able to access AWS Data Pipeline though the console. You will continue to have access to AWS Data Pipeline through the command line interface and API. Please note that AWS Data Pipeline service is in maintenance mode and we are not planning to expand the service to new regions. For information about migrating from AWS Data Pipeline, please refer to the AWS Data Pipeline migration documentation. |
In typical AWS fashion, not a week had gone by after I published How Goodreads offloads Amazon DynamoDB tables to Amazon S3 and queries them using Amazon Athena on the AWS Big Data blog when the AWS Glue team released the ability for AWS Glue crawlers and AWS Glue ETL jobs to read from DynamoDB tables natively. I was actually pretty excited about this. Less code means fewer bugs. The original architecture had been around for at least 18 months and could be simplified significantly with a little bit of work.
Refactoring the data pipeline
The AWS Data Pipeline architecture outlined in my previous blog post is just under two years old now. We had used data pipelines as a way to back up Amazon DynamoDB data to Amazon S3 in case of a catastrophic developer error. However, with DynamoDB point-in-time recovery we have a better, native mechanism for disaster recovery. Additionally, with data pipelines we still own the operations associated with the clusters themselves, even if they are transient. A common challenge is keeping our clusters up with recent releases of Amazon EMR to help mitigate any outstanding bugs. Another is the inefficiency of needing to spin up an EMR cluster for each DynamoDB table.
I decided to take a step back and list the capabilities I wanted to have in the next iteration:
- Export tables using AWS Glue instead of EMR.
- AWS Glue provides a serverless ETL environment where I don’t have to worry about the underlying infrastructure. This minimizes operational tasks like keeping up with the EMR release tags.
- Use a workflow solution that works across services like AWS Glue and Amazon Athena.
- In the first iteration, the workflow was spread across various services. Unless you had the entire pipeline in your head, it was difficult to get a bird’s-eye view of how the pipeline was progressing.
- Ability to select different formats.
- For data engineering, I prefer Apache Parquet. However, customers might prefer a different format.
- Add exported data to Athena.
- I find that the easier it is for the data to be queried, the more likely it’s used.
Architecture overview
At a high level, this is the architecture:
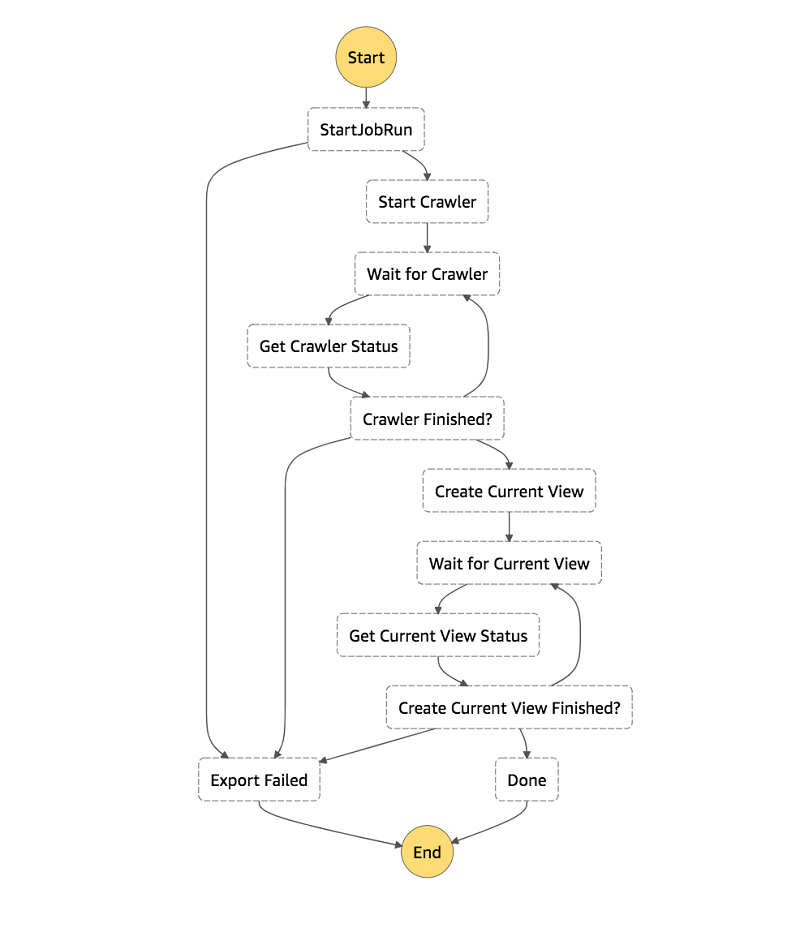
- We’re using AWS Step Functions as the workflow engine.
- Each step is either a built-in Step Functions state, a service integration, or a simple Python AWS Lambda For example, GlueStartJobRun is using the synchronous job run service integration, as discussed in the documentation.
- We get a visual representation of the entire pipeline.
- It’s quick to onboard new developers.
- An event in Amazon CloudWatch Events, which is disabled to start, triggers a Step Functions state machine with a JSON payload that contains the following:
- AWS Glue job name
- Export destination
- DynamoDB table name
- Desired read percentage
- AWS Glue crawler name
- AWS Glue exports a DynamoDB table in your preferred format to S3 as snapshots_your_table_name. The data is partitioned by the snapshot_timestamp
- An AWS Glue crawler adds or updates your data’s schema and partitions in the AWS Glue Data Catalog.
- Finally, we create an Athena view that only has data from the latest export snapshot.
A simple AWS Glue ETL job
The script that I created accepts AWS Glue ETL job arguments for the table name, read throughput, output, and format. Behind the scenes, AWS Glue scans the DynamoDB table. AWS Glue makes sure that every top-level attribute makes it into the schema, no matter how sparse your attributes are (as discussed in the DynamoDB documentation).
There’s not a lot here. We’re creating a DynamicFrameReader of connection type dynamodb and passing in the table name and desired maximum read throughput consumption. We pass that data frame to a DynamicFrameWriter that writes the table to S3 in the specified format.
Athena views
Most teams at Amazon own applications that have multiple DynamoDB tables, including my own team. Our current application uses five primary tables. Ideally, at the end of an export workflow you can write simple, obvious queries across a consistent view of your tables. However, each exported table is partitioned by the timestamp from when the table was exported. This makes querying across one or more tables very cumbersome, because you have to add a WHERE snapshot_timestamp = clause to every table reference in your query. Additionally, each table might have a different snapshot_timestamp value for any given day!
The final step in this export workflow creates an Athena view that adds that WHERE clause for you. This means that you can interact with your DynamoDB exports as if they were one sane view of your exported DynamoDB tables.
Setting up the infrastructure
The AWS CloudFormation stacks I create are split into two stacks. The common stack contains shared infrastructure, and you need only one of these per AWS Region. The table stacks are designed in such a way that you can create one per table-format combination in any given AWS Region. It contains the CloudWatch event logic and AWS Glue components needed to export and transform DynamoDB tables.
Creating the common stack
The common stack contains the majority of the infrastructure. That includes the Step Functions state machine and Lambda functions to trigger and check the state of asynchronous jobs. It also includes IAM roles that the export stacks use, and the S3 bucket to store the exports.
To create the common stack, do the following:
- Choose this Launch Stack
- Choose I acknowledge that AWS CloudFormation might create IAM resources with custom names.
- Choose Create Stack.
Creating the table export stack
If you don’t have a DynamoDB table to export, follow the original blog post. Start with the Working with the Reviews stack section and continue until you’ve added the two Items to the table. Otherwise, feel free to point this CloudFormation stack at your favorite DynamoDB table that is using provisioned throughput. Tables that use on-demand throughput are not currently supported.
Because so much of this architecture is shareable, there’s not much in the table export stack. This stack defines the CloudWatch event used to trigger the Step Functions state machine with a JSON payload containing all the necessary metadata. Additionally, it contains the AWS Glue ETL job that exports the table and the AWS Glue Crawler that updates metadata in the AWS Glue Data Catalog.
Technically, you can define the AWS Glue ETL job in the common stack because it’s already parameterized. However, the default limit for concurrent runs for an AWS Glue job is three. This is a soft limit, but with this architecture you have headroom to export up to 25 tables before asking for a limit increase.
To create the table export stack, do the following:
- Choose this Launch Stack
- Choose an output format from the list. All the available formats are supported by Athena natively.
- Enter your DynamoDB table name.
- Enter the percentage of Read Capacity Units (RCUs) that the job should consume from your table’s currently provisioned throughput. This percentage is expressed as a float between 0.1 and 1.0 inclusive. The default is 0.25 (25 percent).
As an example: Suppose that your table’s RCUs are set to 100 and you use the default 0.25, 25 percent. Then the AWS Glue job consume 25 RCUs while running.
- Choose Create.
Kicking off a state machine execution
To demonstrate how this works, we run the DynamoDB export state machine manually by passing it the JSON payload that the CloudWatch event would pass to Step Functions.
Getting the JSON payload from CloudWatch Events
To get the JSON payload, do the following:
- Open CloudWatch in the AWS Management Console.
- In the left column under Events, choose Rules.

- Choose your rule from the list. It is prefixed by AWSBigDataBlog-.
- For Actions, choose Edit.

- Copy the JSON payload from the Configure input section of Targets.

- Choose Cancel to exit edit mode.
Starting a state machine execution
To start an execution of the state machine, take the following steps:
- Open Step Functions in the console.
- Choose the DynamoDBExportAndAthenaLoad state machine.

- Choose Start execution.

- Paste the JSON payload into the Input

- Choose Start execution.
There are a few ways to follow along with the execution. As steps are entered and exited, entries are added to the Execution event history list. This is a great way to see what state (event in Lambda speak) is passed to each step, in case you need to debug.
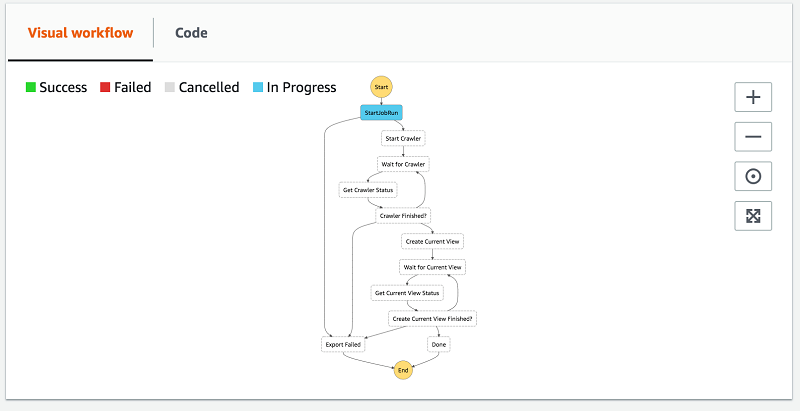
You can also expand the Visual workflow. It’s a great high-level view to see how the workflow is progressing.
After the workflow is finished, you see two new tables under the dynamodb_exports database in your AWS Glue Data Catalog. Your DynamoDB snapshots table name is prefixed with snapshots_. The schema is formatted for the AWS Glue Data Catalog (lowercase and hyphens transformed to underscores). You also have a view table with the same table name formatted for AWS Glue Data Catalog but without the snapshots_ prefix.
Querying your data
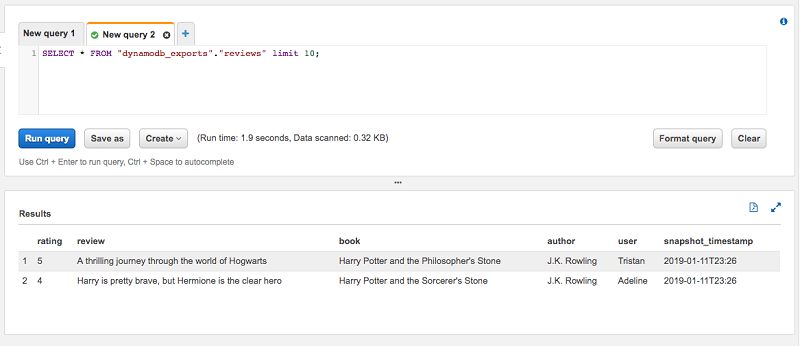
To showcase how having a separate view table of the most recent snapshot of a table is useful, I use the Reviews table from the previous blog post. The table has two items. I have also run the export workflow twice. As you can see when you preview the table, there are four items total. That’s because each snapshot contains two items.
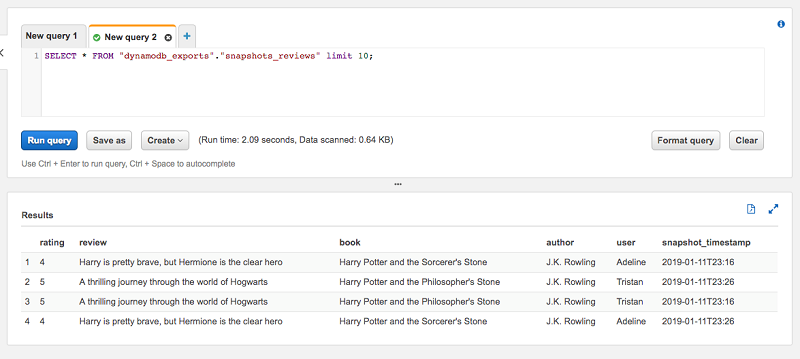
From the items, the latest snapshot_timestamp is 2019-01-11T23:26. When I run the same preview query against the view table reviews, we see that there are only two items, which is what we expect. The view takes care of specifying the where snapshot_timestamp=… clause so you don’t have to.
Wrapping up
In this post, I showed you how to use AWS Glue’s DynamoDB integration and AWS Step Functions to create a workflow to export your DynamoDB tables to S3 in Parquet. I also show how to create an Athena view for each table’s latest snapshot, giving you a consistent view of your DynamoDB table exports.
About the Author
 Joe Feeney is a Software Engineer at Amazon Go, where he does secret stuff and he’s quite chuffed with that. He enjoys embarrassing his family by taking Mario Kart entirely too seriously.