AWS Big Data Blog
Work with partitioned data in AWS Glue
October 2022: This post was reviewed for accuracy.
AWS Glue provides enhanced support for working with datasets that are organized into Hive-style partitions. AWS Glue crawlers automatically identify partitions in your Amazon S3 data. The AWS Glue ETL (extract, transform, and load) library natively supports partitions when you work with DynamicFrames. DynamicFrames represent a distributed collection of data without requiring you to specify a schema. You can now push down predicates when creating DynamicFrames to filter out partitions and avoid costly calls to S3. We have also added support for writing DynamicFrames directly into partitioned directories without converting them to Apache Spark DataFrames.
Partitioning has emerged as an important technique for organizing datasets so that they can be queried efficiently by a variety of big data systems. Data is organized in a hierarchical directory structure based on the distinct values of one or more columns. For example, you might decide to partition your application logs in Amazon S3 by date—broken down by year, month, and day. Files corresponding to a single day’s worth of data would then be placed under a prefix such as s3://my_bucket/logs/year=2018/month=01/day=23/.
Systems like Amazon Athena, Amazon Redshift Spectrum, and now AWS Glue can use these partitions to filter data by value without making unnecessary calls to Amazon S3. This can significantly improve the performance of applications that need to read only a few partitions.
In this post, we show you how to efficiently process partitioned datasets using AWS Glue. First, we cover how to set up a crawler to automatically scan your partitioned dataset and create a table and partitions in the AWS Glue Data Catalog. Then, we introduce some features of the AWS Glue ETL library for working with partitioned data. You can now filter partitions using SQL expressions or user-defined functions to avoid listing and reading unnecessary data from Amazon S3. We’ve also added support in the ETL library for writing AWS Glue DynamicFrames directly into partitions without relying on Spark SQL DataFrames.
Let’s get started!
Crawling partitioned data
In this example, we use the same GitHub archive dataset that we introduced in a previous post about Scala support in AWS Glue. This data, which is publicly available from the GitHub archive, contains a JSON record for every API request made to the GitHub service. A sample dataset containing one month of activity from January 2017 is available at the following location:
Here you can replace <region> with the AWS Region in which you are working, for example, us-east-1. This dataset is partitioned by year, month, and day, so an actual file will be at a path like the following:
To crawl this data, you can either follow the instructions in the AWS Glue Developer Guide or use the provided AWS CloudFormation template. This template creates a stack that contains the following:
- An IAM role with permissions to access AWS Glue resources
- A database in the AWS Glue Data Catalog named githubarchive_month
- A crawler set up to crawl the GitHub dataset
- An AWS Glue development endpoint (which is used in the next section to transform the data)
To run this template, you must provide an S3 bucket and prefix where you can write output data in the next section. The role that this template creates will have permission to write to this bucket only. You also need to provide a public SSH key for connecting to the development endpoint. For more information about creating an SSH key, see our Development Endpoint tutorial. After you create the AWS CloudFormation stack, you can run the crawler from the AWS Glue console.
In addition to inferring file types and schemas, crawlers automatically identify the partition structure of your dataset and populate the AWS Glue Data Catalog. This ensures that your data is correctly grouped into logical tables and makes the partition columns available for querying in AWS Glue ETL jobs or query engines like Amazon Athena.
After you crawl the table, you can view the partitions by navigating to the table in the AWS Glue console and choosing View partitions. The partitions should look like the following:
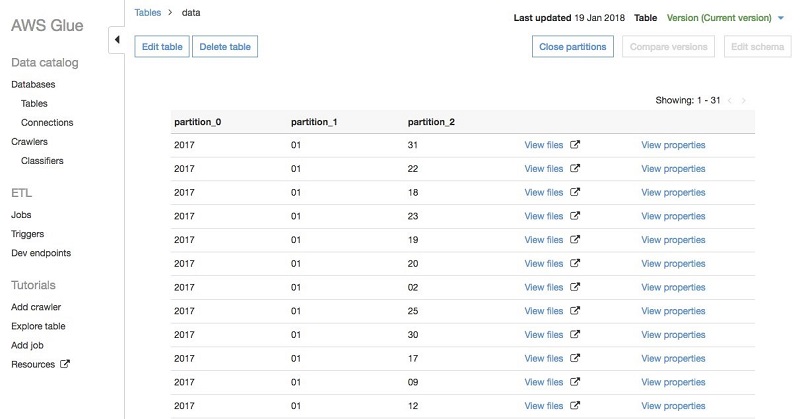
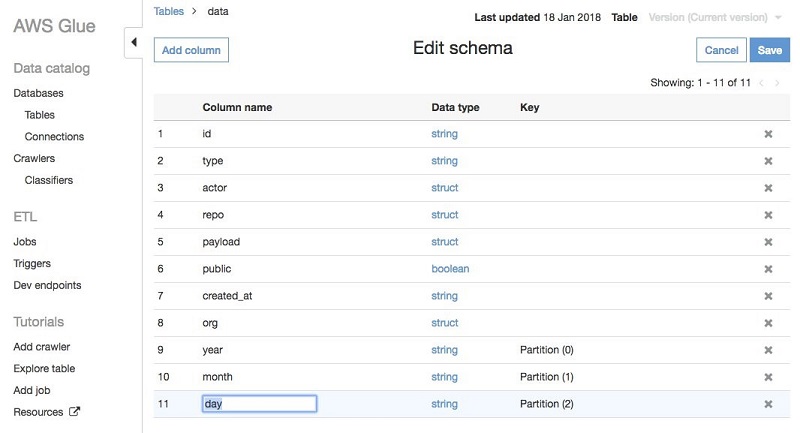
For partitioned paths in Hive-style of the form key=val, crawlers automatically populate the column name. In this case, because the GitHub data is stored in directories of the form 2017/01/01, the crawlers use default names like partition_0, partition_1, and so on. You can easily change these names on the AWS Glue console: Navigate to the table, choose Edit schema, and rename partition_0 to year, partition_1 to month, and partition_2 to day:
Now that you’ve crawled the dataset and named your partitions appropriately, let’s see how to work with partitioned data in an AWS Glue ETL job.
Transforming and filtering the data
To get started with the AWS Glue ETL libraries, you can use an AWS Glue development endpoint and an Apache Zeppelin notebook. AWS Glue development endpoints provide an interactive environment to build and run scripts using Apache Spark and the AWS Glue ETL library. They are great for debugging and exploratory analysis, and can be used to develop and test scripts before migrating them to a recurring job.
If you ran the AWS CloudFormation template in the previous section, then you already have a development endpoint named partition-endpoint in your account. Otherwise, you can follow the instructions in this development endpoint tutorial. In either case, you need to set up an Apache Zeppelin notebook, either locally, or on an EC2 instance. You can find more information about development endpoints and notebooks in the AWS Glue Developer Guide.
The following examples are all written in the Scala programming language, but they can all be implemented in Python with minimal changes.
Reading a partitioned dataset
To get started, let’s read the dataset and see how the partitions are reflected in the schema. First, you import some classes that you will need for this example and set up a GlueContext, which is the main class that you will use to read and write data.
Execute the following in a Zeppelin paragraph, which is a unit of executable code:
This is straightforward with two caveats: First, each paragraph must start with the line %spark to indicate that the paragraph is Scala. Second, the spark variable must be marked @transient to avoid serialization issues. This is only necessary when running in a Zeppelin notebook.
Next, read the GitHub data into a DynamicFrame, which is the primary data structure that is used in AWS Glue scripts to represent a distributed collection of data. A DynamicFrame is similar to a Spark DataFrame, except that it has additional enhancements for ETL transformations. DynamicFrames are discussed further in the post AWS Glue Now Supports Scala Scripts, and in the AWS Glue API documentation.
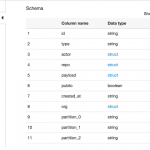
The following snippet creates a DynamicFrame by referencing the Data Catalog table that you just crawled and then prints the schema:
You could also print the full schema using githubEvents.printSchema(). But in this case, the full schema is quite large, so I’ve printed only the top-level columns. This paragraph takes about 5 minutes to run on a standard size AWS Glue development endpoint. After it runs, you should see the following output:
id: string
type: string
actor: struct
repo: struct
payload: struct
public: boolean
created_at: string
year: string
month: string
day: string
org: struct
Note that the partition columns year, month, and day were automatically added to each record.
Filtering by partition columns
One of the primary reasons for partitioning data is to make it easier to operate on a subset of the partitions, so now let’s see how to filter data by the partition columns. In particular, let’s find out what people are building in their free time by looking at GitHub activity on the weekends. One way to accomplish this is to use the filter transformation on the githubEvents DynamicFrame that you created earlier to select the appropriate events:
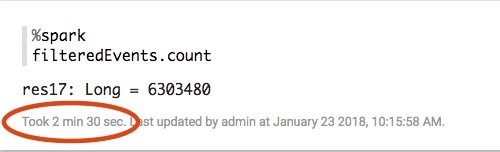
This snippet defines the filterWeekend function that uses the Java Calendar class to identify those records where the partition columns (year, month, and day) fall on a weekend. If you run this code, you see that there were 6,303,480 GitHub events falling on the weekend in January 2017, out of a total of 29,160,561 events. This seems reasonable—about 22 percent of the events fell on the weekend, and about 29 percent of the days that month fell on the weekend (9 out of 31). So people are using GitHub slightly less on the weekends, but there is still a lot of activity!
Predicate pushdowns for partition columns
The main downside to using the filter transformation in this way is that you have to list and read all files in the entire dataset from Amazon S3 even though you need only a small fraction of them. This is manageable when dealing with a single month’s worth of data. But as you try to process more data, you will spend an increasing amount of time reading records only to immediately discard them.
To address this issue, we recently released support for pushing down predicates on partition columns that are specified in the AWS Glue Data Catalog. Instead of reading the data and filtering the DynamicFrame at executors in the cluster, you apply the filter directly on the partition metadata available from the catalog. Then you list and read only the partitions from S3 that you need to process.
To accomplish this, you can specify a Spark SQL predicate as an additional parameter to the getCatalogSource method. This predicate can be any SQL expression or user-defined function as long as it uses only the partition columns for filtering. Remember that you are applying this to the metadata stored in the catalog, so you don’t have access to other fields in the schema.
The following snippet shows how to use this functionality to read only those partitions occurring on a weekend:
Here you use the SparkSQL string concat function to construct a date string. You use the to_date function to convert it to a date object, and the date_format function with the ‘E’ pattern to convert the date to a three-character day of the week (for example, Mon, Tue, and so on). For more information about these functions, Spark SQL expressions, and user-defined functions in general, see the Spark SQL documentation and list of functions.
Note that the pushdownPredicate parameter is also available in Python. The corresponding call in Python is as follows:
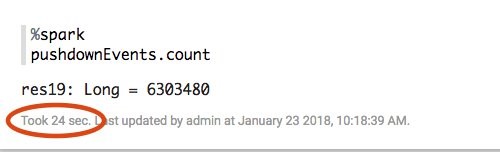
You can observe the performance impact of pushing down predicates by looking at the execution time reported for each Zeppelin paragraph. The initial approach using a Scala filter function took 2.5 minutes:
Because the version using a pushdown lists and reads much less data, it takes only 24 seconds to complete, a 5X improvement!
Of course, the exact benefit that you see depends on the selectivity of your filter. The more partitions that you exclude, the more improvement you will see.
In addition to Hive-style partitioning for Amazon S3 paths, Parquet and ORC file formats further partition each file into blocks of data that represent column values. Each block also stores statistics for the records that it contains, such as min/max for column values. AWS Glue supports pushdown predicates for both Hive-style partitions and block partitions in these formats. While reading data, it prunes unnecessary S3 partitions and also skips the blocks that are determined unnecessary to be read by column statistics in Parquet and ORC formats.
Additional transformations
Now that you’ve read and filtered your dataset, you can apply any additional transformations to clean or modify the data. For example, you could augment it with sentiment analysis as described in the previous AWS Glue post.
To keep things simple, you can just pick out some columns from the dataset using the ApplyMapping transformation:
ApplyMapping is a flexible transformation for performing projection and type-casting. In this example, we use it to unnest several fields, such as actor.login, which we map to the top-level actor field. We also cast the id column to a long and the partition columns to integers.
Writing out partitioned data
The final step is to write out your transformed dataset to Amazon S3 so that you can process it with other systems like Amazon Athena. By default, when you write out a DynamicFrame, it is not partitioned—all the output files are written at the top level under the specified output path. Until recently, the only way to write a DynamicFrame into partitions was to convert it into a Spark SQL DataFrame before writing. We are excited to share that DynamicFrames now support native partitioning by a sequence of keys.
You can accomplish this by passing the additional partitionKeys option when creating a sink. For example, the following code writes out the dataset that you created earlier in Parquet format to S3 in directories partitioned by the type field.
Here, $outpath is a placeholder for the base output path in S3. The partitionKeys parameter can also be specified in Python in the connection_options dict:
When you execute this write, the type field is removed from the individual records and is encoded in the directory structure. To demonstrate this, you can list the output path using the aws s3 ls command from the AWS CLI:
As expected, there is a partition for each distinct event type. In this example, we partitioned by a single value, but this is by no means required. For example, if you want to preserve the original partitioning by year, month, and day, you could simply set the partitionKeys option to be Seq(“year”, “month”, “day”).
Conclusion
In this post, we showed you how to work with partitioned data in AWS Glue. Partitioning is a crucial technique for getting the most out of your large datasets. Many tools in the AWS big data ecosystem, including Amazon Athena and Amazon Redshift Spectrum, take advantage of partitions to accelerate query processing. AWS Glue provides mechanisms to crawl, filter, and write partitioned data so that you can structure your data in Amazon S3 however you want, to get the best performance out of your big data applications.
We hope you try it out!
Additional Reading
If you found this post useful, be sure to check out AWS Glue Now Supports Scala Scripts and Simplify Querying Nested JSON with the AWS Glue Relationalize Transform.
 Ben Sowell is a senior software development engineer at AWS Glue. He has worked for more than 5 years on ETL systems to help users unlock the potential of their data. In his free time, he enjoys reading and exploring the Bay Area.
 Mohit Saxena is a senior software development engineer at AWS Glue. His passion is building scalable distributed systems for efficiently managing data on cloud. He also enjoys watching movies and reading about the latest technology.