AWS Compute Blog
Deep dive on the new Amazon EC2 G4ad instances
This post is contributed by Amr Ragab, Senior Solutions Architect, Amazon EC2
The Amazon EC2 G4ad instance type is the latest addition to AWS’ portfolio of accelerated computing instance types. These instances are ideal for graphics-enabled and gaming workloads. They provide the best price performance for graphics intensive applications such as virtual workstations, gaming and rendering in the cloud. This post guides you through an example interactive deployment using the G4ad on Ubuntu 18.04 with NICE DCV. Follow along if you have a graphics, gaming and interactive computing workload and want to take advantage of the price performance G4ad offers.
Product overview
The G4ad instance type has the following specifications:
| Instance Type | CPU | vCPUs | GPUs | GPU Memory (GB) | RAM (GB) | Local NVMe Disk (GB) | Amazon EBS Bandwidth (Gbps) | Network Bandwidth (Gbps) |
| g4ad.4xlarge | AMD EPYC 7R32 @3.3 GHz | 16 | 1 | 8 | 64 | 600 | Up to 3 | Up to 10 |
| g4ad.8xlarge | AMD EPYC 7R32 @3.3 GHz | 32 | 2 | 16 | 128 | 1200 | 3 | 15 |
| g4ad.16xlarge | AMD EPYC 7R32 @3.3 GHz | 64 | 4 | 32 | 256 | 2400 | 6 | 25 |
The G4ad features an AMD Radeon Pro V520 (NAVI 12) GPU. The G4ad is fully supported on Windows 2016, Windows 2019, Amazon Linux 2, Ubuntu 18.04, and CentOS 7/8. The AMD professional graphics stack is provided by AWS and has no additional licensing costs.
The G4ad instance type is purpose built for remote professional graphics workloads including scientific visualization and data analysis, design, media and entertainment and remote gaming. The G4ad instance family has up to 40% better performance over G4dn for general-purpose graphics rendering, and gaming workloads in addition to 15%-25% lower cost.
If your workload includes video encoding, the G4ad instance type supports the following number of hardware encoding codecs and resolutions:
| Video Encoding Format | AMD Radeon V520 Hardware Support |
| H.264[AVCHD] – YUV 4:2:0 | Yes |
| H.264[AVCHD] – YUV 4:4:4 | No |
| H.264[AVCHD] – Lossless | No |
| H.265[HEVC] – 4K YUV 4:2:0 | Yes |
| H.265[HEVC] – 4K YUV 4:4:4 | No |
| H.265[HEVC] – 4K Lossless | No |
| H.265[HEVC] – 8K | No |
| HEVC 10-bit | Yes |
| HEVC B-Frame | No |
| Max Number of Concurrent Encoding Sessions per GPU | ||
| Resolution | H.264 encoding 8-bit | H.265 encoding 10-bit |
| 720p30 | 28 | 28 |
| 720p60 | 14 | 14 |
| 1080p30 | 12 | 12 |
| 1080p60 | 6 | 6 |
| 4K60 | 1 | 1 |
| 4K90 | 1 | 1 |
Now that you understand the product details, let’s walk through an interactive deployment using G4ad on Ubuntu 18.04 with NICE DCV. Hardware encoding support for the NICE DCV session will be available soon. This is an example deployment of managed desktop environment, which can be used for several interactive applications including graphics rendering and development, interactive scientific computing and gaming development.
Deployment
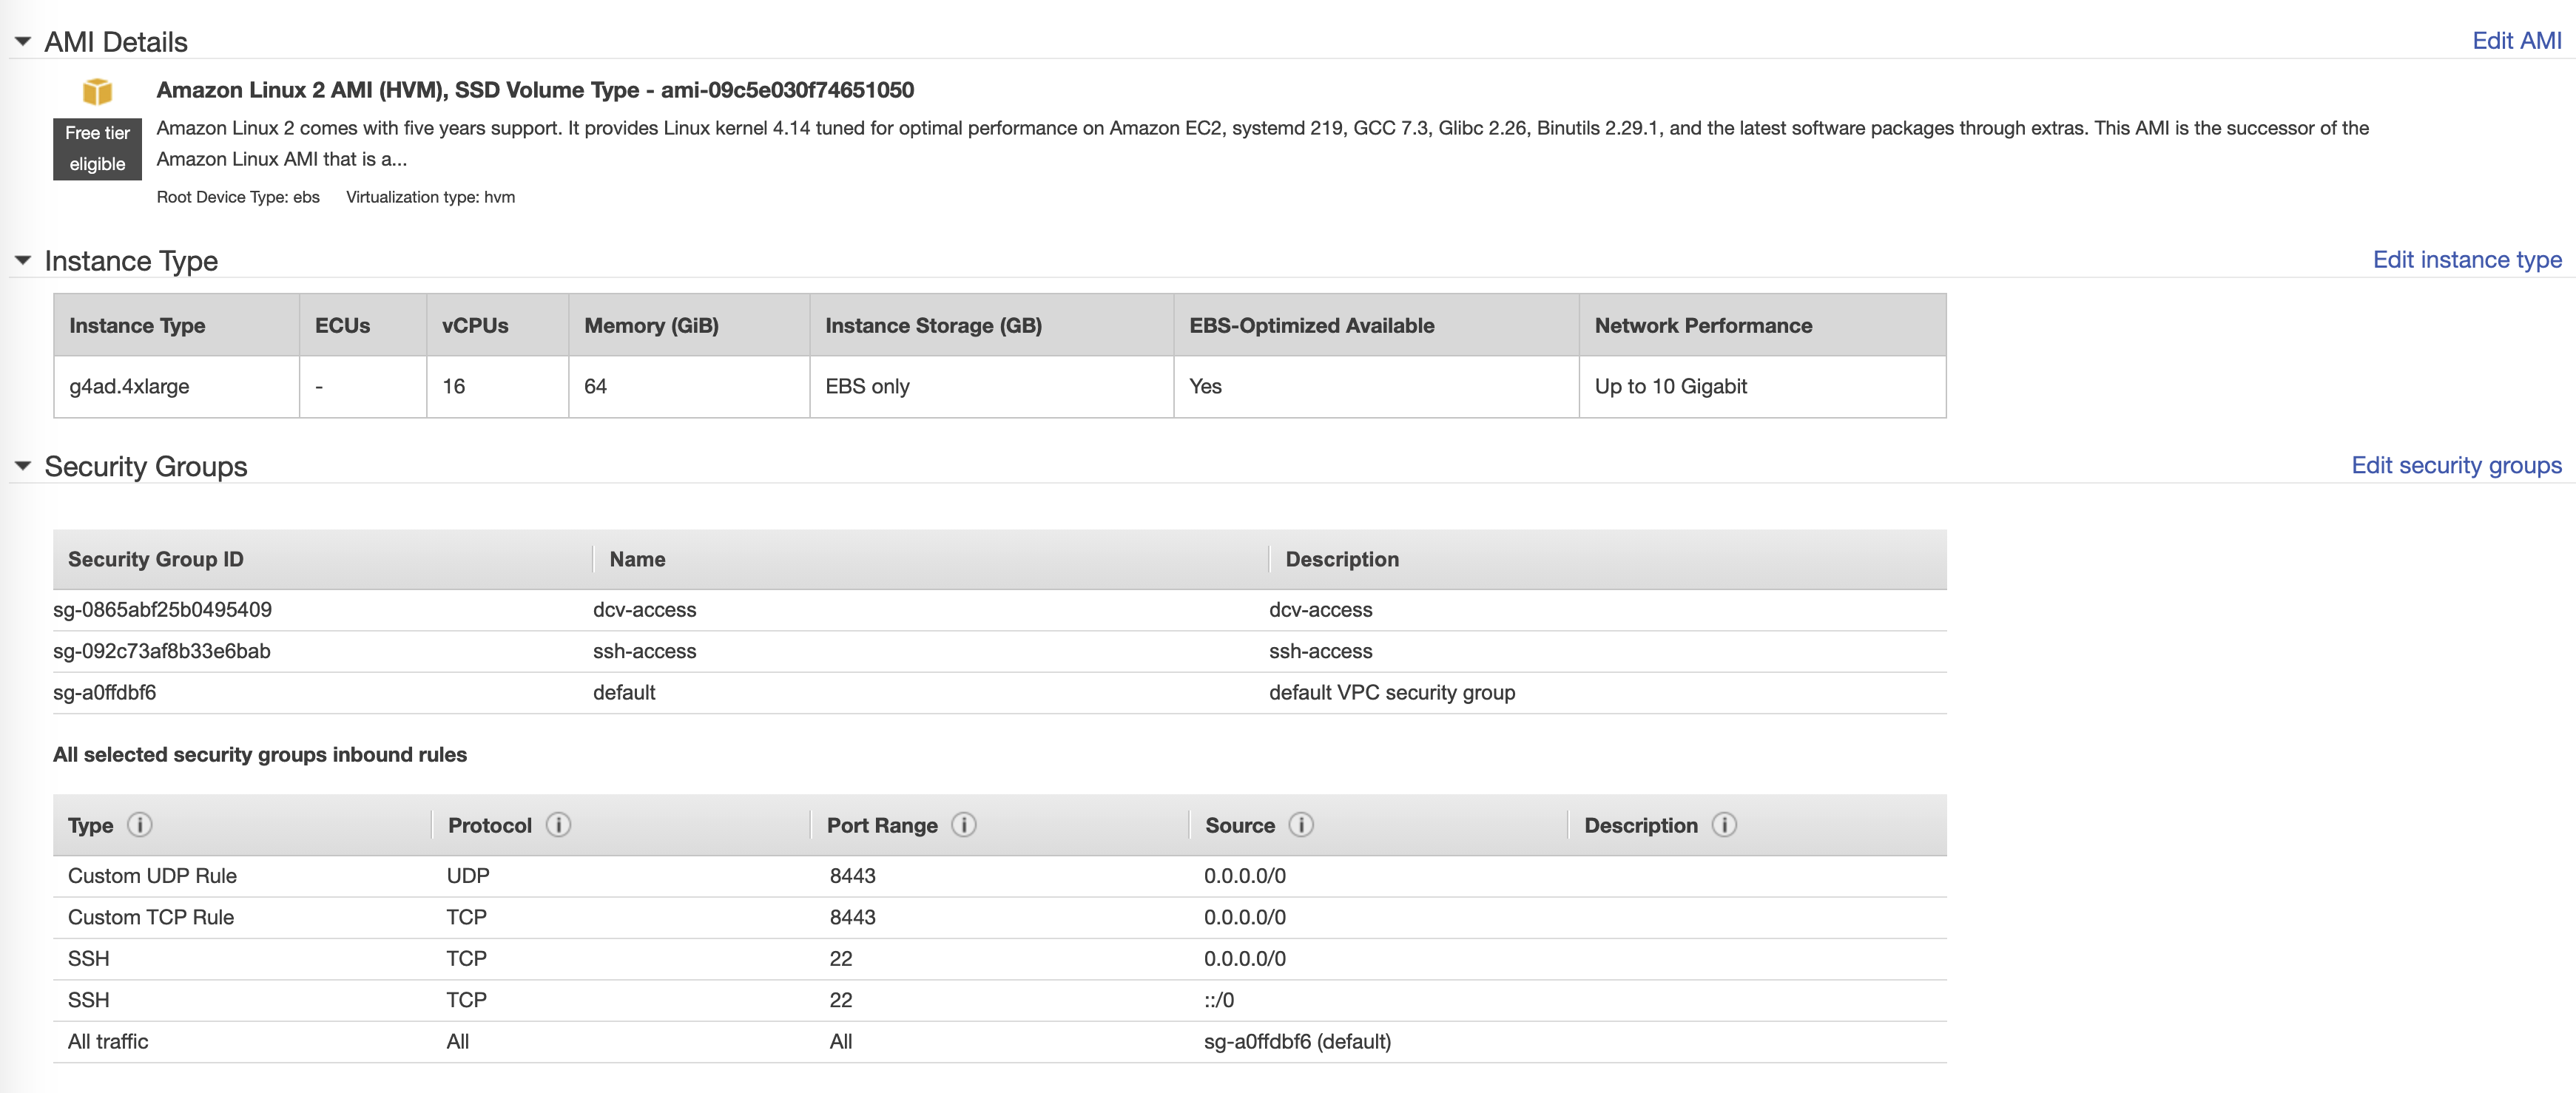
To get started log into the AWS Management Console and choose EC2 or type EC2 in the search bar at the top. Once in the Amazon EC2 Console, choose Launch Instance and select g4ad.4xlarge. In the next page, ensure you launch the instance in a public subnet and the security groups allowing TCP/UDP inbound to ports 8443 and 22.
Set all other settings to default. Launch and connect to the instance over ssh.
Add 32-bit library support in apt-get by entering the following command:
sudo dpkg --add-architecture i386
Update and Install the MATE Desktop and Kernel modules extra:
sudo apt update && sudo apt upgrade -y && sudo apt install python3-pip -y
sudo pip3 install awscli
If the kernel is upgraded, then sudo reboot and continue with the install.
Download and install the AMD Radeon Driver and extract the installer.
aws s3 cp --recursive s3://ec2-amd-linux-drivers/latest/ .
At the time of writing, the current supported driver is amdgpu-pro-20.20-1184451-ubuntu-18.04.tar.xz . The full stack includes the base kernel, accelerated graphics, Mesa, AMD Pro OpenGL, AMD Pro Vulkan and AMD Pro OpenCL can be installed with the following commands:
tar -xvf amdgpu-pro-20.20-1171946-ubuntu-18.04.tar.xz && \
cd amdgpu-pro-20.20-1171946-ubuntu-18.04 && \
cat RPM-GPG-KEY-amdgpu | sudo apt-key add - && \
./amdgpu-pro-install -y --opencl=pal,legacy
Install the MATE Desktop:
sudo apt install xorg-dev ubuntu-mate-desktop linux-modules-extra-$(uname -r) autoconf -y && \
sudo apt purge ifupdown -y
Create an /etc/X11/xorg.conf file with the following contents:
Section "ServerLayout"
Identifier "Layout0"
Screen 0 "Screen0"
InputDevice "Keyboard0" "CoreKeyboard"
InputDevice "Mouse0" "CorePointer"
EndSection
Section "Files"
ModulePath "/opt/amdgpu/lib64/xorg/modules/drivers"
ModulePath "/opt/amdgpu/lib/xorg/modules"
ModulePath "/opt/amdgpu-pro/lib/xorg/modules/extensions"
ModulePath "/opt/amdgpu-pro/lib64/xorg/modules/extensions"
ModulePath "/usr/lib64/xorg/modules"
ModulePath "/usr/lib/xorg/modules"
EndSection
Section "InputDevice"
# generated from default
Identifier "Mouse0"
Driver "mouse"
Option "Protocol" "auto"
Option "Device" "/dev/psaux"
Option "Emulate3Buttons" "no"
Option "ZAxisMapping" "4 5"
EndSection
Section "InputDevice"
# generated from default
Identifier "Keyboard0"
Driver "kbd"
EndSection
Section "Monitor"
Identifier "Monitor0"
VendorName "Unknown"
ModelName "Unknown"
EndSection
Section "Device"
Identifier "Device0"
Driver "amdgpu"
VendorName "AMD"
BoardName "Radeon MxGPU V520"
BusID "PCI:0:30:0"
EndSection
Section "Extensions"
Option "DPMS" "Disable"
EndSection
Section "Screen"
Identifier "Screen0"
Device "Device0"
Monitor "Monitor0"
DefaultDepth 24
Option "AllowEmptyInitialConfiguration" "True"
SubSection "Display"
Virtual 3840 2160
Depth 32
EndSubSection
EndSection
Next install NICE DCV Server 2020:
wget https://d1uj6qtbmh3dt5.cloudfront.net/2020.2/Servers/nice-dcv-2020.2-9662-ubuntu1804-x86_64.tgz
tar -xvf nice-dcv* && \
cd nice-dcv-2020.2-9662-ubuntu1804-x86_64 && \
sudo apt install ./nice-dcv* -y && sudo apt install -f
Ensure that your security groups allow TCP/UDP:8443. Optionally, configure the NICE DCV server accordingly, with an automatic console session startup owned by the “ubuntu” user. Do this by editing the /etc/dcv/dcv.conf file. The following parameters can be used.
create-session = true
owner = "ubuntu"
target-fps = 0
enable-quic-frontend = true
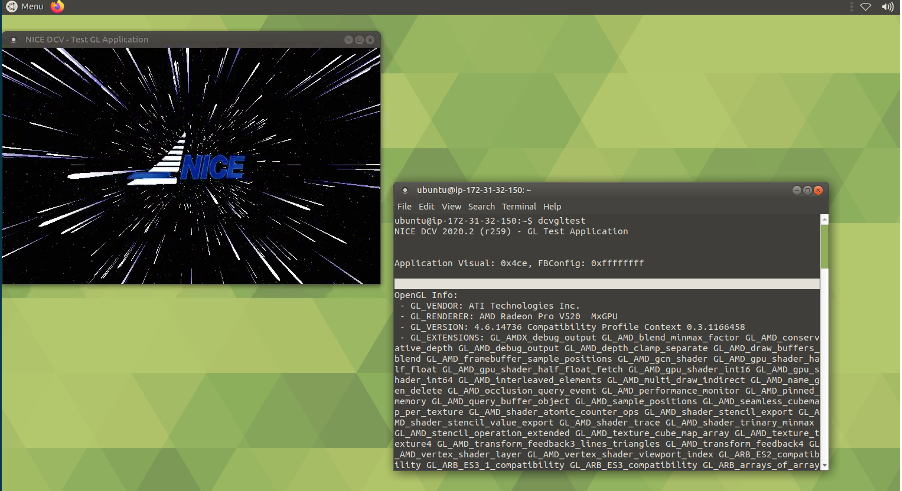
Reboot the instance. On the NICE DCV client, connect to your instance. You should get a session login screen. You can run the dcvgltest to ensure that OpenGL context backend render is the AMD Radeon MxGPU V520.
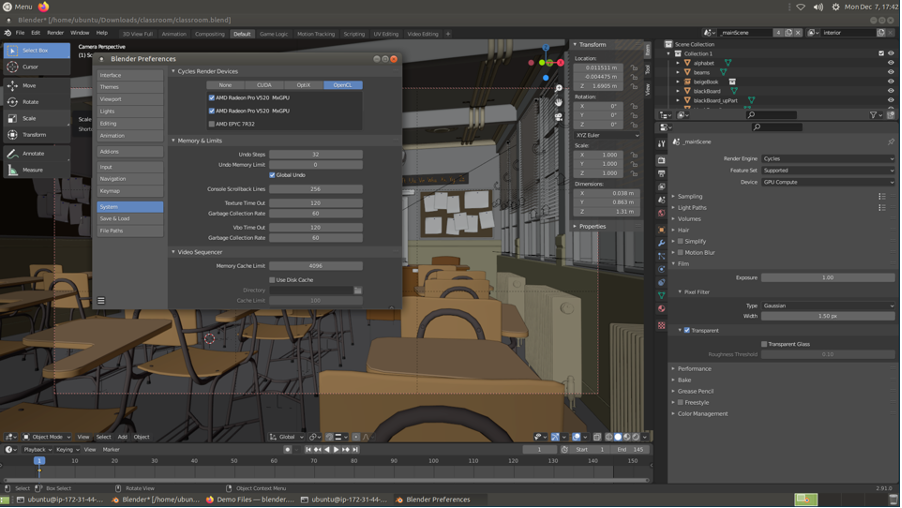
With the base interactive accelerated desktop, you can save the image as a base Amazon Machine Image (AMI) with the OS, AMD driver and desktop session stack in place. You can install your interactive applications. In the next steps, I setup Blender 2.91 with the AMD ProRender Plugin 3.0+.
Monitoring AMD Radeon V520 usage:
To monitor the GPU usage in Linux, access it directly through the kernel.
sudo cat /sys/kernel/debug/dri/<device_id>/amdgpu_pm_info
The following output describes the clocks and power of the GPU device, in addition to temperature.
GFX Clocks and Power:
1000 MHz (MCLK)
1650 MHz (SCLK)
300 MHz (PSTATE_SCLK)
334 MHz (PSTATE_MCLK)
1006 mV (VDDGFX)
77.0 W (average GPU)
GPU Temperature: 34 C
GPU Load: 91 %
MEM Load: 34 %
SMC Feature Mask: 0x00000473a3dd80fb
VCN: Enabled
After creating the AMI, clean up the resources by shutting down the EC2 instance.
Conclusion
In this blog, you deployed an interactive desktop, backed with the first to cloud AMD Radeon V520. Get started running your graphics intensive workload with the new G4ad instances. AWS is excited to hear what you run on these new instances. As always, if you have any questions or feedback please reach out to support or your account team or learn more on the G4 page.