Containers
Scanning images with Trivy in an AWS CodePipeline
This post was contributed by AWS Container Hero, Liz Rice, VP Open Source Engineering at Aqua Security.
If you’re working with containers, it’s important to scan your images for known vulnerabilities, so that you don’t deploy code that an attacker can easily exploit. A good way of ensuring that all your deployed images get this check is to include scanning as an automated step in your CI/CD pipeline. Let’s see how easy it is to include the open source scanner Trivy in an AWS CodePipeline. There’s a fun bonus for those of us who like containers: CodePipeline builds run in containers!
Why vulnerability scanning is important
A container image scanner like Trivy looks at the contents of an image to check which packages it includes, and checks the package versions against various data sources of known package vulnerabilities. Vulnerabilities range in severity from the trivial right up to critical – sometimes they are so serious that they become practically household names, like ShellShock, Heartbleed or Dirty Cow. You really don’t want these running in your deployment! These well-known vulnerabilities are just the tip of the iceberg – there are thousands of known issues, with more being discovered every day. If you take security seriously, a vulnerability scanner is a crucial part of your toolkit.
Trivy is an open source container image scanner that’s easy to install and use, as you’ll see if you follow the demos in this post.
My first demo sets up a pipeline that builds an image from a Dockerfile, downloads, and runs Trivy over it. If the Trivy scan is successful, it pushes the image to the AWS image registry, ECR. Then I’ll show you how to improve this set-up by building a custom build environment with Trivy already installed. Along the way I will mention a couple of things that tripped me up, in the hope that it will make things smoother sailing for you.
IAM Service Role
Just as for anything else in AWS, you will need to get IAM service roles configured correctly. I created a service role called CodeBuildServiceRole with the policy defined here, which gives permissions for the things that CodeBuild might need to do, such as generate CloudWatch Logs, pull from CodeCommit, get and put objects in S3 buckets, and pull images from ECR. (My demo doesn’t actually need the S3 permissions so I could have removed the S3-related parts from this example service role, but you might need them depending what else you are doing in your CodeBuild.)
Defining a CodePipeline
You can use the console or the CLI (aws codepipeline) to configure the pipeline. My scanning pipeline consists of two stages.
- The first is a Source stage, which points to a CodeCommit repository, and triggers when something in that repository changes. This repository holds the source code, which is used in the second stage.
- The second stage is a Build stage, which refers to a CodeBuild project, and that project is where we define what’s going to happen in the build stage.
Once set up, the AWS Management Console gives a nice display of the pipeline stages:
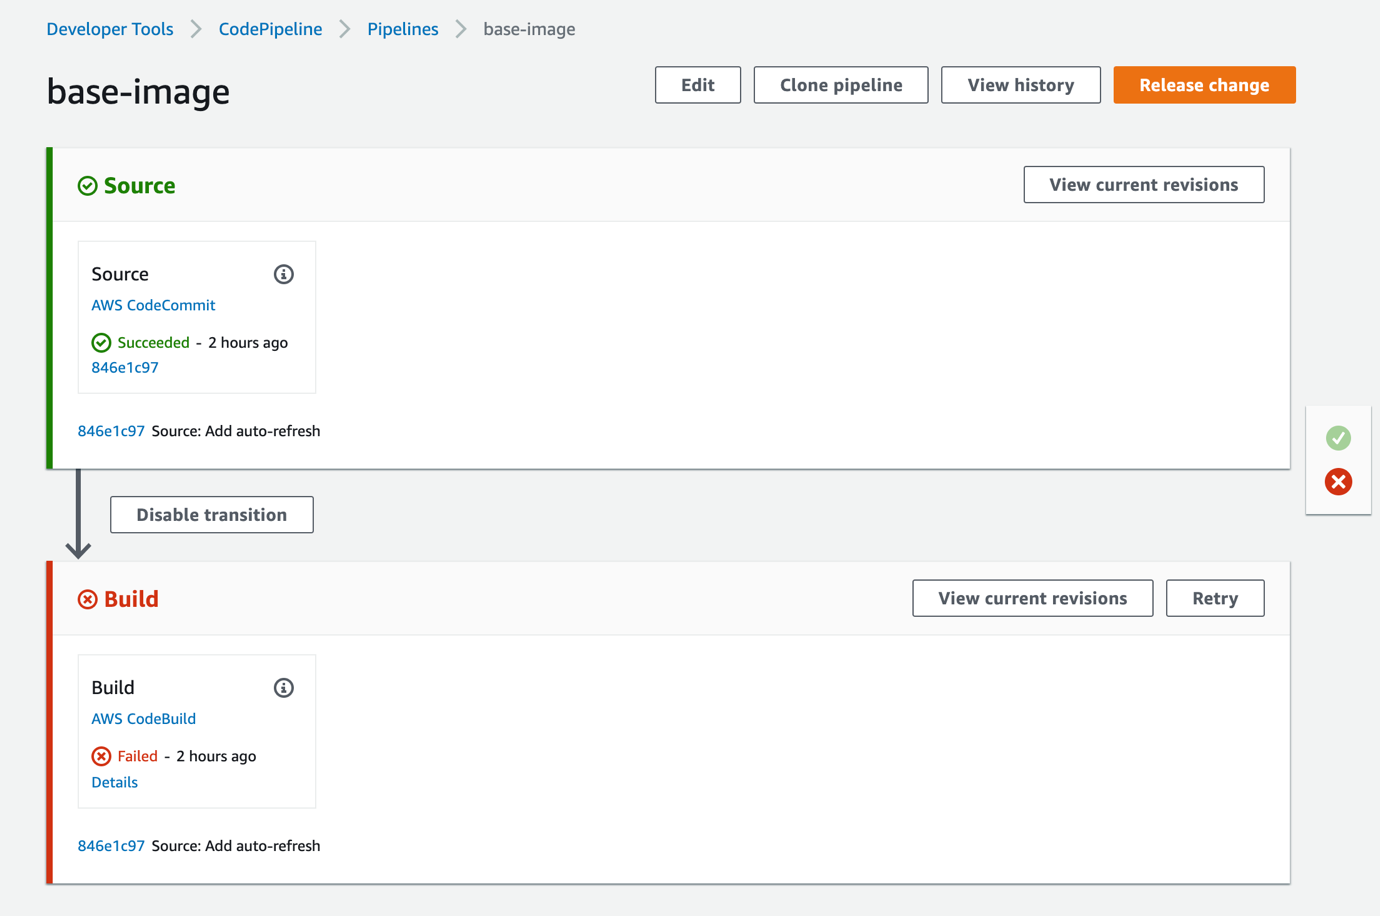
Figure 1 The CodePipeline has two stages. In this example, the most recent run of the pipeline failed, because the scan found a high-severity vulnerability in the image being scanned.
But before you’ll see a screen like that, you’ll need to configure the CodeBuild project.
A CodeBuild project
As I mentioned, builds in AWS CodeBuild run in containers, and the images for these containers are known as “build environments”. AWS provides a selection of managed build environment container images, but it also allows you to configure any image of your choice. For my first demo I’m using aws/codebuild/standard:2.0, which gives me an Ubuntu environment to build in.
In order to build a Docker image in CodeBuild, you will need to set the privilegedMode setting for the build to true, because this will be running Docker-in-Docker to generate an image build within the containerized CodeBuild environment.
By default CodeBuild will look in the source code repository for a file called buildspec.yml, which defines the build steps. Mine includes several phases, which are highlighted in bold:
version: 0.2

phases:
  install:
    runtime-versions:
        docker: 18
  pre_build:
    commands:
      - apt-get install wget apt-transport-https gnupg
      - wget -qO - https://aquasecurity.github.io/trivy-repo/deb/public.key | apt-key add -
      - echo deb https://aquasecurity.github.io/trivy-repo/deb bionic main | tee -a /etc/apt/sources.list.d/trivy.list
      - apt-get update
      - apt-get install -y trivy
      - $(aws ecr get-login --region $AWS_DEFAULT_REGION --no-include-email)
      - REPOSITORY_URI=<id>.dkr.ecr.us-east-1.amazonaws.com/alpine
  build:
    commands:
      - docker build -t $REPOSITORY_URI:success .
  post_build:
    commands:
      - trivy --no-progress --exit-code 1 --severity HIGH,CRITICAL $REPOSITORY_URI:success
      - docker push $REPOSITORY_URI:success
The first phase is an install phase, which specifies one of the available runtimes. Since I am doing a Docker build, I picked a Docker runtime.
The pre_build phase starts by installing Trivy into this Ubuntu container using apt. Once Trivy is in place, it logs in to ECR and sets up an environment variable for the target image that we want to push if the scan is successful.
Then we get to the build phase which uses Docker to build the container image from the Dockerfile.
Finally a post_build phase runs Trivy on the image that is built. There are a few useful parameters for running Trivy in a CI/CD pipeline.
- If you run Trivy on the command line, by default it shows a progress bar, but this output just clutters the logs if you don’t have a terminal to display the output on. The
--no-progressflag turns off this output. - For this demo I want the build to fail if it finds vulnerabilities classed as critical or high severity. The
–-severity parameterdefines which severities Trivy will report on. - The
–-exit-codeparameter defines what output code Trivy will use if it finds vulnerabilities. Any non-zero value represents a failure, and causes the build step to exit.
If Trivy doesn’t find any high or critical severity issues, it will return an exit code of 0 and the build script will continue, and finish by pushing the image to ECR.
There is one more file we need for this build to work: a Dockerfile to specify what should happen in the docker build command. For my demonstration my Dockerfile consists of one line, which specifies a base image that I would like to scan:
FROM alpine:3.10.0
This Dockerfile goes in the same source code repository as the buildspec.yml file.
Running the pipeline
Since the pipeline is triggered by a change to the source code, simply pushing a new version of the Dockerfile will cause a new run of the pipeline.
Here’s the output when the Dockerfile specifies a base image of alpine:3.10.0, which (at the time of writing) is known to include one high-severity issue.
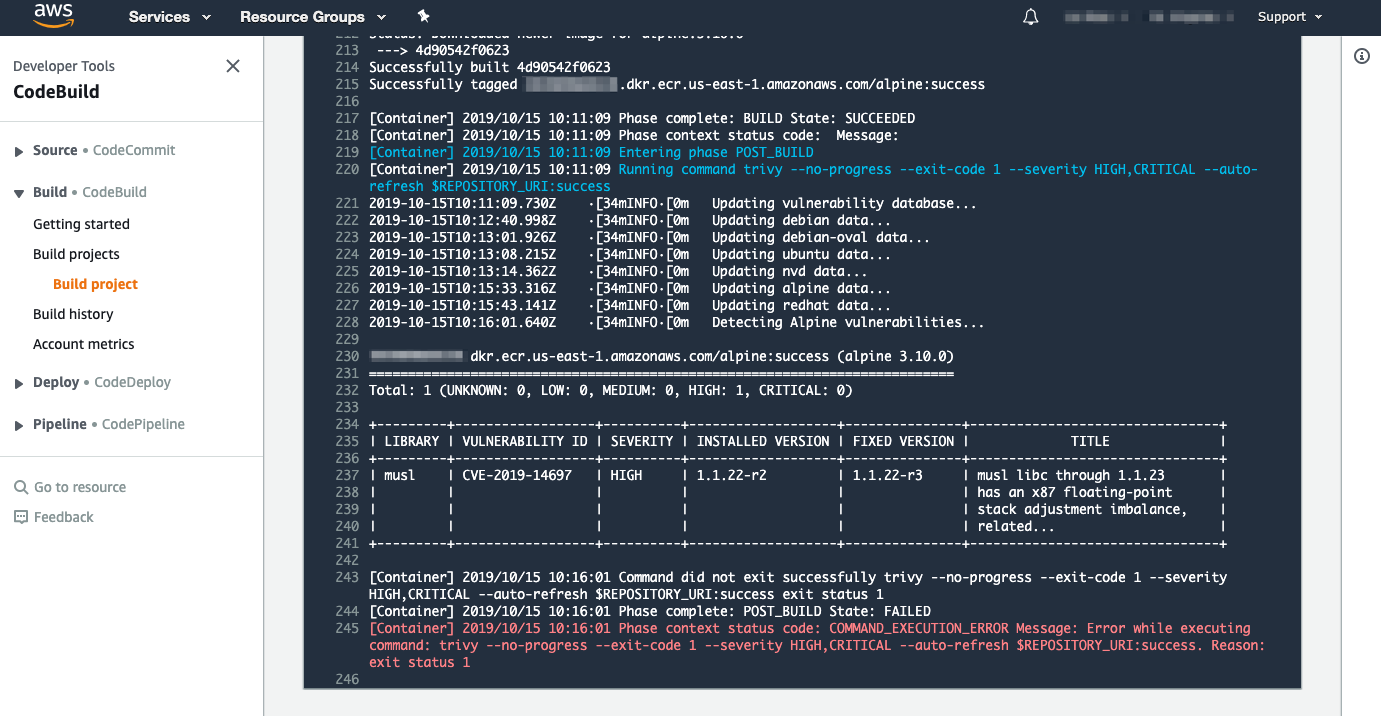
Because of the high-severity vulnerability in this issue, Trivy exits with a value of 1, and the image isn’t pushed to ECR.
Before we move on, let me share a hint that might be helpful if, like me, you inadvertently set up a CodeBuild project with the wrong service role.
A note on permissions
At one point I had a CodeBuild project that was failing to log in to ECR with the following error.
An error occurred (AccessDeniedException) when calling the
GetAuthorizationToken operation: User: arn:aws:sts::<id>:assumed-
role/codebuild-build-scanner-env-service-role/AWSCodeBuild-<token> is not
authorized to perform: ecr:GetAuthorizationToken on resource: *
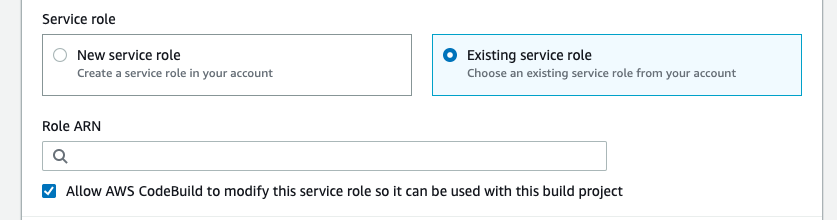
The CodeBuild project wasn’t using the service role I had prepared earlier. I must have missed this when first creating the project with the console, and I’ve not been able to find where to modify it in the console later. Fortunately, it’s easy enough to do with the CLI:
$ aws codebuild update-project --name=scanner-build-env --service-role="arn:aws:iam::<id>:role/CodeBuildServiceRole"This is where I should have configured the Service Role when setting up the CodeBuild project in the console in the first place:
A better build environment
Up to this point I have been using an Ubuntu image as the build environment and installing Trivy into it. This bothers me: it is generally considered bad practice to install software into a running container, and we know that the build environment of CodeBuild is indeed a running container.
Modifying the code in a running container is frowned upon for several reasons including these:
- The container no longer matches the container image it was instantiated from. This could make it difficult to reproduce a problem in the field.
- When you install software from the internet, the code you get may vary over time, so you can’t be sure that the software you’re running would be consistent from one run of the pipeline to the next.
- Any code you install into a running container will not have been subject to the vulnerability scanning over its image, so vulnerable dependencies can easily slip through.
- Unless you’re careful to check the provenance of the software installed at runtime, it’s a weak link, which could potentially be compromised by an attacker, for example by acting as a man-in-the-middle between your running container and the source of the software you intended to install.
Given all these issues, I would be much happier using a pre-built container image that holds all the software that will run during the build, including the Trivy vulnerability scanner. It should also be more efficient to use a container image with it already built in, since it avoids the installation step of downloading code over the internet.
AWS published the contents of the build environment images on GitHub, but at the time of writing, pre-built versions of these images aren’t published. So here are the steps I’ve taken to get my own copy of a standard build image, and create a new version with Trivy included.
- Clone the git repository for the AWS base images onto my local machine
$ git clone git@github.com:aws/aws-codebuild-docker-images.git - Build the Ubuntu standard 2.0 image
$ cd ubuntu/standard/2.0/ $ docker build -t aws-codebuild-ubuntu-standard-2.0 . - Tag the resulting image and store it in ECR
$ docker tag aws-codebuild-ubuntu-standard-2.0:latest <id>.dkr.ecr.us-east-1.amazonaws.com/aws-codebuild-ubuntu-standard-2.0:latest $ docker push <id>.dkr.ecr.us-east-1.amazonaws.com/aws-codebuild-ubuntu-standard-2.0:latest - At this point, I should have my own copy of the standard build environment image stored in my ECR. I’m using this as the base image for new build environment image that will have Trivy added. To create that image I set up another CodePipeline with the following Dockerfile:
The buildspec.yml file for this simply builds this Docker image and pushes it to an ECR repository.
Running this build pipeline creates a new container image called scanner-build-env suitable for use as a build environment.
Scanning with a custom image
I can now specify this build image as a custom image for a new CodeBuild project.
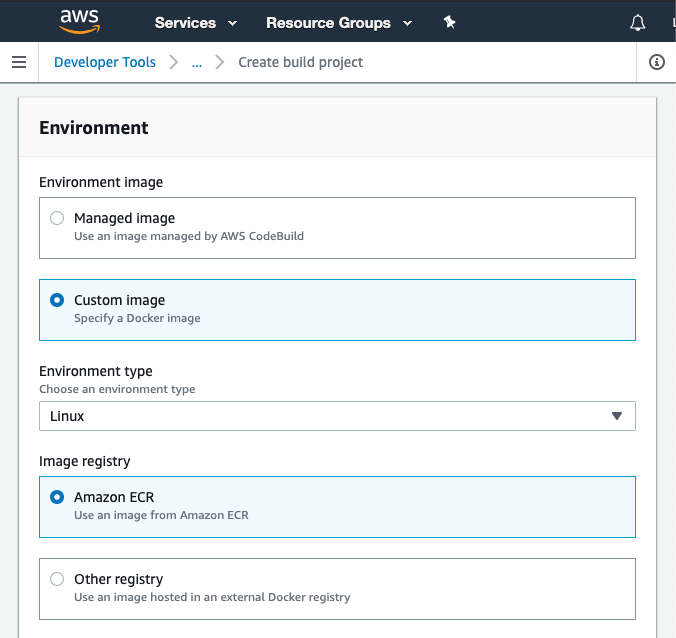
You have to set up permissions on the ECR repository so that CodeBuild can pull this custom image from ECR, as described here. The permissions screen looks like this:
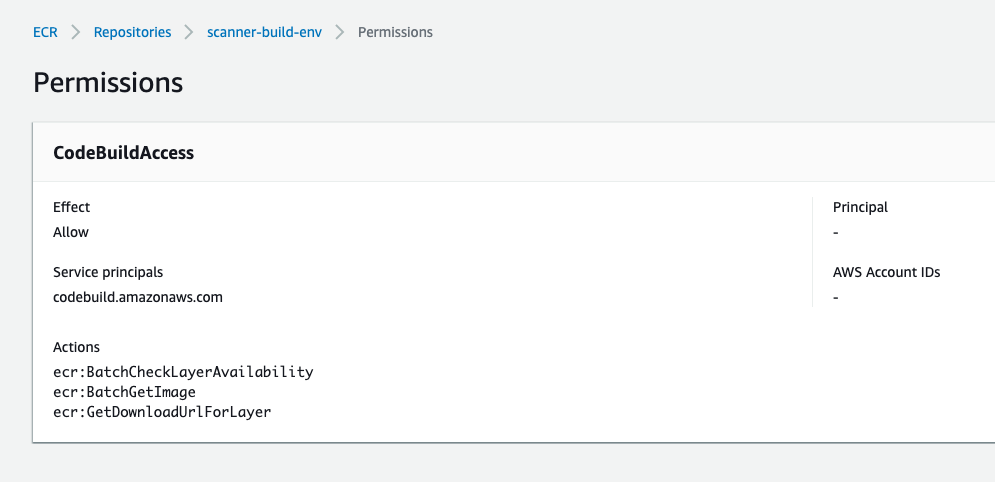
This CodeBuild project has a simpler buildspec.yml file, which I thought would only need to build the image specified in the Dockerfile, scan it with Trivy, and (on success) push the image to ECR. But in order for it to work, it turns out that I also needed to add commands to start Docker too.
Starting Docker in the custom image
Docker is started automatically in the build environment when you use one of the managed images, but this doesn’t happen for the custom images. Without Docker running, you’ll see errors like this:
[Container] 2019/10/15 09:01:13 Running command docker build -t
$REPOSITORY_URI:success .

Cannot connect to the Docker daemon at unix:///var/run/docker.sock. Is
the docker daemon running?
As described here, when using a custom build environment image, you have to explicitly start Docker by including these commands in the buildspec.yml file:
The buildspec.yml file for scanning
The build phases are similar to what we used in the first version of this demo, except that there no longer need to be any commands to install Trivy. Instead, the build spec needs the commands to start Docker as described in the previous section. Experimentation showed that I still needed the install phase to specify Docker as the runtime version. The resulting buildspec.yml file looks like this.
Scanning with Trivy
We saw earlier the result when scanning alpine:3.10.0, which had a high severity vulnerability, which caused the build to fail. If we modify the Dockerfile to specify alpine:3.10.2, it doesn’t find issues:
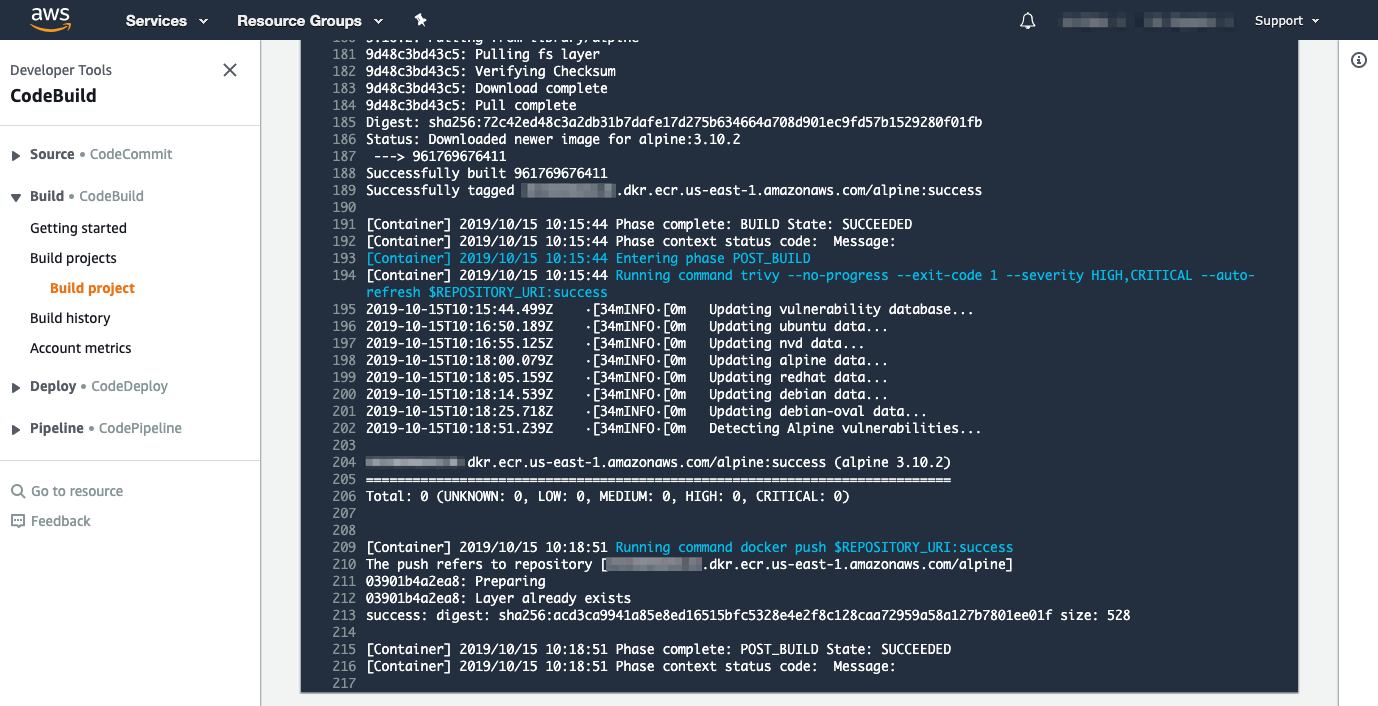
This could change if a vulnerability is discovered in any of the packages included in this version of Alpine. The fact that new vulnerabilities are found all the time is why you should scan images on a regular basis – at Aqua Security most of our customers scan all their deployed images at least every twenty-four hours.
Dealing with vulnerabilities
What should you do if a scan finds a significant vulnerability? For each vulnerability discovered, Trivy shows the package version that it found in the image (which is affected by that vulnerability), and it also shows the version number that includes the fix for that issue. To remove the vulnerability, you’ll need to rebuild the container image to include a version of that package that’s new enough to include that fix.
In the example I’m showing in my demo, the affected package was included in the base image. Check for updated base images, and update your Dockerfile accordingly. Alpine 3.10.0 included the vulnerable version of musl, but this was updated in Alpine 3.10.2.
In other cases, the package might be installed on top of the base image by a command in the Dockerfile. For example, it’s common to see package manager commands like apt,apk or yum specified in the Dockerfile. If these specify the version of the affected package, you’ll need to edit the Dockerfile accordingly. If they don’t specify a version, running the image build again should pick up the latest available version.
From time to time a vulnerability is published without a fix being made available at the same time, although it’s rare for this to happen for high or critical severity vulnerabilities. In this case, Trivy (or any other vulnerability scanner) won’t show a fixed version because no such thing exists. You can look up the vulnerability by searching for the CVE identifier included in Trivy’s output, and this will explain how the vulnerability could be exploited and what its effects are. You may find that it’s not possible to exploit in your environment, or that it’s a sufficiently low risk that you’re prepared to run with it deployed.
Deploying with CodePipeline and other improvements
In this post I’ve shown how you can use CodePipeline to scan your images. In my example, the image only makes it to ECR if it meets the criteria of having no high-severity vulnerabilities. A separate deployment step could then have access to this image.
I only used Source and Build stages in my pipelines. CodePipeline also supports a Deploy stage, which you could use to deploy an image, ensuring that it passed the scan step first.
In this demo, I hard-coded the tag for the image to be $REPOSITORY_URI:success. A production-ready version would likely tag the image with a semantic version number.
If you are inspired by this post to include scanning in your AWS CodePipeline, I’d love to hear about your experiences. You can find me on Twitter as @lizrice.