AWS Database Blog
Store SQL Server backups in Amazon S3 using AWS Storage Gateway
Customers like Alkami and Acadian Asset Management use AWS Storage Gateway to back up their Microsoft SQL Server databases directly to Amazon S3, reducing their on-premises storage footprint and leveraging S3 for durable, scalable, and cost-effective storage.
Storage Gateway is a hybrid cloud storage service providing on-premises applications with access to virtually unlimited cloud storage. This service simplifies storage management and reduces costs for three key use cases:
- Moving backups to the cloud
- Reducing on-premises storage with cloud-backed file shares
- Providing low-latency access to data in AWS for on-premises applications
This post shows one way to move backups to the cloud using a file gateway configuration from Storage Gateway.
Overview
Use the following steps to deploy a file gateway and create a file share as a backup target for SQL Server to store your backups in S3:
- Deploy a file gateway in your on-premises environment.
- Connect your file gateway to your Microsoft Active Directory domain so you can use domain users and groups for file share authentication.
- Create an SMB file share on the file gateway, associate the share with an S3 bucket, and configure on-premises access to the share using your Active Directory domain.
- Mount your share and make a quick backup to make sure that SQL Server can access the share.
Deploy a file gateway
To get started, create a file gateway in your on-premises environment. You can deploy a file gateway on-premises as a VMware virtual machine (VM), as a Microsoft Hyper-V VM, or as a hardware appliance. Select your preferred host platform and create a gateway.
Your file gateway stores data in a local cache and uploads it to S3 in the background. The cache provides low-latency access to recently used data (such as your recent SQL Server backups), and buffers against network variations as data uploads to S3. Your cache can be up to 16 TB in size. I recommend sizing your cache storage so that it’s at least the size of your largest backup file. Ideally, it’s large enough to keep your most recent backup files on-premises for quick restores.
If you are deploying in a VMware or Hyper-V environment, attach one or more disks to the virtual machine to be used for caching. If you are deploying a hardware appliance, the appliance comes with the cache disks pre-configured.
After you successfully activate your gateway, the Storage Gateway console should list your new file gateway as “ONLINE.”
Join your Active Directory domain
Next, connect your file gateway to Active Directory. Connecting to Active Directory makes sure that only authenticated domain users can access the SMB file share and allows you to limit access to specific Active Directory users and groups.
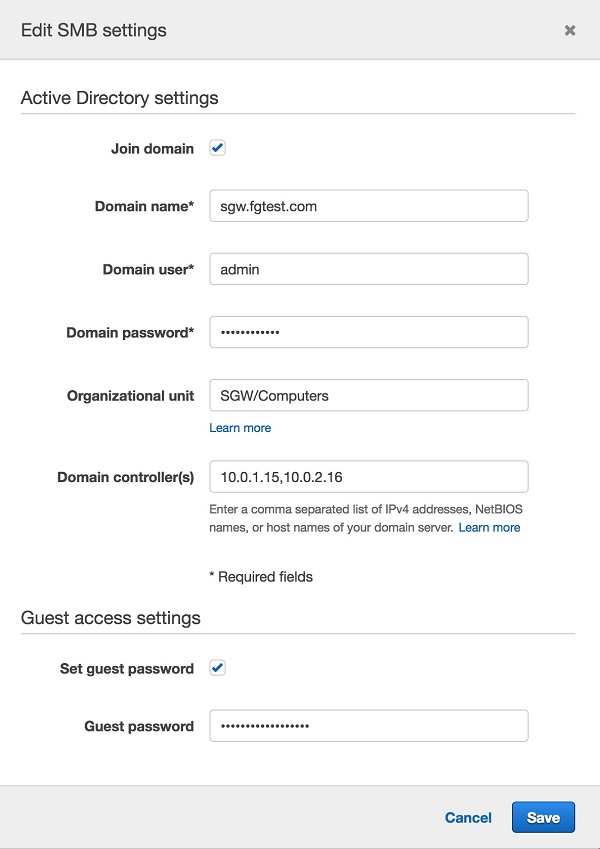
- From the Storage Gateway Management Console, select the file gateway that you created in the previous step, and choose Actions, Edit SMB settings.
- On the following screen, enter the name of your Active Directory domain and the credentials for a user with rights to add a computer to the domain. You can also provide a list of domain controllers to which you want your file gateway to connect.
Create a file share
With your file gateway connected to Active Directory, you can create an SMB file share. I’d like to highlight two main points for consideration: connecting to an S3 bucket and configuring access to the share. For detailed instructions, see Creating an SMB File Share.
Each file share is associated with an S3 bucket. You can store your backups in the bucket, and restore the backup locally or from another gateway (for example, from another office or in the AWS Cloud). For backup restoration options, see the following section. To minimize network latency, use an S3 bucket in the AWS Region nearest to your file gateway installation.
When you create a gateway file share, you must specify an S3 storage class. Your file gateway creates an object in the S3 bucket using the storage class that you specify. File Gateway supports three S3 storage classes: S3 Standard, S3 Standard-IA (Infrequent Access), and S3 OneZone-IA.
For your SQL Server backup jobs, I recommend using S3 Standard. This class allows you to quickly and easily restore your backup files for validation or testing without incurring access charges. To back up files for long-term retention, use S3 lifecycle policies. You can migrate objects to a lower-cost storage class, such as S3 Standard-IA, S3 Glacier, or S3 Glacier Deep Archive.
If an object (e.g. your backup file) gets transitioned to S3 Glacier or S3 Glacier Deep Archive as a result of a lifecycle policy, the object becomes inaccessible to the gateway file share, until you restore it to S3 Standard. To learn more, see Using Storage Classes.
In addition to proper S3 configuration, you should also limit share access to Active Directory domain users and groups requiring the use of the backups. For backup use cases, you’ll want to give read-write access for the domain “backup_user” that is creating backups and read-only access for the domain “restore_user” to validate that the backups can be restored.
For SQL Server to back up successfully to a network share, the service must run from an account with access rights to the gateway file share. Consider granting administrative privileges to users or groups that might modify share permissions. To learn how to limit access to these Active Directory domain users and groups, see Using Active Directory to Authenticate Users.
By default, the file share uses Windows access control lists (ACLs) for ownership and permissions. You can apply fine-grained access controls for up to 10 Active Directory users and groups on files and folder in your file share. For details, see Using Microsoft Windows ACLs to Control Access to an SMB File Share. For ease of management, I recommend that you set the necessary permissions at the top-level shared folder. Enable inheritance to propagate ACLs down to all files and folders in the file share. New files and folders automatically inherit these ACLs.
Mount the file share
The Storage Gateway console and SMB file share instructions show you how to mount the file share on your SQL Server system. To any application running in Windows, including SQL Server, the gateway’s SMB file share looks like a standard file share. The application doesn’t need to recognize that the backups are stored as objects in S3.
You can map the SMB file share to a Windows drive letter and use standard file paths with SQL Server. Or, you can reference the file share directly using a Universal Naming Convention (UNC) path as follows: \\<IP address of your gateway>\<your s3 bucket name>\. For more information about using network shares with SQL Server, see Specify the disk backup file path.
Back up your database
There are many ways to back up your SQL Server database. All result in one or more backup files.
When configuring your database backup, point it to your SMB file share. For example, if I map my SMB share to the X: drive on my SQL Server system, I can run an on-demand backup job using SQL Server Management Studio (SSMS) and specify a path to the X: drive as the Disk Destination, as shown in the following screenshot.

As Storage Gateway writes backup files to the share, it also uploads the files to S3 in the background. Transport Layer Security encryption protects the data while in transit.
You can immediately call the NotifyWhenUploaded API so that you receive an Amazon CloudWatch notification after the backup job completes and uploads to S3. You can then visit the S3 console, navigate to the folder where your backup is stored, and verify that the backup file is in your S3 bucket. For more information, see Getting Notified About File Operations.
The backup file might not appear in your S3 bucket immediately. It could take some time to transfer the contents of the file from the local cache to the S3 bucket. It’s dependent on the size of the backup file and the network bandwidth between your file gateway and AWS. For example, with a 1-GB/s network link, it would take about 1.5 hours to upload a 500-GB backup file to S3. You can use CloudWatch metrics to monitor the traffic.
Restore a database
Using your file gateway, you can restore a database from a backup in comparatively few steps. Select the backup file on the SMB share and restore. For example, if you make a backup of your database to X:\Backups\backup2.bak, you can run an on-demand restore using SSMS. Specify a path to the backup file as the source device, as shown in the following screenshot.
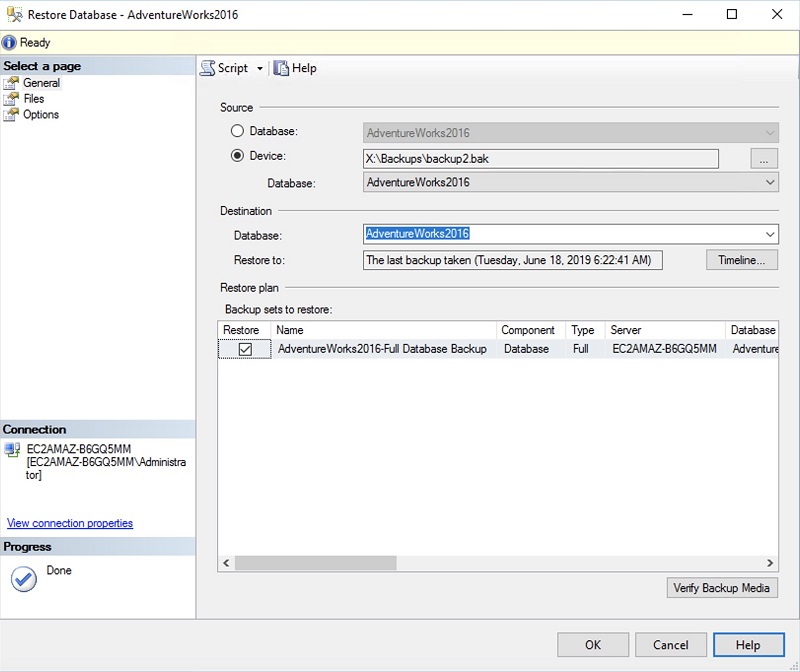 Depending upon how recently you created the backup and its file size, some or all the file data might be on the file gateway cache. Any file data requested by SSMS that is not cached on the file gateway will be retrieved from S3. Reading additional data from S3 might increase backup-restoration time, depending upon the file size and your network bandwidth. You can also restore the backup files from SQL Server running in an Amazon EC2 instance, or import the backup using Amazon RDS running instances of SQL Server.
Conclusion
You now know how to deploy and configure File Gateway as a backup destination for SQL Server. Using File Gateway, you can take advantage of the virtually unlimited, cost-effective, and durable storage that S3 provides, making it available to SQL Server for backups, without having to change your backup and restore workflows. By storing your backups in S3, you’ve taken an important first step in the journey of migrating your database workloads to the cloud, as they are now available in-cloud to be imported for use in Amazon RDS or Amazon EC2.
To learn more about using a file gateway for SQL Server backup and watch a demo, check out this webinar video (24:07-32:42)
About the Authors

Jeff Bartley is a Hybrid Storage and Data Transfer Solutions Architect at Amazon Web Services.

Peter Levett is a Storage Specialist Architect at Amazon Web Services. He enjoys working with AWS customers to find ways to overcome data management and storage challenges in new ways and has a strong focus on hybrid and enterprise architectures