Desktop and Application Streaming
Stream applications at a lower cost with Amazon AppStream 2.0 Elastic fleets and Linux compatibility
You can use Amazon AppStream 2.0 to stream Linux applications at a lower cost than Microsoft Windows apps. AppStream 2.0 is an application and desktop streaming service for securely accessing applications, data, and resources through an HTML5 browser or AppStream 2.0 client. With Elastic fleets, AWS manages the capacity users stream from, eliminating the need for you to create autoscaling policies or manage buffer capacity. Linux fleets are charged per second at a lower hourly rate than Windows with no user fee. In this blog, you are shown how to create an AppStream 2.0 Elastic fleet with Amazon Linux 2-based streaming instances.
| Time to read | 5 minutes |
| Time to complete | 30 minutes |
| Cost to complete (estimated) | $5 |
| Learning level | Foundational (100) |
| Services used | Amazon AppStream 2.0, AWS Identity and Access Management (IAM), Amazon S3 |
Overview of Solution
Before Elastic fleets, customers could select from Always-On or On-Demand fleet types. Both fleet types require you to manage scaling policies which provision instances before your users need them. You had to build and maintain images with your applications installed and configured. You had to choose between the instant-on experience of Always-On fleets, and the cost savings of On-Demand fleets while paying for buffer capacity to ensure availability for users who need to stream applications.
With Elastic fleets, your application is installed to a virtual hard disk (VHD) and uploaded to an Amazon S3 bucket in your AWS account. When a user launches an application, a streaming instance is reserved for the user, an Elastic Network Interface (ENI) is created and attached to the Virtual Private Cloud (VPC) subnets you specify with your security groups, and the VHD is downloaded. After the setup script completes, the application launches.
Walkthrough
This blog walks you through packaging a Linux application onto a VHD. In this example, we will use Google Chrome. Then, we will stream the application from an Amazon Linux 2-based instance in an Elastic fleet.
Prerequisites
This post assumes you have the following:
- Amazon S3 bucket: Create a new S3 bucket for storing the application icon, VHD, and setup script. It is recommended to create a new bucket so you do not impact any existing resources. To learn about how to create an S3 bucket, read Create an S3 Bucket in the Amazon Simple Storage Service (S3) User Guide.
- Allow AppStream 2.0 in the Amazon S3 bucket policy: The Amazon S3 bucket must allow access for AppStream 2.0. You can find an example policy which provides AppStream 2.0 access to your bucket in Store Application Icon, Setup Script, and VHD in S3 Bucket in the AppStream 2.0 Administration Guide.
- An instance running Amazon Linux 2: You can either use an EC2 instance running Amazon Linux 2 (AL2) you can access over SSH, or use an AppStream 2.0 image builder to provide a GUI experience.
- Provide the instance access to upload to the S3 bucket: The Amazon S3 upload step requires permissions to the S3 bucket. In this example, there is an IAM role attached to my Amazon EC2 instance which has permissions to upload to S3. Alternatively, you can download the VHD from the Amazon EC2 instance, or Image Builder, and upload objects manually using the S3 management console.
Step 1: Create VHD and mount script
This section describes how to set up application components for usage by AppStream 2.0 Elastic fleets. Google Chrome is set up on a VHD. The VHD and mount script are created and stored in an Amazon S3 bucket.
Create the VHD and format it. With the second command, the AL2 instance prompt to warn the IMG file is not a block device. Enter y to proceed.
Create a directory, and mount the VHD to the directory.
Get the latest Google Chrome installer, install Google Chrome, copy Google Chrome to the VHD, then unmount the VHD. Your applications may have different dependencies. It is up to the application administrator to capture these in the VHD, or install them with the setup script.
AppStream 2.0 uses a setup script you provide to manage and mount the downloaded VHD object. You can use this setup script to mount your VHD, install other dependencies, or make any configuration changes necessary to the streaming instance. Replace <app_block_name> with a name for your app block.
Upload the mount script, VHD, and Google Chrome application icon to the Amazon S3 bucket. Replace <bucket_name> with the name of your S3 bucket.
Step 2: Create an Elastic fleet
This section describes how AppStream 2.0 uses application components in an Amazon S3 bucket.
Create an app block
An AppStream 2.0 app block is a resource which represents the VHD, setup script, and application icon in your S3 bucket.
- Navigate to app blocks in the AppStream 2.0 console.
- Select Create app block.
- Add a name for your app block. The name must be unique in the AWS account and Region which you create the app block.
- Select the location for your VHD and setup script.
- For Setup script executable input the following where
<app_block_name>is the name of the app block./opt/appstream/AppBlocks/<app_block_name>/mount-script.sh
- Choose Create.

For more information on creating app blocks, please read Create and Manage App Blocks and Applications for Elastic Fleets in the Amazon AppStream 2.0 Administration Guide.
Create an application
An AppStream 2.0 application is a resource which represents the launch details to start the application residing on the app block with proper instance configuration. You can associate many applications to a single app block. Since an application can only be associated to one app block at a time, the files for those applications must reside on your app block.
- Navigate to applications in the AppStream 2.0 console.
- Select Create application.
- Choose a name, display name, and description.
- For Application icon object in S3 choose the icon a user will see for the application during a session.
- For Application executable launch path input
/opt/google/chrome/google-chrome
- For Application launch parameters input the site you want to use for the home page. In this example, I am using AWS Single Sign-on (SSO). Replace
<url>with your domain.https://<url> --start-maximized --password-store=basic --no-first-run --no-default-browser-check
- Lastly, enter constraints for which AppStream 2.0 fleets can use the application. The platform specifies which operating system(s) the application can run on. Select Amazon Linux 2.
- Instance Families specifies whether the application should run on GENERAL_PURPOSE, GRAPHICS_G4, or both. Select General Purpose.
- For App block, select the app block you created in the previous step.
- Choose Create application.

For more information on creating applications, please read Create and Manage App Blocks and Applications for Elastic Fleets in the Amazon AppStream 2.0 Administration Guide.
Create an Elastic fleet
Next, create the Elastic fleet.
- Navigate to fleets in the AppStream 2.0 console.
- Select Create fleet.
- On the Select fleet type page, select Elastic.
- On the Configure fleet page, choose a fleet name, display name, and give it a description.
- In Choose instance type select standard.medium.
- In Choose platform type select Amazon Linux 2.
- For User session details, you can leave the defaults.
- AppStream 2.0 offers two types of streaming views for users. Application view displays only the windows of applications opened by users, whereas Desktop view displays the standard desktop which is provided by the operating system. In this example, the Stream View is set to Application.
- On the Assign applications page, associate the applications with the Elastic fleet. Select the application you created.
- On the Configure network page, add VPC configuration information which determines placement of the Elastic fleets streaming instance ENIs. In this example, private subnets are configured as described in Configure a VPC with Private Subnets and a NAT Gateway. Required ports for Security Group rules can be found in the IP Address and Port Requirements for AppStream 2.0 User Devices section of the AppStream 2.0 Administration Guide.
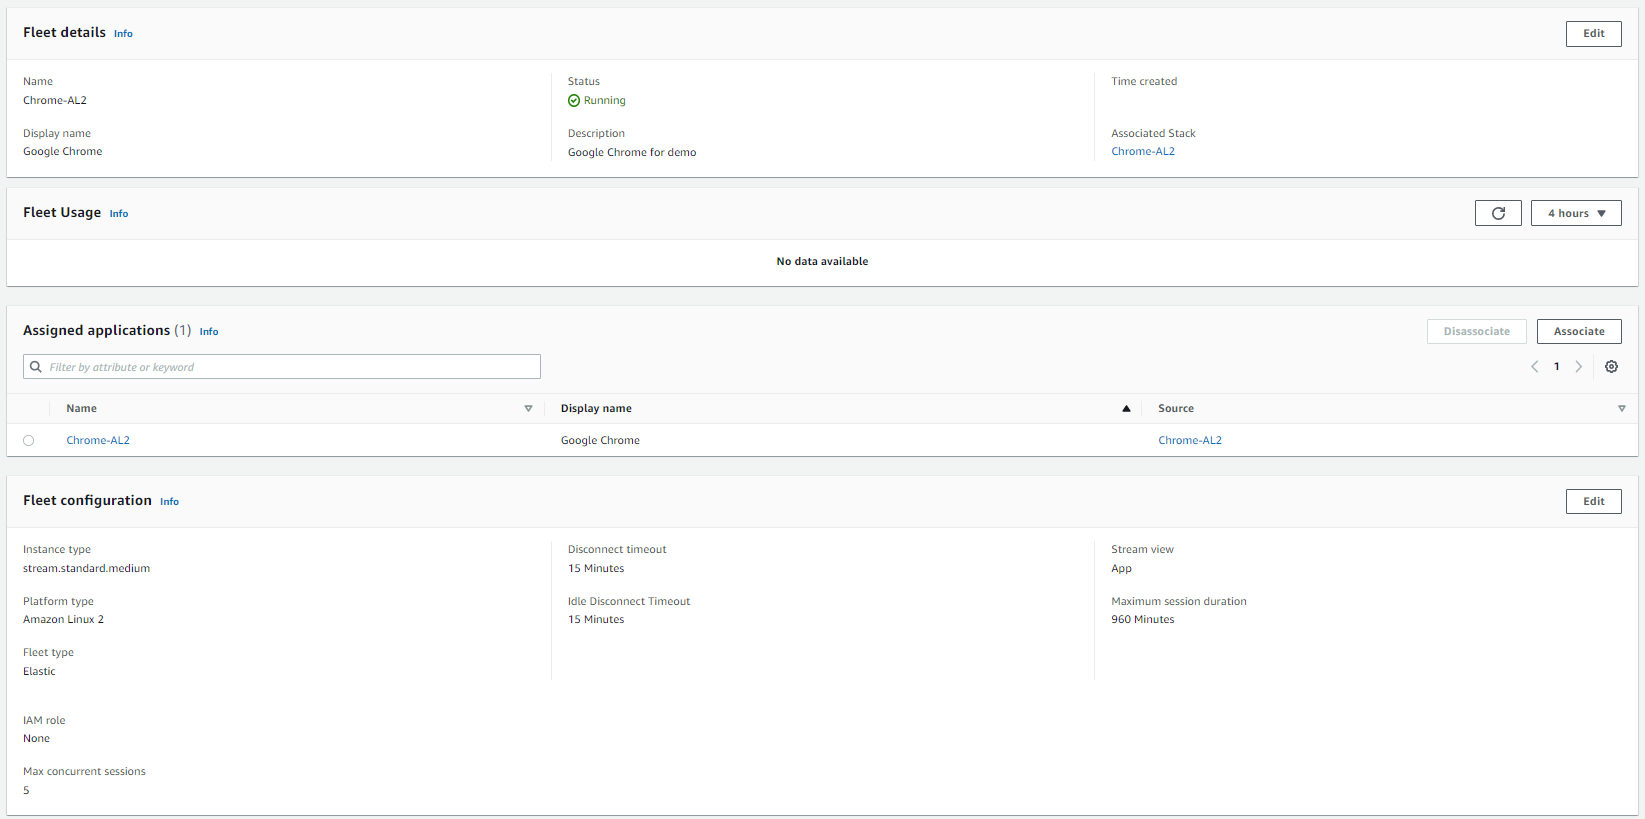
After creating the fleet, it goes into a Starting state. Selecting the fleet shows the fleet details, assigned applications, fleet configuration, and network details. When the fleet is in a Running state, it is ready for use.
After creating the AppStream 2.0 Elastic fleet, create a stack, associate the Elastic fleet to the stack, and provide access to users.
Step 3: Streaming the application in Elastic fleets
When launching a new streaming session using an Elastic fleet, a user chooses the application to launch, the streaming instance is reserved for the user, and an ENI is attached to the instance and created within the VPC. On the instance, the VHD and setup script are downloaded, then the setup script is executed.
The user sees available applications. In this example, Google Chrome is available. If you prefer the application to automatically launch, skipping the application page, configure the app parameter in the relay state URL for SAML, or specify the AppID when generating the streaming URL.

The user sees statuses for reserving the session, preparing applications, and connecting during the startup until the application launches.
Google Chrome launches the AWS SSO login page on Google Chrome, through which the user can sign in, then log into SageMaker Studio from the AppStream 2.0 Elastic fleets streaming session.

Cleaning up
In this blog post, you created several components which generate cost. To avoid incurring future charges, remove the following resources.
- Remove AppStream 2.0 stack:
- Open the AppStream 2.0 console.
- Select Stacks from the navigation pane.
- Select the stack you created, choose Action, then Disassociate fleet. Then confirm.
- With the AppStream 2.0 stack still selected, choose Action, then Delete. Then confirm.
- Remove AppStream 2.0 fleet:
- Select Fleets from the navigation pane.
- Select the fleet you created, choose Action, then Stop.
- Select your fleet to view details.
- Under Assigned applications, select the application you created, and choose Disassociate. Then confirm.
- Once your fleet is in a Stopped state, choose Delete. Then confirm.
- There is no charge for an AppStream 2.0 application. To remove this component, complete the following:
- Select Applications from the navigation pane.
- Select the application you created, then choose Delete. Then confirm.
- There is no charge for an AppStream 2.0 app block. To remove this component, complete the following:
- Under Applications in the navigation pane, select the App blocks
- Select the app block you created, then choose Delete. Then confirm.
- Remove instance running Amazon Linux 2.
- If you used AppStream 2.0 image builder:
- While in the AppStream 2.0 console, select Images from the navigation pane.
- Select the Image builder
- Select the image builder you created, choose Action, then Stop.
- Once your image builder is in a Stopped state, choose Action, then Delete. Then confirm.
- If you used an Amazon EC2 instance:
- Open the Amazon EC2 console.
- Select Instances from the navigation pane.
- Select the EC2 instance you created, choose Instance state, then Terminate instance. Then confirm.
- If you used AppStream 2.0 image builder:
- Remove S3 components:
- Follow the steps for Deleting a bucket in the Amazon Simple Storage Service (S3) User Guide.
Conclusion
AppStream 2.0 Elastic fleets make it easy to stream applications without managing any infrastructure or scaling policies. AppStream 2.0 Linux application streaming allows you to run your applications at a lower cost. In this blog, a Linux application is packaged into a portable application which is streamed on AppStream 2.0 Elastic fleets.
To get started with AppStream 2.0 Elastic fleets, you can use the AWS Management Console, the AWS CLI, or any of the AWS SDKs. To learn more about using AppStream 2.0 with Linux, see the What’s New page for Linux application streaming. To learn more about AppStream 2.0 Elastic fleets, refer to the AppStream 2.0 Administration Guide. To learn more about automating the VHD creation, read Automate AppStream 2.0 Elastic fleet application updates with AWS Systems Manager.