AWS DevOps Blog
Migrating ASP.NET applications to Elastic Beanstalk with Windows Web Application Migration Assistant
This blog post discusses benefits of using AWS Elastic Beanstalk as a business application modernization tool, and walks you through how to use the new Windows Web Application Migration Assistant. Businesses and organizations in all types of industries are migrating their workloads to the Cloud in ever-increasing numbers. Among migrated workloads, websites hosted on Internet Information Services (IIS) on Windows Server is a common pattern. Developers and IT teams that manage these workloads want their web applications to scale seamlessly based on continuously changing load, without having to guess or forecast future demand. They want their infrastructure, including the IIS server and Windows Server operating system, to automatically receive latest patches and updates, and remain compliant with their baseline policies without having to spend lots of manual effort or heavily invest in expensive commercial products. Additionally, many businesses want to tap into the global infrastructure, security, and resiliency offered by the AWS Cloud.
AWS Elastic Beanstalk is designed to address these requirements. Elastic Beanstalk enables you to focus on your application code as it handles provisioning, maintenance, health-check, autoscaling, and other common tasks necessary to keep your application running. Now, the Windows Web Application Migration Assistant makes it easier than ever to migrate ASP.NET and ASP.NET Core web applications from IIS on Windows servers running on-premises or in another cloud to Elastic Beanstalk. This blog post discusses how you can use this open-source tool to automate your migration efforts and expedite your first step into the AWS Cloud.
What is Windows Web Application Migration Assistant?
The Windows Web Application Migration Assistant is an interactive PowerShell script that migrates entire websites and their configurations to Elastic Beanstalk. The migration assistant is available as an open-source project on GitHub, and can migrate entire ASP.NET applications running on .NET Framework in Windows, as well as on ASP.NET Core. Elastic Beanstalk also runs ASP.NET Core applications on Windows platform. For ASP.NET applications, you can use this tool to migrate both classic Web Forms applications, as well as ASP.NET MVC apps.
Windows Web Application Migration Assistant workflow
The migration assistant interactively walks you through the steps shown in the following diagram during the migration process.

1- Discover: The script automatically discovers and lists any websites hosted on the local IIS server.
2- Select: You choose the websites that you wish to migrate.
3- Database connection string: The script checks selected website’s web.config and iterates through their connection string settings. You are then prompted to update connection strings to have them point to the migrated database instance.
4- Generate: The script generates an Elastic Beanstalk deployment bundle. This bundle includes web application binaries and instructions for Elastic Beanstalk on how it should host the application.
5- Deploy: Finally, the script uploads the deployment bundle to the Elastic Beanstalk application for hosting.
Elastic Beanstalk application and other concepts
The most high-level concept in Elastic Beanstalk is application. An Elastic Beanstalk application is a logical collection of lower-level components, such as environments and versions. For example, you might have an Elastic Beanstalk application called MarketingApp, which contains two Elastic Beanstalk environments: Test and Production. Each one of these environments can host one of the different versions of your application, as shown in the following diagram.
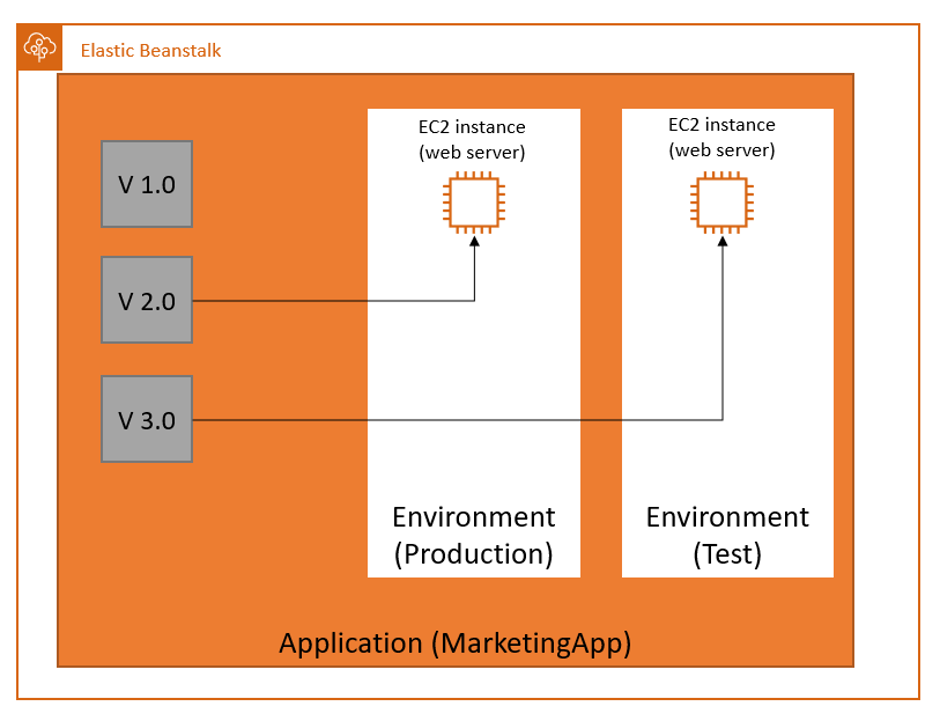
As you can see in the diagram, although it’s possible to have multiple versions of the same application uploaded to Elastic Beanstalk, only one version is deployed to each environment at any point in time. Elastic Beanstalk enables rapid rollback and roll-forward between different versions, as well as swapping environments for Blue-Green deployments.
Migrating databases
The Windows Web Application Migration Assistant is specifically designed to migrate web applications only. However, it’s quite likely that web applications may have dependencies to one or more backend databases. You can use other tools and services provided by AWS to migrate databases. Depending on your requirements, there are multiple options available:
- AWS Database Migration Service (DMS) along with AWS Schema Conversion Tool (SCT) enable migration of homogenous and heterogenous databases. AWS DMS is also an option for ongoing replication of your database, which is applicable for zero down-time migration requirements.
- CloudEndure Migration simplifies and enables lift-and-shift migration of entire virtual machines into the Cloud. It supports common databases, including Microsoft SQL Server and Oracle.
- Windows to Linux Replatforming Assistant for Microsoft SQL Server Databases helps migrate existing SQL Server databases running on Windows and moves them to a Linux Ubuntu instance running in AWS. You can use this tool to migrate SQL Server 2008 or later versions and upgrade them to SQL Server 2017.
- Other native migration solutions can also be applicable depending on your requirements. For example, you can use native MS SQL Server backups to restore your database in Amazon Relational Database Service (RDS), or a SQL Server instance running on Amazon EC2. Amazon RDS is the managed relational database service in AWS, and supports restoring native full and transaction log backups. The transaction log backup is particularly useful to reduce outage windows to near zero during migration.
The Windows Web Application Migration Assistant allows you to migrate your database(s) during or after migration of web applications. In either case, your migrated web applications should be modified to point any connection strings to the new database endpoints. The migration assistant script also helps you to modify connection strings.
Prerequisites
Ensure your server meets the following software requirements.
- IIS 8 and above running on Windows 2012 and above.
- PowerShell 3.0 and above: To verify the version of PowerShell on your server, open a PowerShell window and enter this command:
$PSVersionTable.PSVersion - Microsoft Web Deploy version 3.6 or above: You can verify the installed version from list of programs in Add or Remove Programs in Windows Control Panel.
- .NET Framework (supported versions: 4.x, 2.0, 1.x) or .NET Core (supported versions: 3.0.0, 2.2.8, 2.1.14) installed on your web server.
- AWSPowerShell module for MS PowerShell: You can use the following cmdlet to install it:
Install-Module AWSPowerShell. Make sure the latest version of AWSPowerShell module is installed. If you have an older version already installed, you can first uninstall it using following cmdlet:Uninstall-Module AWSPowerShell -AllVersions -Force - WebAdministration module for MS PowerShell: You can check for this dependency by invoking the PowerShell command
Import-Module WebAdministration. - Since the script automatically inspects IIS and web application settings, it needs to run as a local administrator on your web server. Make sure you have appropriate credentials to run it. If you are logged in with a user other than a local Administrator, open a PowerShell session window as an administrator.
- Finally, make sure your server has unrestricted internet connectivity to the AWS IP range.
Configure the destination AWS account
You need to have an AWS Identity and Access Management (IAM) user in your destination AWS account. Follow the instructions to create a new IAM user. Your user needs credentials for both the AWS Console and programmatic access, so remember to check both boxes, as shown in the following screenshot.

On the permissions page, attach existing policies directly to this user, as shown in the following screenshot. Select the following two AWS-managed policies:
IAMReadOnlyAccessAWSElasticBeanstalkFullAccess

Before finishing the user creation, get the user’s AccessKey and SecretKey from the console, as shown in the following screenshot.

Open a PowerShell terminal on your Windows Server and invoke the following two commands.
PS C:\> Import-Module AWSPowerShell
PS C:\> Set-AWSCredential -AccessKey {access_key_of_the_user} -SecretKey {secret_key_of_the_user} -StoreAs {profile_name} -ProfileLocation {optional - path_to_the_new_profile_file}
The parameter {profile_name} is an arbitrary name to label these credentials. The optional parameter path_to_the_new_profile_file can be used to store the encrypted credentials profile in a customized path.
Setting up
Once you’ve verified the checklist for web server and configured the destination AWS account, set up is as simple as:
- Download the script from GitHub, using clone or the download option of the repository, and place the extracted content on the local file system of your web server.
- Optionally, edit the utils/settings.txt JSON file, and set the following two variables (if not set, the script will use the default values of the AWS PowerShell profile name and path):
defaultAwsProfileFileLocation : {path_to_the_new_profile_file}defaultAwsProfileName : {profile_name }
You’re now ready to run the migration assistant script to migrate your web applications.
Running the migration assistant
The migration assistant is a PowerShell script. Open a PowerShell window as administrator in your web server and run the MigrateIISWebsiteToElasticBeanstalk.ps1 script. Assuming you have copied the content of the GitHub package to your C: drive, launching the script looks as follows:
PS C:\> .\MigrateIISWebsiteToElasticBeanstalk.ps1The migration assistant prompts you to enter the location of your AWS credentials file. If you have used the optional parameter to store your IAM user’s credentials in a file, you can enter its path here. Otherwise, choose Enter to skip this step. The assistant then prompts you to enter the profile name of your credentials. Enter the same {profile_name} that you had used for Set-AWSCredentials.
Having acquired access credentials, the assistant script then prompts you to enter an AWS Region. Enter the identifier of the AWS Region in which you want your migrated web application to run. If you are not sure which values can be used, check the list of available Regions using following cmdlet (in another PowerShell window):
Get-AWSRegionFor example, I am using ap-southeast-2 to deploy into the Sydney Region.
After specifying the Region, the migration assistant script starts scanning your web server for deployed web applications. You can then choose one of the discovered web applications by entering its application number as shown in the list.

So far, you’ve kickstarted the migration assistant and selected a web application to migrate. At this point, the migration assistant begins to assess and analyze your web application. The next step is to update the connection strings for any backend databases.
Modifying connection strings
Once you enter the number of the web application that has to migrate, the assistant takes a snapshot of your environment and lists any connection strings used by your application. To update a connection string, enter its number. Optionally, you could choose Enter to skip this step, but remember to manually update connection strings, if any, before bringing the web application online.
Enter the number of the connection string you would like to update, or press ENTER:
Next, the assistant pauses and allows you to migrate your database. Choose Enter to continue.
Please separately migrate your database, if needed.
The assistant then prompts you to update any connection strings selected above. If you choose M, you can update the string manually by editing it in the file path provided by the migration assistant. Otherwise, paste the contents of the new connection string and choose Enter.
Enter "M" to manually edit the file containing the connection string, or paste the replacement string and press ENTER (default M) :
The script then continues with configuration parameters for the target Elastic Beanstalk environment.
Configuring the target Elastic Beanstalk environment using the script
The migration assistant script prompts you to enter a name for the Elastic Beanstalk application.
Please enter the name of your new EB application.
The name has to be unique:
By default, the migration assistant automatically creates an environment with a name prefixed with MigrationRun. It also creates a package containing your web application files. This package is called application source bundle. The migration assistant uploads this source bundle as a version inside the Elastic Beanstalk application.
Elastic Beanstalk automatically provisions an Amazon EC2 instance to host your web application. The default Amazon EC2 instance type is t3.medium. When the migration assistant prompts you to enter the instance type, you can choose Enter to accept the default size, or you can enter any other Amazon EC2 Instance Type.
Enter the instance type (default t3.medium) :
Elastic Beanstalk provides preconfigured solution stacks. The migration assistant script prompts you to select one of these solution stacks. Not only are these stacks preconfigured with an optimized operating system, as well as an application server and web server to host your application, but Elastic Beanstalk can also handle their ongoing maintenance by offering enhanced health checks, managed updates, and immutable deployment. These extra benefits are available with version 2 solution stacks (i.e. v2.x.x, as, for example, in “64bit Windows Server 2016 v2.3.0 running IIS 10.0”).
The migration assistant prompts you to select the Elastic Beanstalk platform from a list. You should select a platform that matches the version of Windows server that’s currently running on your host server.

That is the final step. Now, the migration assistant starts to do its magic and after a few minutes you should be able to see your application running in Elastic Beanstalk.
Advanced deployment options
The Windows Web Application Migration Assistant uses all the default values to quickly create a new Elastic Beanstalk application. However, you might want to change some of these default values to address your more specific requirements. For example, you may need to deploy your web application inside an Amazon Virtual Private Cloud (VPC), set up advanced health monitoring, or enable managed updates features.
To do this, you can stop running the migration assistant script after receiving this message:
An application bundle was successfully generated.
Now follow these steps:
- Sign in to your AWS console and go to the Elastic Beanstalk app creation page.
- From the top right corner of the page, make sure the correct AWS Region is selected.
- Create the application by following the instructions on the page.
- Choose Upload your code in the Application code section and upload the deployment bundle generated by the migration assistant. Go to your on-premises web server and open the folder to which you copied the migration assistant script. The deployment bundle is a .zip file placed in the
MigrationRun-xxxxxxx/output folder. Use this .zip file as application code and upload it to Elastic Beanstalk. - Choose the Configure more options button to set advanced settings as per your requirements.
- Select the Create application button to instruct Elastic Beanstalk to start provisioning resources and deploy your application.
If your web application has to use existing SSL certificates, manually export those certificates from Windows IIS and then import them into AWS Certificate Manager (ACM) in your AWS account. Elastic Beanstalk creates an Elastic Load Balancer (ELB) for your application. You can configure this ELB to use your imported certificates. This way HTTPS connections will be terminated on the ELB, and you don’t need further configuration overhead on the web server. For more details, see Configuring HTTPS for your Elastic Beanstalk Environment.
Also keep in mind that Elastic Beanstalk supports a maximum of one HTTP and one HTTPS endpoint. No matter what port numbers are used for these endpoints within the on-premises IIS, Elastic Beanstalk will bind them to ports 80 and 433 respectively.
Any software dependencies outside of the website directory, such as Global Assembly Cache (GAC), have to manually be configured on the target environment.
Although Amazon EC2 supports Active Directory (AD)—both the managed AD service provided by AWS Directory Service and customer-managed AD—Elastic Beanstalk currently does not support web servers being joined to an AD domain. If your web application needs the web server to be joined to an Active Directory domain, either alter the application to eliminate the dependency, or use other approaches to migrate your application onto Amazon EC2 instances without using Elastic Beanstalk.
Cleanup
If you use the steps described in this post to test the migration assistant, it creates resources in your AWS account. You keep getting charged for these resources if they go beyond the free tier limit. To avoid that, you can delete resources to stop being billed for them. This is as easy as going to the Elastic Beanstalk console and deleting any applications that you no longer want.
Conclusion
This blog post discussed how you can use Windows Web Applications Migration Assistant to simplify the migration of your existing web applications running on Windows into Elastic Beanstalk. The migration assistant provides an automated script that’s based on best practices and automates commonly used migration steps. You don’t need in-depth skills with AWS to use this tool. Furthermore, by following the steps as performed by the Windows Web Application Migration Assistant tool and Elastic Beanstalk, you can acquire more in-depth skills and knowledge about AWS services and capabilities in practice and as your workloads move into the Cloud. These skills are essential to the ongoing modernization and evolution of your workloads in the Cloud.