AWS for Games Blog
How to Set Up Player Authentication with Amazon Cognito
Game development is all about the players. Personalizing a game experience can be key to transforming first time players into invested fans who keep coming back to your game day after day. But to offer a unique experience to a player, you need to be able to identify them.
Amazon Cognito is a quick and easy user authentication and identity management service. In this how-to guide, I’m going to show you how you can use it to set up your own secure and scalable account sign up and log-in system in your game with this sample source code.

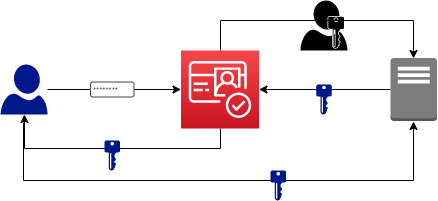
The following diagram shows the process involved in logging in to a game server from a game client. Notice that there are two keys involved?
When the user puts in their username and password, the first key is returned. This is the “access token” generated by Amazon Cognito. This key is sent to the game server from the game client. The game server then sends that key to Amazon Cognito. Amazon Cognito then returns a different key to the game server which is used to verify that the first key was actually sent by the player. If it was legitimate, the user can continue playing.
Setting up Cognito on the AWS console
First things first, you’ll need to create a new User Pool through the AWS console. The user pool is basically a database of users with a small amount of information stored per user, most importantly a hash of their password.
- Log in to the AWS console: https://aws.amazon.com/console/
- Find the Amazon Cognito service. It’s under Security, Identity & Compliance and choose it.
- Choose Manage User Pools, then choose Create a User Pool.
- Call your user pool something, I called mine TheGameUserPool.
- Review the defaults, but don’t change anything for now. Feel free to explore, anything can be changed later. Choose Create.
- On the left, choors App clients and then Add an app client. This will allow you to identify the app that will be using a particular pool. It also allows multiple apps to use the same pool of users, so you could have one pool for all your games if you wanted.
- Call your app something. In this case, I used TheGame.
- Unselect Generate client secret before continuing. Although this is less secure, it is important for demonstration purposes as it makes walking through the API much easier. See the “further reading” section below for information on secure practices for authentication.
- Choose Create app client.
- Once the app client is created, choose Show Details and select Enable username password based authentication .(ALOW_USER_PASSWORD_AUTH). This will eliminate a lot of gooey security code we don’t want to have to deal with for this demo. Now choose Save app client changes.
- At this point you should have the app client ID. Open the ClientSettings.h and ServerSettings.h file. The app client ID will get pasted in the client settings. Make sure the correct AWS region is set in both files (which is the region where you created the User Pool).
The Demo Code
You can find the source code for a Windows version of demo here on GitHub: https://github.com/aws-samples/amazon-cognito-gamelogin-sample
There are two projects in the demo, one for the client (where the meat of the Amazon Cognito API calls are) and one for the server, and one solution file that builds both. The client demonstrates all the Amazon Cognito calls you’d make to create a new account, recover a lost password, log in, change a password, etc. The code is pretty straightforward and has the minimum setup needed to accomplish each of these activities. It also has a very simple socket implementation allowing the client and server talk to one another. I’ve tried to separate it out so it’s obvious where the Amazon Cognito code is and where the socket code is.
Server
Before you start the server, you’ll need to make sure that you have AWS credentials stored on your computer. Many developers are tempted to use their root credentials. This is a really bad idea, because if you inadvertently give away the credential file, you’ve lost control of your AWS account. Instead, you’ll want to create an IAM user and get credentials for that. Many developers choose to create an “admin” user to give easy access to all AWS resources in their development environment. If you are more security conscious you can create an IAM user with access only to the required AWS resources. In addition, you can eliminate the need for any downloaded AWS credentials and use Amazon Cognito Identity Pools to grant AWS resource access to your application. Both of the prior steps are beyond the scope of this tutorial.
For the purposed of this tutorial, you can create an IAM user with administrator credentials. Once the IAM user is created, follow these steps to download and store the credentials on your computer.
- Open the IAM console.
- Choose Users.
- Choose the user name.
- Choose the Security credentials tab.
- Choose Create access key.
- Choose Download .csv file.
- Navigate to this guide to install the credentials correctly on your operating system.
When the Server code starts up, you will see the initialization of the AWS API, assuming you kept the logging options enabled. We will provide the region and create the Amazon Cognito client and start up a socket to listen for a client. Take note of the shutdown API call as well, it’s necessary to call this before your application exits.
AWS SDK Startup Code
int main()
{
    Aws::SDKOptions options;
    Aws::Utils::Logging::LogLevel logLevel{ Aws::Utils::Logging::LogLevel::Trace };
    options.loggingOptions.logger_create_fn = [logLevel] {return std::make_shared&<Aws::Utils::Logging::ConsoleLogSystem>(logLevel); };
    Aws::InitAPI(options);
    Aws::Client::ClientConfiguration clientConfiguration;
    clientConfiguration.region = REGION;    // region must be set for Amazon Cognito operations
    s_AmazonCognitoClient = Aws::MakeShared<Aws::CognitoIdentityProvider::CognitoIdentityProviderClient>("CognitoIdentityProviderClient", clientConfiguration);
    ... snip ...
    Aws::ShutdownAPI(options);
    return exitStatus;
}
When we receive data, we then check the access token by using the Amazon Cognito Identity Provider to see if the user is valid or not, and send a result back to the client with a message.
User Validation Code
bool IsUserValid(const std::string& accessToken)
{
    Aws::CognitoIdentityProvider::Model::GetUserRequest getUserRequest;
    getUserRequest.SetAccessToken(accessToken);
    Aws::CognitoIdentityProvider::Model::GetUserOutcome getUserOutcome{ s_AmazonCognitoClient->GetUser(getUserRequest) };
    if (getUserOutcome.IsSuccess())
    {
        Aws::CognitoIdentityProvider::Model::GetUserResult getUserResult{ getUserOutcome.GetResult() };
        std::cout << "User logged in : " << getUserResult.GetUsername() << std::endl;
        for (const auto& attribute : getUserResult.GetUserAttributes())
        {
            std::cout << attribute.GetName() << " : " << attribute.GetValue() << std::endl;
        }
        return true;
    }
    else
    {
        Aws::Client::AWSError<Aws::CognitoIdentityProvider::CognitoIdentityProviderErrors> error = getUserOutcome.GetError();
        std::cout << "Error getting user: " << error.GetMessage() << std::endl ;
        return false;
    }
}
Client
On the client side you will see the same InitAPI for AWS and the creation of an Amazon Cognito client.
AWS SDK Startup Code
int main()
{
    Aws::SDKOptions options;
    Aws::Utils::Logging::LogLevel logLevel{ Aws::Utils::Logging::LogLevel::Error };
    options.loggingOptions.logger_create_fn = [logLevel] {return make_shared<Aws::Utils::Logging::ConsoleLogSystem>(logLevel); };

    Aws::InitAPI(options);
    Aws::Client::ClientConfiguration clientConfiguration;

    clientConfiguration.region = REGION;    // region must be set for Amazon Cognito operations
    s_AmazonCognitoClient = Aws::MakeShared<Aws::CognitoIdentityProvider::CognitoIdentityProviderClient>("CognitoIdentityProviderClient", clientConfiguration);
    ...
	Aws::ShutdownAPI(options);
    return exitStatus;
}
We now have a few things to do on the client side to handle user account management. Here we’ll create the log in, and also retrieve account details, resetting, and changing your password.
Logging In
Aws::CognitoIdentityProvider::Model::InitiateAuthRequest initiateAuthRequest;
    initiateAuthRequest.SetClientId(APP_CLIENT_ID);
    initiateAuthRequest.SetAuthFlow(Aws::CognitoIdentityProvider::Model::AuthFlowType::USER_PASSWORD_AUTH);
    map<string, string> authParameters{
        {"USERNAME", username},
        {"PASSWORD", password}
    };
    initiateAuthRequest.SetAuthParameters(authParameters);
    Aws::CognitoIdentityProvider::Model::InitiateAuthOutcome initiateAuthOutcome{ s_AmazonCognitoClient->InitiateAuth(initiateAuthRequest) };
    if (initiateAuthOutcome.IsSuccess())
    {
        Aws::CognitoIdentityProvider::Model::InitiateAuthResult initiateAuthResult{ initiateAuthOutcome.GetResult() };
        if (initiateAuthResult.GetChallengeName() == Aws::CognitoIdentityProvider::Model::ChallengeNameType::NOT_SET)
        {
            // for this code sample, this is what we expect, there should be no further challenges
            // there are more complex options, for example requiring the user to reset the password the first login
            // or using a more secure password transfer mechanism which will be covered in later examples
            Aws::CognitoIdentityProvider::Model::AuthenticationResultType authenticationResult = initiateAuthResult.GetAuthenticationResult();
            cout << endl << "Congratulations, you have successfully signed in!" << endl;
            cout << "\tToken Type: " << authenticationResult.GetTokenType() << endl;
            cout << "\tAccess Token: " << authenticationResult.GetAccessToken().substr(0, 20) << " ..." << endl;
            cout << "\tExpires in " << authenticationResult.GetExpiresIn() << " seconds" << endl;
            cout << "\tID Token: " << authenticationResult.GetIdToken().substr(0, 20) << " ..." << endl;
            cout << "\tRefresh Token: " << authenticationResult.GetRefreshToken().substr(0, 20) << " ..." << endl;
            s_IsLoggedIn = true;
            s_TokenType = authenticationResult.GetTokenType();
            s_AccessToken = authenticationResult.GetAccessToken();
            s_IDToken = authenticationResult.GetIdToken();
            s_RefreshToken = authenticationResult.GetRefreshToken();

            if (!SendAccessTokenToServer(s_AccessToken))
            {
                cout << "Unable to connect to server" << endl;
            }
        }
    }
Changing Your Password
Aws::CognitoIdentityProvider::Model::ChangePasswordRequest changePasswordRequest;
    changePasswordRequest.SetAccessToken(s_AccessToken);
    changePasswordRequest.SetPreviousPassword(currentPassword);
    changePasswordRequest.SetProposedPassword(newPassword);
    Aws::CognitoIdentityProvider::Model::ChangePasswordOutcome changePasswordOutcome{ s_AmazonCognitoClient->ChangePassword(changePasswordRequest) };
    if (changePasswordOutcome.IsSuccess())
    {
        cout << "Password reset successful!" << endl << endl;
    }
Getting User Attributes
Aws::CognitoIdentityProvider::Model::GetUserRequest getUserRequest;
    getUserRequest.SetAccessToken(s_AccessToken);
    Aws::CognitoIdentityProvider::Model::GetUserOutcome getUserOutcome{ s_AmazonCognitoClient->GetUser(getUserRequest) };
    if (getUserOutcome.IsSuccess())
    {
        Aws::CognitoIdentityProvider::Model::GetUserResult getUserResult{ getUserOutcome.GetResult() };
        cout << endl << "User name : " << getUserResult.GetUsername() << endl;
        for (const auto& attribute : getUserResult.GetUserAttributes())
        {
            cout << attribute.GetName() << " : " << attribute.GetValue() << endl;
        }
    }
Notes for C++ and Visual Studio
Client
If you’re starting from scratch and want to get the Amazon Cognito SDK and all its dependencies, NuGet is your best choice. Left click on your project and select “Manage NuGet Packages”. Search for AWSSDKCPP-CognitoIdentityProvider and add it to the project. I’ve already added these in the sample project and the libraries will automatically be downloaded and linked when you build the first time.
I ran into an issue in Visual Studio 2017 when running the client in the debugger. I got an exception in ntdll writing to a null address. This was solved by checking the option debug->options→”Automatically close the console window when debugging stops”. This was not consistent across machines or even projects, but I found others online experiencing the same issue.
Make sure you include aws/core/utils/Outcome.h and any of the “request” includes before you include aws/cognito-idp/CognitoIdentityProviderClient.h or you’ll get compile errors for missing symbols.
In the example I used synchronous calls to make it simple to follow the code. Generally, you don’t want to have calls to the internet to be synchronous, it leads to unacceptable UI hitches (your players won’t put up with that!). If you take a look at the AWS C++ API you’ll find that each of the calls used here have a matching “async” call that you can use instead. They work the same as the synchronous calls, with the exception that they take a callback function as a parameter. This would be a great place to use C++ lambda expressions. And of course, if you already have your own threading model, the synchronous API’s will work fine on a thread.
Server
For the sample code I chose to use Amazon Cognito to verify the access token and return the user ID. This is not necessarily the most ideal way to deal with the tokens returned by Amazon Cognito, however, for C++, it’s the simplest.
The more typical use would be to only have the server communicate with Amazon Cognito when grabbing a public key from a special URL set up by Amazon Cognito, so no Amazon Cognito API use would occur (this is more cost effective as well.) This would allow you to do more with the tokens, extracting different types of information, like determining access rights for the user rather than just giving blanket login permissions.
You can read here for more info on the process of validating tokens produced by Amazon Cognito. However, dealing with JWT and JWK (the token and public key from Amazon Cognito) in C++ was more challenging than I expected. In fact, I was originally going to demo this process and had found a nice C++ JWT handling library build on top of OpenSSL. Unfortunately, the next step, using the JWK to verify the JWT required the JWK be converted to a different format (PEM) and I wasn’t able to find a library to do this in C++ that was open source. It could be done if you are very familiar with security API’s, but alas I am not! So I looked at other options.
One option was to create a NodeJS Lambda function and call that to decode and verify the tokens. I would recommend this as it gives you more utility from the tokens and doesn’t require you to become a security expert as NodeJS speaks “JOSE” natively. However, this article was meant to give you a short and sweet solution and I didn’t want to add more complexity by creating and calling a Lambda.
Visual Studio 2019
Unfortunately the provided demo won’t compile directly in Visual Studio 2019, unless you have the Visual Studio 2017 platform toolset installed. The demo downloads the AWS SDK for C++ that’s available on NuGet, and the libraries are not compiled for the Visual Studio 2019 tooling. Refer to the instructions for building the AWS SDK for C++ in the developer guide. You’ll then need to configure your projects to find the include and library files in the SDK.
Clean up!
When you’re done with this tutorial, it’s very easy to clean up the user pool you created.
- Open the Amazon Cognito console to the user pool section.
- Choose the user pool you created.
- Choose Delete
- Type in “delete” when prompted.
That’s it, we only created one AWS resource and there’s nothing else to do.
What’s Not Covered Here and Further Reading
Security and the functionality of Amazon Cognito are bigger topics than one blog post can hold. Here are a few ideas you can check out for yourself that I’d also love to write about!
- Secure password transfer and how to do it in C++/Python – though the example doesn’t use it, Amazon Cognito can use a cool tech called the Secure Remote Password protocol which means you never actually have to send your password from your client. Though this is built in to the JavaScript, mobile and .NET AWS SDK’s, you have to provide your own for C++ and Python.
- Even if you don’t have any online services or data and just want to make a single player game, you probably have some sort of save game. It would be a great feature to allow players to have their save game stored online and then seamlessly move from device to device and continue where they left off. I’m sure it won’t be a surprise that AWS has a solution for this and it’s called App Sync. This will be explored in a follow up article to this one as it’s one of the most commonly requested services!
- Token refresh – as you’ll see, the security tokens have a limited lifespan, defaulting to 5 minutes for the access tokens. There is a separate refresh token that can be stored for up to 30 days (by default) and can be used to automatically fetch new access tokens. The API use pattern is similar. Unfortunately this is only automatic for the Mobile SDK, for the other SDK’s you’ll need to write the refresh code yourself. I’ll have code to do this in the App Sync article as it’s going to become very important to refresh tokens with that code.
For more information on using Amazon Cognito, check out the documentation.
And to learn more about Amazon Game Tech solutions, visit our home page.
Have questions? Drop them into the GameDev forums.