AWS for M&E Blog
Getting started with AWS cloud video editing
In the first installment of Edit in the Cloud series, we covered the fundaments of enabling various editorial personas on AWS. Now it is time to get started and deploy the GitHub sample. This step-by-step guide details how to deploy an edit host, storage, and connectivity on AWS. This template allows users to build additional features, and add functionality, into an Amazon Elastic Compute Cloud (Amazon EC2) deployment. By incorporating Amazon FSx for Windows File Server, you can utilize a central repository for your media assets while providing an easy connection to your EC2 instance. The template also includes AWS Directory Services in conjunction with Teradici for Federated Login to allow for seamless editorial experience. Once you are logged into AWS management console, use this AWS CloudFormation deployment template. It is now available in US-East-1 and US-West-2.
In this deployment guide, learn how to:
- Deploy the CloudFormation template in US-West-2
- Enable Teradici Cloud Access Software
- Move Data from Amazon S3 to Amazon FSx for Windows File Server
Alternatively, you can deploy this template via the Command Line (CLI) using this AWS Sample on Github.
Requirements
To perform this deployment, you must have permissions to an AWS account. Within your AWS account, go to the web console and deploy the requested assets. A Key Pair is required for the specific region to access the deployed EC2 instance. Lastly, you need an active Teradici license. If you do not have one, request one from Teradici before moving forward.
Note: If you are using a new AWS account for this deployment, a brief resource validation is required. If this causes deployment failure, please delete the stack and re-deploy the resources.
Ready to deploy
Follow the US-West-2 link here to get started. This link opens the template on the CloudFormation service in the AWS Management Console. Be sure to give the deployment a name under Stack name. This example uses “MediaEdit”, but you can choose a name that fits your use case.
Deployment name

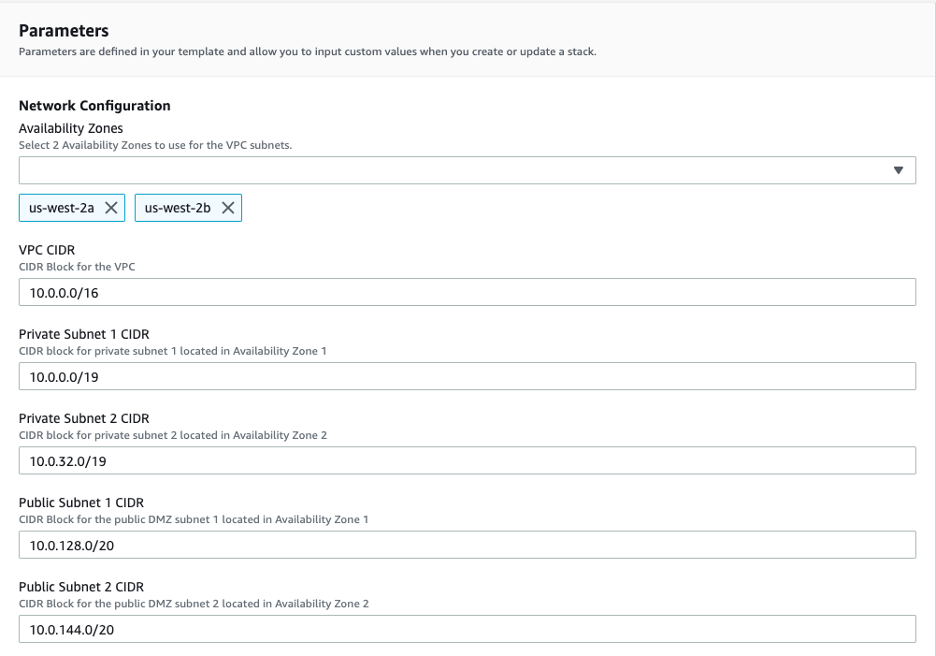
Network Configuration
To get started, you will need to:
- Select two (2) Availability Zones for the deployment. This example uses us-west-2a and us-west-2b.
- Deploy an Amazon Virtual Private Cloud (VPC), including new network configurations. To increase the speed of deployment, this template is prepopulated with the CIDR information you need. The configuration can be adjusted to fit your workflow.
EC2 Configuration
Amazon G4dn instances are recommended for post-production, video playout, video encoding, and transcoding.
Configure your EC2 instance:
- Select the desired G4dn instance size from the first dropdown menu.
- In the Edit Host Access CIDR field, insert your IP address/range from your location. The following screenshot uses the example “X.X.X.X/XX” to indicate formatting. If you need help locating your IP, please use: http://checkip.amazonaws.com
- Select your Key Pair Name from the last dropdown menu under Amazon EC2 Configuration.

Active Directory Domain
At this step, you will create a Microsoft Active Directory for the EC2 instance and FSx for Windows File Server to authenticate the user credentials.
- Enter in a Domain Name.
- Enter a Domain NetBIOS Name. This can be a short version of the full domain.
- Enter a Domain Admin User. By Default, using “Admin” is recommended.
- Enter a Domain Admin Password for your Administrator account.

FSx for Windows File Server Configurations
FSx for Windows File Server is the shared storage source for your edit host.
- Enter a FSx File System Size.
- Enter a FSx Throughput amount that will match your testing material.
- Select the FSx AZ Deployment Mode. For this test, using a “SINGLE_AZ_2” deployment mode is recommended.

S3 Configuration
Next, reference the public Amazon S3 bucket to retrieve the CloudFormation template. No additional changes are required for this section.

Create the Stack
The final step to deploy the template is to acknowledge the items listed on the Capabilities window and select Create stack.

This deployment will take 40 – 55 minutes to complete. Select the refresh icon to load the current deployment status.
Success, you have deployed the template!

The Outputs tab offers more granular detail around your new environment, including the FSx Share name and the instance ID.

It is now time to connect to your EC2 edit host. Navigate to the Services drop down in the top menu bar and select on EC2 under the Compute category.

Choose your new EC2 instance named “win-host” and copy the IPv4 Public IP address.

Windows Connection Steps
If you use a Microsoft Windows operating system, begin by opening Remote Desktop. A quick way to find the Remote Desktop application is to select the Start menu and search “MSTSC” using the search bar. When prompted, add the IP address of the edit host and press Connect.
You will be prompted to enter a username and password.
- Username: Admin
- Password: the domain password you set in the Active Directory Domain step
MacOS Connection Steps
If you use a MacOS computer, you will need to download the Microsoft Remote Desktop Client from the AppStore by following this link or by accessing the AppStore directly.
Once the application is downloaded, open the application and select the + icon. Then select Add PC. A window will open where you can enter the IP address of the edit host where it says PC Name. You may specify a friendly name, such as “Edit Host,” for easy reference. Finally, select Add.
You should now see a new PC added to your connection options. Double-click on the new PC to connect to the edit host. You will be prompted to enter a username and password.
- Username: Admin
- Password: the domain password you set in the Active Directory Domain step
Activating Teradici License
To activate your Teradici License, locate the Teradici icon in your desktop menu, as identified in the image below. Right-click on the icon, and select Licensing.

Enter your registration code in the PCoIP Control Panel, and select Register.

Once you have active your Teradici License, you can connect to the edit host using a Teradici PCoIP Client.

On the connection screen, enter in the IP address of your edit host and a connection name for future reference. When prompted for a username and password, use the same credentials you used before to connect to the instance using RDP.
You should now be connected to your edit host using Teradici.
How to Mount the NVMe Disk
In this deployment, you are mounting ephemeral storage to the edit host for a scratch media edit space. Ephemeral storage provides low latency to the host as it is physically attached storage. Note: Any assets stored on this logical volume will be lost if the edit host is rebooted or terminated. It is recommended that you take the appropriate steps to save edits back to the FSx for Windows File Server network file share described later in this post.
Mount the NVMe Disk, open a Windows Powershell terminal by selecting the Start menu and typing “powershell” in the Search bar. To run Windows Powershell as an Administrator, right-click on Windows Powershell and select Run as Administrator.

You may be prompted with an alert to allow Windows Powershell to make changes on your device. If so, select Yes.
A Windows Powershell terminal will open. Enter the following Powershell command to change to the correct directory.
cd C:\ProgramData\Amazon\EC2-Windows\Launch\Scripts
Then, enter the following Powershell command to mount the NVMe disk.
.\InitializeDisks.ps1
How to use a FSx for Windows File System
The FSx file share is mounted to the F-drive upon user login, as depicted in the image below.

Load data from S3
Open a new Windows Powershell terminal using the instructions above, but this time, select Windows Powershell for AWS.

Ensure that you are using Windows Powershell for AWS to run the following commands.
- First change the FSx File Share drive mapping.
F: - Create a new directory for media.
mkdir Media - From here, you can use the following command to list the contents of your S3 bucket.
aws s3 ls s3://<bucket-name> - To load the data from your S3 bucket into the FSx File Share, use the command below where the <key-prefix> is any folder or object you wish to load into the file share.
aws s3 sync s3://<bucket-name>/<key-prefix> .\Media\
An example of these commands is depicted in the following image.

You can verify that your files synchronized from S3 to the FSx File Share by navigating to your Windows File Explorer, then to your FSx File Share, which is mounted to the F: Drive. You should see the Media folder you created in the previous section. Within that folder, the synchronized contents of your S3 bucket.

Conclusion
This blog post discussed the steps required to deploy and connect to an edit host in the AWS Cloud, as well as how to load data from an Amazon S3 bucket into a FSx for Windows File Server network share that is deployed as part of the CloudFormation template. The next part of the Edit in the Cloud series will discuss cost optimization, security, and connection brokers.