Networking & Content Delivery
Automating AWS Transit Gateway attachments to a transit gateway in a central account
As IT environments grow, they can become more complex, with additional accounts, VPCs, and the networking between them. AWS Transit Gateway is a service that addresses networking complexity by building a hub-and-spoke network to simplify your network routing and security. With Transit Gateway, you can connect your Virtual Private Clouds (VPCs) that span multiple accounts and on-premises networks to a single gateway.
While Transit Gateway eases network administration and complexity, it does not address typical environment missteps such as configuration drift and multiple worker administration.
Automation through Infrastructure as Code helps combat deployment inconsistencies and assist in managing your network by templatizing your environment as a central source of truth. AWS provides a robust API that allows changes to be made quickly and to automate your environment’s processes. If you are doing a task 10 times, you can codify and automate it. This is the concept of Infrastructure as Code.
AWS CloudFormation is a service that provisions AWS resources quickly and simplifies your infrastructure management. A CloudFormation template describes the configuration of your resources, such as their property values. You can update templates to add, remove, or change the configuration of resources. This process keeps an accurate history of your resources, allowing you to track and document changes between different versions of your templates. So instead of recording changes in a ticketing system, you can reference changes in the versioning of CloudFormation templates.
CloudFormation provides a feature called StackSets, which extends the functionality of stacks by enabling you to create, update, or delete stacks across multiple accounts and Regions with a single operation. A stack set can be created in a central account, referred to as an administrator account, which provisions stacks and resource creation to target accounts.
AWS Organizations helps you centrally govern your accounts and scale your workloads on AWS. You can centrally manage billing, access control, compliance, security, and share resources across AWS accounts. Many existing AWS services take advantage of Organizations to streamline access control and management of resources.This post walks you through a solution that automates the association of transit gateway attachments to a transit gateway in a central account within your organization. It includes the following steps:
- Launching a template that creates a transit gateway in the central account.
- Sharing the transit gateway to your organization with resource access manager.
- Creation of IAM roles and permissions in a central account and child accounts.
- Launching a stack set from a master account that automates the creation of a transit gateway attachment, which attaches to an existing Amazon VPC based upon an AWS tag value.
- Associating the transit gateway attachment with the transit gateway in the central account.
- Creating a route table in the target account VPC with a configurable route CIDR address range and a destination to the transit gateway.
- Implementing and deploying the transit gateway to populate routes within its own route table back to the target account VPC. (You can deploy this in your existing environment and across many target accounts in a single operation.)
You can use the provided CloudFormation templates and code for a Lambda function to accomplish these tasks. The provided files can easily be modified to integrate in to your environment as part of your account creation and baselining.
Provided Files
This solution deploys AWS CloudFormation templates and AWS Lambda to accomplish the outlined goals. The files can be downloaded from the “aws-samples” GitHub solution aws-transit-gateway-attachment-automation. The following files are instrumental in this post
transit-gateway.yaml – Deploys a transit gateway in a central account.
transit-gateway-association.yaml – Deployed in the child accounts and creates a transit gateway attachment and associates it with a user provided transit gateway id.
lambda.zip – Deployed in the child accounts and builds a default route to the transit gateway based on a user provided CIDR within VPCs that are selected based on a user provided Tag value.
Prerequisites
The following steps and services are instrumental in achieving this goal:
- Providing target accounts must have an existing VPC that is tagged for the VPC to be attached to the transit gateway attachment.
- Providing target accounts with existing subnets with their VPC, as transit gateway attachment must have subnets from the attached VPC associated.
- Transit Gateways are AWS Region specific. CloudFormation StackSets can be deployed across multiple regions. You will only be able to successfully deploy the stack set in the same AWS Region that the Transit Gateway resides with the provided templates. Additional changes can be made to the templates using CloudFormation mappings to make this a multi region solution.
Overview of AWS Organization architecture
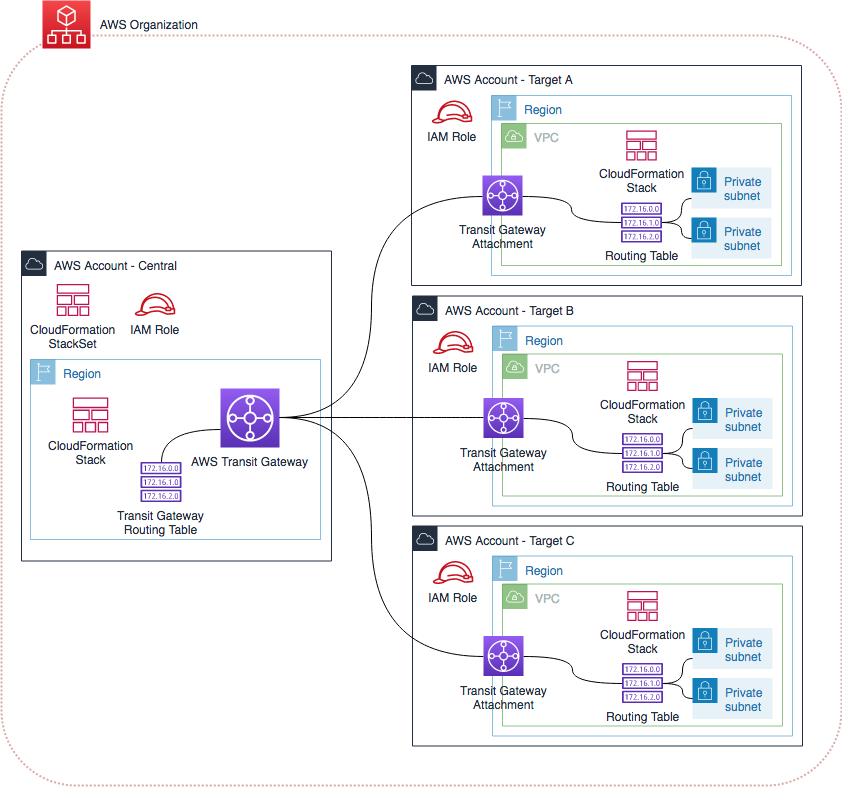
Figure 1: Architectural diagram
Using a CloudFormation template, you can create a transit gateway in a central account and then share it with your organization using AWS Resource Access Manager (AWS RAM). You then can launch a stack set that automates the creation of a transit gateway attachment.
A Lambda function gathers metadata about a VPC based on a user-provided tag value. This metadata is relevant when creating and attaching the transit gateway attachment and VPC, along with route creation to the transit gateway based on a user-provided CIDR range.
The transit gateway in the central account is configured to auto-accept peering connections and to propagate its routing table to ensure bidirectional routing.
Limitations
- Overlapping CIDR ranges– Overlapping CIDR ranges are not allowed in the transit gateway routing table. Each VPC must have a unique CIDR.
- Additional accounts–This solution works with multi-account environments. When deploying the stack set, you need an additional account to which to deploy.
- Transit gateways – You can deploy five transit gateways per Region per account. You can modify the provided templates and Lambda function to send traffic to different transit gateways based on your standards.
For more information about additional transit gateway limitations, see Limits for Your Transit Gateways.
Granting IAM permissions for stack set operations
Because stack sets perform stack operations across multiple accounts, you must have the necessary permissions defined in your AWS accounts before you can get started creating your first stack set.
In the central account, create an IAM role named AWSCloudFormationStackSetAdministrationRole. The role must have this exact name. You can do this by creating a stack from the following CloudFormation template. This role enables the following policy on your administrator account:
{
	"Version": "2012-10-17",
	"Statement": [{
		"Action": [
			"sts:AssumeRole"
		],

		"Resource": [
			"arn:aws:iam::*:roleAWSCloudFormationStackSetExecutionRole/"
		],
		"Effect": "Allow"
	}]
}
The preceding template creates the following trust relationship:
{
	"Version": "2012-10-17",
	"Statement": [{
		"Effect": "Allow",
		"Principal": {
			"Service": "cloudformation.amazonaws.com"
		},
		"Action": "sts:AssumeRole"
	}]
}
In each target account, create a service role named AWSCloudFormationStackSetExecutionRole that trusts the administrator account. The role must have this exact name. You can do this by creating a stack from the following CloudFormation template. When you use this template, provide the name of the administrator account with which your target account must have a trust relationship.
The target account service role requires permissions to perform any operations that your CloudFormation template specifies. Your target account always needs full CloudFormation permissions, which include permissions to create, update, delete, and describe stacks. Additional permissions are provided that will allow the creation and moditification of any resources needed within this post. The role created by this template enables the following policy on a target account:
{
    "Version": "2012-10-17",
    "Statement": [
        {
            "Effect": "Allow",
            "Action": [
                "iam:CreateRole",
                "lambda:CreateFunction",
                "lambda:AddPermission",
                "lambda:Invoke",
                "cloudformation:*",
                "ec2:Describe*",
                "ec2:GetTransit*",
                "ec2:SearchTransit*"
            ],
            "Resource": [
                "*"
            ]
        },
        {
            "Effect": "Allow",
            "Action": [
                "ec2:AcceptTransitGatewayVpcAttachment",
                "ec2:AssociateTransitGatewayRouteTable",
                "ec2:CreateTransitGateway",
                "ec2:CreateTransitGatewayRoute",
                "ec2:CreateTransitGatewayRouteTable",
                "ec2:CreateTransitGatewayVpcAttachment",
                "ec2:EnableTransitGatewayRouteTablePropagation",
                "ec2:ModifyTransitGatewayVpcAttachment",
                "ec2:ReplaceTransitGatewayRoute"
            ],
            "Resource": [
                "arn:aws:ec2:*:*:transit-gateway-attachment/*",
                "arn:aws:ec2:*:*:transit-gateway-route-table/*",
                "arn:aws:ec2:*:*:transit-gateway/*",
                "arn:aws:ec2:*:*:vpc/*",
                "arn:aws:ec2:*:*:subnet/*"
            ]
        }
    ]
}
The following trust relationship is created by the template. The administrator account’s ID shows as central_account_id:
{
    "Version": "2012-10-17",
    "Statement": [
        {
            "Effect": "Allow",
            "Principal": {
                "AWS": "arn:aws:iam::{central_account_id}:AWSCloudFormationStackSetExecutionRole"
            },
            "Action": "sts:AssumeRole"
        }
    ]
}
You can configure the trust relationship of an existing target account execution role to trust a specific role in the administrator account. If you delete the role in the administrator account and create a new one to replace it, you must configure your target account trust relationships with the new administrator account role, represented by central_account_id in the preceding example.
Deploying the template and configuring a resource share
In the central account in which to deploy the transit gateway, open the CloudFormation console.
On the Choose a template page, choose Upload a template file and select the provided transit-gateway.yaml file to upload. Choose Next.
On the Specify stack details page, provide a stack name along with the parameter values for the following fields:
- Amazon-Side ASN – A private Autonomous System Number (ASN) for the Amazon side of a BGP session.
- Auto Accept Share Attachments – Indicate whether to accept cross-account attachment requests
- Auto Associate Route Table Association – Enable or disable automatic association with the default association route table.
- Automatic Route Propagation – Enable or disable automatic propagation of routes to the default propagation route table.
- DNS Support – Enable or disable DNS support.
- Equal Cost Multipath Protocol – Enable or disable equal-cost multi-path protocol (ECMP). You can use the ECMP to get higher VPN bandwidth by aggregating multiple VPN connections or Direct Connect VIFs. For this example, set the option to Disable, as you are not using VPN or Direct Connect VIF connections.
At the time of publication, you cannot change or modify these parameters. To enable or disable these parameters, you must create a new transit gateway.
For this deployment, keep the default values. You can customize these values later for your own deployment.
The Configure stack options page doesn’t require you to enter any values or configuration changes. Choose Next.
On the Review page, verify your values and stack detail and choose Create stack to deploy the transit gateway.
The template takes a few minutes to deploy and reports CREATE_COMPLETE when finished.
In the VPC console, choose Transit Gateway. This page shows your deployed transit gateways and additional metadata. In the next step, you need the Transit Gateway ID.
When the transit gateway is available, you can share it across multiple accounts, an organization, and an organizational unit using AWS RAM. In this example, you share it across an organization. A significant benefit of sharing across an organization is that you can share resources without requiring the exchange of resource share invitations.
When using Organizations to share resources across an organization or organizational unit, you must enable sharing with your organization from your organization’s master account. Sharing within your organization can only be enabled by the master account. The following steps outline this process:
- Log in to the organization’s master account.
- Open the Resource Access Manager
- From the menu, choose Settings.
- Choose Enable sharing within your AWS Organization.
Log back in to the account that contains your transit gateway. In the Resource Access Manager console, choose Create resource share.
Provide a name to the resource share. For Select resource type, choose Transit Gateways. This step populates a field where you can select your transit gateway.
Under Principals, you can add the accounts, organizational units, or your organization with which to share. This step allows you to limit what accounts can view the transit gateway as an available resource to which to attach. For this example, share with the entire organization.
Choose Create resource share. Now you have a transit gateway shared with your organization. Because you shared across the organization, you don’t have to accept sharing invitations in the child accounts.
Deploying the VPC with a template in the central account as a stack set
In the central account, create and deploy a stack set. This stack set deploys CloudFormation stacks in target accounts that create a Lambda function to perform a lookup for your VPC and its associated subnets and default route table, based upon a user-provided tag value.
You can use that information to create and attach the transit gateway attachment and VPC to each other. The transit gateway attachment becomes associated with the central account transit gateway. The target VPC’s default route table populates with a configurable route with the destination to the central account transit gateway. The transit gateway’s route table then populates routes back to the target VPC.
This example deploys a Lambda function in each target account as part of the automation of transit gateway attachments. The code is in a .zip file named lambda.zip. Upload the file to an S3 bucket that allows access permissions to the child account. Amazon S3 bucket policies support the PrincipalOrg, which allows any account that originates from the same Organizations ID to access resources from with S3.
The following is a sample S3 bucket policy to allow the GetObject and ListBucket actions within your organization. Replace S3 bucket ARN and o-id with your own resource values:
{
	"Version": "2012-10-17",
	"Statement": [
		{
			"Sid": "S3AccessToTgwLambdaCode",
			"Action": [
				"s3:GetObject",
				"s3:ListBucket"
			],
			"Effect": "Allow",
			"Resource": [
				"S3 bucket ARN",
				"S3 bucket ARN/*"
			],
			"Condition": {
				"StringEquals": {
					"aws:PrincipalOrgID": "o-id"
				}
			},
			"Principal": "*"
		}
	]
}
You can modify this sample policy to allow external account access, but this example locks down the policy to your organization.
In the CloudFormation console, choose StackSets, Create StackSet.
On the Choose a template page, choose Upload a template file. Select the provided transit-gateway-association.yaml file and choose Next.
On the Specify stack details page, provide a name for the stack set along with the parameter values for the following fields, then choose Next.
- VPC Tag Value – Tag values of VPCs in your child accounts that you would like to associate with the transit gateway (comma-separated). Only the tag value is required. For example, if your tag is Name:Production, you only have to provide the value Production.
- Transit Gateway Id – ID of the central account transit gateway.
- Route Destination CIDR – Destination route for traffic to the central account transit gateway.
- S3 Bucket – S3 bucket for transit gateway attachment Lambda code.
- S3 Key – The key location of the Lambda function .zip for transit gateway attachment.
On the Configure StackSet options page, enter AWSCloudFormationStackSetExecutionRole for the IAM execution role name. This field should already have this value populated. You do not need an optional IAM admin role ARN. Choose Next.
In the Set deployment options screen, provide the account numbers or the organizational unit ID in which to deploy the solution. You can use either value depending on your use case. The benefit of selecting accounts is that you limit the deployment to the specific accounts in which to deploy. The organizational units deploy in all accounts within that organizational unit.
You can specify the Region or Regions that the solution deploys in for each account. You can also set deployment options to deploy one at a time, or increase the options to deploy in multiple accounts at the same time. However, transit gateways are Region-specific, and you must deploy the stack set in the same Region in which the transit gateway resides. You can further customize the template with multiple transit gateways in multiple Regions, which could have mappings defined to associate the correct transit gateway with the deployment Region.
After you enter the preceding information, choose Next.
On the following screen, verify your settings and choose Submit. This step begins the operation of deploying the stack set to the target account.
You can add additional accounts as stack instances by navigating to the console for the newly created stack set. Choose Actions, Add new stacks to StackSet, and repeat the preceding process.
Monitoring activity
After the stack set is running, you can log in to the target account. In the CloudFormation console, view the newly created stack. The Resources tab shows a list of created items.
To verify success, log in to a target account. In the VPC console, in the left navigation pane, choose Transit Gateway Attachments. You should see a transit gateway attachment associated with the transit gateway in the central account. You can navigate to your route tables and verify that a route is now in the VPC’s default route table with the transit gateway as the destination.
In the central account, in the VPC console, choose Transit Gateway Routes. There you can verify that there are routes back to the target VPCs.
Conclusion
The provided templates serve as a starting point to build out more complex solutions that you can integrate into your environment. You can modify the stack set to handle multiple transit gateways that could reside in different Regions or for different workloads.
You can also build logic into the CloudFormation template to handle conditions and determine which transit gateways to attach to or how to construct the route tables. This process can become part of the foundation for automating your environment and network management across multiple VPCs and AWS accounts.

Michael Coyne
Michael is a Consultant with AWS Professional Services in Dallas, Texas. He enjoys the fast-paced environment of ever-changing technology and assisting customers in creating complex technical solutions. Away from AWS, Michael can typically be found playing or building guitars and spending time with his wife and two young kiddos. He holds a BS in Computer Science from WGU.
| Blog: Using AWS Client VPN to securely access AWS and on-premises resources | ||
| Learn about AWS VPN services | ||
 |
Watch re:Invent 2019: Connectivity to AWS and hybrid AWS network architectures |