Networking & Content Delivery
Using AWS Lambda to enable static IP addresses for Application Load Balancers
Update:
On September 27th, 2021, we launched Application Load Balancer(ALB)-type target groups for Network Load Balancer (NLB). With this launch, you can register ALB as a target of NLB to forward traffic from NLB to ALB without needing to actively manage ALB IP address changes through Lambda.
You can also use AWS Global Accelerator to get static IP addresses that act as a fixed entry point to your application endpoints in a single or multiple AWS Regions, such as your Application Load Balancers, Network Load Balancers or Amazon EC2 instances. These IP addresses are announced from multiple AWS edge locations at the same time via anycast, enabling traffic to ingress onto the AWS global network as close to your users as possible.
Introduction
In August 2016, Elastic Load Balancing launched Application Load Balancer (ALB), which enable many layer 7 features for your HTTP traffic. People use Application Load Balancers because they scale automatically to adapt to changes in your traffic. This makes planning for growth easy, but it has a side effect of changing the IP addresses that clients connect to. This is normal, and it works for cases where clients can connect to any website and use best practices for resolving DNS. The issue is that clients can’t always connect to every IP address on the internet, and best practices aren’t always used. This makes using ALB tricky if you have old devices or a security-conscious network administrator. A static IP address lets you deal with these problems, and it does it without the need to update all of your clients or put in a work-around, such as running scripts to keep your firewall updated with the current IP addresses.
Fast-forward a year later to the launch of the Network Load Balancer (NLB), a layer 4 TCP load balancer. NLB enables static IP addresses for each Availability Zone. These static addresses don’t change, so they are good for our firewalls’ whitelisting. However, NLB allows only TCP traffic, no HTTPS offloading, and they have none of the nice layer 7 features of ALB.
Before now, you had to choose either the benefits of NLB or the benefits of ALB, but you couldn’t have both together. This blog post shows you how to have your cake and eat it too, by putting an Application Load Balancer behind a Network Load Balancer.
Prerequisites
Before we get into any of the setup, you need to make sure that the following prerequisites are ready:
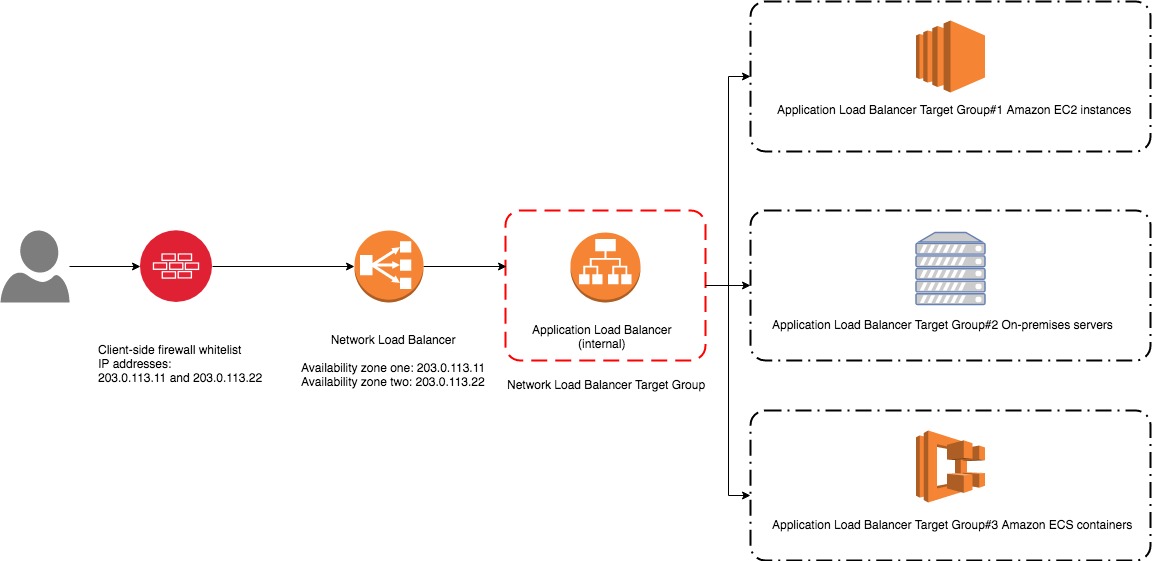
- An internal or external NLB. Use an internal NLB if your clients are inside your VPC, and use an external NLB for everything else.
- An internal Application Load Balancer. This is where your layer 7 magic happens, such as HTTPS termination fancy routing. This is where your servers will be plumbed in to receive traffic.
- Both your internal Application Load Balancer and Network Load Balancer need to be in the same Availability Zones.
- An IP-address-based target group for the NLB (target group protocol is TCP). This is where the AWS Lambda function glues the ALB to the NLB.
- An Amazon S3 bucket where we will store information such as ALB IP addresses.
- An IAM role that has an IAM policy that allows AWS Lambda to create the resources for us. (See Appendix A.)
Bringing it all together
We end up with a TCP listener on a NLB that accepts traffic and forwards it to an internal ALB. The ALB terminates TLS, examines HTTP headers, and routes requests based on your configured rules to target groups with your instances, servers, or containers. The AWS Lambda function keeps everything in sync by watching the ALB for IP address changes and updating the NLB target group. In the end we’ll have a few static IP addresses that are easy for whitelisting, and we won’t lose any of the benefits of ALB. Note that we will be sending all of the traffic through two load balancers.
Note: We’ll have to pay the cost of data processing through each load balancer, along with the hourly charges for running both load balancers, plus the cost of the Lambda function, Amazon S3, and Amazon CloudWatch, so keep that in mind when implementing this solution.
The architecture
What the Lambda function does

The steps the Lambda function takes
- Query DNS for IP addresses in use by the ALB. Upload the results (NEW IP LIST) to the S3 bucket.
- Call the describe-target-health API action to get a list of the IP addresses that are currently registered to the NLB (REGISTERED LIST).
- Download previous IP address list (OLD LIST). If it is the first invocation of the Lambda function, this IP address list is empty.
- Publish the NEW LIST to the Lambda function’s CloudWatch Logs log stream. This can be used later to search for IP addresses that were used by the ALB.
- Update the CloudWatch metric that tracks the number of the internal ALB IP addresses (created on first invocation). This metric shows how many IP addresses changed since the last run. This is useful if you want to track how many IP addresses your load balancer had over time. You can disable it by setting CW_METRIC_FLAG_IP_COUNT to “false”. Here is an example of the CloudWatch metric, showing that the number of IP addresses of the ALB changed from 20 IP addresses to 24 then to 28.

- Register IP addresses to the NLB that are in NEW LIST but missing from the OLD LIST or REGISTERED LIST.
- Deregister IP addresses in the OLD LIST that are missing from the NEW LIST.
Getting Started and setup
We’ll go over two ways to set up this solution: first, by using the AWS Management Console, and then by using AWS CloudFormation. The CloudFormation template is available here and the Lambda function zip package is available here. Let’s dive in!
Setting it up using the AWS Management Console
STEP 1: Create an IAM policy
In the IAM console, create an IAM policy with the permissions required by the Lambda function. You can find the sample IAM policy in Appendix A. To learn more, see the documentation for Creating IAM Policies. To learn how to create an IAM role for AWS Lambda see the documentation for Creating a Role for an AWS Service (Console).


STEP 2: Create an IAM role
After the IAM policy is ready, create an IAM role and attach the IAM policy that we created in Step 1.


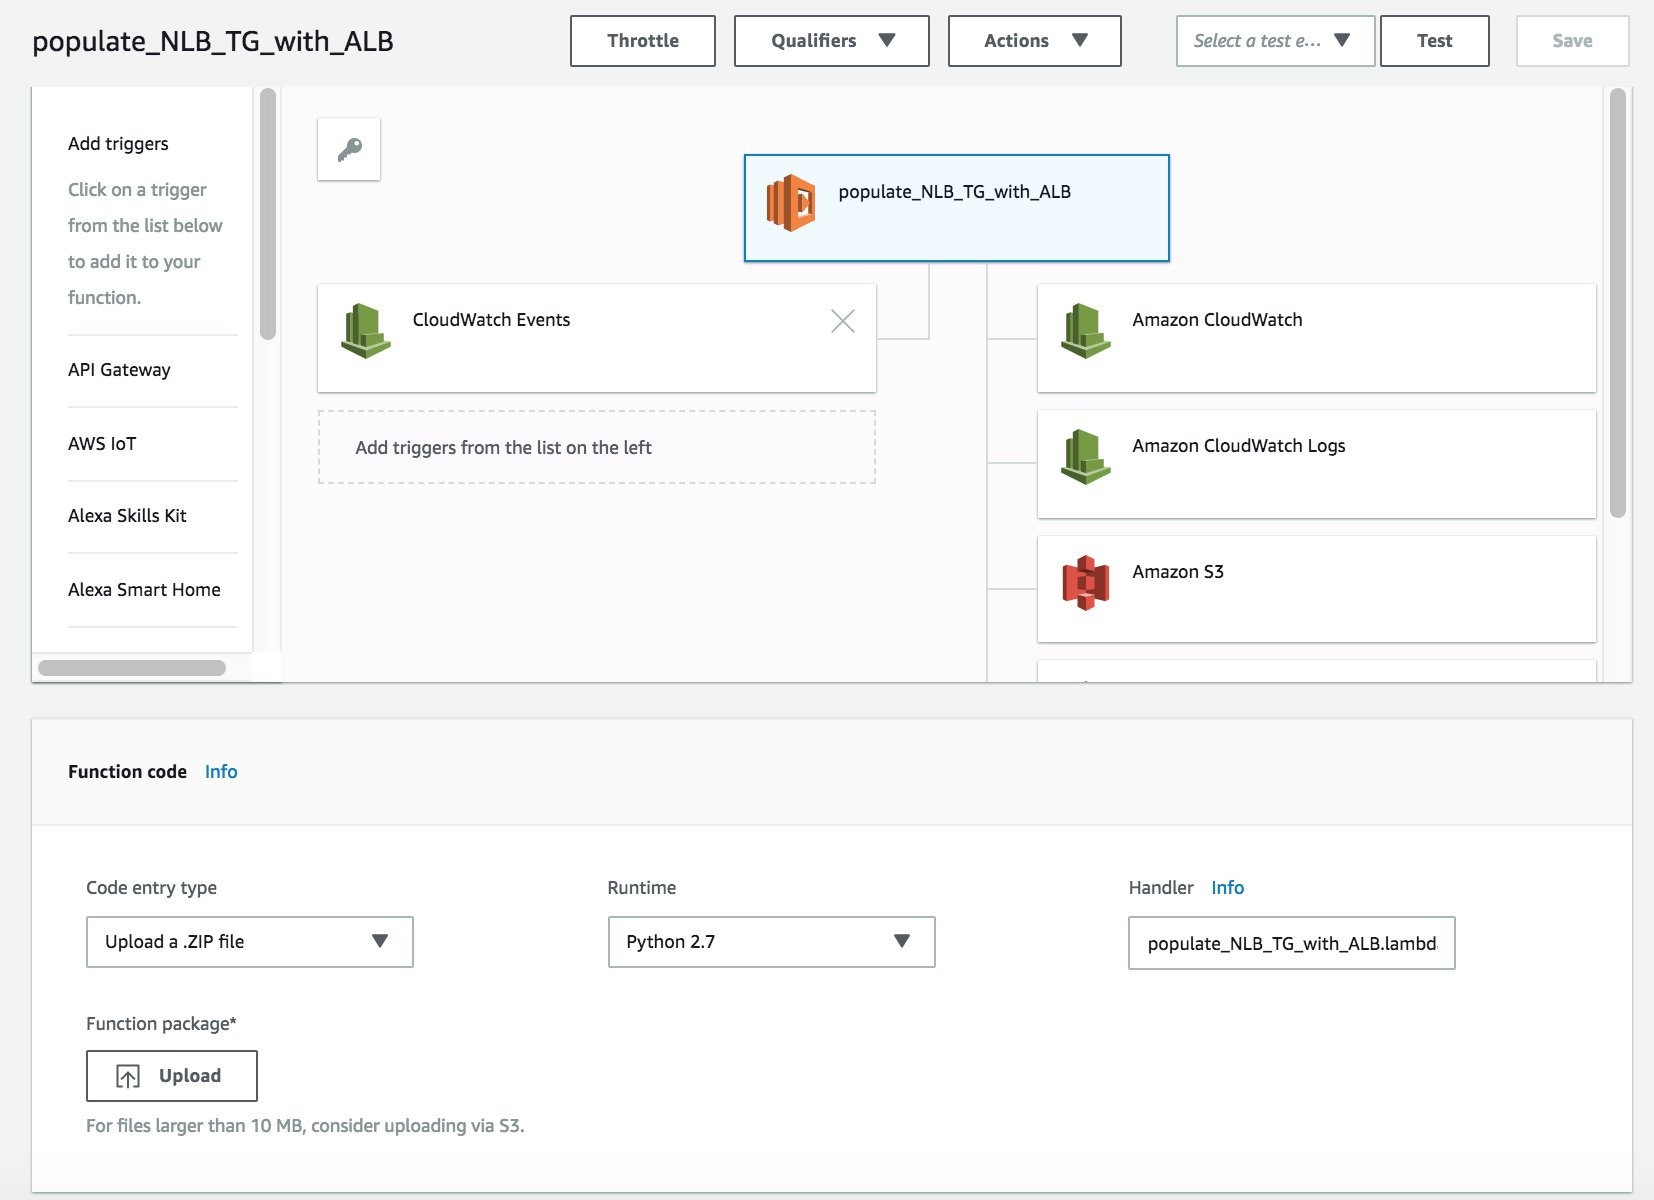
STEP 3: Create a Lambda function
Now we have an IAM role for our Lambda function to assume. In the AWS Lambda console, create the Lambda function. While creating the function, we need to make sure the IAM role that was created in Step 2 is selected and the Runtime environment is set to Python3.8.

STEP 4: Configure the Lambda function
Change the handler name to “populate_NLB_TG_with_ALB.lambda_handler” so that AWS Lambda can pick up the Python file that contains the function code. After that, click the “Upload” button and upload the Lambda function zip file.
STEP 5: Set up the Lambda environment variables
After we see the function code on the Lambda console, add the following environment variables to the Lambda function to let it populate Network Load Balancer’s target group with Application Load Balancer IP addresses.

- ALB_DNS_NAME – the full DNS name (FQDN) of the ALB
- ALB_LISTENER – The traffic listener port of the ALB
- S3_BUCKET – Bucket to track changes between Lambda invocations
- NLB_TG_ARN – The ARN of the NLBs target group
- MAX_LOOKUP_PER_INVOCATION – The max times of DNS look per invocation. The default value is 50 in the CloudFormation template.
- INVOCATIONS_BEFORE_DEREGISTRATION – Then number of required Invocations before an IP address is deregistered. The default value is 3 in the CloudFormation template.
- CW_METRIC_FLAG_IP_COUNT – The controller flag that enables the CloudWatch metric of the IP address count. The default value is “True” in the CloudFormation template.
- SAME_VPC – The indicator flag to tell Lambda if the Network Load Balancer and the internal Application Load Balancer are in the same VPC. The default value is “True” in the CloudFormation template.
A single DNS lookup for a load balancer will only return up to eight IP addresses. So, if you have an ALB that has more than eight IP addresses, you need to perform multiple DNS queries to be sure you have all of the addresses. To achieve this we provide two environment variables MAX_LOOKUP_PER_INVOCATION and INVOCATIONS_BEFORE_DEREGISTRATION.
MAX_LOOKUP_PER_INVOCATION gives us the option to define how many DNS lookups the Lambda function performs if there are more than 8 IP addresses in the first DNS response. The default value is set to 50. The higher this is, the more likely you will have all of the addresses. In our testing we found that the vast majority of the time all IP addresses were returned within 20-40 queries. We suggest starting here and tuning if you observe IP addresses missing from results.
INVOCATIONS_BEFORE_DEREGISTRATION lets you configure the number of times an IP address can not be in the DNS results before we will deregister it. In normal operation, the IP address of an ALB continues to be available after it is removed from DNS for a short period. The NLB health check will detect failed ALB IP addresses if we miss one, so immediately de-registering is not a risk to our traffic. The default value is set to 3, which causes an ALB IP address to be deregistered only after it is missing from the DNS result for 3 minutes.
In our testing, the Lambda function rarely takes more than 1 minute to run. We set the timeout to 5 minutes to give it enough time to run. More information about how to configure your Lambda function is available in the documentation at Configure Your Lambda Function.

STEP 6: Create a CloudWatch Event
After we create the Lambda function, the next step is to open the CloudWatch console, create a CloudWatch Event, and configure it to trigger the Lambda function that we just created.

STEP 7: Configure the CloudWatch Event
On the CloudWatch Event console, set the job to run at a fixed rate of 1 time per minute. On the left side, we select the Lambda function as the target of the event.

After the configuration is ready, go ahead and save the CloudWatch Event rule.

Setting it up using AWS CloudFormation
We created a CloudFormation template for setting up this utility to register and deregister an Application Load Balancer as a target of a Network Load Balancer. The template creates the following AWS resources:
- A Lambda function
- An IAM policy and role for the Lambda function
- A CloudWatch Event
In the CloudFormation console, the following Launch Stack button launches the template in the US East (N. Virginia) Region in your account.
![]()
Verification
Let’s go over the following steps to verify that the solution is working:
- Verify if your site works by using the DNS name of the NLB or the IP address on the listening port. For example, if your NLB listens on port 80, we can run the following command to check if we can get your site page back from a Linux client.
curl http://yourNLB-DNS.elb.us-east-1.amazonaws.com
- Verify that the Lambda function populates IP addresses to the NLB’s target group and that the IP address targets are in a healthy state.

- After we see healthy IP address targets in the NLB’s target group, we can verify that the CloudWatch metric has the same IP address count. If you disabled the CloudWatch metric, skip this step.

- Confirm that the IP addresses are in the CloudWatch log.

- After you confirm that everything is working as expected, you can create a weight-based CNAME DNS record set to map your own DNS name to NLB’s DNS name in Amazon Route 53 and start shifting traffic gradually from the existing stack to the newly created NLB-ALB stack. The source stack remains fully operational during the migration, and you can always roll back the change to use the previous stack. More information about the weight based DNS record in Route53 is available in the documentation for Weighted Routing.
Notes
- The finest resolution using a cron expression is a minute, and it is the default configuration in the provided CloudFormation template. You can always adjust it based on your use case.
- AWS service costs apply to the resources created by the CloudFormation template, which will include the following:
- Lambda function
- Amazon S3 storage and access
- CloudWatch metric
- CloudWatch log
- The internal ALB appends the NLB’s private IP address in the X-Forwarded-For header before sending to a request to the backend targets. Therefore, if the requests from the clients contain X-Forwarded-For header, the backend targets will see the clients’ actual IP addresses along with the private IP address of the NLB in the X-Forwarded-For header. Otherwise, the backend targets will only see the NLB’s private IP address in the X-Forwarded-For header.
- You can also use Amazon VPC Flow Logs for traffic sent through your NLB, or use a client-side method to track the clients’ IP addresses.
- Network Load Balancer has a default idle timeout of 350 seconds, so you need to configure your Application Load Balancer to have an idle timeout of less than 350 seconds, otherwise connections may be timed out by the NLB.
- Be sure to test this solution before you use it in production!
— Long;
Appendix A – IAM policy
{

"Version": "2012-10-17",

"Statement": [

{

"Action": [

"logs:CreateLogGroup",

"logs:CreateLogStream",

"logs:PutLogEvents"

],

"Resource": [

"arn:aws:logs:*:*:*"

],

"Effect": "Allow",

"Sid": "LambdaLogging"

},

{

"Action": [

"s3:Get*",

"s3:PutObject",

"s3:CreateBucket",

"s3:ListBucket",

"s3:ListAllMyBuckets"

],

"Resource": "*",

"Effect": "Allow",

"Sid": "S3"

},

{

"Action": [

"elasticloadbalancing:Describe*",

"elasticloadbalancing:RegisterTargets",

"elasticloadbalancing:DeregisterTargets"

],

"Resource": "*",

"Effect": "Allow",

"Sid": "ELB"

},

{

"Action": [

"cloudwatch:putMetricData"

],

"Resource": "*",

"Effect": "Allow",

"Sid": "CW"

}

]

}
About the Author

| Blog: Using AWS Client VPN to securely access AWS and on-premises resources | ||
| Learn about AWS VPN services | ||
 |
Watch re:Invent 2019: Connectivity to AWS and hybrid AWS network architectures |