AWS Open Source Blog
Best Practices for Running Ansys Fluent Using AWS ParallelCluster
Using HPC (high performance computing) to solve Computational Fluid Dynamics (CFD) challenges has become common practice. As the growth from HPC workstation to supercomputer has slowed over the last decade or two, compute clusters have increasingly taken the place of single, big SMP (shared memory processing) supercomputers, and have become the ‘new normal’. Another, more recent innovation, the cloud, has also enabled dramatic growth in total throughput.
This post will show you best good practices for setting up an HPC cluster on AWS running Ansys Fluent (a commercial computational fluid dynamics software package) in just a few minutes. In addition, you will find some sample scripts to install Ansys Fluent and run your first job. ‘Best guidance’ is a relative term, and in the cloud even more so, as there are many possibilities (aka services) that can be combined in different ways to achieve the same goal. Whether one option is better than another can only be decided in the context of the specific application characteristics or application features to be used. For example, “a high performance parallel file system (Amazon FSx) is better than NFS share” is true for the vast majority of HPC workloads, but there could be cases (like !I/O-intensive applications, or small HPC clusters created to run few and/or small jobs) where NFS share is more than enough, and it’s cheaper and simpler to set up. In this post we will share what we consider best good practices, together with some additional options – valid alternatives that you may wish to consider.
The main cluster components we will use are the following AWS services:
- AWS ParallelCluster, an AWS-supported open source cluster management tool to deploy and manage HPC clusters in the AWS cloud.
- The new Amazon EC2 C5n instances that can use up to 100 Gbps of network bandwidth.
- Amazon FSx for Lustre , a highly parallel file system that supports sub-millisecond access to petabyte-scale file systems, designed to deliver 200 MB/s of aggregate throughput at 10,000 IOPS for every 1TiB of provisioned capacity.
- Nice DCV as the remote visualization protocol.
Note: We announced Elastic Fabric Adapter (EFA) at re:Invent 2018, and have recently launched the service in multiple AWS regions. EFA is a network device that you can attach to your Amazon EC2 instances to accelerate HPC applications, providing lower and more consistent latency and higher throughput than the TCP transport traditionally used in cloud-based HPC systems. It enhances the performance of inter-instance communication critical for scaling HPC applications, and is optimized to work on the existing AWS network infrastructure. Ansys Fluent is not yet ready for use with EFA, so the use of this specific network device will not be extensively covered in this post.
Note: ANSYS Fluent is a commercial software package that requires a license. This post assumes that you already have your Ansys Fluent license on (or accessible from) AWS. Also, the installation script you will find below requires Ansys installation packages. You can download the current release from Ansys under “Downloads → Current Release”.
First step: Create a Custom AMI
To speed up cluster creation and, most importantly, to shorten the time needed to start up the compute nodes, it’s good practice to create a custom AMI that has certain packages preinstalled and settings pre-configured.
- Start based on an existing AMI and note down the AMI id appropriate to the region where you plan to deploy your cluster; see our list of AMIs by region. For example, we started with CentOS7 in Virginia (us-east-1), and the AMI ID is
ami-0a4d7e08ea5178c02. - Open the AWS Console and launch an instance in your preferred region (the same you chose your AMI from), using the ami-id as before.
- Make sure that your instance is accessible from the internet and has a public IP address.
- Give the instance an IAM role that allows it to download files from S3 (or from a specific S3 bucket).
- Optionally, tag the instance. (i.e., Name = Fluent-AMI-v1)
- Configure the security group to allow incoming connections on port 22.
- If you need additional details on how to create a custom AMI for AWS ParallelCluster, please refer to Building a custom AWS ParallelCluster AMI. the official documentation.
- Once the instance is ready, ssh into it and run the following commands as root:
Now you can create your AMI via the AWS CLI (or the AWS Web Console):
The output would be something like:
Note down the AMI id. It will be used later in the AWS ParallelCluster configuration file.
Create / reuse the VPC, subnet, and security group
Next, create or reuse an existing VPC. Note the vpc-ID and the subnet-ID. More information on how to create and configure your vpc for AWS ParallelCluster is available in Network Configurations.
You can either use a single subnet for both master and compute instances, or two subnets: master in one public subnet and compute instances in a private subnet.
The configuration file below shows how to run your cluster in a single subnet, as shown in this architecture diagram:
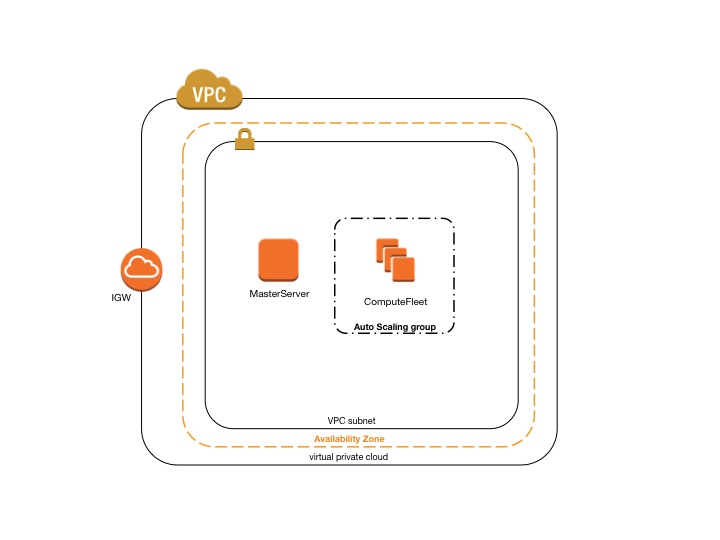
Also create an ad-hoc security group that has port 8443 open. This will be used to allow incoming connection to the master node using NICE DCV as a remote desktop streaming protocol.
Create the cluster configuration file and the post-install script
Now you can start writing your configuration file. Open a text file on your local PC and paste in the code below. (This is an example; you may want to modify some parameters according to your preferences. You will also need to replace the <XXX> placeholders for your own setup.)
Let’s dive deep into some of the settings of this configuration:
- aws_region_name = choosing the proper AWS Region is very important for the usability of your Remote Desktop session: the closer you are geographically to the selected region, the lower the network latency – usability and interactivity will be improved. If you are unsure which is your closest AWS region, use this simple CloudPing service to determine which region gives you the lowest latency.
- initial_queue_size=0 . This setting is used to define the initial size of your cluster. In this case it is 0 (you are free to change it accordingly to your needs). 0 means that when you first submit a job, your job will be queued in the pending state. It then moves to the running state as nodes are added to the cluster. AWS ParallelCluster by default will look at the scheduler queue every five minutes and add (or remove) nodes depending on the number of slots needed to run the pending jobs.
- compute_instance_type = c5n.18xlarge. This setting is used to define the instance type for the compute nodes of your cluster. This configuration file shows c5n.18xlarge. This is – at the time of writing – the most suitable instance for tightly-coupled workloads. C5n.18xlarge has the best price/performance ratio, as well as an optimal memory/core ratio and – very important – it is ready for EFA. Other suitable instances are (the newest) c5.24xlarge and c4.8xlarge – both are similarly priced, but do not support for EFA. If you want to build your mesh and need a higher memory/core ratio, m5.24xlarge or r5.24xlarge are good candidates, but at a different cost. Finally, z1d.12xlarge instances deliver the highest performance thanks to a custom Intel® Xeon® Scalable processor with a sustained all-core frequency of up to 4.0 GHz, the fastest of any cloud instance. Regardless of the instance type, our recommendation is to always choose the biggest size for every instance type. Very often, the scalability of tightly-coupled workloads is constrained by the network bandwidth (and the latency), so using the biggest size for your instances will reduce inter-node communication by using as many cores as possible from every single instance.
- master_instance_type = g3.4xlarge. This setting is used to define the instance type for the master node (or login node) of your cluster. In this example, we chose an instance equipped with a GPU (Nvidia M60) because we also want to post-process our data after the job is completed. Post-processing applications usually require a GPU to render heavy 3D images. If you won’t need to do any post-processing (or your post-process does not require a GPU), you could choose the same instance type as the compute nodes (maybe just a smaller size), or you could choose an instance type suitable for building your mesh (m5.24xlarge or r5.24xlarge).
- placement_group = DYNAMIC and placement = compute together are used to tell AWS that we want to use the cluster placement groups and that only the compute nodes need to be on the same placement group; the master does not. It’s a good practice to also have the master node in the same placement group when an NFS share is enabled, latency between the compute nodes and the master needs to be low. In our example, we are not using NFS share but FSx.
- extra_json = { “cluster” : {“cfn_scheduler_slots” : “cores” } } This, together with the “for” cycle you can see at the beginning of the post-install script below, is used to disable hyper-threading. The vast majority of HPC applications do not benefit from hyper-threading. However, if you disable hyper-threading without this line, SGE will not be able to correctly map slot to cores.
- custom_ami = ami-<AMI-ID> This setting will tell AWS ParallelCluster to use the AMI you created previously.
- [fsx parallel-fs] This section contains the settings to define your parallel high performance file system based on FSx .
- post_install = s3://<Your-S3-Bucket>/fluent-post-install.sh. This setting defines the location of a script that runs on all instances right after they have been created. Below is an example script tuned for this use case; feel free to use as it is or modify as needed:
Note: Replace the placeholder <YourPassword> with your own password. This password will be only used for connecting via NICE DCV. In order to connect via ssh, you still need to use the private key defined in the configuration file.
Note: Some of the services mentioned so far, FSx and C5n in particular, are extremely new services and their availability may be limited to a subset of regions. Please check the Region Table to see whether your preferred region has all the services needed. If C5n is not available, opt for C4.8xlarge or C5.18xlarge. If FSx is not available, use NFS share over EBS. Below is a sample code snippet to enable NFS share over an IO1 volume type. IO1 is an I/O-intensive, high-performance SSD volume designed to deliver a consistent baseline performance of up to 50 IOPS/GB (to a maximum of 64,000 IOPS) and provide up to 1,000 MB/s of throughput per volume (i.e., with one 1TB you can provision up to 50,000 IOPS ). You may also consider GP2 as a lower-cost alternative that offers single-digit millisecond latencies, delivers a consistent baseline performance of three IOPS/GB (minimum 100 IOPS) to a maximum of 16,000 IOPS, and provides up to 250 MB/s of throughput per volume. Learn more under EBS in the ParallelCluster documentation.
You also need to comment out the fsx_setting parameter:
and replace it with:
When using NFS, be mindful that it has limited scalability; FSx is particularly useful when thousands of clients need to access the file system simultaneously. (Not an unusual situation if you plan to run several jobs each one using multiple nodes.)
Deploy your first cluster
Now that you have in place all the basic components to create your first AWS ParallelCluster for Ansys Fluent, you just need to upload the post-install script into your S3 bucket:
Note: Make sure that you upload the post-install script into the bucket you specified on the configuration file.
Once the post-install script is uploaded, you can create the cluster by running the command below, using the ParallelCluster configuration file defined previously:
Note: If this is your first test with AWS ParallelCluster and you need additional instruction on how to get started, you can refer to this blog post on getting started with ParallelCluster , and/or to the AWS ParallelCluster documentation.
Install Ansys Fluent
It is now time to connect to the master node of your cluster and install the Ansys suite. You will need to use the public IP address found in the output of the previous command.
You can connect to the master node using SSH and/or DCV.
- via SSH:
ssh -i /path/of/your/ssh.key centos@<public-ip-address> - via DCV: open the browser and connect to
https://<public-ip-address>:8443you can use “centos” as username and the password you have defined on the post-install script.
Once you are logged in, become root (sudo su - or sudo -i ) and install the Ansys suite under the /fsx directory. You can install it manually, or you can use the sample script below.
Note: We have defined the import_path = s3://<Your-S3-Bucket> in the FSx section of the configuration file. This tells FSx to preload all the data from <Your-S3-Bucket>. We recommend copying the Ansys installation files, as well as any other file or package you may need, to S3 in advance, so that all these files will be available for you under the /fsx directory of your cluster. The example below uses the Ansys iso installation files. You can use either the tar or the iso file; both can be downloaded from the Ansys website under “Download → Current Release”.
Note: If you decided to use the EBS shared option instead of FSx, once the installation of Ansys is completed, you may want to create a snapshot of your EBS volume so you can re-use it in another cluster. You can create the snapshot via web console:
- Open the Amazon EC2 console.
- Choose Snapshots in the navigation pane.
- Choose Create Snapshot.
- On the Create Snapshot page, select the volume to create a snapshot for.
- (Optional) Choose Add tags to your snapshot. For each tag, provide a tag key and a tag value.
- Choose Create Snapshot.
Or via the CLI:
If you want to re-use an existing snapshot, add the following parameter in the “ebs” section of your AWS ParallelCluster configuration file:
For more information, see Amazon EBS Snapshots.
Run your first Ansys Fluent job
Finally, you can run your first job by submitting the following script via qsub. Here’s an example of how to run a job using 14 C5n.18xlarge instances: qsub -pe mpi 360 /fsx/ansys-run.sh
ansys-run.shcan be something like:
Note: you may want to copy on S3 the benchmark file f1_racecar_140m.tar.gz or any other dataset you want to use, so that it’s preloaded on FSx and ready for you to use.
Conclusion
Even though this post will primarily focus on installing, setting up, and running Ansys Fluent, similar practices can be applied to run other CFD applications, as well as other applications that leverage the message passing interface (MPI) standard, such as OpenMPI or Intel-MPI. We are happy to help you by running those HPC applications on AWS on your behalf and then sharing with you our best practices, so feel free to submit your requests either via the AWS Docs GitHub repo or email.
Finally, don’t forget that AWS ParallelCluster is a community-driven project. We encourage everyone to submit pull requests or provide feedback through GitHub issues. Users’ feedback is extremely important for AWS as it drives the development of each and every service and feature!