AWS Security Blog
How to seamlessly domain join Amazon EC2 instances to a single AWS Managed Microsoft AD Directory from multiple accounts and VPCs
You can now share a single AWS Directory Service for Microsoft Active Directory (also known as an AWS Managed Microsoft AD) with multiple AWS accounts within an AWS Region. This capability makes it easier and more cost-effective for you to manage directory-aware workloads from a single directory across accounts and Amazon Virtual Private Clouds (Amazon VPC). Instead of needing to manually domain join your Amazon Elastic Compute Cloud instances (EC2 instances) or create one directory per account and VPC, you can use your directory from any AWS account and from any VPC within an AWS Region.
In this post, I show you how to launch two EC2 instances, each in a separate Amazon VPC within the same AWS account (the directory consumer account), and then seamlessly domain-join both instances to a directory in another account (the directory owner account). You’ll accomplish this in four steps:
- Create an AWS Managed Microsoft AD directory.
- Establish networking connectivity between VPCs.
- Share the directory with the directory consumer account.
- Launch Amazon EC2 instances and seamlessly domain join to the directory.
Solution architecture
The following diagram shows the steps you’ll follow to use a single AWS Managed Microsoft AD in multiple accounts. Note that when you complete Step 3, AWS Microsoft Managed AD will create a shared directory in the directory consumer account. The shared directory contains the metadata that enables the EC2 seamless domain join to locate the directory in the directory owner account. Note that there are additional charges for directory sharing.
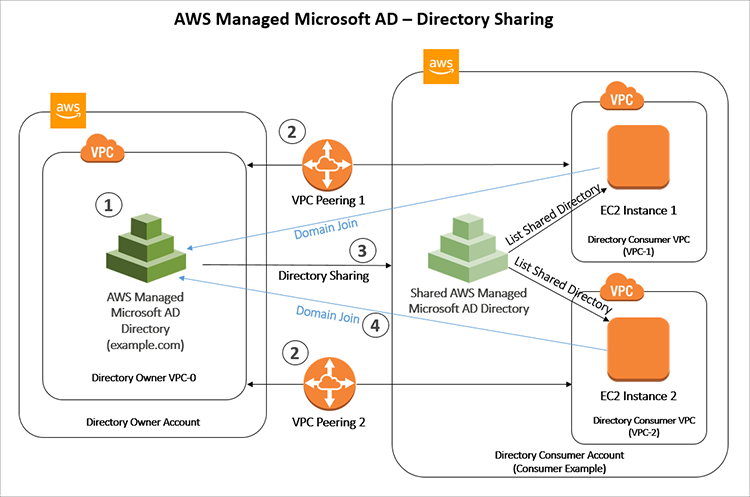
Figure 1: Architecture diagram showing directory sharing
Step 1: Create an AWS Microsoft AD directory
First, follow the steps to create an AWS Microsoft AD directory in your directory owner AWS Account and Amazon VPC. In the examples I use throughout this post, my domain name is example.com, but remember to replace this with your own domain name.
When you create your directory, you’ll have the option in Step 3: Choose VPC and subnets to choose the subnets in which to deploy your domain controllers. AWS Microsoft AD ensures that you select subnets from different Availability Zones. In my example, I have no subnet preference, so I choose No Preference from the Subnets drop-down list.
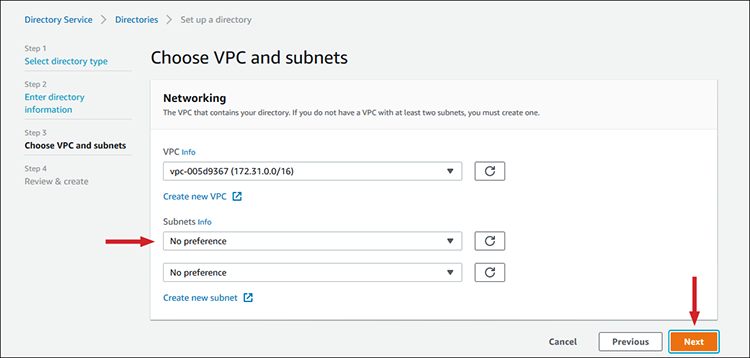
Figure 2: Selecting Subnet preference
Select Next to review your configuration, and then select Create directory. It can take 20-45 minutes for the directory creation process to finish. While AWS Managed Microsoft AD creates the directory, you can move on to the next step.
Step 2: Establish networking connectivity between VPCs
To domain join your Amazon EC2 instances to your directory, you need to establish networking connectivity between the VPCs. There are multiple methods of establishing networking connectivity between two VPCs. In this post, I’ll show you how to use Amazon VPC peering by performing the following steps:
- Create one VPC peering connection between the directory owner VPC-0 and directory consumer VPC-1, then create another connection between the directory owner VPC-0 and directory consumer VPC-2. For reference, here are my own VPC details:
VPC CIDR block Directory owner VPC-0 172.31.0.0/16 Directory consumer VPC-1 10.0.0.0/16 Directory consumer VPC-2 10.100.0.0/16 - Enable traffic routing between the peered VPCs by adding a route to your VPC route table that points to the VPC peering connection to route traffic to the other VPC in the peering connection. I’ve configured my directory owner VPC-0 route table by adding the following VPC peering connections:
Destination Target 172.31.0.0/16 Local 10.0.0.0/16 pcx-0 10.100.0.0/16 pcx-1 - Configure each of the directory consumer VPC route tables by adding the peering connection with the directory owner VPC-0. If you want, you can also create and attach an Internet Gateway to your directory consumer VPCs. This enables the instances in the directory consumer VPCs to communicate with the AWS System Manager (SSM) agent that performs the domain join. Here are my directory consumer VPC route table configurations:
VPC-1 route table:Destination Target 10.0.0.0/16 Local 172.31.0.0/16 pcx-0 0.0.0.0/0 igw-0 VPC-2 route table:
Destination Target 10.100.10.10/16 Local 172.31.0.0/16 pcx-1 0.0.0.0/0 igw-1 - Next, configure your directory consumer VPCs’ security group to enable outbound traffic by adding the Active Directory protocols and ports to the outbound rules table.
Step 3: Share the directory with the directory consumer account
Now that your networking is in place, you must make your directory visible to the directory consumer account. You can accomplish this by sharing your directory with the directory consumer account. Directory sharing works at the account level, which also makes the directory visible to all VPCs within the directory consumer account.
AWS Managed Microsoft AD provides two directory sharing methods: AWS Organizations and Handshake:
- AWS Organizations makes it easier to share the directory within your organization because you can browse and validate the directory consumer accounts. To use this option, your organization must have all features enabled, and your directory must be in the organization master account. This method of sharing simplifies your setup because it doesn’t require the directory consumer accounts to accept your directory sharing request.
- Handshake enables directory sharing when you aren’t using AWS Organizations. The handshake method requires the directory consumer account to accept the directory sharing request.
In my example, I’ll walk you through the steps to use AWS Organizations to share a directory:
- Open the AWS Management Console, then select Directory Service and select the directory you want to share (in my case, example.com). Select the Actions button, and then the Share directory option.
- Select Share this directory with AWS accounts inside your organization, then choose the Enable Access to AWS Organizations button. This allows your AWS account to list all accounts in your Organizations in the AWS Directory Service console.
- Select your directory consumer account (in my example, Consumer Example) from the Organization accounts browser, then select the Add button.

Figure 3: Select the account and then select “Add”
- You should now be able to see your directory consumer account in the Selected Accounts table. Select the Share button to share your directory with that account:

Figure 4: Selected accounts and the “Share” button
To share your directory with multiple directory consumer accounts, you can repeat steps 3 and 4 for each account.When you’re finished sharing, AWS Managed Microsoft AD will create a shared directory in each directory consumer account. The shared directory contains the metadata to locate the directory in the directory owner account. Each shared directory has a unique identifier (Shared directory ID). After you’ve shared your directory, you can find your shared directory IDs in the Scale & Share tab in the AWS Directory Service console. In my example, AWS Managed Microsoft AD created the shared directory ID d-90673f8d56 in the Consumer Example account:

Figure 5: Confirmation notification about successful sharing
You can see the shared directory details in your directory consumer account by opening the AWS Management Console, choosing Directory Service, selecting the Directories shared with me option in the left menu, and then choosing the appropriate Shared directory ID link:

Figure 6: Shared account details example
Step 4: Launch Amazon EC2 instances and seamlessly domain join to the directory
Now that you’ve established the networking between your VPCs and shared the directory, you’re ready to launch EC2 instances in your directory consumer VPCs and seamlessly domain join to your directory. In my example, I use the Amazon EC2 console but you can also use AWS Systems Manager.
Follow the prompts of the Amazon EC2 launch instance wizard to select a Windows server instance type. When you reach Step 3: Configure Instance Details, select the shared directory that locates your domain in the directory owner account. (I’ve chosen d-926726739b, which will locate the domain example.com.) Then select the EC2DomainJoin IAM role. Choose the Review and Launch button, and then the Launch button on the following screen.
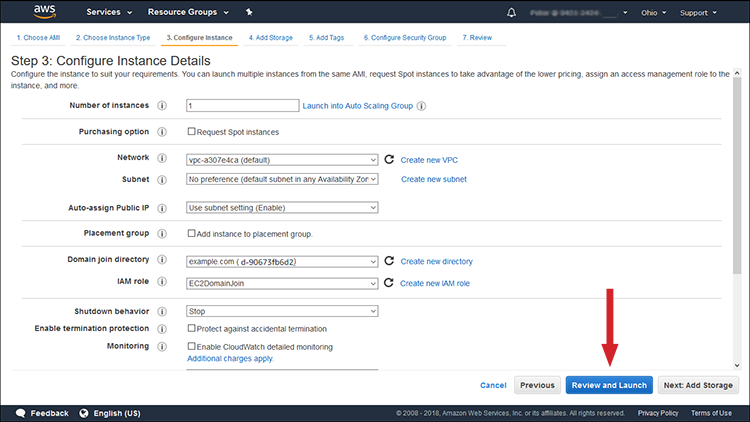
Figure 7: The “Review and Launch” button
Now that you’ve joined your Amazon EC2 instance to the domain, you can log into your instance using a Remote Desktop Protocol (RDP) client with the credentials from your AD user account.
You can then install and run AD-aware workloads such as Microsoft SharePoint on the instance, and the application will use your directory. To launch your second instance, just repeat Step 4: Launch Amazon EC2 instances and seamlessly domain join to the directory, selecting the VPC-2 instead of VPC-1. This makes it easier and quicker for you to deploy and manage EC2 instances using the credentials from a single AWS Managed Microsoft AD directory across multiple accounts and VPCs.
Summary
In this blog post, I demonstrate how to seamlessly domain join Amazon EC2 instances from multiple accounts and VPCs to a single AWS Managed Microsoft AD directory. By sharing the directory with multiple accounts, you can simplify the management and deployment of directory-aware workloads on Amazon EC2 instances. This eliminates the need to manually domain join the instances or create one directory per account and VPC. In addition, with AWS Managed Microsoft AD and AWS Systems Manager, you can automate your Amazon EC2 deployments and seamlessly domain join to your single directory from any account and VPC without the need to write PowerShell code using AWS Command Line Interface or application programming interfaces.
To learn more about AWS Directory Service, see the AWS Directory Service home page. If you have questions, post them on the Directory Service forum.
Want more AWS Security news? Follow us on Twitter.