AWS Security Blog
How to query and visualize Macie sensitive data discovery results with Athena and QuickSight
February 21, 2023: We’ve updated the CREATE TABLE DDL to add the new originType field introduced as part of the Automated Sensitive Data Discovery feature of Macie.
Amazon Macie is a fully managed data security service that uses machine learning and pattern matching to help you discover and protect sensitive data in Amazon Simple Storage Service (Amazon S3). With Macie, you can analyze objects in your S3 buckets to detect occurrences of sensitive data, such as personally identifiable information (PII), financial information, personal health information, and access credentials.
In this post, we walk you through a solution to gain comprehensive and organization-wide visibility into which types of sensitive data are present in your S3 storage, where the data is located, and how much is present. Once enabled, Macie automatically starts discovering sensitive data in your S3 storage and builds a sensitive data profile for each bucket. The profiles are organized in a visual, interactive data map, and you can use the data map to run targeted sensitive data discovery jobs. Both automated data discovery and targeted jobs produce rich, detailed sensitive data discovery results. This solution uses Amazon Athena and Amazon QuickSight to deep-dive on the Macie results, and to help you analyze, visualize, and report on sensitive data discovered by Macie, even when the data is distributed across millions of objects, thousands of S3 buckets, and thousands of AWS accounts. Athena is an interactive query service that makes it simpler to analyze data directly in Amazon S3 using standard SQL. QuickSight is a cloud-scale business intelligence tool that connects to multiple data sources, including Athena databases and tables.
This solution is relevant to data security, data governance, and security operations engineering teams.
The challenge: how to summarize sensitive data discovered in your growing S3 storage
Macie issues findings when an object is found to contain sensitive data. In addition to findings, Macie keeps a record of each S3 object analyzed in a bucket of your choice for long-term storage. These records are known as sensitive data discovery results, and they include additional context about your data in Amazon S3. Due to the large size of the results file, Macie exports the sensitive data discovery results to an S3 bucket, so you need to take additional steps to query and visualize the results. We discuss the differences between findings and results in more detail later in this post.
With the increasing number of data privacy guidelines and compliance mandates, customers need to scale their monitoring to encompass thousands of S3 buckets across their organization. The growing volume of data to assess, and the growing list of findings from discovery jobs, can make it difficult to review and remediate issues in a timely manner. In addition to viewing individual findings for specific objects, customers need a way to comprehensively view, summarize, and monitor sensitive data discovered across their S3 buckets.
To illustrate this point, we ran a Macie sensitive data discovery job on a dataset created by AWS. The dataset contains about 7,500 files that have sensitive information, and Macie generated a finding for each sensitive file analyzed, as shown in Figure 1.
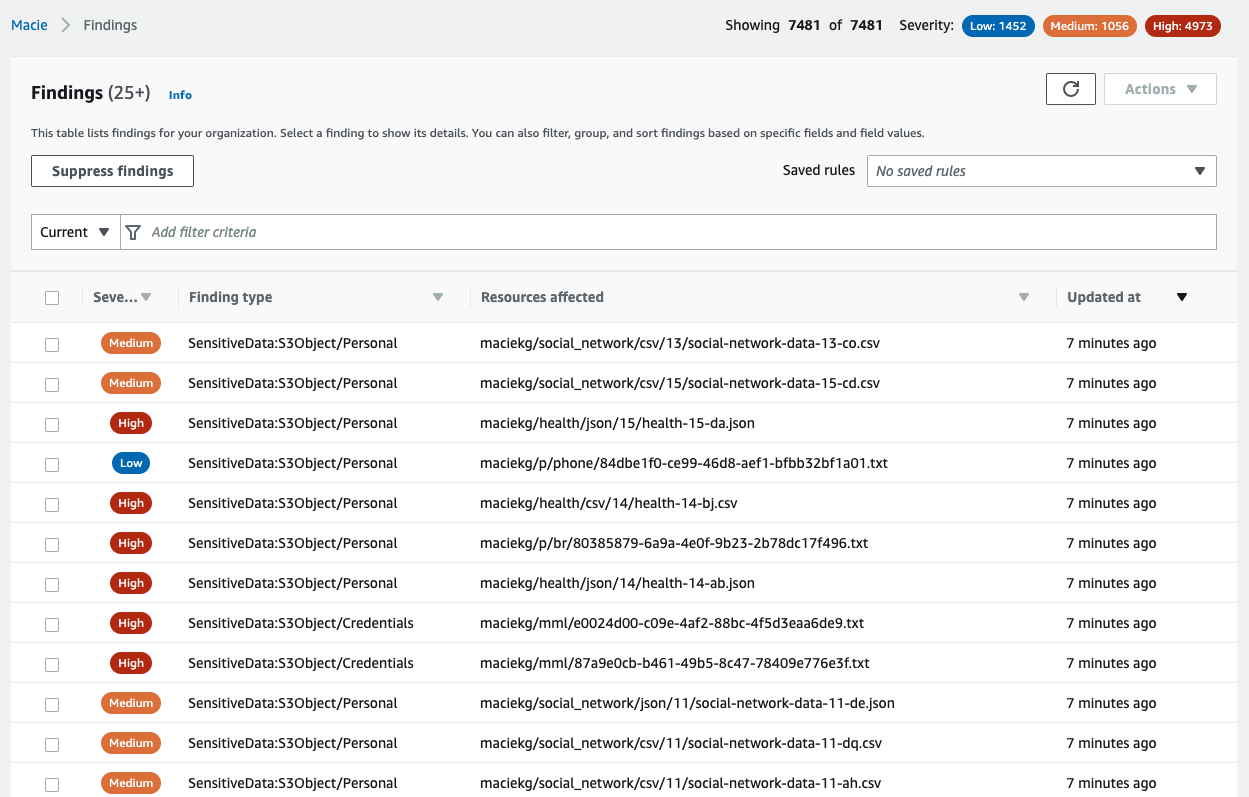
Figure 1: Macie findings from the dataset
Your security team could spend days, if not months, analyzing these individual findings manually. Instead, we outline how you can use Athena and QuickSight to query and visualize the Macie sensitive data discovery results to understand your data security posture.
The additional information in the sensitive data discovery results will help you gain comprehensive visibility into your data security posture. With this visibility, you can answer questions such as the following:
- What are the top 5 most commonly occurring sensitive data types?
- Which AWS accounts have the most findings?
- How many S3 buckets are affected by each of the sensitive data types?
Your security team can write their own customized queries to answer questions such as the following:
- Is there sensitive data in AWS accounts that are used for development purposes?
- Is sensitive data present in S3 buckets that previously did not contain sensitive information?
- Was there a change in configuration for S3 buckets containing the greatest amount of sensitive data?
How are findings different from results?
As a Macie job progresses, it produces two key types of output: sensitive data findings (or findings for short), and sensitive data discovery results (or results).
Findings provide a report of potential policy violations with an S3 bucket, or the presence of sensitive data in a specific S3 object. Each finding provides a severity rating, information about the affected resource, and additional details, such as when Macie found the issue. Findings are published to the Macie console, AWS Security Hub, and Amazon EventBridge.
In contrast, results are a collection of records for each S3 object that a Macie job analyzed. These records contain information about objects that do and do not contain sensitive data, including up to 1,000 occurrences of each sensitive data type that Macie found in a given object, and whether Macie was unable to analyze an object because of issues such as permissions settings or use of an unsupported format. If an object contains sensitive data, the results record includes detailed information that isn’t available in the finding for the object.
One of the key benefits of querying results is to uncover gaps in your data protection initiatives—these gaps can occur when data in certain buckets can’t be analyzed because Macie was denied access to those buckets, or was unable to decrypt specific objects. The following table maps some of the key differences between findings and results.
| Findings | Results | |
| Enabled by default | Yes | No |
| Location of published results | Macie console, Security Hub, and EventBridge | S3 bucket |
| Details of S3 objects that couldn’t be scanned | No | Yes |
| Details of S3 objects in which no sensitive data was found | No | Yes |
| Identification of files inside compressed archives that contain sensitive data | No | Yes |
| Number of occurrences reported per object | Up to 15 | Up to 1,000 |
| Retention period | 90 days in Macie console | Defined by customer |
Architecture
As shown in Figure 2, you can build out the solution in three steps:
- Enable the results and publish them to an S3 bucket
- Build out the Athena table to query the results by using SQL
- Visualize the results with QuickSight
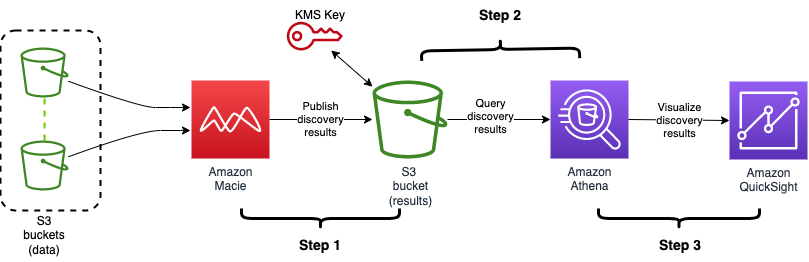
Figure 2: Architecture diagram showing the flow of the solution
Prerequisites
To implement the solution in this blog post, you must first complete the following prerequisites:
- Enable Macie in your account. For instructions, see Getting started with Amazon Macie.
- Set your account as the delegated Macie administrator account by using AWS Organizations. Optionally, you can also enable Macie in additional member accounts using AWS Organizations.
- Sign up for QuickSight in the account that you set as the delegated Macie administrator. For instructions on how to sign up, see Signing up for an Amazon QuickSight subscription. You can use the QuickSight Standard Edition for this post.
- To follow along with the examples in this post, download the sample dataset. The dataset is a single .ZIP file that contains three directories (fk, rt, and mkro). For this post, we used three accounts in our organization, created an S3 bucket in each of them, and then copied each directory to an individual bucket, as shown in Figure 3.
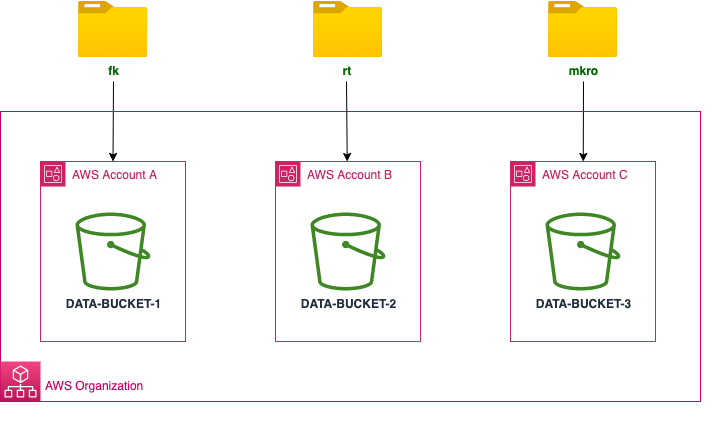
Figure 3: Sample data loaded into three different AWS accounts
Note: All data in this blog post has been artificially created by AWS for demonstration purposes and has not been collected from any individual person. Similarly, such data does not, nor is it intended, to relate back to any individual person.
Step 1: Enable the results and publish them to an S3 bucket
Publication of the discovery results to Amazon S3 is not enabled by default. The setup requires that you specify an S3 bucket to store the results (we also refer to this as the discovery results bucket), and use an AWS Key Management Service (AWS KMS) key to encrypt the bucket.
If you are analyzing data across multiple accounts in your organization, then you need to enable the results in your delegated Macie administrator account. You do not need to enable results in individual member accounts. However, if you’re running Macie jobs in a standalone account, then you should enable the Macie results directly in that account.
To enable the results
- Open the Macie console.
- Select the AWS Region from the upper right of the page.
- From the left navigation pane, select Discovery results.
- Select Configure now.
- Select Create Bucket, and enter a unique bucket name. This will be the discovery results bucket name. Make note of this name because you will use it when you configure the Athena tables later in this post.
- Under Encryption settings, select Create new key. This takes you to the AWS KMS console in a new browser tab.
- In the AWS KMS console, do the following:
- For Key type, choose symmetric, and for Key usage, choose Encrypt and Decrypt.
- Enter a meaningful key alias (for example, macie-results-key) and description.
- (Optional) For simplicity, set your current user or role as the Key Administrator.
- Set your current user/role as a user of this key in the key usage permissions step. This will give you the right permissions to run the Athena queries later.
- Review the settings and choose Finish.
- Navigate to the browser tab with the Macie console.
- From the AWS KMS Key dropdown, select the new key.
- To view KMS key policy statements that were automatically generated for your specific key, account, and Region, select View Policy. Copy these statements in their entirety to your clipboard.
- Navigate back to the browser tab with the AWS KMS console and then do the following:
- Select Customer managed keys.
- Choose the KMS key that you created, choose Switch to policy view, and under Key policy, select Edit.
- In the key policy, paste the statements that you copied. When you add the statements, do not delete any existing statements and make sure that the syntax is valid. Policies are in JSON format.
- Navigate back to the Macie console browser tab.
- Review the inputs in the Settings page for Discovery results and then choose Save. Macie will perform a check to make sure that it has the right access to the KMS key, and then it will create a new S3 bucket with the required permissions.
- If you haven’t run a Macie discovery job in the last 90 days, you will need to run a new discovery job to publish the results to the bucket.
In this step, you created a new S3 bucket and KMS key that you are using only for Macie. For instructions on how to enable and configure the results using existing resources, see Storing and retaining sensitive data discovery results with Amazon Macie. Make sure to review Macie pricing details before creating and running a sensitive data discovery job.
Step 2: Build out the Athena table to query the results using SQL
Now that you have enabled the discovery results, Macie will begin publishing them into your discovery results bucket in the form of jsonl.gz files. Depending on the amount of data, there could be thousands of individual files, with each file containing multiple records. To identify the top five most commonly occurring sensitive data types in your organization, you would need to query all of these files together.
In this step, you will configure Athena so that it can query the results using SQL syntax. Before you can run an Athena query, you must specify a query result bucket location in Amazon S3. This is different from the Macie discovery results bucket that you created in the previous step.
If you haven’t set up Athena previously, we recommend that you create a separate S3 bucket, and specify a query result location using the Athena console. After you’ve set up the query result location, you can configure Athena.
To create a new Athena database and table for the Macie results
- Open the Athena console, and in the query editor, enter the following data definition language (DDL) statement. In the context of SQL, a DDL statement is a syntax for creating and modifying database objects, such as tables. For this example, we named our database macie_results.
After running this step, you’ll see a new database in the Database dropdown. Make sure that the new macie_results database is selected for the next queries.

Figure 4: Create database in the Athena console
- Create a table in the database by using the following DDL statement. Make sure to replace
<RESULTS-BUCKET-NAME>with the name of the discovery results bucket that you created previously.After you complete this step, you will see a new table named maciedetail_all_jobs in the Tables section of the query editor.
- Query the results to start gaining insights. For example, to identify the top five most common sensitive data types, run the following query:
Running this query on the sample dataset gives the following output.

Figure 5: Results of a query showing the five most common sensitive data types in the dataset
- (Optional) The previous query ran on all of the results available for Macie. You can further query which accounts have the greatest amount of sensitive data detected.
To test this query, we distributed the synthetic dataset across three member accounts in our organization, ran the query, and received the following output. If you enable Macie in just a single account, then you will only receive results for that one account.

Figure 6: Query results for total number of sensitive data detections across all accounts in an organization
For a list of more example queries, see the amazon-macie-results-analytics GitHub repository.
Step 3: Visualize the results with QuickSight
In the previous step, you used Athena to query your Macie discovery results. Although the queries were powerful, they only produced tabular data as their output. In this step, you will use QuickSight to visualize the results of your Macie jobs.
Before creating the visualizations, you first need to grant QuickSight the right permissions to access Athena, the results bucket, and the KMS key that you used to encrypt the results.
To allow QuickSight access to the KMS key
- Open the AWS Identity and Access Management (IAM) console, and then do the following:
- In the navigation pane, choose Roles.
- In the search pane for roles, search for aws-quicksight-s3-consumers-role-v0. If this role does not exist, search for aws-quicksight-service-role-v0.
- Select the role and copy the role ARN. You will need this role ARN to modify the KMS key policy to grant permissions for this role.
- Open the AWS KMS console and then do the following:
- Select Customer managed keys.
- Choose the KMS key that you created.
- Paste the following statement in the key policy. When you add the statement, do not delete any existing statements, and make sure that the syntax is valid. Replace
<QUICKSIGHT_SERVICE_ROLE_ARN>and<KMS_KEY_ARN>with your own information. Policies are in JSON format.
To allow QuickSight access to Athena and the discovery results S3 bucket
- In QuickSight, in the upper right, choose your user icon to open the profile menu, and choose US East (N.Virginia). You can only modify permissions in this Region.
- In the upper right, open the profile menu again, and select Manage QuickSight.
- Select Security & permissions.
- Under QuickSight access to AWS services, choose Manage.
- Make sure that the S3 checkbox is selected, click on Select S3 buckets, and then do the following:
- Choose the discovery results bucket.
- You do not need to check the box under Write permissions for Athena workgroup. The write permissions are not required for this post.
- Select Finish.
- Make sure that the Amazon Athena checkbox is selected.
- Review the selections and be careful that you don’t inadvertently disable AWS services and resources that other users might be using.
- Select Save.
- In QuickSight, in the upper right, open the profile menu, and choose the Region where your results bucket is located.
Now that you’ve granted QuickSight the right permissions, you can begin creating visualizations.
To create a new dataset referencing the Athena table
- On the QuickSight start page, choose Datasets.
- On the Datasets page, choose New dataset.
- From the list of data sources, select Athena.
- Enter a meaningful name for the data source (for example, macie_datasource) and choose Create data source.
- Select the database that you created in Athena (for example, macie_results).
- Select the table that you created in Athena (for example, maciedetail_all_jobs), and choose Select.
- You can either import the data into SPICE or query the data directly. We recommend that you use SPICE for improved performance, but the visualizations will still work if you query the data directly.
- To create an analysis using the data as-is, choose Visualize.
You can then visualize the Macie results in the QuickSight console. The following example shows a delegated Macie administrator account that is running a visualization, with account IDs on the y axis and the count of affected resources on the x axis.
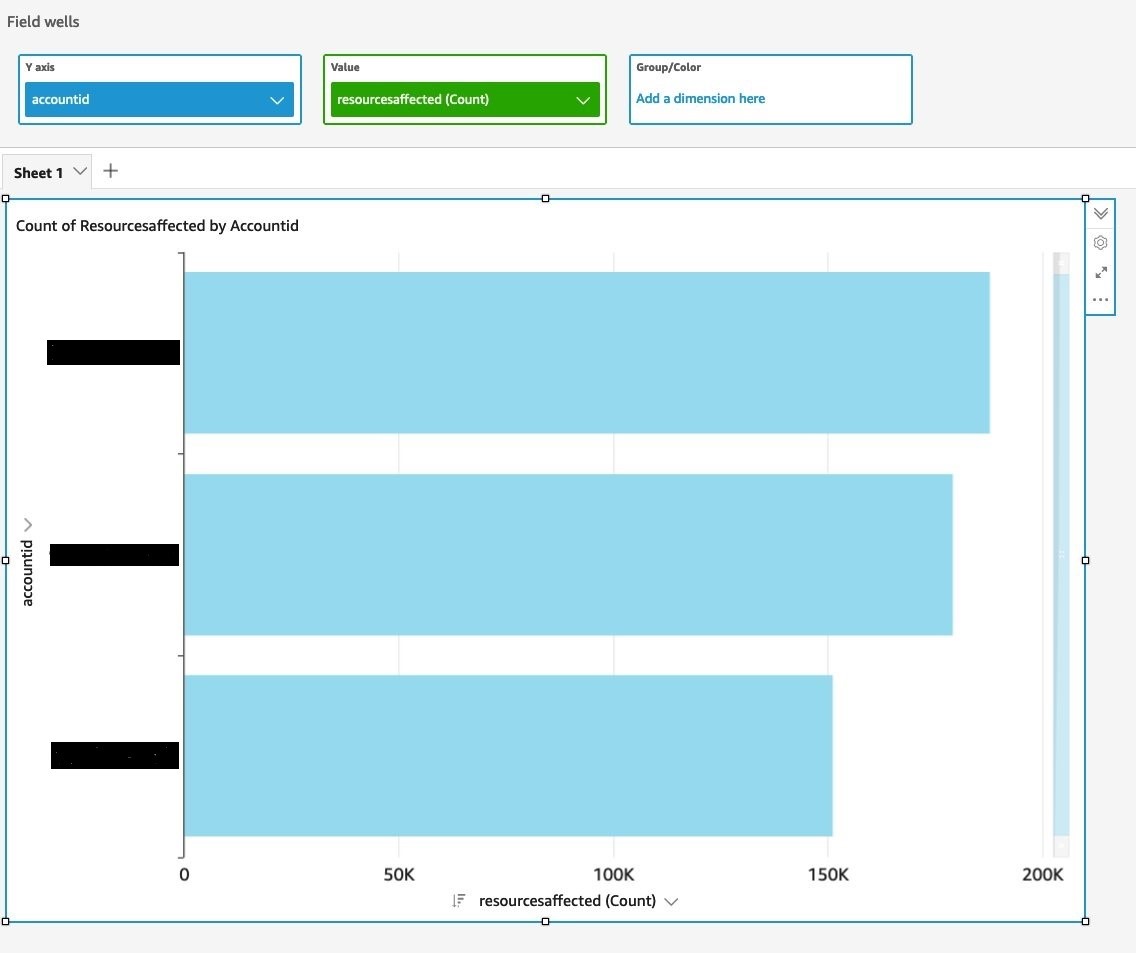
Figure 7: Visualize query results to identify total number of sensitive data detections across accounts in an organization
You can also visualize the aggregated data in QuickSight. For example, you can view the number of findings for each sensitive data category in each S3 bucket. The Athena table doesn’t provide aggregated data necessary for visualization. Instead, you need to query the table and then visualize the output of the query.
To query the table and visualize the output in QuickSight
- On the Amazon QuickSight start page, choose Datasets.
- On the Datasets page, choose New dataset.
- Select the data source that you created in Athena (for example, macie_datasource) and then choose Create Dataset.
- Select the database that you created in Athena (for example, macie_results).
- Choose Use Custom SQL, enter the following query below, and choose Confirm Query.
- You can either import the data into SPICE or query the data directly.
- To create an analysis using the data as-is, choose Visualize.
Now you can visualize the output of the query that aggregates data across your S3 buckets. For example, we used the name of the S3 bucket to group the results, and then we created a donut chart of the output, as shown in Figure 6.
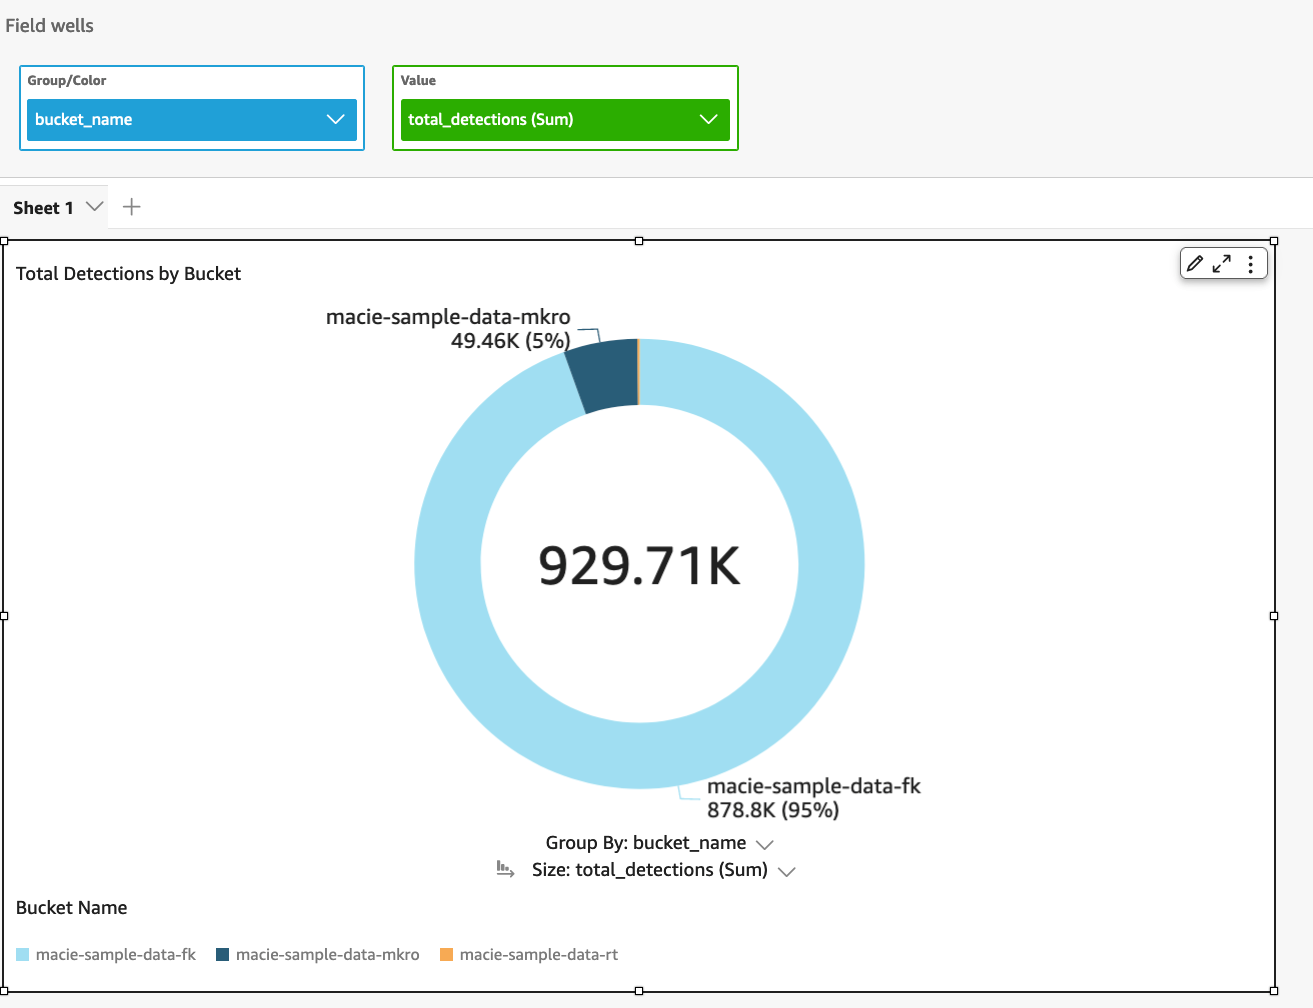
Figure 8: Visualize query results for total number of sensitive data detections across each S3 bucket in an organization
From the visualizations, we can identify which buckets or accounts in our organizations contain the most sensitive data, for further action. Visualizations can also act as a dashboard to track remediation.
If you encounter permissions issues, see Insufficient permissions when using Athena with Amazon QuickSight and Troubleshooting key access for troubleshooting steps.
You can replicate the preceding steps by using the sample queries from the amazon-macie-results-analytics GitHub repo to view data that is aggregated across S3 buckets, AWS accounts, or individual Macie jobs. Using these queries with the results of your Macie results will help you get started with tracking the security posture of your data in Amazon S3.
Conclusion
In this post, you learned how to enable sensitive data discovery results for Macie, query those results with Athena, and visualize the results in QuickSight.
Because Macie sensitive data discovery results provide more granular data than the findings, you can pursue a more comprehensive incident response when sensitive data is discovered. The sample queries in this post provide answers to some generic questions that you might have. After you become familiar with the structure, you can run other interesting queries on the data.
We hope that you can use this solution to write your own queries to gain further insights into sensitive data discovered in S3 buckets, according to the business needs and regulatory requirements of your organization. You can consider using this solution to better understand and identify data security risks that need immediate attention. For example, you can use this solution to answer questions such as the following:
- Is financial information present in an AWS account where it shouldn’t be?
- Are S3 buckets that contain PII properly hardened with access controls and encryption?
You can also use this solution to understand gaps in your data security initiatives by tracking files that Macie couldn’t analyze due to encryption or permission issues. To further expand your knowledge of Macie capabilities and features, see the following resources:
- Automated Data Discovery for Amazon Macie
- Use Amazon Macie for automatic, continual, and cost-effective discovery of sensitive data in S3
- Best practices for setting up Amazon Macie with AWS Organizations
- How to use Amazon Macie to preview sensitive data in S3 buckets
- Use Security Hub custom actions to remediate S3 resources based on Macie discovery results
- Learn more about the new allow list feature in Macie
- Discover sensitive data by using custom data identifiers with Amazon Macie
If you have feedback about this post, submit comments in the Comments section below. If you have questions about this post, start a new thread on Amazon Macie re:Post.
Want more AWS Security news? Follow us on Twitter.