By Srinivas Kesanapally, Partner Solutions Architect at AWS
By Issac Kunen, Product Manager at Snowflake Computing
By Bosco Albuquerque, Sr. Partner Solutions Architect, Data and Analytics – AWS
By Frank Dallezotte, Sr. Solutions Architect – AWS
In modern data workflows, businesses are interested in learning about end users’ experiences and feedback in near real-time, and then acting on it expeditiously for better business outcomes and user experiences.
When streaming data comes in from a variety of sources—such as smartphones, Internet of Things (IoT) devices, or ad-click data—organizations should have the capability to ingest this data quickly and join it with other relevant business data to derive insights and provide positive experiences to customers.
In this post, we explain how organizations can build and run a fully managed Apache Kafka-compatible Amazon MSK to ingest streaming data. We’ll also explore how to (1) use a Kafka connect application or (2) MSK Connect to persist this data to Snowflake, enabling businesses to derive near real-time insights into end users’ experiences and feedback.
Amazon MSK is a fully-managed service that makes it easy for you to build and run applications that use Apache Kafka to process streaming data. Apache Kafka is an open-source platform for building real-time streaming data pipelines and applications.
Kafka Connect is a tool for streaming data between Apache Kafka and other data systems in a scalable and reliable manner. It can be used to quickly and easily define connectors that move large volumes of data in and out of Kafka, such as for stream processing with low latency. MSK Connect is the Amazon-managed version of Apache Kafka on AWS.
With Amazon MSK, you can use native Apache Kafka APIs to populate data lakes, stream changes to and from databases, and power machine learning (ML) and analytics applications.
Snowflake Computing is an AWS Competency Partner and modern cloud data warehouse that has built an enterprise-class SQL data warehouse designed for the cloud and today’s data.
Data Flow
The data flow from an Amazon MSK cluster to Snowflake data warehouse using Snowflake connector is as follows. Ingest flow for Kafka with Snowflake connector is shown in Figure 1.
- One or more applications publish JSON or Avro records to an Amazon MSK cluster. The records are split into one or more topic partitions.
.
If you use Avro records, read the documentation on Installing and Configuring the Kafka Connector to install and configure Avro parser and schema registry.
.
- The Snowflake connector for Kafka buffers messages from the Kafka topics. In this post, the connector is configured to run on a separate Amazon Elastic Compute Cloud (Amazon EC2) instance in a different AWS Availability Zone.
.
When a threshold (time or memory or number of messages) is reached, the connector writes the messages to a temporary file in the internal stage. It triggers Snowpipe to ingest the temporary file; Snowpipe copies a pointer to the data file into a queue.
.
- A Snowflake-managed virtual warehouse loads data from the staged file into the target table (for example, the table specified in the configuration file for the topic) via the pipe created for the Kafka topic partition.
.
- Not shown in Figure 1: The connector monitors Snowpipe and deletes each file in the internal stage after confirming the file data was loaded into the table. If a failure prevented the data from loading, the connector moves the file into the table stage and produces an error message.
.
- The connector repeats steps 2-4 above.
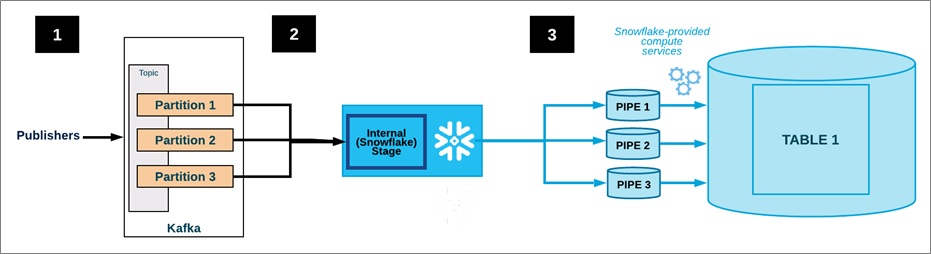
Figure 1 – Ingest flow for Kafka with Snowflake connector.
Architecture
This post explains how to ingest real-time streaming data into Amazon MSK and persists it to Snowflake using the following architecture.
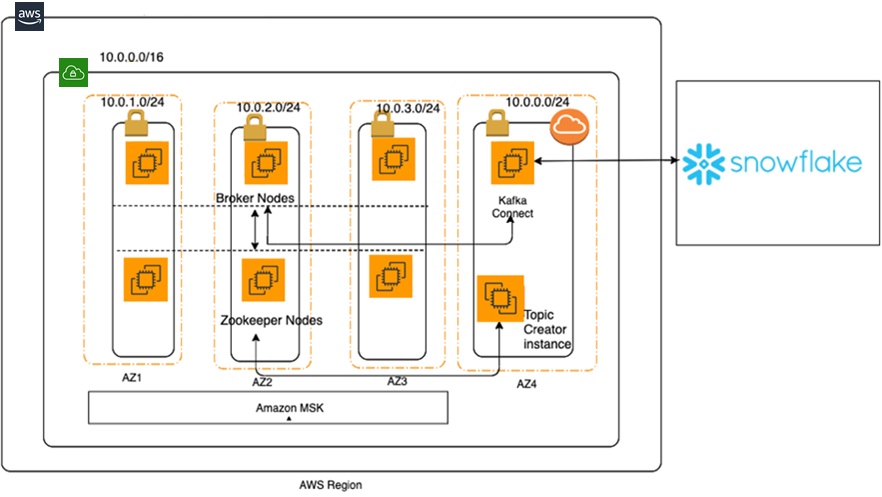
Figure 2 – Amazon MSK architecture with Snowflake.
You will build the Amazon MSK cluster using the provided AWS CloudFormation template. For simplicity, we are running a single cluster in one region across three AWS Availability Zones in three different subnets.
In the same region and same virtual private cloud (VPC), but in a different AWS Availability Zone, you will install a standalone Kafka Connect instance. This instance will be used to:
- Create a topic in the MSK cluster.
- Write test data to the Kafka topic from a producer.
- Push test data to Snowflake.
The following steps walk you through configuring the cluster with Snowflake connectivity using either (1a) MSK with Apache Connect or (1b) MSK with MSK Connect. Following (1a) or (1b) setup, we will generate test data using the Kafka Producer and show that this data is ingested into Snowflake..
(1a) Deploy the Amazon MSK Cluster and Apache Connect
To get started, launch the AWS CloudFormation template:

Be sure to choose the US East (N. Virginia) Region (us-east-1). Then, enter the appropriate stack and key names to log in to the Kafka Connect instance and SSH location.
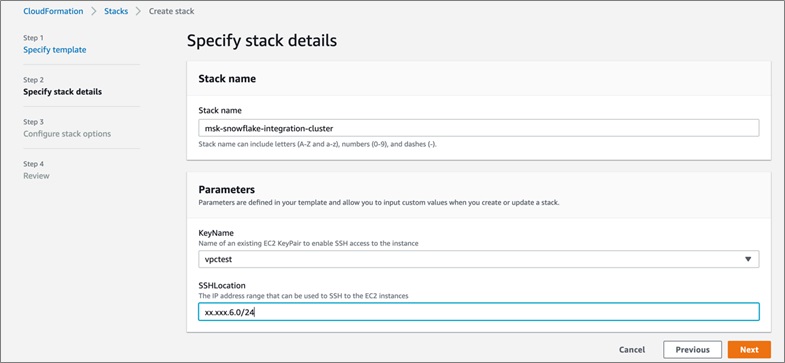
Choose the defaults on the next two pages, acknowledge that CloudFormation is going to create resources in your account and click Next.
The CloudFormation template creates the following resources in your AWS account:
- Amazon MSK cluster in private subnet.
- Kafka Connect instance in public subnet.
- One VPC.
- Three private subnets and a private subnet.
Ensure the CloudFormation template ran successfully. Note the output values for the KafkaClientEc2Instance and for the MSKClusterARN, which we’ll use in the following steps to configure the Snowflake connector and Kafka topic.
The rest of the steps in the post will enable you to:
- Configure a Kafka connect instance with connectivity to MSK cluster.
- Configure connection to Snowflake database.
- Install Snowflake client tool, Snowsql, to check the connectivity to Snowflake from Kafka connect instance and configure secure private key based authentication to Snowflake.
Login to Kafka Connect Instance
Login to the Kafka Connect instance using the Kafka Connect instance value, KafkaClientEC2InstancePublicDNS, from the CloudFormation template’s output value.
	ssh -i "<local key file>" <instance name>
	Replace local key file with your key file and instance name with instance name obtained from the previous step
Next, we’ll create a Kafka topic from Kafka Connect instance.
Get Zookeeper information using the MSKClusterArn from the CloudFormation template. A Kafka topic is created via Zookeeper.
aws kafka describe-cluster --region us-east-1 --cluster-arn <kafka cluster arn value from step 1> | grep -i ZookeeperConnectString
Using the Zookeeper connection, create a Kafka topic called MSKSnowflakeTestTopic.
/home/ec2-user/kafka/kafka_2.12-2.4.0/bin/kafka-topics.sh –-create –-zookeeper < ZookeeperConnectString value from previous step> --replication-factor 3 --partitions 1 --topic MSKSnowflakeTestTopic
The following will be the output upon successful completion:
Created topic MSKSnowflakeTestTopic
Now, we’ll configure the Snowflake environment in the Kafka Connect instance.
sudo su -
# Install Maven
cd /opt
wget https://www.apache.org/dist/maven/maven-3/3.6.3/binaries/apache-maven-3.6.3-bin.tar.gz
tar xzf apache-maven-3.6.3-bin.tar.gz
ln -s apache-maven-3.6.3 maven
Fetch the Snowflake jar files.
#snowflake-kafka connector jar file
/opt/maven/bin/mvn org.apache.maven.plugins:maven-dependency-plugin:2.8:get -Dartifact=com.snowflake:snowflake-kafka-connector:1.1.0:jar

#bouncycastle libraries are used to decrypt the private keys
/opt/maven/bin/mvn org.apache.maven.plugins:maven-dependency-plugin:2.8:get -Dartifact=org.bouncycastle:bcprov-jdk15on:1.64:jar
/opt/maven/bin/mvn org.apache.maven.plugins:maven-dependency-plugin:2.8:get -Dartifact=org.bouncycastle:bc-fips:1.0.1:jar

/opt/maven/bin/mvn org.apache.maven.plugins:maven-dependency-plugin:2.8:get -Dartifact=org.bouncycastle:bcpkix-fips:1.0.3:jar

#if the input data format is of type Avro , the following jar is needed
/opt/maven/bin/mvn org.apache.maven.plugins:maven-dependency-plugin:2.8:get -Dartifact=org.apache.avro:avro:1.9.1:jar
Copy the Snowflake jar files into the Kafka Connect’s lib folder.
cp /root/.m2/repository/com/snowflake/snowflake-kafka-connector/1.1.0/snowflake-kafka-connector-1.1.0.jar /home/ec2-user/kafka/kafka_2.12-2.4.0/libs/

cp /root/.m2/repository/net/snowflake/snowflake-ingest-sdk/0.9.6/snowflake-ingest-sdk-0.9.6.jar /home/ec2-user/kafka/kafka_2.12-2.4.0/libs/

cp /root/.m2/repository/net/snowflake/snowflake-jdbc/3.11.1/snowflake-jdbc-3.11.1.jar /home/ec2-user/kafka/kafka_2.12-2.4.0/libs/

cp /root/.m2/repository/org/bouncycastle/bcprov-jdk15on/1.64/bcprov-jdk15on-1.64.jar /home/ec2-user/kafka/kafka_2.12-2.4.0/libs/

cp /root/.m2/repository/org/bouncycastle/bc-fips/1.0.1/bc-fips-1.0.1.jar /home/ec2-user/kafka/kafka_2.12-2.4.0/libs/

cp /root/.m2/repository/org/bouncycastle/bcpkix-fips/1.0.3/bcpkix-fips-1.0.3.jar /home/ec2-user/kafka/kafka_2.12-2.4.0/libs/
Verify the files are present in the /home/ec2-user/kafka/kafka_2.12-2.4.0/libs folder.

Generate public and private keys to connect to Snowflake using openssl. Enter a password at the prompt, and for the public key use the password entered during private key generation.
#generate private key
[root@ip-10-0-0-34 ec2-user]# openssl genrsa 2048 | openssl pkcs8 -topk8 -inform PEM -out rsa_key.p8
Generating RSA private key, 2048 bit long modulus
Enter Encryption Password:
Verifying - Enter Encryption Password:

#generate public key
[root@ip-10-0-0-34 ec2-user]# openssl rsa -in rsa_key.p8 -pubout -out rsa_key.pub
Enter pass phrase for rsa_key.p8:
Create a Snowflake connector configuration file and add the following information:
Please note that these steps require an active account with snowflake, snowflake database name and a schema name. This file has sensitive information and need to be secured with proper permissions.
echo  "name=XYZCompanySensorData" >> .snowflake-connection.properties
echo "connector.class=com.snowflake.kafka.connector.SnowflakeSinkConnector" >> .snowflake-connection.properties
echo "tasks.max=8" >> .snowflake-connection.properties
echo "buffer.count.records=100" >> .snowflake-connection.properties
echo "buffer.flush.time=60" >> .snowflake-connection.properties
echo "buffer.size.bytes=65536" >> .snowflake-connection.properties

#replace snowflake account name with your snowflake account
echo "snowflake.url.name=<snowflake account name>.snowflakecomputing.com" >> .snowflake-connection.properties

#replace snowflake user name with your snowflake user name
echo "snowflake.user.name=<snowflake user name>" >> .snowflake-connection.properties

#replace snowflake database name with your snowflake database name
echo "snowflake.database.name=<SnowflakeDBName>" >> .snowflake-connection.properties

#replace snowflake schema name with your snowflake schema name
echo "snowflake.schema.name=<SnowflakeDBSchema>" >> .snowflake-connection.properties

echo "key.converter=org.apache.kafka.connect.storage.StringConverter" >> .snowflake-connection.properties

echo "value.converter=com.snowflake.kafka.connector.records.SnowflakeJsonConverter" >> .snowflake-connection.properties

#The following step copies snowflake private key with header and footer information removed into .snowflake-connection.properties file

SNOWFLAKE_PRIVATE_KEY=$(echo `sed -e '2,$!d' -e '$d' -e 's/\n/ /g' /home/ec2-user/rsa_key.p8`|tr -d ' ')
echo "snowflake.private.key=$SNOWFLAKE_PRIVATE_KEY" >> .snowflake-connection.properties

# replace it with your private key password here
echo "snowflake.private.key.passphrase=<private key pass phrase>" >> .snowflake-connection.properties

#topic to subscribe to
echo "topics=MSKSnowflakeTestTopic" >> .snowflake-connection.properties

# replace it with your private key password here
echo "snowflake.private.key.passphrase=<private key pass pharase" >>
.snowflake-connection.properties

#topic to subscribe to
echo "topics=MSKSnowflakeTestTopic" >> .snowflake-connection.properties

#The following steps copies snowflake private key with header and footer information removed into .snowflake-connection.properties file

SNOWFLAKE_PRIVATE_KEY=$ (echo 'sed -e '2,$!d' -e '$d' -e 's/\n/ /g' /home/ec2-user/rsa_key.p8'|tr -d ' ')
echo "snowflake.private.key=$SNOWFLAKE_PRIVATE_KEY" >> .snowflake-connection.properties
Edit the Kafka config file /home/ec2-user/kafka/kafka_2.12-2.4.0/config/connect-standalone.properties, and update bootstrap.servers property to the MSK cluster nodes running in your account.
sudo su - ec2-user
aws kafka get-bootstrap-brokers --region=us-east-1 --cluster-arn <your msk cluster arn>

#It will have two output values:
{
"BootstrapBrokerString": "<server nodes>",
"BootstrapBrokerStringTls": "<server nodes>"
}

#Since, we are using PLAINTEXT authentication from Kafkaconnect instance to Kafka cluster, Use the value of BootstrapBrokerString.
Start the Kafka Connect instance.
/home/ec2-user/kafka/kafka_2.12-2.4.0/bin/connect-standalone.sh /home/ec2-user/kafka/kafka_2.12-2.4.0/config/connect-standalone.properties /home/ec2-user/.snowflake-connection.properties

			#upon successful completion of the start operation , the output will
#look as follows:
[2020-02-07 05:46:30,535] INFO
[SF_KAFKA_CONNECTOR] SnowflakeSinkTask[ID:7]:put 0 records (com.snowflake.kafka.connector.SnowflakeSinkTask:200)
#Please ensure that correct Java version is used while running the following cp command. Currently, the Java version that came with the Amazon EC2 instance is #java-1.8.0-openjdk-1.8.0.222.b10-0.amzn2.0.1.x86_64. You can cd to #/usr/lib/jvm folder to check on the correct version.

cp /usr/lib/jvm/java-1.8.0-openjdk-1.8.0.222.b10-0.amzn2.0.1.x86_64/jre/lib/security/cacerts /home/ec2-user/kafka.client.truststore.jks

echo "ssl.truststore.location=/home/ec2-user/kafka.client.truststore.jks" >> /home/ec2-user/kafka/kafka_2.12-2.4.0/bin/client.properties

echo "security.protocol=ssl" >> /home/ec2-user/kafka/kafka_2.12-2.4.0/bin/client.properties
Install the Snowflake client, snowsql. This tool is needed to log in to Snowflake from a Kafka Connect instance and configure private key-based authentication.
cd /home/ec2-user
#get snowsql binary
curl -O https://sfc-repo.snowflakecomputing.com/snowsql/bootstrap/1.2/linux_x86_64/snowsql-1.2.3-linux_x86_64.bash
repo.snowflakecomputing.com/snowsql/bootstrap/1.2/linux_x86_64/snowsql-1.2.3-linux_x86_64.bash

#install snowsql
bash snowsql-1.2.3-linux_x86_64.bash

#create snowsql client config file
echo [connections] > /home/ec2-user/.snowsql.config
#either edit the file to enter password = your password
#or run the following command if your password does not #have special characters
echo "password=<enter your snowflake password>" >> /home/ec2-user/.snowsql.config
Log in to Snowflake using snowsql and set up the public key on the user’s account.
#run the following commands to parse the public key to remove the header and footer information and remove any new lines in the key.
SNOWFLAKE_PUBLIC_KEY=$(echo `sed -e '2,$!d' -e '$d' -e 's/\n/ /g' /home/ec2-user/rsa_key.pub`|tr -d ' ')
snowsql -a <snowflake account name> -u <snowflake user name> -q "alter user <snowflake user name> set rsa public key='$SNOWFLAKE_PUBLIC_KEY'" -r ACCOUNTADMIN

Output should be:
+----------------------------------+
| status                           |
|----------------------------------|
| Statement executed successfully. |
+----------------------------------+
1 Row(s) produced. Time Elapsed: 0.170s
Test Snowflake access using the private key.
snowsql -a <snowflake account name> -u <snowflake user name> --private-key-path=/home/ec2-user/rsa key.p8

Output:
Private Key Passphrase:
* SnowSQL * v1.2.4
Type SQL statements or !help
If you have chosen and completed step (1a), you can skip to step (2) now.
(1b) Deploy the Amazon MSK Cluster and MSK Connect
To get started, launch the AWS CloudFormation template:

Be sure to choose the US East (N. Virginia) Region (us-east-1). Then, enter an appropriate name for the stack and key, which will be used to log in to the Kafka Connect instance, and CIDR block address from which to allow SSH connections.
Choose the defaults on the next two pages, acknowledge that the CloudFormation is going to create resources in your account, and click Next.
The CloudFormation template creates the following resources in your AWS account:
- A VPC
- Three private subnets and a public subnet
- Amazon MSK cluster in a private subnet
- Kafka Connect instance in public subnet
Ensure the CloudFormation template ran successfully. Note the output values for the Kafka Client EC2 Instance and for the MSK Cluster ARN, which we’ll use in the following steps to configure the Snowflake connector and Kafka topic.
The rest of the steps in the post will enable you to:
- Configure an MSK Connect instance with connectivity to MSK cluster
- Configure a connection to your Snowflake database
- Install Snowflake client tool, snowsql, to check the connectivity to Snowflake from Kafka Client EC2 Instance and configure secure private key based authentication to Snowflake.
Create a Kafka Topic
Next, we’ll create a Kafka topic from Kafka Client EC2 Instance.
Get Zookeeper information using the MSKClusterArn from the CloudFormation template. The Zookeeper connect string is required by the kafka-topics.sh script in order to create the Kafka topic.
aws kafka describe-cluster --region us-east-1 --cluster-arn <kafka cluster arn value from step 1> | grep -i ZookeeperConnectString
Using this Zookeeper connection string, create a Kafka topic called MSKSnowflakeTestTopic.
/home/ec2-user/kafka/kafka_2.12-2.2.1/bin/kafka-topics.sh –-zookeeper < ZookeeperConnectString value from previous step> --replication-factor 3 --partitions 1 –-create --topic MSKSnowflakeTestTopic
The following will be the output upon successful completion:
Created topic MSKSnowflakeTestTopic
Download required Jars and create a zip file.
The CloudFormation template will download the required jars and create a zip file for you containing these jars. The name of the zip file is snowflake-mskcon-1.zip and is located in the /home/ec2-user/jar directory along with the jars downloaded.
Create an S3 bucket and upload this zip file to it.
Generate public and private keys to connect to Snowflake.
The public and private keys needed to connect to Snowflake are created by the CloudFormation template. The names for the private and public key is rsa_key.p8 and rsa_key.pub, respectively. These files contain keys that may contain spaces and new line characters which need to be removed before they are copy/pasted into the MSK Connect config text-box in the MSK Console or in the setting up the public key in Snowflake.
Here are the steps on how to do this:
export SNOWFLAKE_PVT_KEY=$(echo `sed -e '2,$!d' -e '$d' -e 's/\n/ /g' /home/ec2-user/rsa_key.p8`|tr -d ' ')

echo $SNOWFLAKE_PVT_KEY > rsa_key_p8.out
You can now copy/paste or add the contents of the rsa_key_p8.out file into the .snowflake-connections.properties file in the ec2-user home directory.
We will remove the spaces and newline characters in the public key, and set up the public key for your Snowflake user ID in the following steps in section (2).
As part of the CloudFormation template the cacerts file from your Java version will be copied to the kafka.client.truststore.jks file in the ec2-user home directory.
The CloudFormation template will also add the two parameters below to the client.properties file located in the Kafka bin directory (/home/ec2-user/kafka/kafka_2.12-2.2.1/bin/client.properties)
ssl.truststore.location=/home/ec2-user/kafka.client.truststore.jks
security.protocol=ssl
The CloudFormation template downloads the snowsql client and installs it under the ec2-user home directory in a directory called ‘snowflake’. You can setup your PATH environment variable so that it can find snowsql.
export PATH=$PATH:$HOME/snowflake
We can now set up and test key pair authentication with Snowflake using the snowsql client.
Log in to Snowflake using snowsql and set up the public key on the user’s account.
#run the following commands to parse the public key to remove the header and footer information and remove any new lines in the key.
SNOWFLAKE_PUBLIC_KEY=$(echo `sed -e '2,$!d' -e '$d' -e 's/\n/ /g' /home/ec2-user/rsa_key.pub`|tr -d ' ')

snowsql -a <snowflake account name> -u <snowflake user name> -q "alter user <snowflake user name> set rsa_public_key='$SNOWFLAKE_PUBLIC_KEY'" -r ACCOUNTADMIN

Output should be:
+----------------------------------+
| status                           |
|----------------------------------|
| Statement executed successfully. |
+----------------------------------+
1 Row(s) produced. Time Elapsed: 0.170s
Test Snowflake access using the private key.
snowsql -a <snowflake account name> -u <snowflake user name> --private-key-path=/home/ec2-user/rsa_key.p8

Output:
Private Key Passphrase:
* SnowSQL * v1.2.4
Type SQL statements or !help
(2) Testing the KafKa Producer to Send a Message to Snowflake
Start generating test data from a producer running on the Kafka Client EC2 Instance. Open another terminal window connection to the Kafka Client EC2 Instance, and run the following commands:
#The following command will start a producer. At the prompt, send some test traffic. Replace bootstrapbrokerstring with the correct value.
/home/ec2-user/kafka/kafka_2.12-2.4.0/bin/kafka-console-producer.sh --broker-list <BootstrapBrokerString>  /home/ec2-user/kafka/kafka_2.12-2.4.0/bin/client.properties --topic MSKSnowflakeTestTopic

For ex:
>{"temperature":"45.6"}
>{"Humidity":"80%"}
Finally, verify that data is arriving in Snowflake by logging into your Snowflake account and verifying if a table with the same name as the Kafka topic MSKSnowflakeTestTopic exists in the Snowflake database you used in your setup.
You can also log into Snowflake using snowsql client from the Kafka Connect instance by opening another terminal window connection to the Kafka connect instance as follows:
snowsql -u <snowflake user name> -a <snowflake account name> --private-key-path=/home/ec2-user/rsa_key.p8

Input:
use <your_database>;
use warehouse <your_warehouse>;
select * from MSKSNOWFLAKETESTTOPIC;

Output
+------------------------------------+-------------------------+
| RECORD_METADATA                    | RECORD_CONTENT          |
|------------------------------------+-------------------------|
| {                                  | {                       |
|   "CreateTime": 1581057931179,     |   "temperature": "45.6" |
|   "offset": 0,                     | }                       |
|   "partition": 0,                  |                         |
|   "topic": "MSKSnowflakeTestTopic" |                         |
| }                                  |                         |
+------------------------------------+-------------------------+
1 Row(s) produced. Time Elapsed: 0.705s
Cleanup
Delete the CloudFormation template from the AWS console and drop the database from your Snowflake account.
Summary
In this post, you have learned how to ingest streaming data into an Amazon MSK cluster and persist that data in Snowflake using Snowflake connector installed on a Kafka Connect instance.
We have also gone into details of configuring Snowflake connector in a Kafka Connect instance to ingest data from an MSK cluster by:
- Creating an MSK cluster and Kafka Connect instance using an AWS CloudFormation template.
- Configuring Snowflake on a Kafka Connect instance.
- Creating a Kafka topic from a Kafka Connect instance.
- Publishing test data to a Kafka topic from a Kafka producer running on the Kafka Connect instance.
- Testing that data published to the Kafka topic is persisted in Snowflake.
Next Steps
If you are an existing Snowflake customer and have an active AWS account, spin up an Amazon MSK cluster and Kafka Connect instance using the AWS CloudFormation template. You can then start ingesting streaming data into Snowflake.
If you’re new to Snowflake, create a test account to test the streaming solution.
Here are some other resources you may find helpful:
.

.
Snowflake Computing – APN Partner Spotlight
Snowflake is an AWS Competency Partner. A modern cloud data warehouse, Snowflake has built an enterprise-class SQL data warehouse designed for the cloud and today’s data.
Contact Snowflake | Solution Overview | AWS Marketplace
*Already worked with Snowflake? Rate this Partner
*To review an APN Partner, you must be an AWS customer that has worked with them directly on a project.
