AWS Partner Network (APN) Blog
Building a Simple Serverless WebSocket with Stackery and AWS
By AM Grobelny, Startup Partner Solutions Architect at AWS
By Chase Douglas, CTO at Stackery
 |
 |
With the addition of WebSocket support in Amazon API Gateway, we set out to build an AWS CloudFormation template to get the simplest WebSocket version. What we built was backed by an AWS Lambda function that responds directly to the client who initiated the request.
We learned quite a few things along the way, and even ended up with an easy solution in Stackery for managing and deploying one of these simple WebSockets.
Stackery is an AWS Partner Network (APN) Advanced Technology Partner with the AWS DevOps Competency. Its tool is dedicated to making serverless application development simpler.
In this post, we use the Stackery Canvas, which lets developers visually construct serverless applications and automatically generates CloudFormation templates. For the more terminal-driven people out there, Stackery also offers a command line interface (CLI) tool for deploying and managing serverless architectures.
To understand the distinction between one-way and two-way WebSockets with Amazon API Gateway, we’ll also discuss the alternative—a one-way communication WebSocket with messages sent to clients through the @connections API.
Overview
Our goal in this post is to build a very simple serverless WebSocket. Since this is a serverless app, we’ll use Stackery to visualize our serverless architecture and deploy directly to AWS.
Luckily, Stackery has a built-in resource for this kind of WebSocket, so it’s as easy as dragging and dropping a WebSocket onto the Stackery Canvas. To get started, sign up for a free account with Stackery.
The type of WebSocket we’re building needs two-way communication enabled and a route and integration response. This allows interaction with clients directly without the need for client connection IDs and the @connections API.
We’ll explore these configuration settings, the @connections API, and more in this post. If you’d rather skip the details and just deploy, see the section called “Deploying with Stackery” below.
Concepts
In this post, we’ll discuss the following concepts: connecting and disconnecting, sending messages, routing messages, one-way and two-way communication, and various CloudFormation types used with WebSockets in Amazon API Gateway.
First, as promised, it helps to have a general understanding of how WebSockets work with Amazon API Gateway. Let’s start with a general diagram:
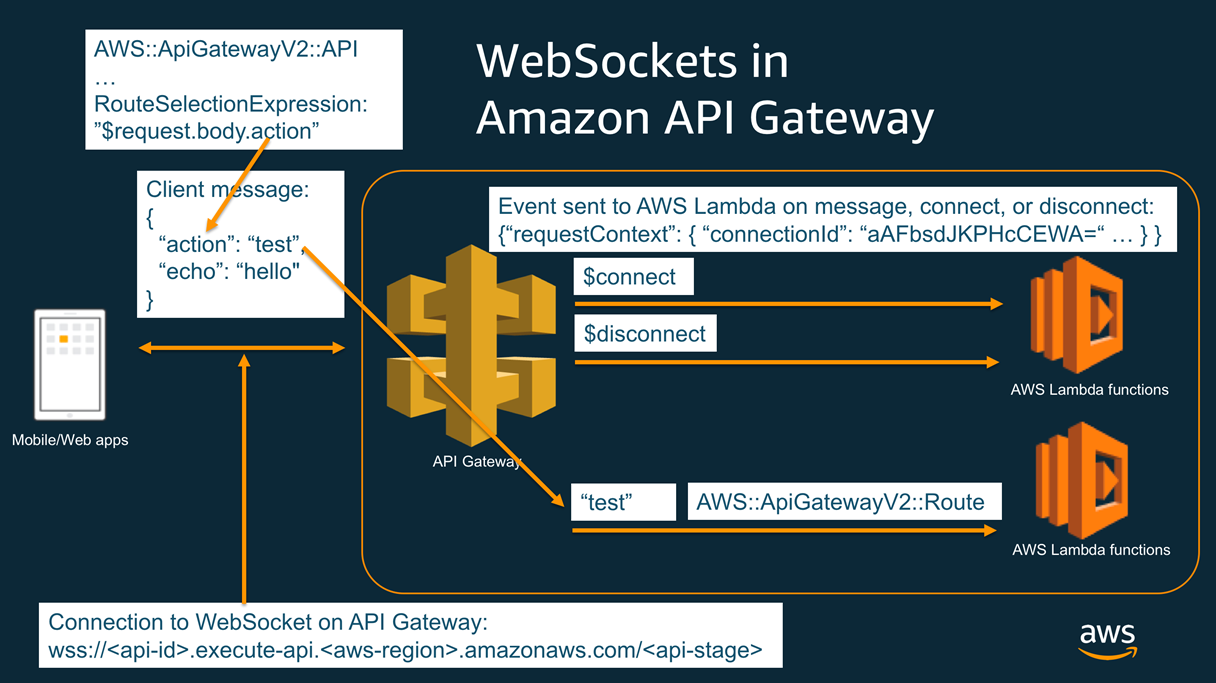
Figure 1 – How WebSockets communicate using Amazon API Gateway.
Refer back to this diagram as we discuss the different parts of WebSockets in Amazon API Gateway.
Connections
Clients connect to a WebSocket via an Amazon API Gateway URI formatted like this: wss://<api-id>.execute-api.< region>.amazonaws.com/<api-stage>.
Once a client connects to a WebSocket, that connection stays open until the client terminates the connection or until your backend closes the connection. When a client connects to or disconnects from your WebSocket via this URI, event data is sent to special $connect and $disconnect routes.
Part of the data in these events includes unique connection IDs that identify connected clients and allow you to send response messages directly to that client through the @connections API.
Routing Messages
Clients communicate with your backend by sending messages over this connection. In a REST API, you’d typically map specific actions in your backend to individual paths in a URI, and clients would send requests to each of those URIs.
To achieve this with WebSockets, clients instead send messages formatted as JSON objects. The JSON object needs to include a predefined key of your choosing to be used for routing. Let’s add a route selector for this JSON object: {“action”: “test”}.
You register a JSON key like “action,” and that key is evaluated for routing on every message sent through the WebSocket. With the routing key set, you declare specific routes with values for that routing key, like “test.”
In a CloudFormation template, the RouteSelectionExpression under the AWS::ApiGatewayV2::Api type sets a JSON routing key. The RouteKey under the AWS::ApiGatewayV2::Route type sets a route.
In our example, we set the RouteSelectionExpression to “$route.body.action,” which evaluates the “action” key. We register “test” under RouteKey and assign the Target for this route to be an AWS::ApiGatewayV2::Integration.
The AWS::ApiGatewayV2::Integration declares which part of your backend will fulfill client messages sent to this route. We’ll go into more depth on the AWS::ApiGatewayV2::Integration type later.
Here’s a snippet used to create a WebSocket in Amazon API Gateway:

And here’s a snippet used to create a route for a WebSocket in Amazon API Gateway:

Respond to Clients with One- or Two-Way Communication
Now that we know how to get client requests to the right place, we need to make sure the backend can respond. Our goal is to respond directly to the client that initiated the request, but that’s not the only kind of response used with WebSockets in Amazon API Gateway.
We need to decide on one- or two-way communication for the WebSocket. These options pertain to how you send responses back to clients.
We need two-way communication enabled so we can respond directly to clients without using the @connections API. But first, let’s evaluate what one-way communication means and why you’d use it.
With one-way communication, your backend doesn’t directly respond to the messages clients send. Instead, when your backend gets invoked by a client request, your backend integration is responsible for sending messages back to clients via the @connection API by using one or more client connection IDs.

Figure 2 – How WebSockets communicate to a client using the @connections API.
Remember those special $connect and $disconnect routes? In addition to notifying when clients connect and disconnect to the WebSocket, these events also allow you to capture connection IDs that are generated for tracking and interacting with clients.
To manage these connection IDs, you register Lambda functions to handle the $connect and $disconnect events and store these connection IDs in a database like Amazon DynamoDB. For more information on connection IDs and the @connections API, see the documentation.
This allows for more complex communication, but adds the overhead of managing connection IDs. What if you only need to communicate directly back to the same client that sent a request? That’s where two-way communication comes in.

Figure 3 – How WebSockets communicate to a client directly.
The two-way communication configuration allows for Lambda to directly respond to a client connected via WebSocket. We enable two-way communication by supplying an AWS::ApiGatewayV2::RouteResponse type. For more information on the AWS::ApiGatewayV2::RouteResponse type, see the documentation.
Here’s a snippet used to create a route response for a WebSocket in Amazon API Gateway:

Backend Integrations
Finally, we need an AWS::ApiGatewayV2::Integration to tie everything together. We’ve got client requests coming through the WebSocket connection and being routed, but we haven’t told the routing mechanism where to send messages.
With an integration, we declare which backend piece fulfills a route. We want Lambda to act as the backend for the “test” route, so here’s the CloudFormation:
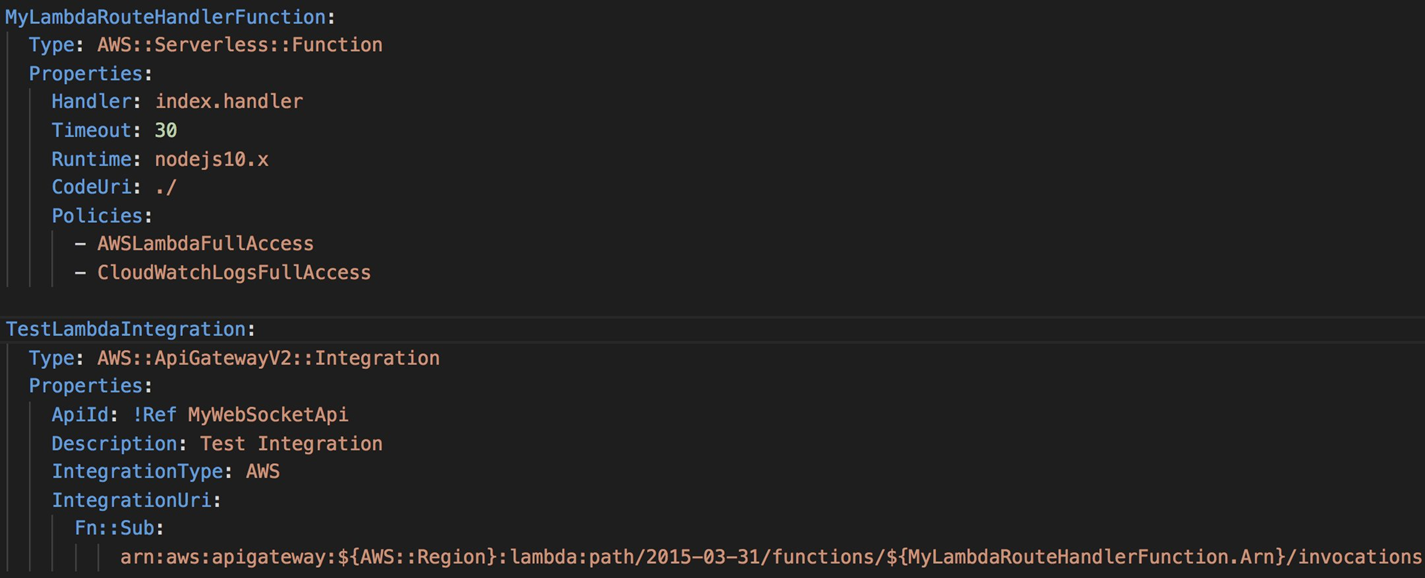
Figure 4 – A snippet used to create a Lambda function and Amazon API Gateway integration.
It’s worth noting that choosing the IntegrationType of “AWS_PROXY” makes your Lambda function responsible for parsing the JSON event body sent to the WebSocket, and also that you must format your response in a JSON object that has a “body” key.
Deploying with Stackery
Writing CloudFormation wasn’t our goal, but we needed learn about a lot of CloudFormation types, settings, and values on the journey to creating this WebSocket.
These detours on our trip brings us to Stackery’s motto: write functions, not YAML. We’ll be using the Stackery Canvas to visually create our architecture, but you can also utilize the Stackery CLI.
Before you do anything else, you need to create a Stackery account, link your AWS account to your Stackery account, and link a version control system to your Stackery account. This quick start guide gives great step-by-step instructions on how to get set up.
After setting up, create a new stack:
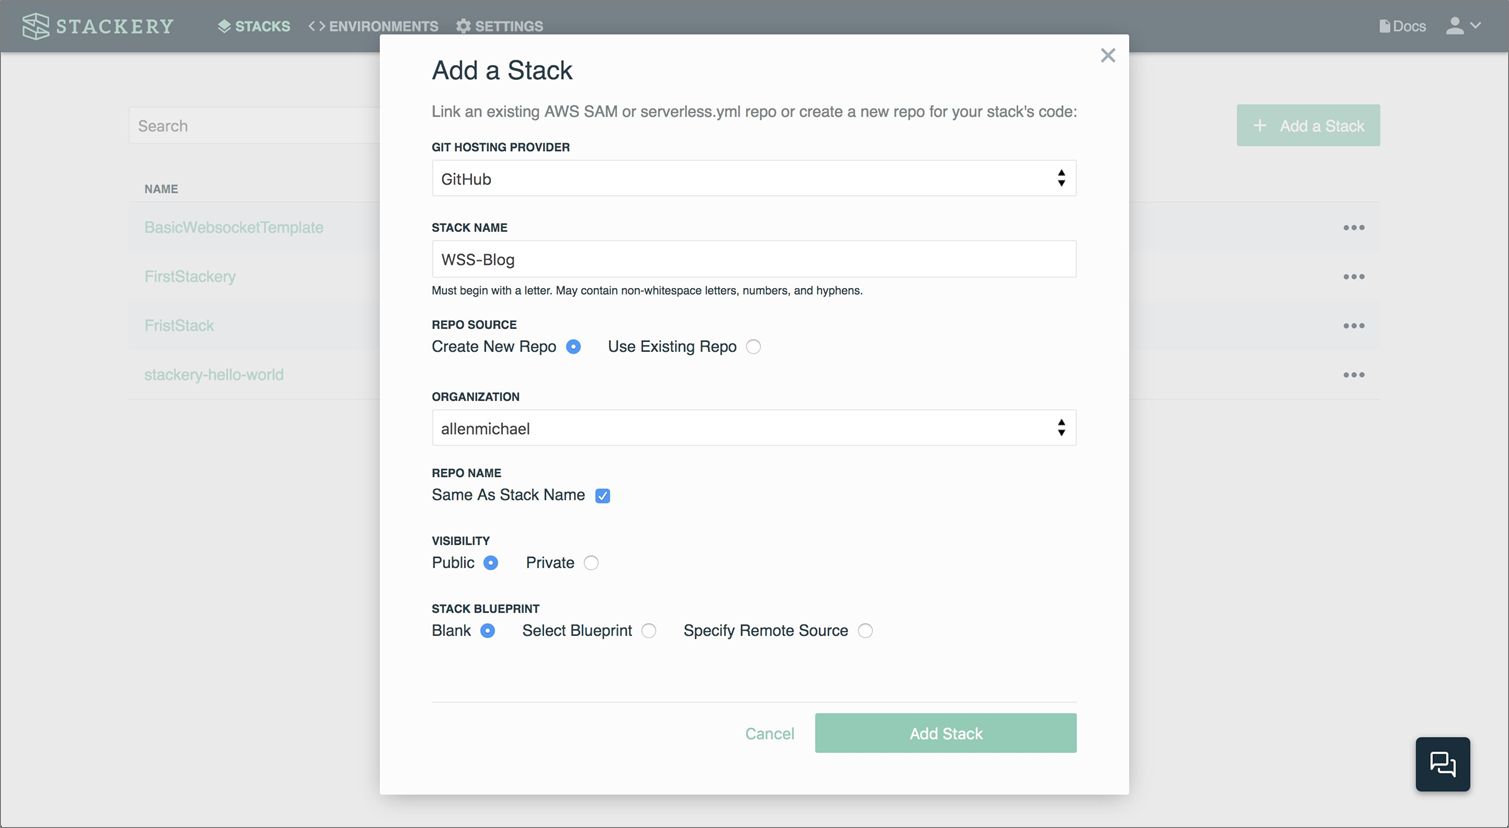
Figure 5 – Create a stack in your favorite Git provider.
You can create a new repo, or use an existing repo with your linked version control system. The code we use for the function is simple:
We are just returning a message that contains the string in the “echo” key in the JSON object sent by the client.
Then, it’s as simple as dragging and dropping a WebSocket.
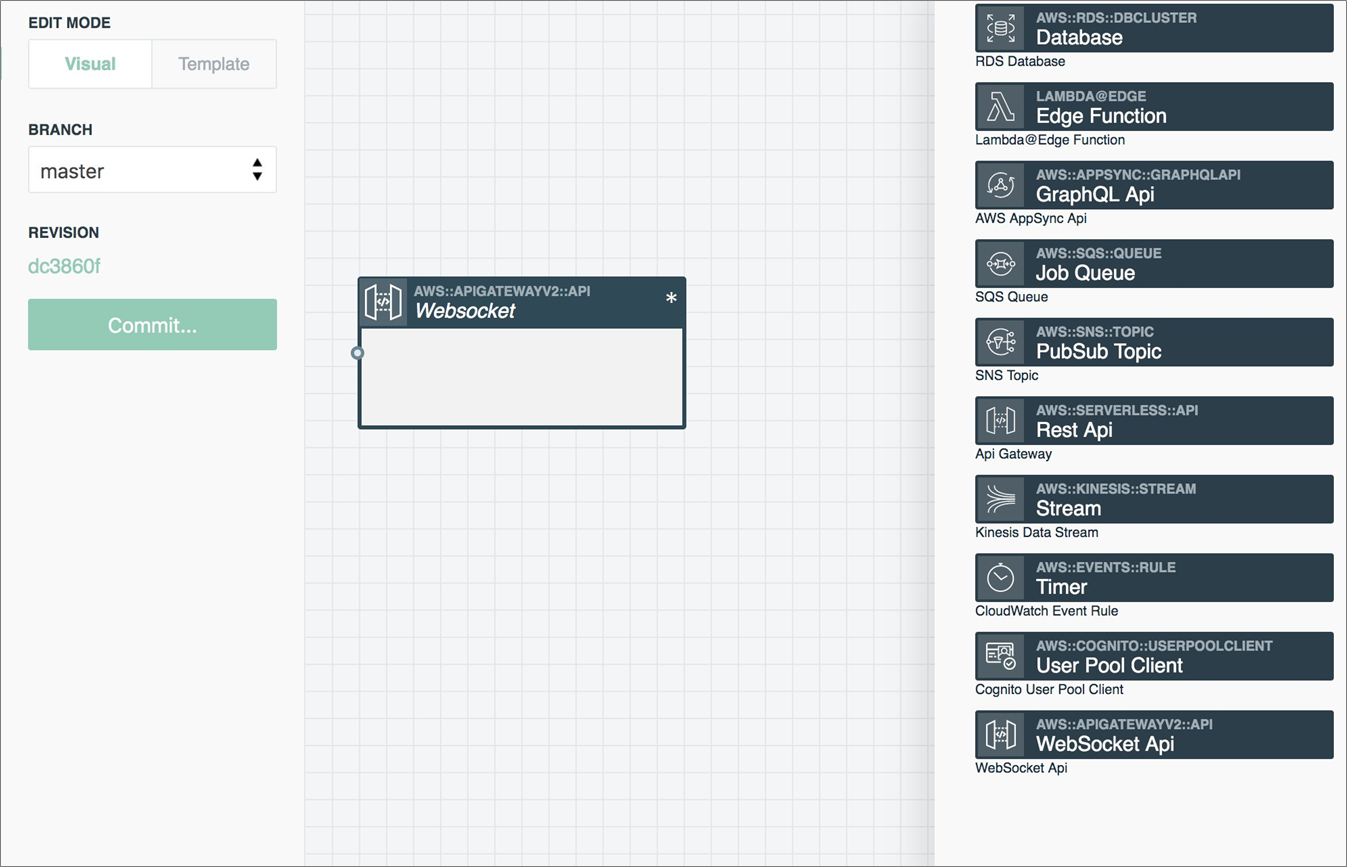
Figure 6 – Drag and drop a WebSocket API into your stack.
Once the WebSocket exists on the Stackery Canvas, double-click to open the configuration. Add the “test” route.
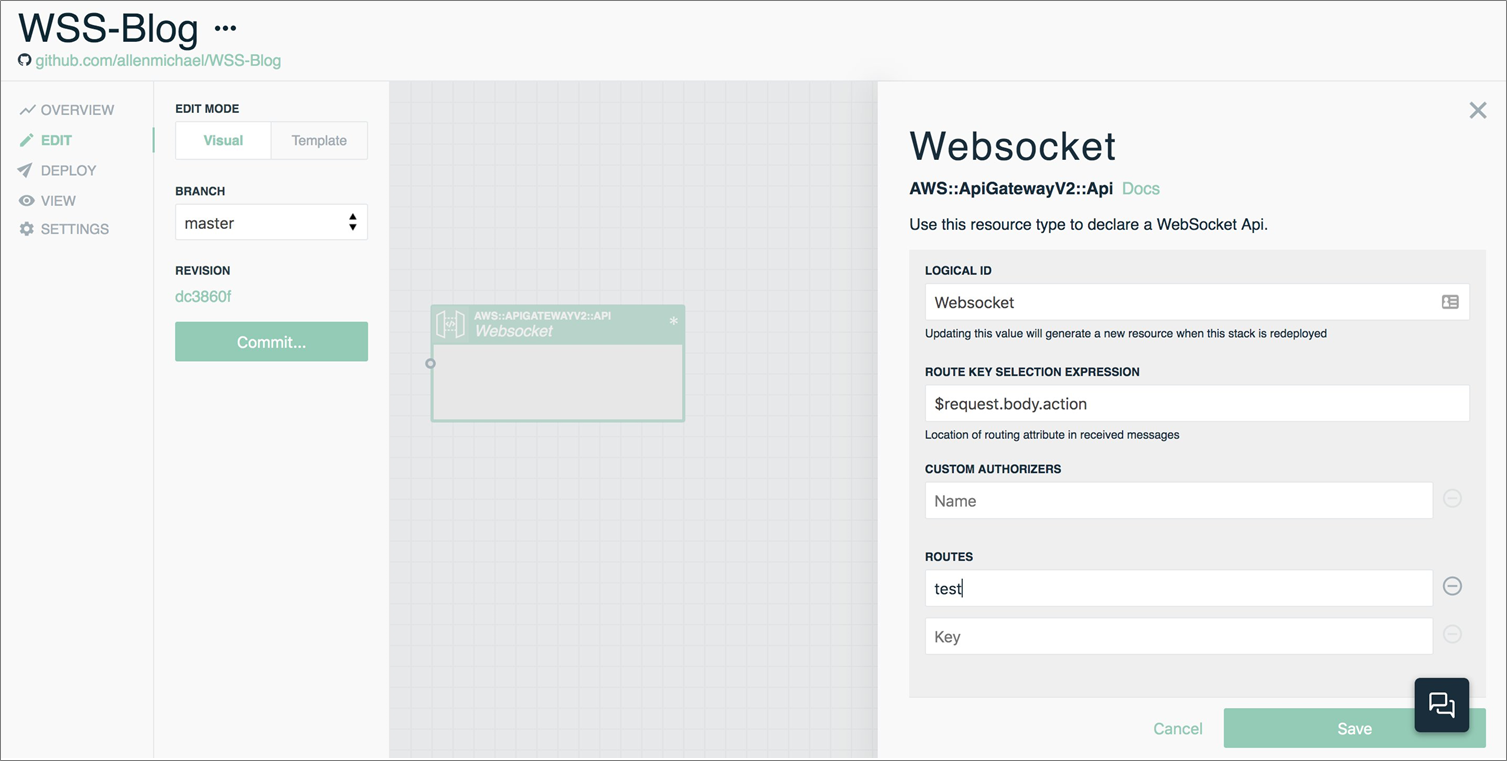
Figure 7 – Add a “test” route to your WebSocket API.
Next, drag and drop an AWS Lambda function. Connect the route with the function by clicking the handle on the “test” route and dragging to the handle on the function.
Finally, double-click the function to verify the Source Path field matches the location of the code in the Github repo you’re using.

Figure 8 – Create and integrate a Lambda function to handle “test” route messages.
Now, you’re ready to deploy. Move to the Deploy section in Stackery and prepare a new deployment. After your code is packaged for you, click Deploy and you’re redirected to the CloudFormation console.
You can alternatively use the Stackery CLI for an easy way to deploy in one step using AWS credentials in your local environment.
Click Execute and monitor for when CloudFormation completes.

Figure 9 – Deploy the stack into your AWS account.
Finally, once the stack finishes creating, click View back in the Stackery dashboard.
Retrieve the URI for the deployed WebSocket by double clicking on the API Gateway resource in the Stackery Canvas.

Figure 10 – View the properties of your newly deployed WebSocket API.
You can use a tool like wscat to connect via this URI and send messages to the Lambda function that simply echoes back the value in the “echo” key.

Figure 11 – Send a message to the test route of the API.
You can optionally commit all these template changes directly to your linked version control system.
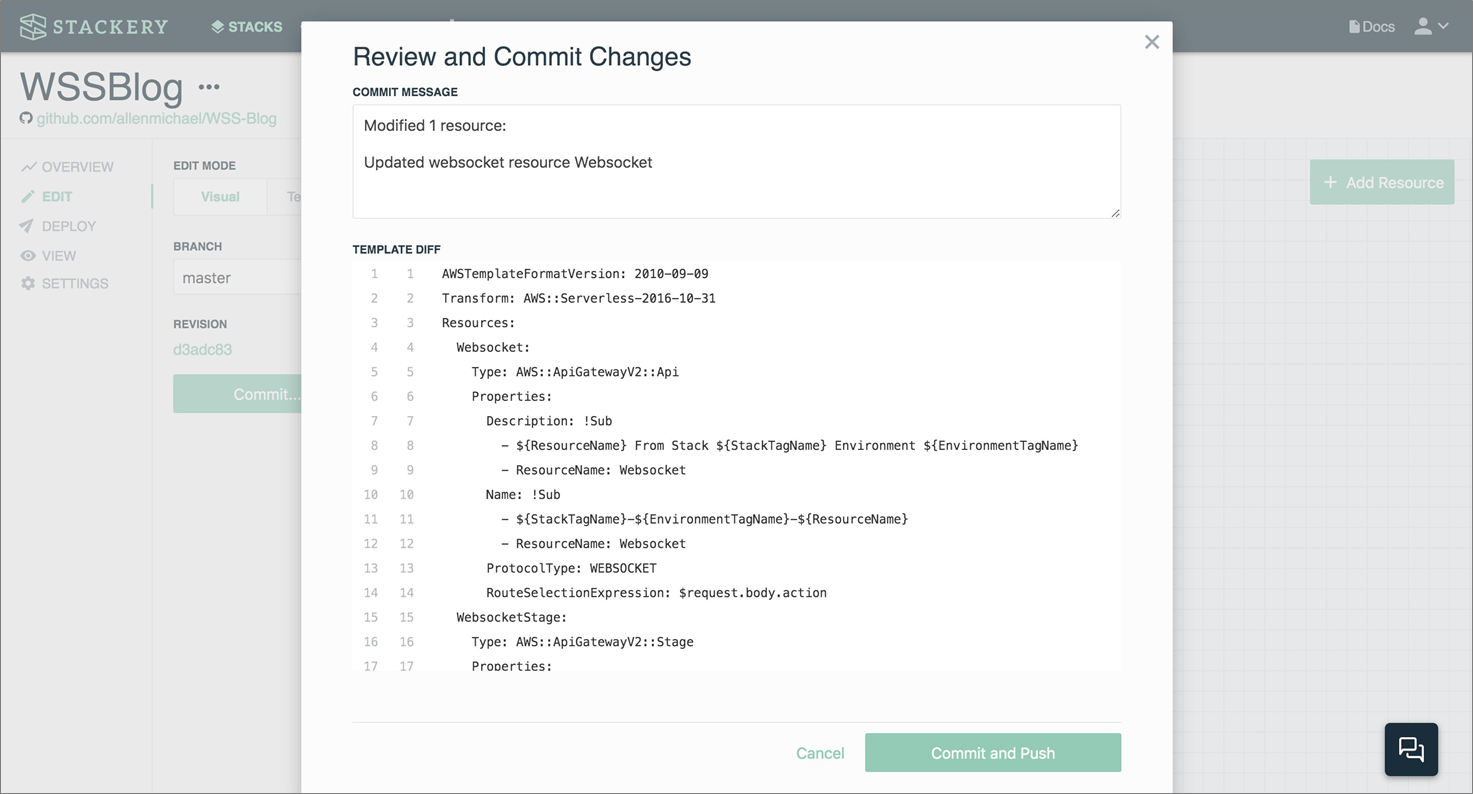
Figure 12 – Save the stack in your Git repo.
And with that, you have a basic WebSocket ready to interact with clients.
Summary
Through this guide, we created the simplest serverless WebSocket in Amazon API Gateway that can directly communicate back to the client who sent a message through the WebSocket. We also explored how to manage client connections and send messages to clients via the @connections API.
By using Stackery, we were able to skip past writing our own AWS CloudFormation templates. Instead, we moved directly to deploying our two-way enabled WebSocket, and we could instead focus our efforts on writing code for our backend Lambda function.
For more information on WebSockets in Amazon API Gateway, see the documentation. Be sure to follow Stackery on Twitter to keep up with the latest features and tune in for their live events.
.
AWS Competency Partners: The Next Smart
Stackery is an AWS Competency Partner, and if you want to be successful in today’s complex IT environment and remain that way tomorrow and into the future, teaming up with an AWS Competency Partner is The Next Smart.

.
|
Stackery – APN Partner Spotlight
Stackery is an AWS DevOps Competency Partner. Its operations dashboards and command line (CLI) tools provide sophisticated runtime support to the most complex serverless systems.
Contact Stackery | Solution Overview | AWS Marketplace
*Already worked with Stackery? Rate this Partner
*To review an APN Partner, you must be an AWS customer that has worked with them directly on a project.