AWS News Blog
Scalable, Cost-Effective Disaster Recovery in the Cloud

|
Should disaster strike, business continuity can require more than just periodic data backups. A full recovery that meets the business’s recovery time objectives (RTOs) must also include the infrastructure, operating systems, applications, and configurations used to process their data. The growing threats of ransomware highlight the need to be able to perform a full point-in-time recovery. For businesses affected by a ransomware attack, restoration of data from an old, possibly manual, backup will not be sufficient.
Previously, businesses have elected to provision separate, physical disaster recovery (DR) infrastructure. However, customers tell us this can be both space- and cost-prohibitive, involving capital expenditure on hardware and facilities that remain idle until called upon. The infrastructure also incurs overhead in terms of regular inspection and maintenance, typically manual, to ensure that should it ever be called upon, it’s ready and able to handle the current business load, which may have grown considerably since initial provisioning. This also makes testing difficult and expensive.
Today, I am happy to announce AWS Elastic Disaster Recovery (DRS) a fully scalable, cost-effective disaster recovery service for physical, virtual, and cloud servers, based on CloudEndure Disaster Recovery. DRS enables customers to use AWS as an elastic recovery site without needing to invest in on-premises DR infrastructure that lies idle until needed. Once enabled, DRS maintains a constant replication posture for your operating systems, applications, and databases. This helps businesses meet recovery point objectives (RPOs) of seconds, and RTOs of minutes, after disaster strikes. In cases of ransomware attacks, for example, DRS also allows recovery to a previous point in time.
DRS provides for recovery that scales as needed to match your current setup and does not need any time-consuming manual processes to maintain that readiness. It also offers the ability to perform disaster recovery readiness drills. Just as it’s important to test restoration of data from backups, being able to conduct recovery drills in a cost-effective manner without impacting ongoing replication or user activities can help give confidence that you can meet your objectives and customer expectations should you need to call on a recovery.
Elastic Disaster Recovery in Action
Once enabled, DRS continuously replicates block storage volumes from physical, virtual, or cloud-based servers, allowing it to support business RPOs measured in seconds. Recovery includes applications running on physical infrastructure, VMware vSphere, Microsoft Hyper-V, and cloud infrastructure to AWS. You’re able to recover all your applications and databases that run on supported Windows and Linux operating systems, with DRS orchestrating the recovery process for your servers on AWS to support an RTO measured in minutes.
Using an agent that you install on your servers, DRS securely replicates the data to a staging area subnet in a selected Region in your AWS account. The staging area subnet reduces costs to you, using affordable storage and minimal compute resources. Within the DRS console, you can recover Amazon Elastic Compute Cloud (Amazon EC2) instances in a different AWS Region if required. With DRS automating replication and recovery procedures, you can set up, test, and operate your disaster recovery capability using a single process without the need for specialized skill sets.
DRS gives you the flexibility to pay on an hourly basis, instead of needing to commit to a long-term contract or a set number of servers, a benefit over on-premises or data center recovery solutions. DRS charges hourly, on a pay-as-you-go basis. You can find specific details on pricing at the product page.
Exploring Elastic Disaster Recovery
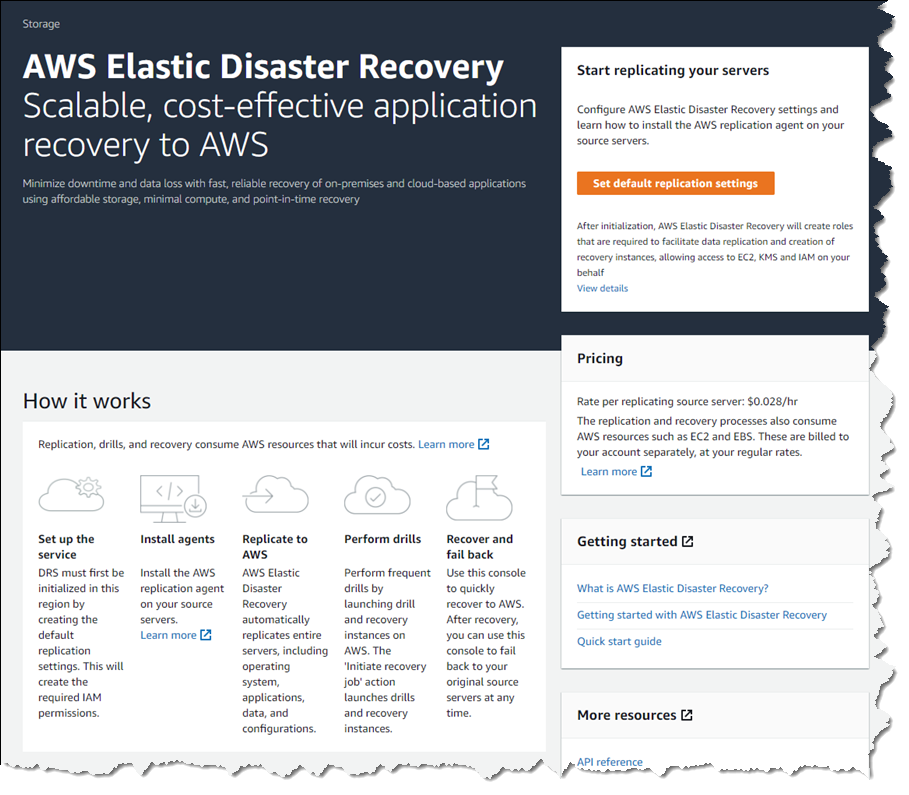
To set up disaster recovery for my resources I first need to configure my default replication settings. As I mentioned earlier, DRS can be used with physical, virtual, and cloud servers. For this post, I’m going to use a collection of EC2 instances as my source servers for disaster recovery.
From the DRS console home, shown earlier, choosing Set default replication settings takes me to a short initialization wizard. In the wizard, I first need to select an Amazon Virtual Private Cloud (Amazon VPC) subnet that will be used for staging. This subnet does not need to be in the same VPC as my resources, but I need to select one that is not private or blocked to the world. Below, I’ve chosen a subnet from my default VPC in my Region. I can also change the instance type used for the replication instance. I chose to keep the suggested default and clicked Next to proceed.

I also left the default settings unchanged for the next two pages. In Volumes and security groups, the wizard suggests I use the general-purpose SSD (gp3) Amazon Elastic Block Store (Amazon EBS) storage type and to use a security group provided by DRS. On the Additional settings page I can elect to use a private IP for data replication instead of routing over the public internet, and set the snapshot retention period, which defaults to seven days. Clicking Next one final time, I arrive at the Review and create page of the wizard. Choosing Create default completes the process of configuring my default replication settings.

With my replication settings finalized (I can edit them later if I wish, from the Actions menu on the Source servers console page) it’s time to set up my servers. I’m running a test fleet in EC2 that includes two Windows Server 2019 instances, and three Amazon Linux 2 instances. The DRS User Guide contains full instructions on how to obtain and set up the agent on each server type, so I won’t repeat them here. As I run and configure the agent on each of my server instances, the Source servers list automatically updates to include the new source server. The status of the initial sync, and future replication and recovery status of each source server, are summarized in this view.

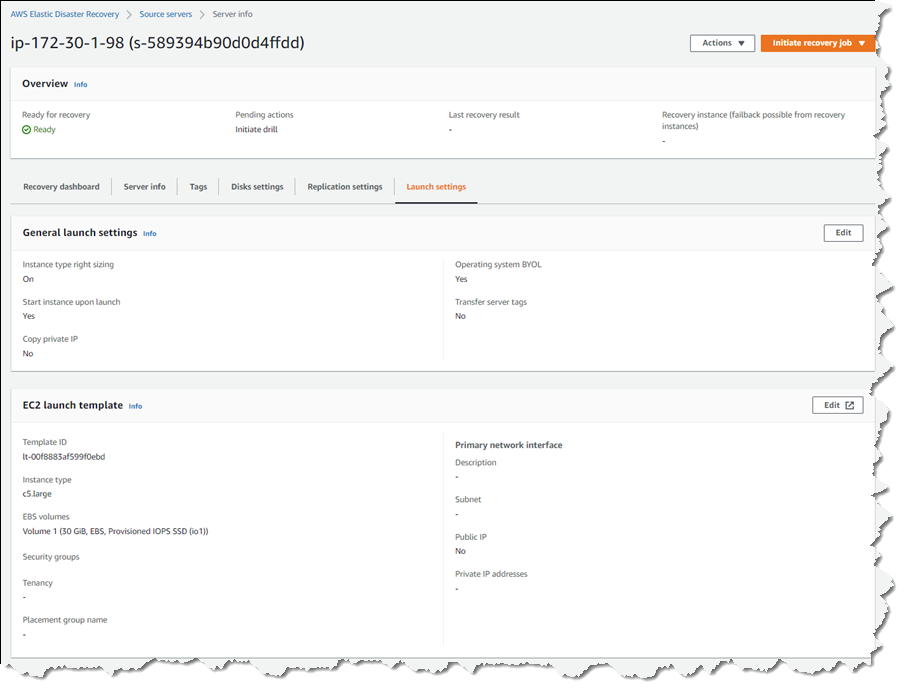
Selecting a hostname entry in the list takes me to a detail page. Here I can view a recovery dashboard, information on the underlying server, disk settings (including the ability to change the staging disk type from the default gp3 type selected by the initialization wizard, or whatever you choose during setup), and launch settings, shown below, that govern the recovery instance that will be created if I choose to initiate a drill or an actual recovery job.
Just like data backups, where established best practice is to periodically verify that the backups can actually be used to restore data, we recommend a similar best practice for disaster recovery. So, with my servers all configured and fully replicated, I decided to start a drill for a point-in-time (PIT) recovery for two of my servers. On these instances, following initial replication, I’d installed some additional software. In my scenario, perhaps this installation had gone badly wrong, or I’d fallen victim to a ransomware attack. Either way, I wanted to know and be confident that I could recover my servers if and when needed.
In the Source servers list I selected the two servers that I’d modified and from the Initiate recovery job drop-down menu, chose Initiate drill. Next, I can choose the recovery PIT I’m interested in. This view defaults to Any, meaning it lists all recovery PIT snapshots for the servers I selected. Or, I can choose to filter to All, meaning only PIT snapshots that apply to all the selected servers will be listed. Selecting All, I chose a time just after I’d completed installing additional software on the instances, and clicked Initiate drill.

I’m returned to the Source servers list, which shows status as the recovery proceeds. However, I switched to the Recovery job history view for more detail.

Clicking the job ID, I can drill down further to view a detail page of the source servers involved in the recovery (and can drill down further for each), as well as an overall recovery job log.
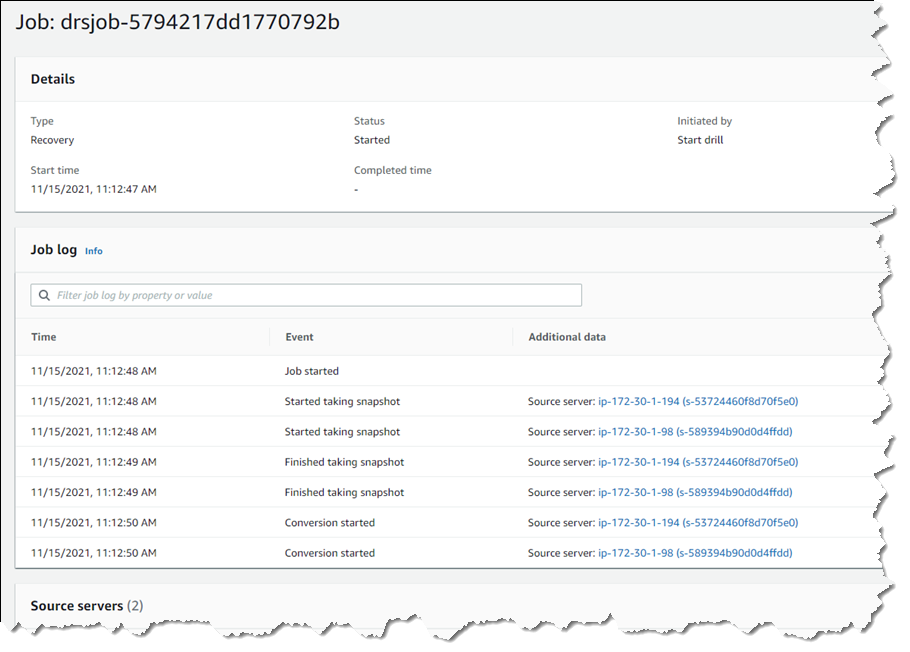
Note – during a drill, or an actual recovery, if you go to the EC2 console you’ll notice one or more additional instances, started by DRS, running in your account (in addition to the replication server). These temporary instances, named AWS Elastic Disaster Recovery Conversion Server, are used to process the PIT snapshots onto the actual recovery instance(s) and will be terminated when the job is complete.
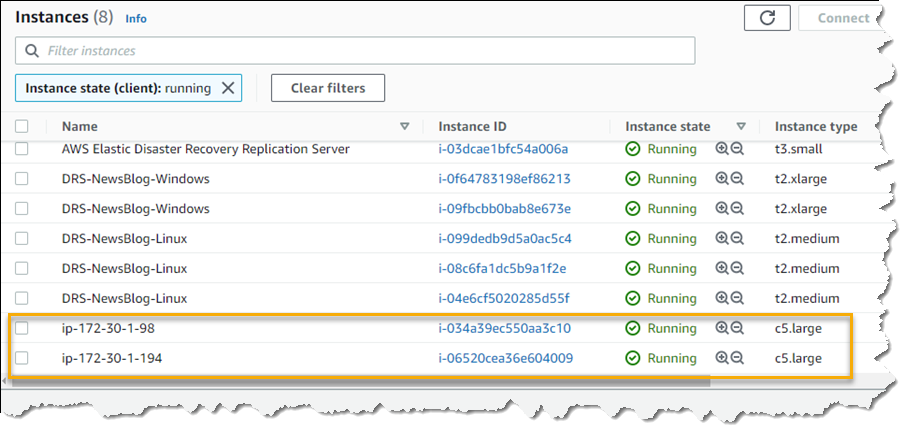
Once the recovery is complete, I can see two new instances in my EC2 environment. These are in the state matching the point-in-time recovery I selected, and are using the instance types I selected earlier in the DRS initialization wizard. I can now connect to them to verify that the recovery drill performed as expected before terminating them. Had this been a real recovery, I would have the option of terminating the original instances to replace them with the recovery versions, or handle whatever other tasks are needed to complete the disaster recovery for my business.
Set Up Your Disaster Recovery Environment Today
AWS Elastic Disaster Recovery is generally available now in the US East (N. Virginia), US East (Ohio), US West (Oregon), Asia Pacific (Singapore), Asia Pacific (Sydney), Asia Pacific (Tokyo), Europe (Frankfurt), Europe (Ireland), and Europe (London) Regions. Review the AWS Elastic Disaster Recovery User Guide for more details on setup and operation, and get started today with DRS to eliminate idle recovery site resources, enjoy pay-as-you-go billing, and simplify your deployments to improve your disaster recovery objectives.