AWS Big Data Blog
Combine Transactional and Analytical Data Using Amazon Aurora and Amazon Redshift
A few months ago, we published a blog post about capturing data changes in an Amazon Aurora database and sending it to Amazon Athena and Amazon QuickSight for fast analysis and visualization. In this post, I want to demonstrate how easy it can be to take the data in Aurora and combine it with data in Amazon Redshift using Amazon Redshift Spectrum.
With Amazon Redshift, you can build petabyte-scale data warehouses that unify data from a variety of internal and external sources. Because Amazon Redshift is optimized for complex queries (often involving multiple joins) across large tables, it can handle large volumes of retail, inventory, and financial data without breaking a sweat.
In this post, we describe how to combine data in Aurora in Amazon Redshift. Here’s an overview of the solution:
- Use AWS Lambda functions with Amazon Aurora to capture data changes in a table.
- Save data in an Amazon S3
- Query data using Amazon Redshift Spectrum.
We use the following services:
- Amazon Aurora
- AWS Lambda
- Amazon Kinesis Data Firehose
- Amazon S3
- Amazon Redshift
Serverless architecture for capturing and analyzing Aurora data changes
Consider a scenario in which an e-commerce web application uses Amazon Aurora for a transactional database layer. The company has a sales table that captures every single sale, along with a few corresponding data items. This information is stored as immutable data in a table. Business users want to monitor the sales data and then analyze and visualize it.
In this example, you take the changes in data in an Aurora database table and save it in Amazon S3. After the data is captured in Amazon S3, you combine it with data in your existing Amazon Redshift cluster for analysis.
By the end of this post, you will understand how to capture data events in an Aurora table and push them out to other AWS services using AWS Lambda.
The following diagram shows the flow of data as it occurs in this tutorial:

The starting point in this architecture is a database insert operation in Amazon Aurora. When the insert statement is executed, a custom trigger calls a Lambda function and forwards the inserted data. Lambda writes the data that it received from Amazon Aurora to a Kinesis data delivery stream. Kinesis Data Firehose writes the data to an Amazon S3 bucket. Once the data is in an Amazon S3 bucket, it is queried in place using Amazon Redshift Spectrum.
Creating an Aurora database
First, create a database by following these steps in the Amazon RDS console:
- Sign in to the AWS Management Console, and open the Amazon RDS console.
- Choose Launch a DB instance, and choose Next.
- For Engine, choose Amazon Aurora.
- Choose a DB instance class. This example uses a small, since this is not a production database.
- In Multi-AZ deployment, choose No.
- Configure DB instance identifier, Master username, and Master password.
- Launch the DB instance.
After you create the database, use MySQL Workbench to connect to the database using the CNAME from the console. For information about connecting to an Aurora database, see Connecting to an Amazon Aurora DB Cluster.
The following screenshot shows the MySQL Workbench configuration:

Next, create a table in the database by running the following SQL statement:
You can now populate the table with some sample data. To generate sample data in your table, copy and run the following script. Ensure that the highlighted (bold) variables are replaced with appropriate values.
The following screenshot shows how the table appears with the sample data:

Sending data from Amazon Aurora to Amazon S3
There are two methods available to send data from Amazon Aurora to Amazon S3:
- Using a Lambda function
- Using SELECT INTO OUTFILE S3
To demonstrate the ease of setting up integration between multiple AWS services, we use a Lambda function to send data to Amazon S3 using Amazon Kinesis Data Firehose.
Alternatively, you can use a SELECT INTO OUTFILE S3 statement to query data from an Amazon Aurora DB cluster and save it directly in text files that are stored in an Amazon S3 bucket. However, with this method, there is a delay between the time that the database transaction occurs and the time that the data is exported to Amazon S3 because the default file size threshold is 6 GB.
Creating a Kinesis data delivery stream
The next step is to create a Kinesis data delivery stream, since it’s a dependency of the Lambda function.
To create a delivery stream:
- Open the Kinesis Data Firehose console
- Choose Create delivery stream.
- For Delivery stream name, type AuroraChangesToS3.
- For Source, choose Direct PUT.
- For Record transformation, choose Disabled.
- For Destination, choose Amazon S3.
- In the S3 bucket drop-down list, choose an existing bucket, or create a new one.
- Enter a prefix if needed, and choose Next.
- For Data compression, choose GZIP.
- In IAM role, choose either an existing role that has access to write to Amazon S3, or choose to generate one automatically. Choose Next.
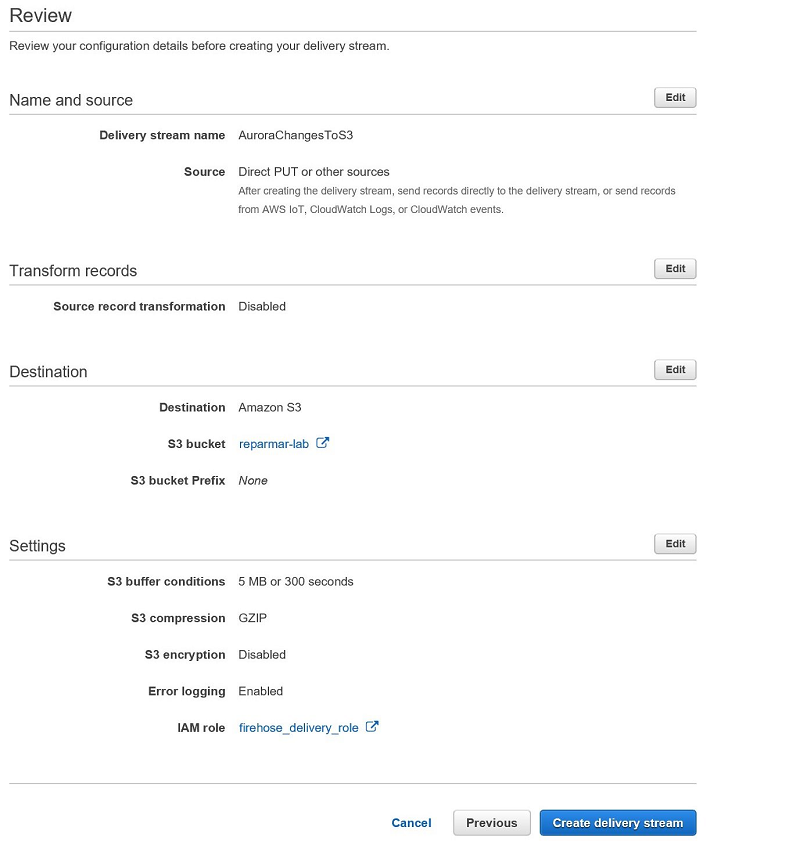
- Review all the details on the screen, and choose Create delivery stream when you’re finished.
Creating a Lambda function
Now you can create a Lambda function that is called every time there is a change that needs to be tracked in the database table. This Lambda function passes the data to the Kinesis data delivery stream that you created earlier.
To create the Lambda function:
- Open the AWS Lambda console.
- Ensure that you are in the AWS Region where your Amazon Aurora database is located.
- If you have no Lambda functions yet, choose Get started now. Otherwise, choose Create function.
- Choose Author from scratch.
- Give your function a name and select Python 3.6 for Runtime
- Choose and existing or create a new Role, the role would need to have access to call firehose:PutRecord
- Choose Next on the trigger selection screen.
- Paste the following code in the code window. Change the stream_name variable to the Kinesis data delivery stream that you created in the previous step.
- Choose File -> Save in the code editor and then choose Save.
Note the Amazon Resource Name (ARN) of this Lambda function.
Giving Aurora permissions to invoke a Lambda function
To give Amazon Aurora permissions to invoke a Lambda function, you must attach an IAM role with appropriate permissions to the cluster. For more information, see Invoking a Lambda Function from an Amazon Aurora DB Cluster.
Once you are finished, the Amazon Aurora database has access to invoke a Lambda function.
Creating a stored procedure and a trigger in Amazon Aurora
Now, go back to MySQL Workbench, and run the following command to create a new stored procedure. When this stored procedure is called, it invokes the Lambda function you created. Change the ARN in the following code to your Lambda function’s ARN.
Create a trigger TR_Sales_CDC on the Sales table. When a new record is inserted, this trigger calls the CDC_TO_FIREHOSE stored procedure.
If a new row is inserted in the Sales table, the Lambda function that is mentioned in the stored procedure is invoked.
Verify that data is being sent from the Lambda function to Kinesis Data Firehose to Amazon S3 successfully. You might have to insert a few records, depending on the size of your data, before new records appear in Amazon S3. This is due to Kinesis Data Firehose buffering. To learn more about Kinesis Data Firehose buffering, see the “Amazon S3” section in Amazon Kinesis Data Firehose Data Delivery.
Every time a new record is inserted in the sales table, a stored procedure is called, and it updates data in Amazon S3.
Querying data in Amazon Redshift
In this section, you use the data you produced from Amazon Aurora and consume it as-is in Amazon Redshift. In order to allow you to process your data as-is, where it is, while taking advantage of the power and flexibility of Amazon Redshift, you use Amazon Redshift Spectrum. You can use Redshift Spectrum to run complex queries on data stored in Amazon S3, with no need for loading or other data prep.
Just create a data source and issue your queries to your Amazon Redshift cluster as usual. Behind the scenes, Redshift Spectrum scales to thousands of instances on a per-query basis, ensuring that you get fast, consistent performance even as your dataset grows to beyond an exabyte! Being able to query data that is stored in Amazon S3 means that you can scale your compute and your storage independently. You have the full power of the Amazon Redshift query model and all the reporting and business intelligence tools at your disposal. Your queries can reference any combination of data stored in Amazon Redshift tables and in Amazon S3.
Redshift Spectrum supports open, common data types, including CSV/TSV, Apache Parquet, SequenceFile, and RCFile. Files can be compressed using gzip or Snappy, with other data types and compression methods in the works.
First, create an Amazon Redshift cluster. Follow the steps in Launch a Sample Amazon Redshift Cluster.
Next, create an IAM role that has access to Amazon S3 and Athena. By default, Amazon Redshift Spectrum uses the Amazon Athena data catalog. Your cluster needs authorization to access your external data catalog in AWS Glue or Athena and your data files in Amazon S3.
In the demo setup, I attached AmazonS3FullAccess and AmazonAthenaFullAccess. In a production environment, the IAM roles should follow the standard security of granting least privilege. For more information, see IAM Policies for Amazon Redshift Spectrum.
Attach the newly created role to the Amazon Redshift cluster. For more information, see Associate the IAM Role with Your Cluster.
Next, connect to the Amazon Redshift cluster, and create an external schema and database:
Don’t forget to replace the IAM role in the statement.
Then create an external table within the database:
Query the table, and it should contain data. This is a fact table.

Next, create a dimension table. For this example, we create a date/time dimension table. Create the table:
Populate the table with data:
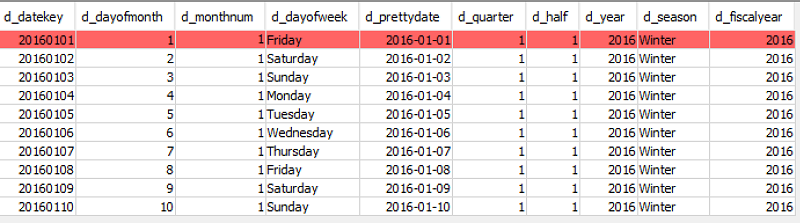
The date dimension table should look like the following:
Querying data in local and external tables using Amazon Redshift
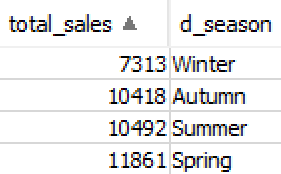
Now that you have the fact and dimension table populated with data, you can combine the two and run analysis. For example, if you want to query the total sales amount by weekday, you can run the following:
You get the following results:
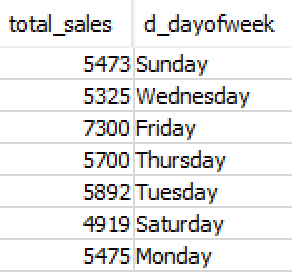
Similarly, you can replace d_season with d_dayofweek to get sales figures by weekday:
With Amazon Redshift Spectrum, you pay only for the queries you run against the data that you actually scan. We encourage you to use file partitioning, columnar data formats, and data compression to significantly minimize the amount of data scanned in Amazon S3. This is important for data warehousing because it dramatically improves query performance and reduces cost.
Partitioning your data in Amazon S3 by date, time, or any other custom keys enables Amazon Redshift Spectrum to dynamically prune nonrelevant partitions to minimize the amount of data processed. If you store data in a columnar format, such as Parquet, Amazon Redshift Spectrum scans only the columns needed by your query, rather than processing entire rows. Similarly, if you compress your data using one of the supported compression algorithms in Amazon Redshift Spectrum, less data is scanned.
Analyzing and visualizing Amazon Redshift data in Amazon QuickSight
Modify the Amazon Redshift security group to allow an Amazon QuickSight connection. For more information, see Authorizing Connections from Amazon QuickSight to Amazon Redshift Clusters.
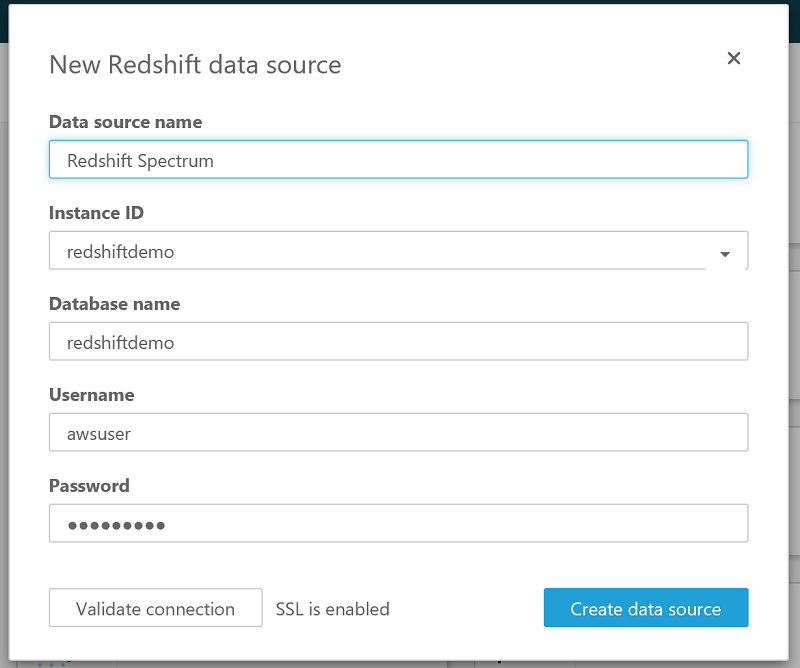
After modifying the Amazon Redshift security group, go to Amazon QuickSight. Create a new analysis, and choose Amazon Redshift as the data source.
Enter the database connection details, validate the connection, and create the data source.
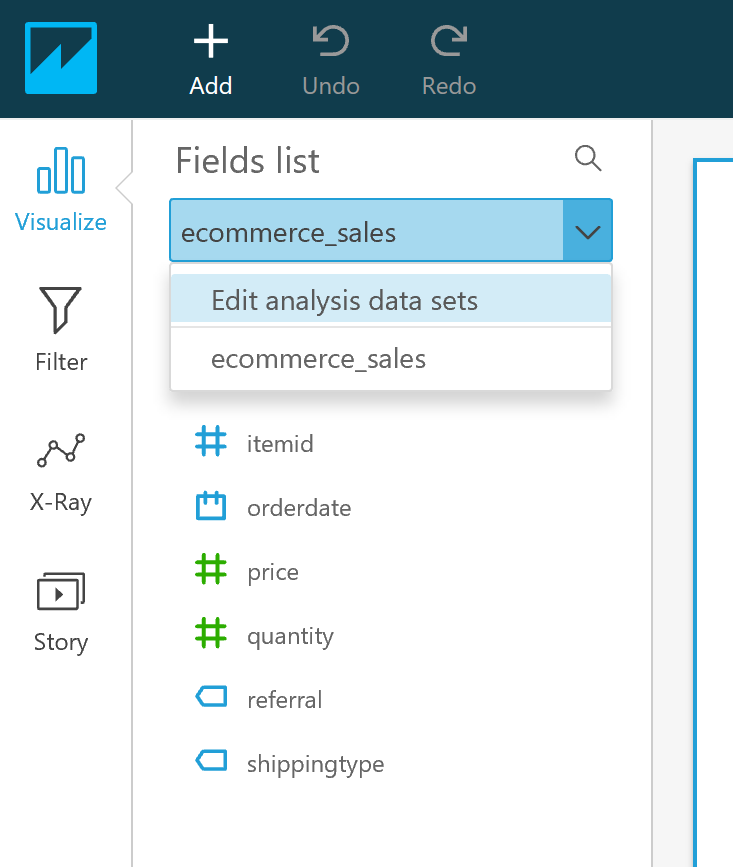
Choose the schema to be analyzed. In this case, choose spectrum_schema, and then choose the ecommerce_sales table.

Next, we add a custom field for Total Sales = Price*Quantity. In the drop-down list for the ecommerce_sales table, choose Edit analysis data sets.
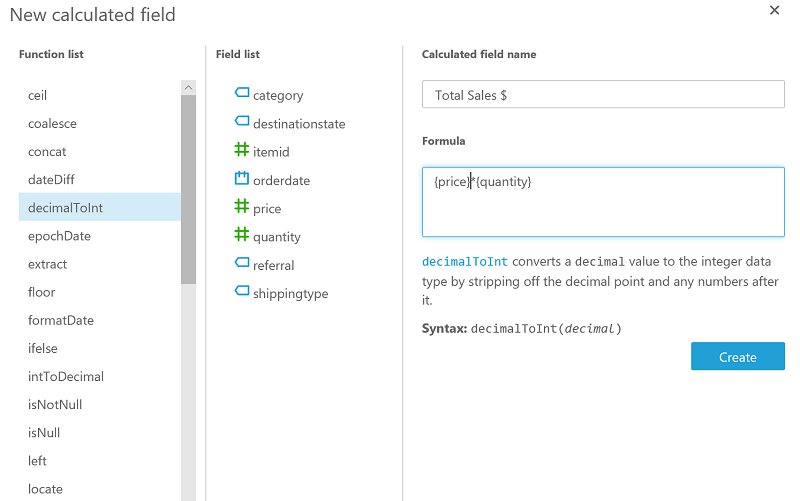
On the next screen, choose Edit.
In the data prep screen, choose New Field. Add a new calculated field Total Sales $, which is the product of the Price*Quantity fields. Then choose Create. Save and visualize it.
Next, to visualize total sales figures by month, create a graph with Total Sales on the x-axis and Order Data formatted as month on the y-axis.

After you’ve finished, you can use Amazon QuickSight to add different columns from your Amazon Redshift tables and perform different types of visualizations. You can build operational dashboards that continuously monitor your transactional and analytical data. You can publish these dashboards and share them with others.
Final notes
Amazon QuickSight can also read data in Amazon S3 directly. However, with the method demonstrated in this post, you have the option to manipulate, filter, and combine data from multiple sources or Amazon Redshift tables before visualizing it in Amazon QuickSight.
In this example, we dealt with data being inserted, but triggers can be activated in response to an INSERT, UPDATE, or DELETE trigger.
Keep the following in mind:
- Be careful when invoking a Lambda function from triggers on tables that experience high write traffic. This would result in a large number of calls to your Lambda function. Although calls to the lambda_async procedure are asynchronous, triggers are synchronous.
- A statement that results in a large number of trigger activations does not wait for the call to the AWS Lambda function to complete. But it does wait for the triggers to complete before returning control to the client.
- Similarly, you must account for Amazon Kinesis Data Firehose limits. By default, Kinesis Data Firehose is limited to a maximum of 5,000 records/second. For more information, see Monitoring Amazon Kinesis Data Firehose.
In certain cases, it may be optimal to use AWS Database Migration Service (AWS DMS) to capture data changes in Aurora and use Amazon S3 as a target. For example, AWS DMS might be a good option if you don’t need to transform data from Amazon Aurora. The method used in this post gives you the flexibility to transform data from Aurora using Lambda before sending it to Amazon S3. Additionally, the architecture has the benefits of being serverless, whereas AWS DMS requires an Amazon EC2 instance for replication.
For design considerations while using Redshift Spectrum, see Using Amazon Redshift Spectrum to Query External Data.
If you have questions or suggestions, please comment below.
Additional Reading
If you found this post useful, be sure to check out Capturing Data Changes in Amazon Aurora Using AWS Lambda and 10 Best Practices for Amazon Redshift Spectrum
About the Authors
 Re Alvarez-Parmar is a solutions architect for Amazon Web Services. He helps enterprises achieve success through technical guidance and thought leadership. In his spare time, he enjoys spending time with his two kids and exploring outdoors.