AWS Big Data Blog
Create an Amazon Redshift Data Warehouse That Can Be Securely Accessed Across Accounts
Data security is paramount in many industries. Organizations that shift their IT infrastructure to the cloud must ensure that their data is protected and that the attack surface is minimized. This post focuses on a method of securely loading a subset of data from one Amazon Redshift cluster to another Amazon Redshift cluster that is located in a different AWS account. You can accomplish this by dynamically controlling the security group ingress rules that are attached to the clusters.
Disclaimer: This solution is just one component of creating a secure infrastructure for loading and migrating data. It should not be thought of as an all-encompassing security solution. This post doesn’t touch on other important security topics, such as connecting to Amazon Redshift using Secure Sockets Layer (SSL) and encrypting data at rest.
The case for creating a segregated data loading account
From a security perspective, it is easier to restrict access to sensitive infrastructure if the respective stages (dev, QA, staging, and prod) are each located in their own isolated AWS account. Another common method for isolating resources is to set up separate virtual private clouds (VPCs) for each stage, all within a single AWS account. Because many services live outside the VPC (for example, Amazon S3, Amazon DynamoDB, and Amazon Kinesis), it requires careful thought to isolate the resources that should be associated with dev, QA, staging, and prod.
The segregated account model setup does create more overhead. But it gives administrators more control without them having to create tags and use cumbersome naming conventions to define a logical stage. In the segregated account model, all the data and infrastructure that are located in an account belong to that particular stage of the release pipeline (dev, QA, staging, or prod).
But where should you put infrastructure that does not belong to one particular stage?
Infrastructure to support deployments or to load data across accounts is best located in another segregated account. By deploying infrastructure or loading data from a separate account, you can’t depend on any existing roles, VPCs, subnets, etc. Any information that is necessary to deploy your infrastructure or load the data must be captured up front. This allows you to perform repeatable processes in a predictable and secure manner. With the recent addition of the StackSets feature in AWS CloudFormation, you can provision and manage infrastructure in multiple AWS accounts and Regions from a single template. This four-part blog series discusses different ways of automating the creation of cross-account roles and capturing account-specific information.
Loading OpenFDA data into Amazon Redshift
Before you get started with loading data from one Amazon Redshift cluster to another, you first need to create an Amazon Redshift cluster and load some data into it. You can use the following AWS CloudFormation template to create an Amazon Redshift cluster. You need to create Amazon Redshift clusters in both the source and target accounts.
After you create your Amazon Redshift clusters, you can go ahead and load some data into the cluster that is located in your source account. One of the great benefits of AWS is the ability to host and share public datasets on Amazon S3. When you test different architectures, these datasets serve as useful resources to get up and running without a lot of effort. For this post, we use the OpenFDA food enforcement dataset because it is a relatively small file and is easy to work with.
In the source account, you need to spin up an Amazon EMR cluster with Apache Spark so that you can unzip the file and format it properly before loading it into Amazon Redshift. The following AWS CloudFormation template provides the EMR cluster that you need.
Note: As an alternative, you can load the data using AWS Glue, which now supports Scala.
Now that your EMR cluster is up and running, you can submit this Scala code over a REST API call to Apache Livy. You also have the option of running this code inside of an Apache Zeppelin notebook.
To be able to run this Scala code, you must install the spark-redshift driver on your EMR cluster.
Connect to your source Amazon Redshift cluster in your source account, and verify that the data is present by running a quick query:
Opening up the security groups
Now that the data has been loaded in the source Amazon Redshift cluster, it can be moved over to the target Amazon Redshift cluster. Because the security groups that are associated with the two clusters are very restrictive, there is no way to load the data from the centralized data loading AWS account without modifying the ingress rules on both security groups. Here are a few possible options:
- Add an ingress rule to allow all traffic to port 5439 (the default Amazon Redshift port).
- This option is not recommended because you are widening your attack surface significantly and exposing yourself to a potential attack.
- Peer the VPC in the data loader account to the source and target Amazon Redshift VPCs, and modify the ingress rule to allow all traffic from the private IP range of the data loader VPC.
- This solution is reasonably secure but does require some manual setup. Because the ingress rules in the source and target Amazon Redshift clusters allow access from the VPC private IP range, any resources in the data loader account can access both clusters, which is suboptimal.
- Leave long-running Amazon EC2 instances or EMR clusters in the data loader AWS account and manually create specific ingress rules in the source and target Amazon Redshift security groups to allow for those specific IPs.
- This option creates a lot of wasted cost because it requires leaving EC2 instances or an EMR cluster running indefinitely whether or not they are actually being used.
None of these three options is ideal, so let’s explore another option. One of the more powerful features of running EC2 instances in the cloud is the ability to dynamically manage and configure your environment using instance metadata. The AWS Cloud is dynamic by nature and incentivizes you to reduce costs by terminating instances when they are not being used. Therefore, instance metadata can serve as the glue to performing repeatable processes to these dynamic instances.
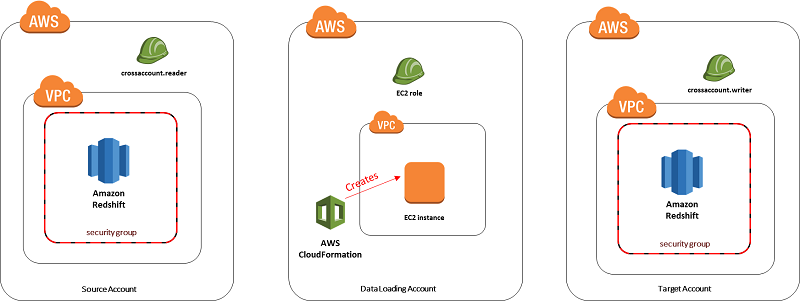
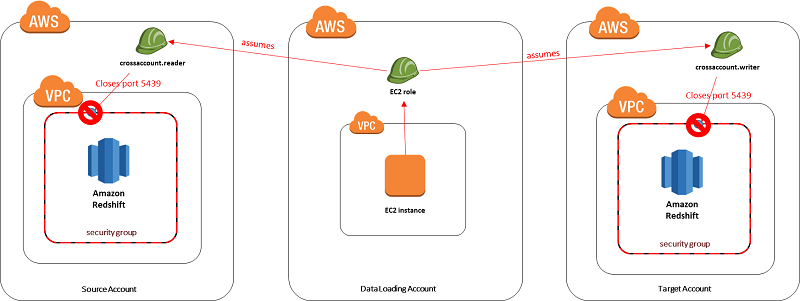
To load the data from the source Amazon Redshift cluster to the target Amazon Redshift cluster, perform the following steps:
- Spin up an EC2 instance in the data loader account.
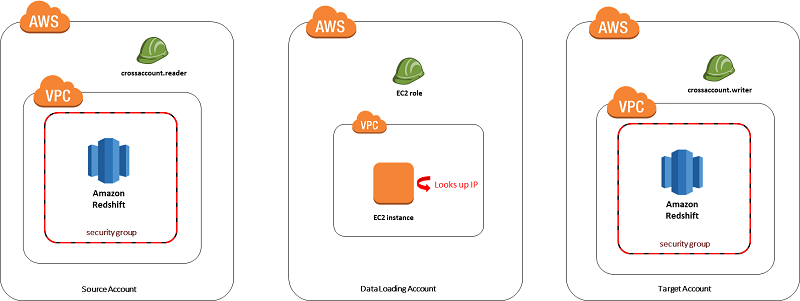
- Use instance metadata to look up the IP of the EC2 instance.
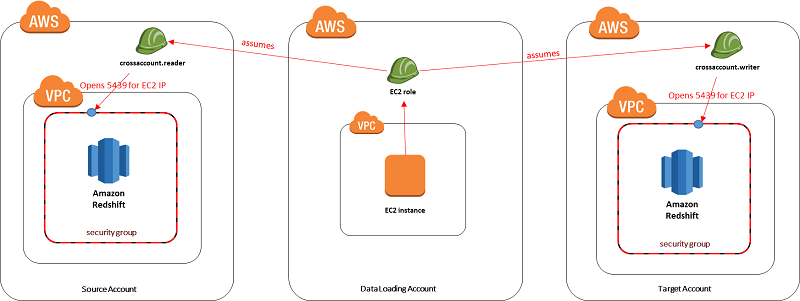
- Assume roles in the source and target accounts using the AWS Security Token Service (AWS STS), and create ingress rules for the IP that was retrieved from instance metadata.
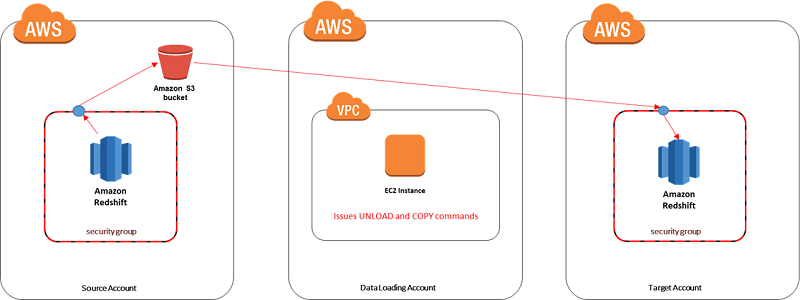
- Run a simple Python or Java program to perform a simple transformation and unload the data from the source Amazon Redshift cluster. Then load the results into the target Amazon Redshift cluster.
- Assume roles in the source and target accounts using AWS STS, and remove the ingress rules that were created in step 3.
By following the steps in this GitHub repository, you can run the AWS CloudFormation template in the data loader account and see all five steps in action. When the Python program finishes, you should see that the security groups for both Amazon Redshift clusters don’t allow traffic from any IP. Manually add your IP as an ingress rule to the target Amazon Redshift cluster’s security group on port 5439. When you run the following query, you should see that the data has been populated within the target Amazon Redshift cluster.

Recap
This post highlighted the importance of loading data in a secure manner across accounts. It mentioned reasons why you might want to provision infrastructure and load data from a centralized account. Several candidate solutions were discussed. Ultimately, the solution that we chose involved opening up security groups for a single IP and then closing them back up after the data was loaded. This solution minimizes the attack surface to a single IP and can be completely automated. The final solution is implemented in this GitHub repository.
Additional Reading
Be sure to check out the 10 Best Practices for Amazon Redshift Spectrum, and the Top 10 Tuning Techniques for Amazon Redshift.
About the Author
 Ryan Hood is a Data Engineer for AWS. He works on big data projects leveraging the newest AWS offerings. In his spare time, he attempts to Sous-vide anything he can find in his refrigerator.