AWS Big Data Blog
Introducing AWS Glue for Ray: Scaling your data integration workloads using Python
AWS Glue is a serverless data integration service that makes it simple to discover, prepare, move, and integrate data from multiple sources for analytics, machine learning (ML), and application development. Today, AWS Glue processes customer jobs using either Apache Spark’s distributed processing engine for large workloads or Python’s single-node processing engine for smaller workloads. Customers like Python for its ease of use and rich collection of built-in data-processing libraries but might find it difficult for customers to scale Python beyond a single compute node. This limitation makes it difficult for customers to process large datasets. Customers want a solution that allows them to continue using familiar Python tools and AWS Glue jobs on data sets of all sizes, even those that can’t fit on a single instance.
We are happy to announce the release of a new AWS Glue job type: Ray. Ray is an open-source unified compute framework that makes it simple to scale AI and Python workloads. Ray started as an open-source project at RISELab in UC Berkeley. If your application is written in Python, you can scale it with Ray in a distributed cluster in a multi-node environment. Ray is Python native and you can combine it with the AWS SDK for pandas to prepare, integrate and transform your data for running your data analytics and ML workloads in combination. You can use AWS Glue for Ray with Glue Studio Notebooks, SageMaker Studio Notebook, or a local notebook or IDE of your choice.
This post provides an introduction to AWS Glue for Ray and shows you how to start using Ray to distribute your Python workloads.
What is AWS Glue for Ray?
Customers like the serverless experience and fast start time offered by AWS Glue. With the introduction of Ray, we have ensured that you get the same experience. We have also ensured that you can use the AWS Glue job and AWS Glue interactive session primitives to access the Ray engine. AWS Glue jobs are fire-and-forget systems where customer submit their Ray code to the AWS Glue jobs API and AWS Glue automatically provisions the required compute resources and runs the job. AWS Glue interactive session APIs allow interactive exploration of the data for the purpose of job development. Regardless of the option used, you are only billed for the duration of the compute used. With AWS Glue for Ray, we are also introducing a new Graviton2 based worker (Z.2x) which offers 8 virtual CPUs and 64 GB of RAM.
AWS Glue for Ray consists of two major components:
- Ray Core – The distributed computing framework
- Ray Dataset – The distributed data framework based on Apache Arrow
When running a Ray job, AWS Glue provisions the Ray cluster for you and runs these distributed Python jobs on a serverless auto-scaling infrastructure. The cluster in AWS Glue for Ray will consists of exactly one head node and one or more worker nodes.
The head node is identical to the other worker nodes with the exception that it runs singleton processes for cluster management and the Ray driver process. The driver is a special worker process in the head node that runs the top-level application in Python that starts the Ray job. The worker node has processes that are responsible for submitting and running tasks.
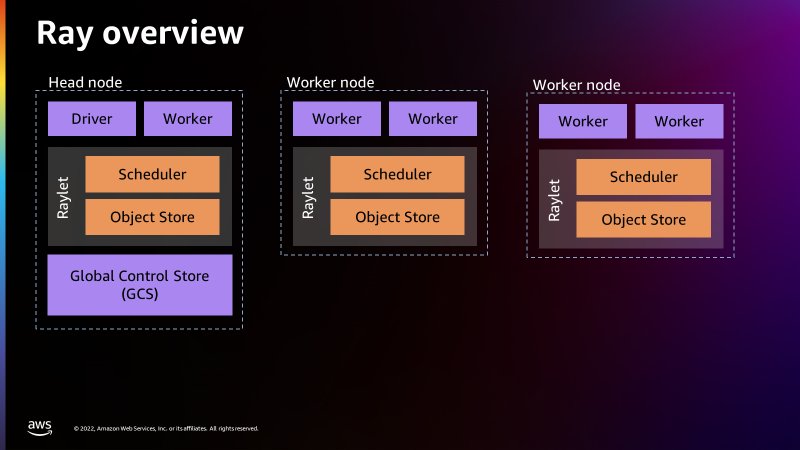
The following figure provides a simple introduction to the Ray architecture. The architecture illustrates how Ray is able to schedule jobs through processes called Raylets. The Raylet manages the shared resources on each node and is shared between the concurrently running jobs. For more information on how Ray works, see Ray.io.
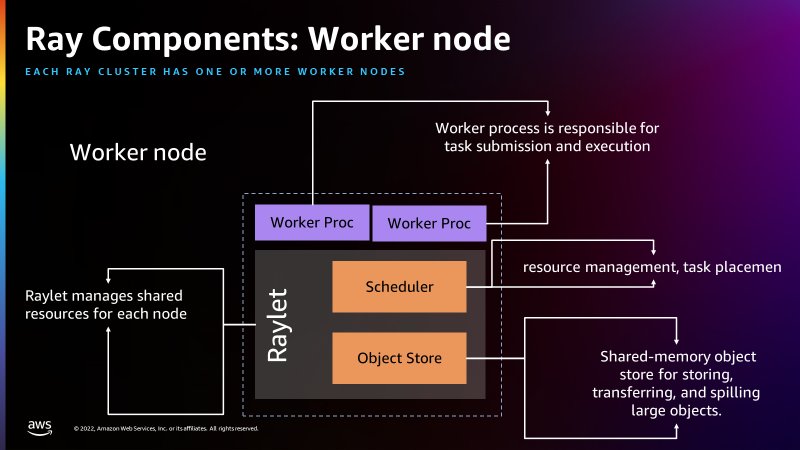
The following figure shows the components of the worker node and the shared-memory object store:
There is a Global Control Store in the head node that can treat each separate machine as nodes, similar to how Apache Spark treats workers as nodes. The following figure shows the components of the head node and the Global Control Store managing the cluster-level metadata.

AWS Glue for Ray comes included with Ray Core, Ray Dataset, Modin (distributed pandas) and the AWS SDK for pandas (on Modin) for seamless distributed integration into other AWS services. Ray Core is the foundation of Ray and the basic framework for distributing Python functions and classes. Ray Dataset is a distributed data framework based on Apache Arrow and is most closely analogous to a dataframe in Apache Spark. Modin is a library designed to distribute pandas applications across a Ray cluster without any modification and is compatible with data in Ray Datasets. The included AWS SDK for pandas (formerly AWS Data Wrangler) is an abstraction layer on top of Modin to allow for the creation of pandas dataframes from (and writing to) many AWS sources such as Amazon Simple Storage Service (Amazon S3), Amazon Redshift, Amazon DynamoDB, Amazon OpenSearch Service, and others.
You can also install your own ARM compatible Python libraries via pip, either through Ray’s environmental configuration in @ray.remote or via --additional-python-modules.
To learn more about Ray, please visit the GitHub repo.
Why use AWS Glue for Ray?
Many of us start our data journey on AWS with Python, looking to prepare data for ML and data science, and move data at scale with AWS APIs and Boto3. Ray allows you to bring those familiar skills, paradigms, frameworks and libraries to AWS Glue and make them scale to handle massive datasets with minimal code changes. You can use the same data processing tools you currently have (such as Python libraries for data cleansing, computation, and ML) on datasets of all sizes. AWS Glue for Ray enables the distributed run of your Python scripts over multi-node clusters.
AWS Glue for Ray is designed for the following:
- Task parallel applications (for example, when you want to apply multiple transforms in parallel)
- Speeding up your Python workload as well as using Python native libraries.
- Running the same workload across hundreds of data sources.
- ML ingestion and parallel batch inference on data
Solution overview
For this post, you will use the Parquet Amazon Customer Reviews Dataset stored in the public S3 bucket. The objective is to perform transformations using the Ray dataset and then write it back to Amazon S3 in the Parquet file format.
Configure Amazon S3
The first step is to create an Amazon S3 bucket to store the transformed Parquet dataset as the end result.
- On the Amazon S3 console, choose Buckets in the navigation pane.
- Choose Create bucket.
- For Bucket name, enter a name for your Amazon S3 bucket.

- Choose Create.
Set up a Jupyter notebook with an AWS Glue interactive session
For our development environment, we use a Jupyter notebook to run the code.
You’re required to install the AWS Glue interactive sessions locally or run interactive sessions with an AWS Glue Studio notebook. Using AWS Glue Interactive sessions will help you follow and run the series of demonstration steps.
Refer to Getting started with AWS Glue interactive sessions for instructions to spin up a notebook on an AWS Glue interactive session.
Run your code using Ray in a Jupyter notebook
This section walks you through several notebook paragraphs on how to use AWS Glue for Ray. In this exercise, we look at the customer reviews from the Amazon Customer Review Parquet dataset, perform some Ray transformations, and write the results to Amazon S3 in a Parquet format.
- On Jupyter console, under New, choose Glue Python.
- Signify you want to use Ray as the engine by using the
%glue_raymagic. - Import the Ray library along with additional Python libraries:
- Initialize a Ray Cluster with AWS Glue.
- Next, we read a single partition from the dataset, which is Parquet file format:

- Parquet files store the number of rows per file in the metadata, so we can get the total number of records in ds without performing a full data read:

- Next , we can check the schema of this dataset. We don’t have to read the actual data to get the schema; we can read it from the metadata:

- We can check the total size in bytes for the full Ray dataset:

- We can see a sample record from the Ray dataset:


Applying dataset transformations with Ray
There are primarily two types of transformations that can be applied to Ray datasets:
- One-to-One transformations – Each input block will contributes to only one output block, such as
add_column(),map_batches()anddrop_column(), and so on. - All-to-All transformations – Input blocks can contribute to multiple output blocks such as
sort()andgroupby(), and so on.
In the next series of steps we will apply some of these transformations on our resultant Ray datasets from the previous section.
- We can add a new column and check the schema to verify the newly added column, followed by retrieving a sample record. This transformation is only available for the datasets that can be converted to pandas format.


- Let’s drop a few columns we don’t need using a
drop_columnstransformation and then check the schema to verify if those columns are dropped from the Ray dataset:

Ray datasets have built-in transformations such as sorting the dataset by the specified key column or key function. - Next, we apply the sort transformation using one of the columns present in the dataset (
total_votes):

- Next, we will create a Python UDF function that allows you to write customized business logic in transformations. In our UDF we have written a logic to find out the products that are rated low (i.e. total votes less than 100).We create a UDF as a function on pandas DataFrame batches. For the supported input batch formats, see the UDF Input Batch Format. We also demonstrate using
map_batches()which applies the given function to the batches of records of this dataset.Map_batches()uses the default compute strategy (tasks), which helps distribute the data processing to multiple Ray workers, which are used to run tasks. For more information on amap_batches()transformation, please see the following documentation.

- If you have complex transformations that require more resources for data processing, we recommend utilizing Ray actors using additional configurations with applicable transformations. We have demonstrated with
map_batches()below: - Next, before writing the final resultant Ray dataset we will apply
map_batches()transformations to filter out the customer reviews data where the total votes for a given product is greater than 0 and the reviews belongs to the “US” marketplace only. Usingmap_batches()for the filter operation is better in terms of performance in comparison tofilter()transformation.
- Finally, we write the resultant data to the S3 bucket you created in a Parquet file format. You can use different dataset APIs available, such as
write_csv()orwrite_json()for different file formats. Additionally, you can convert the resultant dataset to another DataFrame type such as Mars, Modin or pandas.
Clean up
To avoid incurring future charges, delete the Amazon S3 bucket and Jupyter notebook.
- On the Amazon S3 console, choose Buckets.
- Choose the bucket you created.
- Choose Empty and enter your bucket name.
- Choose Confirm.
- Choose Delete and enter your bucket name.
- Choose Delete bucket.
- On the AWS Glue console, choose Interactive Sessions
- Choose the interactive session you created.
- Choose Delete to remove the interactive session.
Conclusion
In this post, we demonstrated how you can use AWS Glue for Ray to run your Python code in a distributed environment. You can now run your data and ML applications in a multi-node environment.
Refer to the Ray documentation for additional information and use cases.
About the authors
 Zach Mitchell is a Sr. Big Data Architect. He works within the product team to enhance understanding between product engineers and their customers while guiding customers through their journey to develop data lakes and other data solutions on AWS analytics services.
 Ishan Gaur works as Sr. Big Data Cloud Engineer ( ETL ) specialized in AWS Glue. He’s passionate about helping customers build out scalable distributed ETL workloads and implement scalable data processing and analytics pipelines on AWS. When not at work, Ishan likes to cook, travel with his family, or listen to music.
 Derek Liu is a Solutions Architect on the Enterprise team based out of Vancouver, BC. He is part of the AWS Analytics field community and enjoys helping customers solve big data challenges through AWS analytic services.
 Kinshuk Pahare is a Principal Product Manager on AWS Glue.