AWS Big Data Blog
Publish and update data products dynamically with AWS Data Exchange
Updated June, 2022. We’ve enhanced the “Publishing new data files to the product automatically” section of this blog post via Publisher Coordinator. Please refer to this solution when needing to automate the import of new files to an existing dataset.
Data is revolutionizing the way organizations of all sizes conduct their business. Companies are increasingly using third-party data to complement their internal data and deliver value for their customers. Third party data is used across a wide variety of use-cases, such as to build applications for customers, to run analytics workloads to improve business operations and marketing activities, or to build predictive models using machine learning (ML) techniques.
However, as data becomes the center of how companies operate, the way data providers deliver to data subscribers has not changed in years. As data providers, you spend time and effort on undifferentiated heavy lifting to build data delivery and entitlement management mechanisms to serve your customers. Many data providers also rely on traditional sales and delivery channels and are often unable to reach many customers interested in their data, which leads to slower adoption of their data products.
Enter AWS Data Exchange.
AWS Data Exchange makes it easy to exchange data in the cloud efficiently. In a few minutes, customers can find and subscribe to hundreds of data products from more than 80 qualified data providers across industries, such as Financial Services, Healthcare and Life Sciences, and Consumer and Retail. After subscribing, customers can download a dataset or copy it to Amazon S3 and analyze it with a wide variety of AWS analytics and ML services. AWS Data Exchange gives data providers a secure, transparent, and reliable channel to reach millions of AWS customers. AWS Data Exchange also helps you service your existing customer subscriptions more efficiently and at a lower cost by eliminating the need to build and maintain data delivery, licensing, or billing infrastructure.
Many data providers publish data products that are updated regularly. For example, a stock market data provider may want to publish daily closing prices every day, or a weather forecast data provider may want to provide an updated forecast every week. This post walks through the process of publishing and updating products dynamically on AWS Data Exchange. The post first shows how to publish a new product and make it available to subscribers, which can be done in minutes using the AWS Data Exchange console. The post also reviews a workflow using a Lambda function to automatically update the product by publishing new revisions to its underlying data sets.
Prerequisites
Before you begin, complete the following prerequisites:
- You must be a registered provider on AWS Data Exchange. Only eligible and registered providers can publish data products on AWS Data Exchange. Eligible providers must agree to the Terms and Conditions for AWS Marketplace under a valid legal entity domiciled in the United States or a member state of the EU, supply valid banking and taxation identification, and be qualified by the AWS Data Exchange business operations team. For more information, see Providing Data Products on AWS Data Exchange.
- The data that you publish must be compliant with the AWS Marketplace Terms and Conditions and the AWS Data Exchange Publishing Guidelines.
- You must have the appropriate IAM permissions to use AWS Data Exchange as a provider. For example, you can use the
AWSDataExchangeProviderFullAccessmanaged IAM policy. - You need an S3 bucket for your ready-to-publish data files. For more information, see Create a Bucket and What is Amazon S3?
AWS Data Exchange concepts
Products are the unit of exchange in AWS Data Exchange. A product is a package of data sets that a provider publishes and others subscribe to. The AWS Data Exchange product catalog and AWS Marketplace website both list products. A product can contain one or more data sets, as well as product details, including the product’s name and description, categories, and contact details. The product also contains information related to the product’s offer terms, which are the terms that subscribers agree to when subscribing to a product. These terms include the available pricing and duration options, the data subscription agreement, and the refund policy.
A data set is a dynamic set of file-based data content. Data sets are dynamic and versioned using revisions. A revision is a specific version of a data set. Each revision can contain multiple files called assets, which you can import to a revision using an asynchronous workflow called a job. After creating a revision and importing assets into it, you need to finalize the revision to mark it as ready for publishing, before publishing it into the dataset’s product. For more information, see Working with Data Sets.
The following diagram summarizes the concepts described above and the hierarchy of the different resources.

Publishing a new product to AWS Data Exchange
Before reviewing how to automatically update an existing product, let’s start by setting up and creating a new product. If you already have a published product, skip this section and move on to “Publishing new data files to the product automatically.”
Creating a dataset
To publish a product, first create a dataset. Complete the following steps:
- On the AWS Data Exchange console’s, under Data sets, choose Create data set.

- Enter a Name and Description for the dataset and choose Create.
The name of the data set is visible as part of the product details in the catalog; consider using a concise name that enables customers to understand the content of the data set easily. The description is visible to subscribers who have an active subscription to the product; consider including coverage information as well as the features and benefits of the dataset.
The following screenshot shows the Create data set section with name and description. This post entered the name Exchange-A End of Day Prices, and the description, End-of-day pricing of all equities listed on Exchange-A. Covers all industries and all equities traded on the exchange (2,000+). This data set contains full history from 1985, and is updated daily with a new file every day around 5pm EST

Creating a revision
After creating the dataset, but before publishing it into a product, you need to create its first initial revision. Complete the following steps:
- On your data set’s page, choose the Revisions.
- Choose Create revision.
- For Revision settings, enter a brief comment about the data in this revision.
- Choose Create.The revision comment is visible to subscribers after they subscribe to your product.The following screenshot shows that this post entered the comment
Historical data from January 1st, 1985 to November 13th, 2019. You can choose to import files (assets) to this revision from either an S3 bucket or your computer. This post imports a file from an S3 bucket. It is important to note that by default, AWS Data Exchange uses the source S3 Object’s key as an Asset name. The following screenshot shows the example file this post uses.
- When the import status is complete, choose Finalize.

Marking a revision as finalized means that it is staged for publishing. You can only publish finalized revisions to subscribers; you can’t modify a revision after publishing it.
Publishing a new product
You are now ready to publish a new product using this data set. Complete the following steps:
- On the AWS Data Exchange console, under Publish data, choose Products.
- Choose Publish new product.

- In Product overview, enter the product details that subscribers can use to identify the product. For information about best practices when populating your product’s details, see Publishing Products. In particular you may want to consider including links to a Data due diligence questionnaire (DDQ), information about the data set file types and schemas, and any other fact sheets.Note that you can use markdown to include links and format your product description.

- Choose Next to proceed to the Add data You can then add the dataset that you created above.

- Choose Next to proceed to the Configure the public offer page. This is the page where you configure the offer details for your product, including the available pricing options, the Data Subscription Agreement, and the refund policy.You can also choose whether you would like to enable subscription verification. If you enable subscription verification, prospective subscribers will have to fill in information such as their name, company name, email address, and use-case before being able to subscribe. The subscription request will then appear on your Product Dashboard page, and you will have up to 45 days to approve or decline the request. For information about subscription verification, see Subscription Verification for Providers.

- Choose Next to review your product. You can preview the product as it will appear on the AWS Data Exchange product catalog. When you are satisfied with your product and offer details, choose Publish the product.Important: Choosing Publish the product will publish your product to the AWS Data Exchange catalog and make it publicly available to subscribers.
You have now created a new data set, added your first revision to this data set with historical data, finalized the revision, and published a product using this finalized revision. This product is available for subscribers to purchase within a few hours after publishing.
Publishing new data files to the product automatically
Now that the product is available to customers, you need to update the product and continuously publish new revisions to it. In our example, you need to publish new equity prices every day. To do so, set up the following architecture, which automatically picks any files uploaded to your S3 bucket and publishes them to the product’s dataset as part of a new revision. The workflow creates and publishes a new revision for each file uploaded to the S3 bucket.

The workflow is as follows:
- You upload a ready-to-publish data file to the S3 bucket to update your data set.
- S3 invokes an AWS Lambda function with the S3 API event that contains details about the object. For more information, see Using AWS Lambda with Amazon S3.
- The AWS Lambda function creates a new revision under the pre-existing data set and starts a job to import the file.
- The AWS Lambda function modifies the pre-existing product to include the new dataset revision.
- Subscribers can now consume the new revision, which appears as part of their entitled data set.
Building a Lambda function
Now that you published a product with a data set, you have the foundational pieces in place to build a Lambda function that picks a new data file uploaded to S3 and publishes it as a part of that product.
To configure your Lambda function correctly, you first need to record the dataset ID and product ID that you created earlier. You can retrieve them from the AWS Data Exchange console. The product ID is available on the product page, which you can access from your Product Dashboard. The data set ID is available in the data set’s page, which you can access from the Data sets pages.
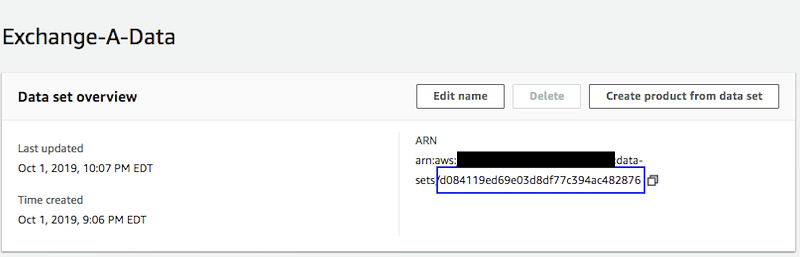
Data set page
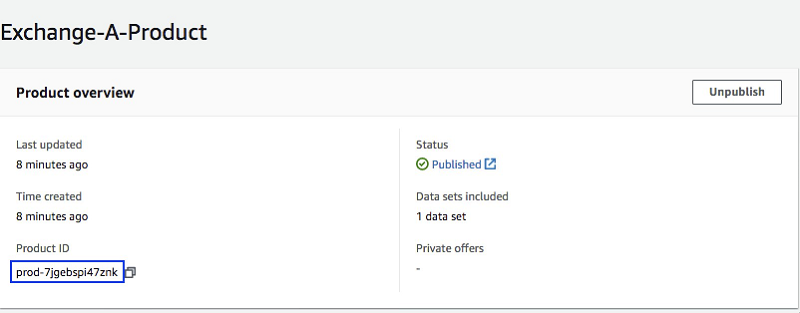
Product page
Creating an IAM role
To give the Lambda function permission to read from the source S3 bucket, create a revision, upload files to it, and publish it to a product, you need to create an IAM role with the appropriate permissions.
To do so, create an IAM role and attach the following policy to it. Be sure to replace {INSERT-BUCKET-NAME} and {INSERT-ACCOUNTID} with your S3 bucket’s name and your account ID respectively.
For more information, see Creating IAM Roles.
Deploying a Lambda layer
This post uses a Lambda layer that extends the AWS Python SDK (boto3) that is built into the Lambda Python runtime by adding the AWS Data Exchange and AWS Marketplace Catalog API SDKs as of November 13, 2019. You can deploy a sample layer published for this post, but you should use the version of the AWS SDK that matches your needs.
Creating a Lambda function
Now that you created the IAM role and deployed the Lambda layer with your latest SDK, you can create a Lambda function using the following steps:
- On the Lambda console, choose Create a function.
- In the Create function section, choose Author from scratch.
- In the Basic information section, configure your Lambda function with the following information:
- For Function name, enter a name of your choice.
- For Runtime, choose Python 3.7.
- For Permissions, select Use an existing role.
- From the Existing role dropdown, select the Lambda role you created earlier.
- Choose Create function.
Configuring your Lambda function
You can now configure your Lambda function. You first need to configure the function to be triggered when new files upload to the S3 bucket. Complete the following steps:
- On the Lambda console, choose Functions.
- Select the newly created function.
- On the function configuration page, choose Add trigger.
- Under Trigger Configuration, choose S3.
- From the drop-down, select the bucket you created as a part of the prerequisites.
- Under Event type, choose All Object Create Events.
- Optionally, choose a Prefix or a Suffix if you want to only publish specific files to your AWS Data Exchange product.
- Choose Add.
To confirm your code is running with the appropriate SDK, associate the Lambda layer that you deployed earlier with your Lambda function. As noted previously, this post published a sample layer, but you should use the appropriate version of the AWS SDK that matches your needs.
- On the Lambda console, choose Functions.
- Select the newly created function.
- On the function configuration page, under the function name, choose Layers.
- Choose Add a layer.
- Under Layer Selection, deselect Select from list of runtime compatible layers.
- From the drop-down, choose the layer you deployed earlier.
- Choose Add.
You now need to configure the Lambda function’s code. You can copy the following code for the Lambda function. This code programmatically calls the following APIs, which are the same APIs that you performed earlier using the console:
CreateRevisioncreates a new revision.CreateJobandStartJobstart importing the file to the revision.GetJobchecks the status of the import.UpdateRevisionmarks the revision as finalized.
To publish an update to the product, the Lambda function uses the AWS Marketplace Catalog API service with the following APIs. To learn more, see the AWS Marketplace Catalog API Reference.
DescribeEntitygets the product details.StartChangeSetstarts an update.DescribeChangeSetchecks the status of the product update.
Complete the following steps:
- On the Lambda console, choose Functions.
- Select your newly created function.
- Scroll down to the Function code
- Enter the following code:
- Scroll down to Environment Variables
- Set the DATA_SET_ID and PRODUCT_ID variables to the values you retrieved from the console.
- Scroll further down to Basic Settings and set the Timeout value to 1 minute.
- Choose Save.
When you upload a file to your S3 bucket, the S3 event now triggers the Lambda function, which updates the dataset automatically and publishes the new file to your subscribers. Subscribers also receive an Amazon CloudWatch event from AWS Data Exchange to automate exporting the data to their S3 buckets.
Conclusion
AWS Data Exchange provides an easy and convenient way for data providers to exchange data with their customers in a cloud-native, secure, and efficient way. This post showed you how to publish a new product from on a newly created data set and revision in the AWS Data Exchange Console. You also learned how to automatically publish files uploaded to your S3 bucket as new revisions. To learn more, visit AWS Data Exchange.
About the Authors
 Akram Chetibi is a senior product manager of AWS Data Exchange. Akram joined AWS more than two years ago, and has launched multiple services including AWS Data Exchange and AWS Fargate.
 Keerti Shah is a global solutions architect with Amazon Web Services. She enjoys working with Financial Services customers to drive innovation, digitization, and modernization of legacy applications.
 Harsha W. Sharma is a global account solutions architect with AWS New York. Harsha joined AWS more than three years ago and works with Global Financial Services customers to design and develop architectures on AWS and support their journey on the cloud.