AWS Big Data Blog
Set alerts in Amazon Elasticsearch Service
September 8, 2021: Amazon Elasticsearch Service has been renamed to Amazon OpenSearch Service. See details.
Customers often use Amazon OpenSearch Service for log analytics. Amazon OpenSearch Service lets you collect logs from your infrastructure, transform each log line into a JSON document, and send those documents to the bulk API.
A transformed log line contains many fields, each containing values. For instance, an Apache web log line includes a source IP address field, a request URL field, and a status code field (among others). Many users build dashboards—using Kibana—to monitor their infrastructure visually, surfacing application usage, bugs, or security problems evident from the data in those fields. For example, you can graph the count of HTTP 5xx status codes, then watch and react to changes. If you see a sudden jump in 5xx codes, you likely have a server issue. But with this system, you must monitor Kibana manually.
On April 8, Amazon OpenSearch Service launched support for event monitoring and alerting. To use this feature, you work with monitors—scheduled jobs—that have triggers, which are specific conditions that you set, telling the monitor when it should send an alert. An alert is a notification that the triggering condition occurred. When a trigger fires, the monitor takes action, sending a message to your destination.
This post uses a simulated IoT device farm to generate and send data to Amazon OpenSearch Service.
Simulator overview
This simulation consists of several important parts: sensors and devices.
Sensors
The core class for the simulator is the sensor. Devices have sensors that simulate different patterns of floating-point values. When called, each sensor’s report method updates and returns the value of its sensor. There are several subclasses for Sensor:
- SineSensor: Produces a sin wave, based on the current timestamp.
- ConstSensor: Produces a constant value. The class includes a random “fuzz” factor to drift around a particular value.
- DriftingSensor: Allows continuous, random drift with a starting value.
- MonotonicSensor: Increments its value by a constant delta, with random fuzz.
For this post, I used MonotonicSensor, whose value constantly increases, to force a breach in an alert that I set up.
You can identify a sensor by a universally unique identifier (UUID) and a label for the metric that it tracks. The report function for the sensor class returns a timestamp, the UUID of the sensor, the metric label, and the metric’s value at that instant.
Devices
Devices are collections of sensors. For this post, I created a collection of devices that simulate IoT devices in a field, measuring the temperature and humidity, and sending the CPU of the device. Each has a report method that recursively calls the report methods for all their sensors, returning a collection of the sensor reports. I made the code available in the Open Distro for Elasticsearch sample code repository on GitHub.
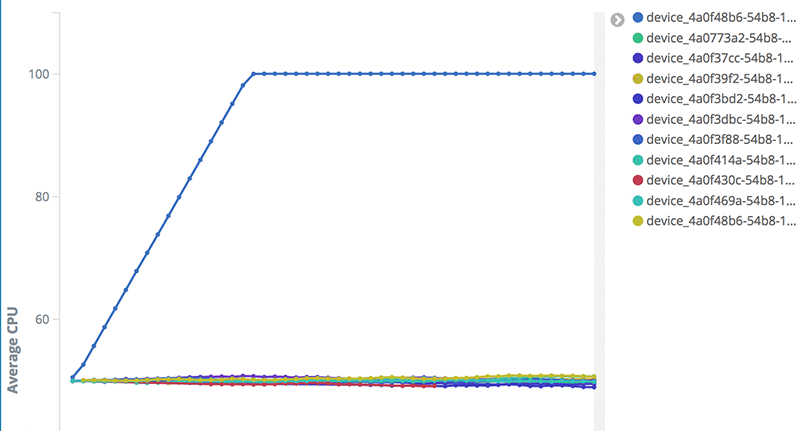
I set the CPU sensor of one device to drift constantly upward, simulating a problem in the device. You can see the intended “bad behavior” in the following line graph:
In the next sections, I set up an alert at 90% CPU so that I can catch and correct the situation.
Prerequisites
To follow along with this solution, you need an AWS account. Set up your own Amazon OpenSearch Service domain, to form the basis of your monitors and alerts.
Step 1: Set up your destination
When you create alerts in Amazon OpenSearch Service, you assign one destination or multiple. A destination is a delivery channel, where your domain sends notifications when your alerts trigger. You can use Amazon SNS, your Slack channel, or Amazon Chime as your destination. Or, you can set up a custom webhook (a URL) to receive messages. You set up headers and the message body, and Amazon ES Alerts posts the message to the destination URL.
I use SNS to receive alerts from my Amazon OpenSearch Service domain in this example, but Amazon OpenSearch Service provides many options for setting up your topic and subscription. I created the topic to receive notifications and subscribe to the topic for email delivery. Your SNS topic can have many subscriptions, supporting delivery via HTTP/S endpoint, email, Amazon SQS, AWS Lambda, and SMS.
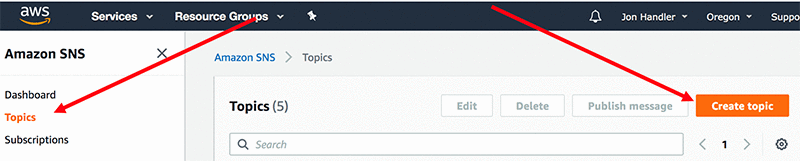
To set up your destination, navigate to the AWS Management Console. Sign in and open the SNS console.
Choose Topics, Create Topic.
In the Create topic page, fill out values for Name and Display name. I chose sensor-alerting for both. Choose Create topic.
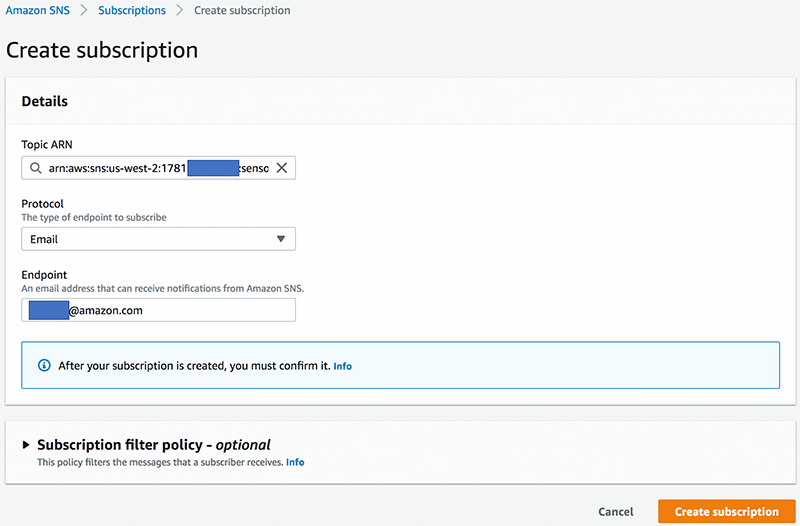
Now subscribe to your topic. You can do this from the topic page, as the console automatically returns you there when you complete topic creation. You can also subscribe from the Subscriptions tab in the left navigation pane. From the topic page, choose Create subscription.
On the Create Subscription page, for Protocol, choose Email. Fill in your email address in the Endpoint box and choose Create subscription. Make a note of the Topic ARN here, as you refer to it again later.
Finally, confirm your subscription by clicking the confirmation link in the email that SNS sends to you.
Step 2: Set up a role
To let Amazon OpenSearch Service publish alerts to your topic, create an IAM role with the proper permissions. Before you get started, copy the Topic ARN from the SNS topic page in Step 1.
Your role has two components: trusted entities and permissions for entities that assume the role. The console doesn’t support creating a role with Amazon OpenSearch Service as a trusted entity. Create a role with EC2 as the trusted entity and then edit the JSON trust document to change the entity.
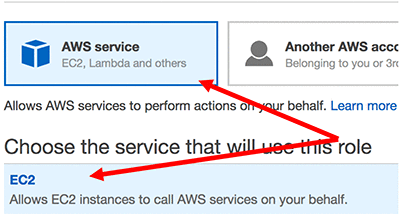
In the AWS Management Console, open the IAM console and choose Roles, Create role.
On the Create role page, choose AWS Service and EC2. Choose Next: Permissions.
On the permissions page, choose Create policy. This brings you to a new window to create the policy. Don’t close the old tab, as you return to it in a moment.
The policy that you create in this step defines the permissions for entities that assume the role. Add a policy document that allows various entities (Amazon OpenSearch Service in this case) to publish to your SNS topic.
On the Create policy page, choose the JSON tab and copy-paste to replace the JSON text with the following code. Replace the sns-topic-arn in the code with the ARN for the topic that you created earlier. After you have done this, choose Review policy.
On the Review policy page, give your policy a name. I chose SensorAlertingPolicy in this example. Choose Create policy.
Return to the Create role window or tab. Use the refresh button to reload the policies and type the name of your policy in the search box. Select the check box next to your policy. Choose Next: Tags, then choose Next: Review. You can also add tags to make your role easier to search.
On the Review page, give your role a name. I used SensorAlertingRole in this example. Choose Create role.
To change the trusted entity for the role to Amazon OpenSearch Service, in the IAM console, choose Roles. Type SensorAlertingRole in the search box, and choose the link (not the check box) to view that role. Choose Trust relationships, Edit trust relationship.
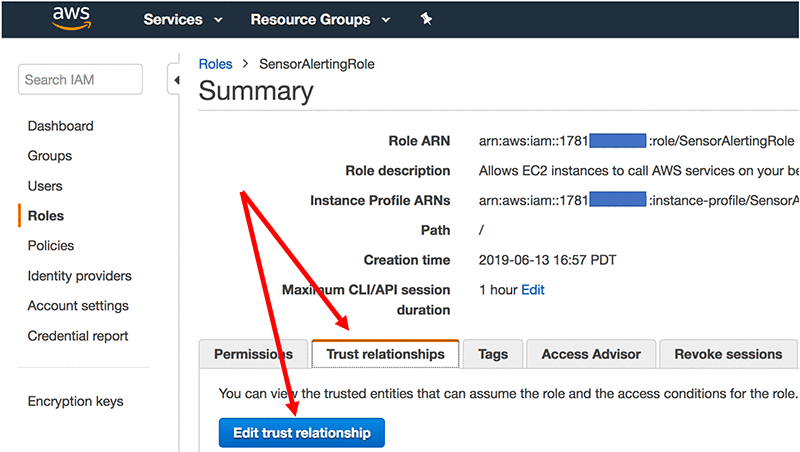
Edit the Policy Document code to replace ec2.amazonaws.com with es.amazonaws.com. Your completed policy document should look like the following code example:
Choose Update Trust Policy. Make a note of your role ARN, as you refer to it again.
Step 3: Set up Amazon OpenSearch Service alerting
I pointed my IoT sensor simulator at my Amazon OpenSearch Service domain. This creates data that serves as the basis for the monitors and alerts. To do this yourself, navigate to your Kibana endpoint in your browser and choose Alerting in the left navigation pane. At the top of the window, choose Destinations, Add Destination.
In the Add Destination dialog, give your destination a name. For Type, choose SNS, and set the SNS topic ARN to the topic ARN that you created in Step 1. Set the IAM role ARN to the role ARN that you created in Step 2. Choose Create. You can set as many destinations as you like, allowing you to alert multiple people in the event of a problem.
Step 4: Set up a monitor
Monitors in Open Distro for Amazon OpenSearch Service allow you to specify a value to monitor. You can select the value either graphically or by specifying an Amazon OpenSearch Service query. You define a monitor first and then define triggers for the monitored value.
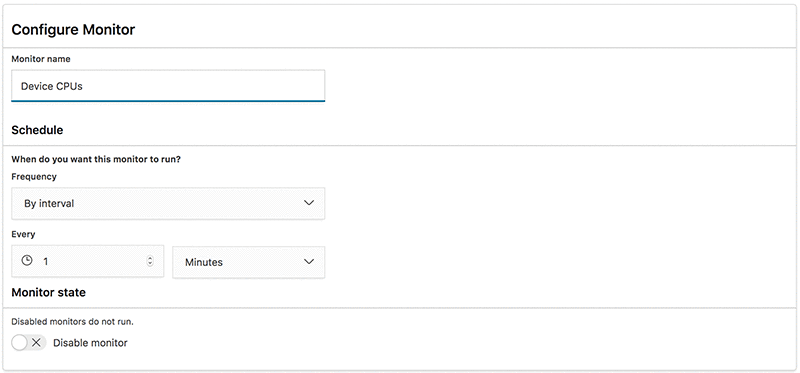
In Kibana, choose Monitors, Create Monitor.

Give your monitor a name. I named my monitor Device CPUs. You can set the frequency to one of the predefined intervals, or use a cron expression for more granular control. I chose Every 1 minute.
Scroll to the Define Monitor section of the page. Use this set of controls to specify the value to monitor. You can enter a value for Index or Indexes, Time field, and a target value. Choose Define using visual graph from the How do you want to define your monitor? list. You can also enter information for Define using extraction query, allowing you to provide a query that produces a value to monitor. For simple thresholds, the visual interface is fast and easy.
Select the Index value to monitor from the list. The list contains individual indexes. To use a wildcard, you can also type in the text box. For the value to register, you must press Enter after typing the index name (for example, “logs-*” <enter>).
Choose a value for Time field from the list. This reveals several selectors on top of a graph. Choose Count() and open the menu to see the aggregations for computing the value. Choose max(), then choose CPU for Select a field. Finally, set FOR THE LAST to 5 minute(s). Choose Create.
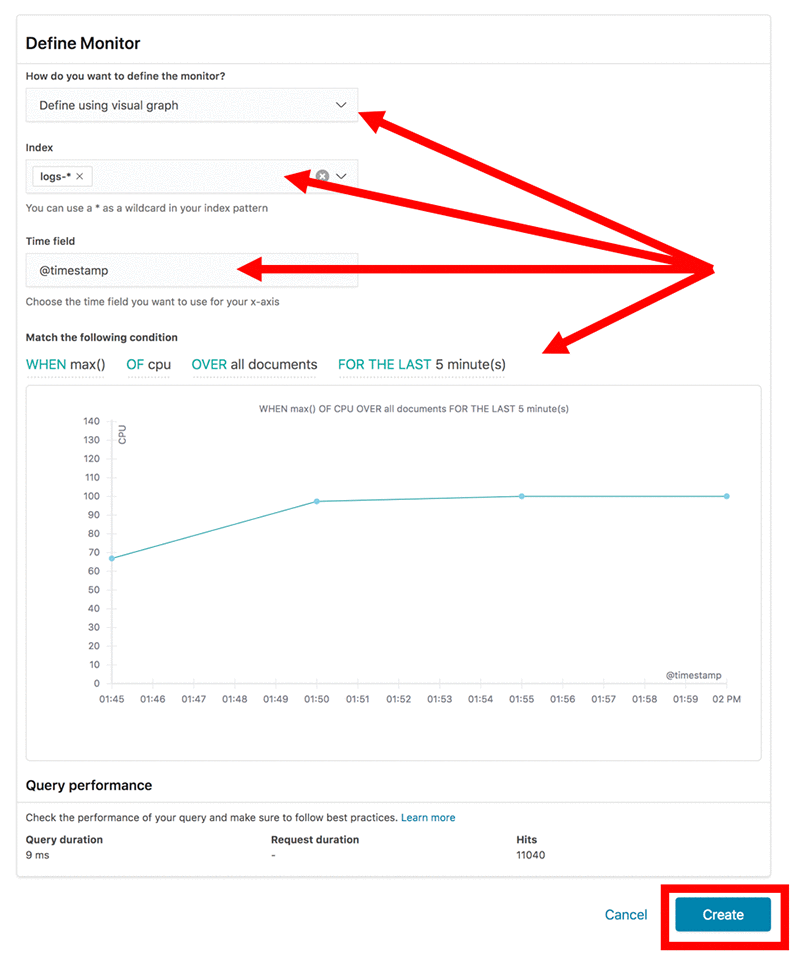
You can create your monitor visually or provide a query to produce the value to monitor.
I chose the logs-* index to monitor the max value of the CPU field, but this doesn’t create a trigger yet. Choose Create. This brings you to the Define Trigger page.
Step 5: Create a trigger
To create a trigger, specify the threshold value for the field that you’re monitoring. When the value of the field exceeds the threshold, the monitor enters an Active state. I created a trigger called CPU Too High, with a threshold value of 90 and a severity level of 1.

When you set the trigger conditions, set the action or actions that Amazon OpenSearch Service performs.
To add actions, scroll through the page. I added one action to send a message to my SNS topic—including the monitor name, trigger, severity, and the period over which the alarm has been active. You can use Mustache scripting to create a template for the message that you receive.
After you finish adding actions, choose Create at the bottom of the page.

Wrap up
When you return to the Alerting Dashboard, your alert appears in the Completed state. Alerts can exist in a variety of states. Completed signals that the monitor successfully queried your target, and that the trigger is not engaged.
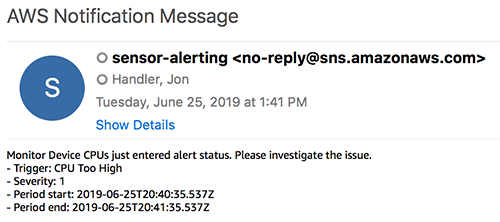
To send the alert into the Active state, I sent simulated sensor data with a failing device whose CPU ramped up from 50% to 100%. When it hit 90%, I received the following email:
Conclusion
In this post, I demonstrated how Amazon OpenSearch Service alerting lets you monitor the critical data in your log files so that you can respond quickly when things start to go wrong. By identifying KPIs, setting thresholds, and distributing alerts to your first responders, you can improve your response time for critical issues.
If you have questions or feedback, leave them below, or reach out on Twitter!
About the Author
 Jon Handler (@_searchgeek) is a Principal Solutions Architect at Amazon Web Services based in Palo Alto, CA. Jon works closely with the CloudSearch and Elasticsearch teams, providing help and guidance to a broad range of customers who have search workloads that they want to move to the AWS Cloud. Prior to joining AWS, Jon’s career as a software developer included four years of coding a large-scale, eCommerce search engine.