AWS Big Data Blog
Simplify data loading on the Amazon Redshift console with Informatica Data Loader
Amazon Redshift is a fast, petabyte-scale cloud data warehouse delivering the best price–performance. Tens of thousands of customers use Amazon Redshift to process exabytes of data every day to power their analytics workloads. Data engineers, data analysts, and data scientists want to use this data to power analytics workloads such as business intelligence (BI), predictive analytics, machine learning (ML), and real-time streaming analytics.
Informatica Intelligent Data Management Cloud™ (IDMC) is an AI-powered, metadata-driven, persona-based, cloud-native platform to empower data professionals with a comprehensive and cohesive cloud data management capabilities to discover, catalog, ingest, cleanse, integrate, govern, secure, prepare, and master data. Informatica Data Loader for Amazon Redshift, available on the AWS Management Console, is a zero-cost, serverless IDMC service that enables frictionless data loading to Amazon Redshift.
Customers need to bring data quickly and at scale from various data stores, including on-premises and legacy systems, third-party applications, and AWS services such as Amazon Relational Database Service (Amazon RDS), Amazon DynamoDB, and more. You also need a simple, easy, and cloud-native solution to quickly onboard new data sources or to analyze recent data for actionable insights. Now, with Informatica Data Loader for Amazon Redshift, you can securely connect and load data to Amazon Redshift at scale via a simple and guided interface. You can access Informatica Data Loader directly from the Amazon Redshift console.
This post provides step-by-step instructions to load data into Amazon Redshift using Informatica Data Loader.
Solution overview
You can access Informatica Data Loader directly from the navigation pane on the Amazon Redshift console. The process follows a similar workflow that Amazon Redshift users already use to access the Amazon Redshift query editor to author and organize SQL queries, or create datashares to share live data in read-only mode across clusters.
For this post, we use a Salesforce developer account as the data source. For instructions in importing a sample dataset, see Import Sample Account Data. You can use over 30 pre-built connectors supported by Informatica services to connect to the data source of your choice.
We use Informatica Data Loader to select and load a subset of Salesforce objects to Amazon Redshift in three simple steps:
- Connect to the data source.
- Connect to the target data source.
- Schedule or run the data load.

In addition to object-level filtering, the service also supports full and incremental loads, change data capture (CDC), column-based and row-based filtering, and schema drifts. After the data is loaded, you can run query and generate visualizations using Amazon Redshift Query Editor v2.0.
Prerequisites
Complete the following prerequisites:
- Create an Amazon Redshift cluster or workgroup. For more information, refer to Creating a cluster in a VPC or Amazon Redshift Serverless.
- Ensure that the cluster can be accessed from Informatica Data Loader. For a private cluster, add an ingress rule to the security group attached to your cluster to allow traffic from Informatica Data Loader. Allow-list the IP address for the cluster to be accessed from Informatica Data Loader. For more information about adding rules to an Amazon Elastic Compute Cloud (Amazon EC2) security group, see Authorize inbound traffic for your Linux instances.
- Create an Amazon Simple Storage Service (Amazon S3) bucket in the same Region as the Amazon Redshift cluster. The Informatica Data Loader will stage the data into this bucket before uploading the data to the cluster. Refer to Creating a bucket for more details. Make a note of the access key ID and secret access key for the user with permission to write to the staging S3 bucket.
- If you don’t have a Salesforce account, you can sign up for a free developer account.
Now that you have completed the prerequisites, let’s get started.
Launch Informatica Data Loader from the Amazon Redshift console
To launch Informatica Data Loader, complete the following steps:
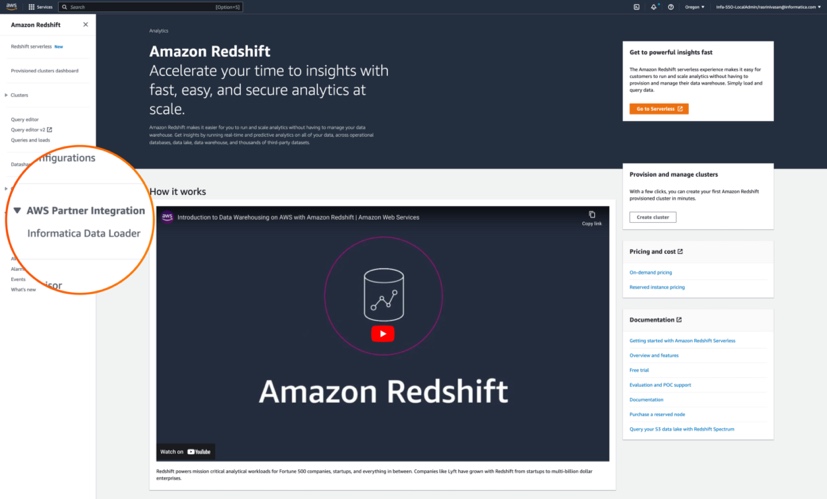
- On the Amazon Redshift console, under AWS Partner Integration in navigation pane, choose Informatica Data Loader.

- In the pop-up window Create Informatica integration, choose Complete Informatica integration.
 If you’re accessing the free Informatica Data Loader for first time, you’re directed to the Informatica Data Loader for Amazon Redshift to sign up at no cost. You only need your email address to sign up.
 - After you sign up, you can sign in to your Informatica account.

Connect to a data source
To connect to a data source, complete the following steps:
- On the Informatica Data Loader console, choose New in the navigation pane.
- Choose New Connection.
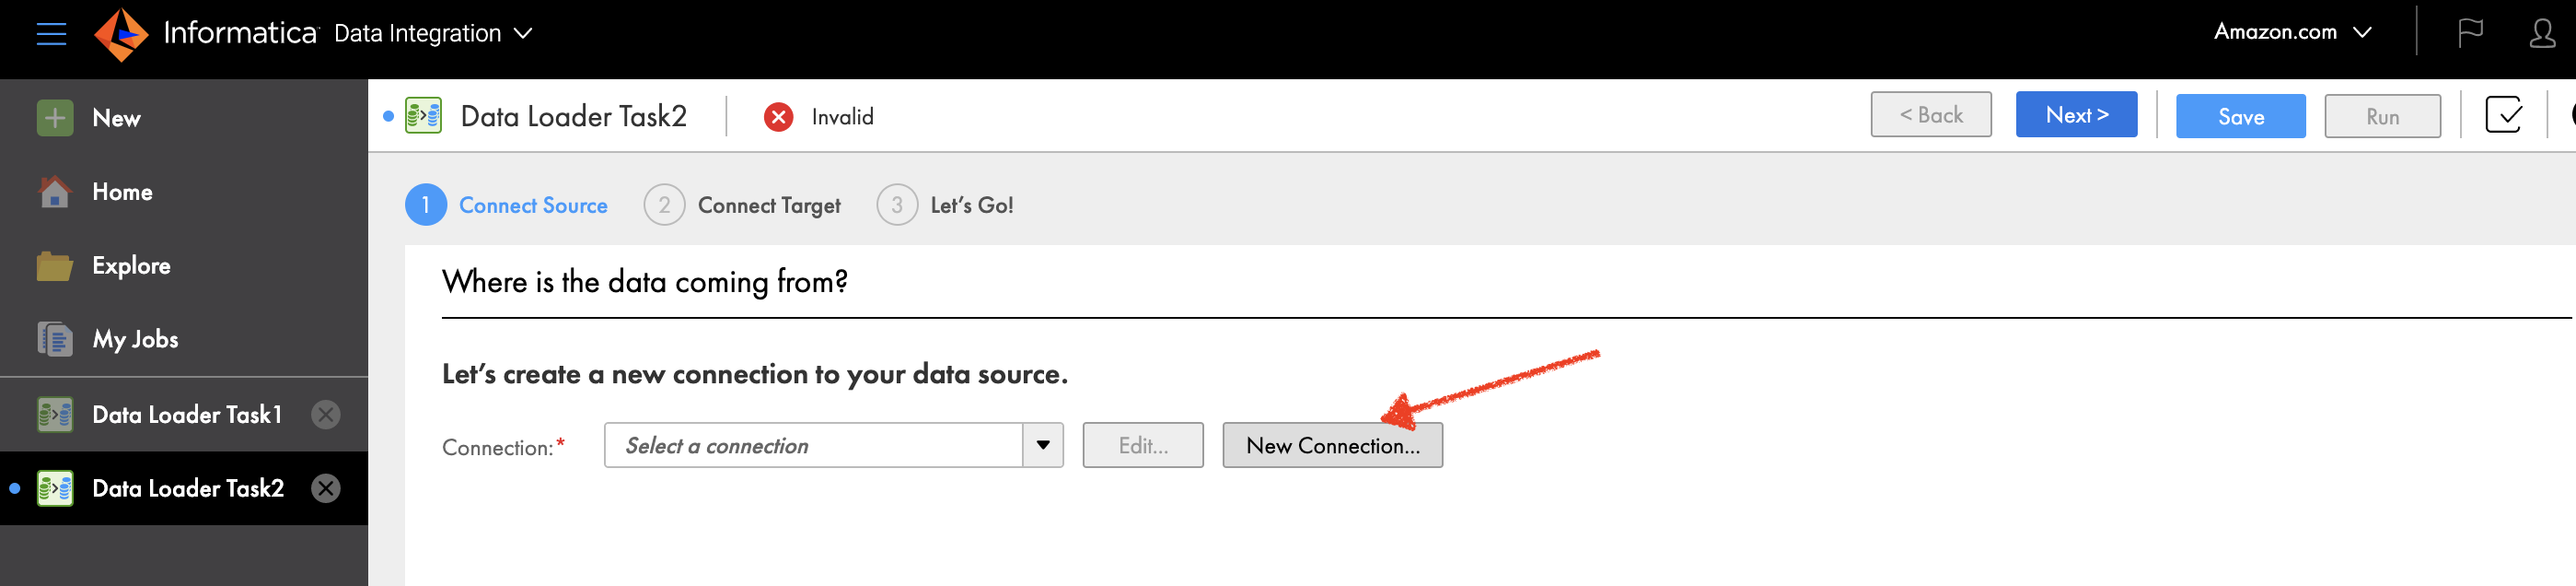
- Choose Salesforce as your source connection.
- Choose Continue.

- Under General Properties, enter a name for your connection and an optional description.
- Under Salesforce Connection Properties¸ enter the credentials for your Salesforce account and security token.These options may vary depending on the source type, connection type, and authentication method. For guidance, you can use the embedded connection configuration help video.
- Make a note of the connection name
Salesforce_Source_Connection. - Choose Test to verify the connection.
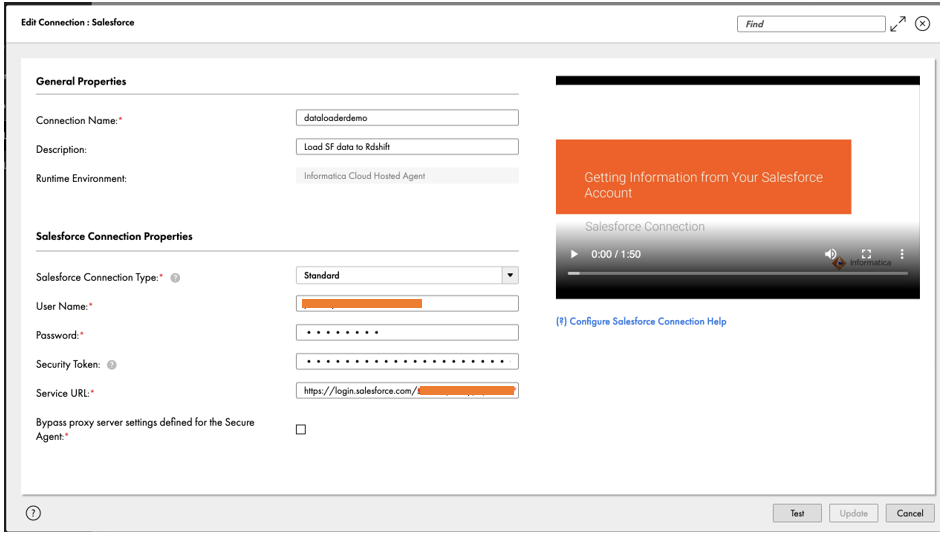
- Choose Add to save your connection details, and continue setting up the data loader.Now that you have connected to the Salesforce data source, you load the sample account information to Amazon Redshift. For this post, we load the Account object containing information on customer type and billing state or province, among other fields.
- Ensure that
Salesforce_Source_Connectionyou just created is selected as Connection. - To filter the Account object in Salesforce, select Include some under Define Object.
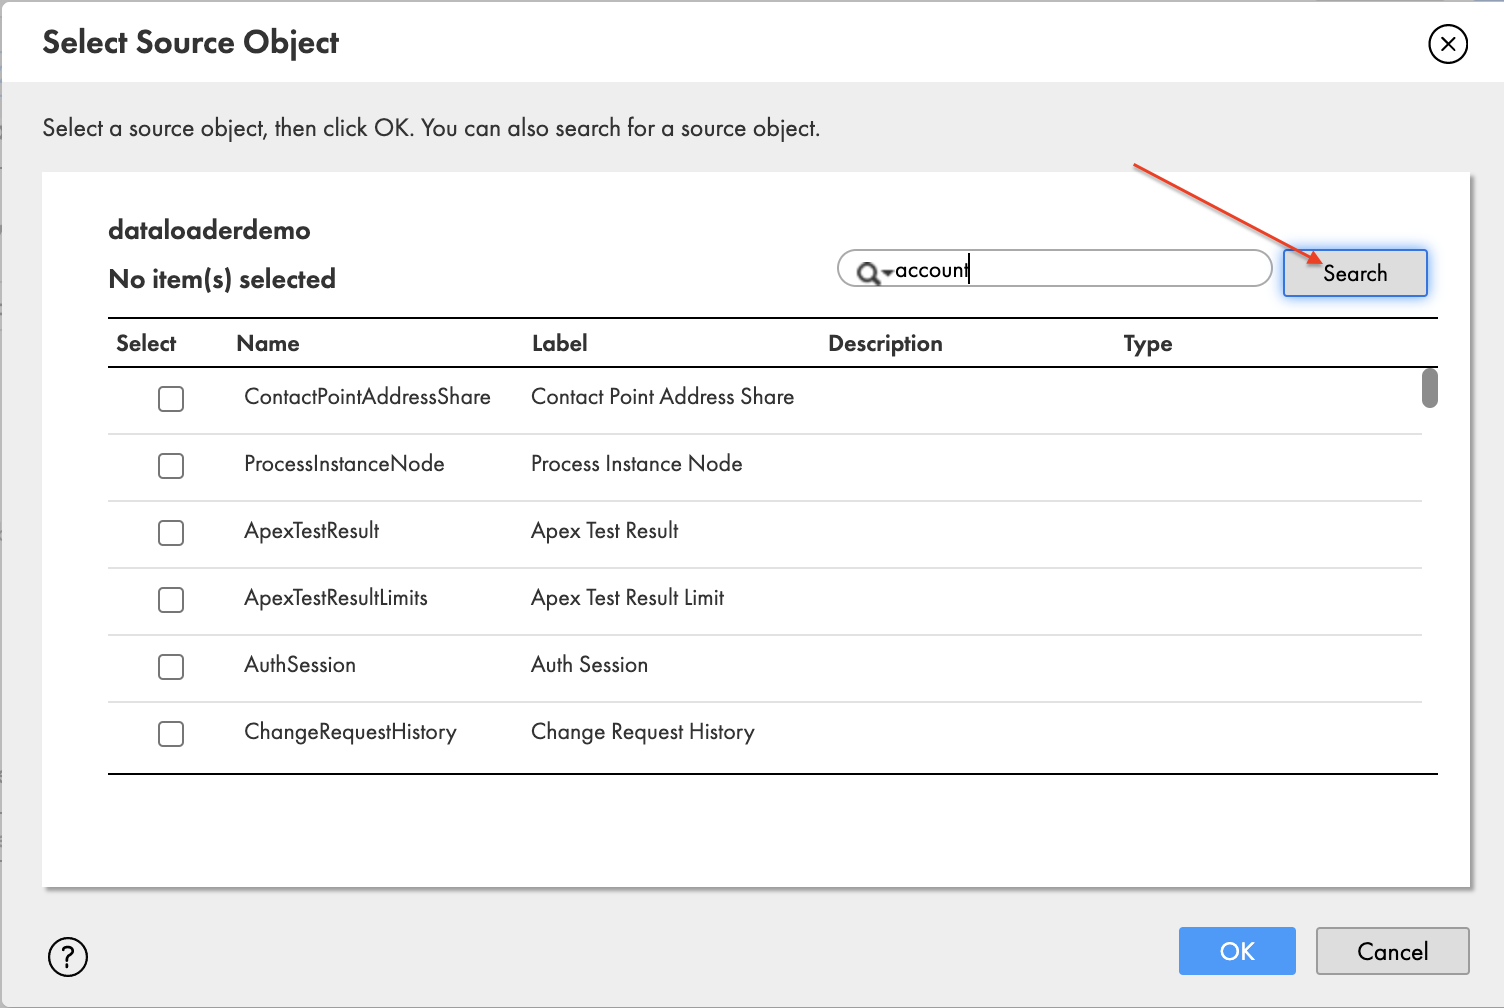
- Choose the plus sign to select the source object Account.
- In the pop-up window Select Source Object, search for account and choose Search.
- Select Account and choose OK.
- For this post, the rest of the following settings are left to their default value:
- Exclude fields – Exclude source fields from the source data.
- Define Filter – Filter rows from source data based on one or more specified filters.
- Define Primary Keys – Configuration to specify or detect the primary key column in the data source.
- Define Watermark Fields – Configuration to specify or detect the watermark column in the data source.

Connect to the target data source
To connect to the target data source (Amazon Redshift), complete the following steps:
- On the Informatica Data Loader, choose Connect Target.
- Choose New Connection.
- For Connection, choose Redshift (Amazon Redshift v2).
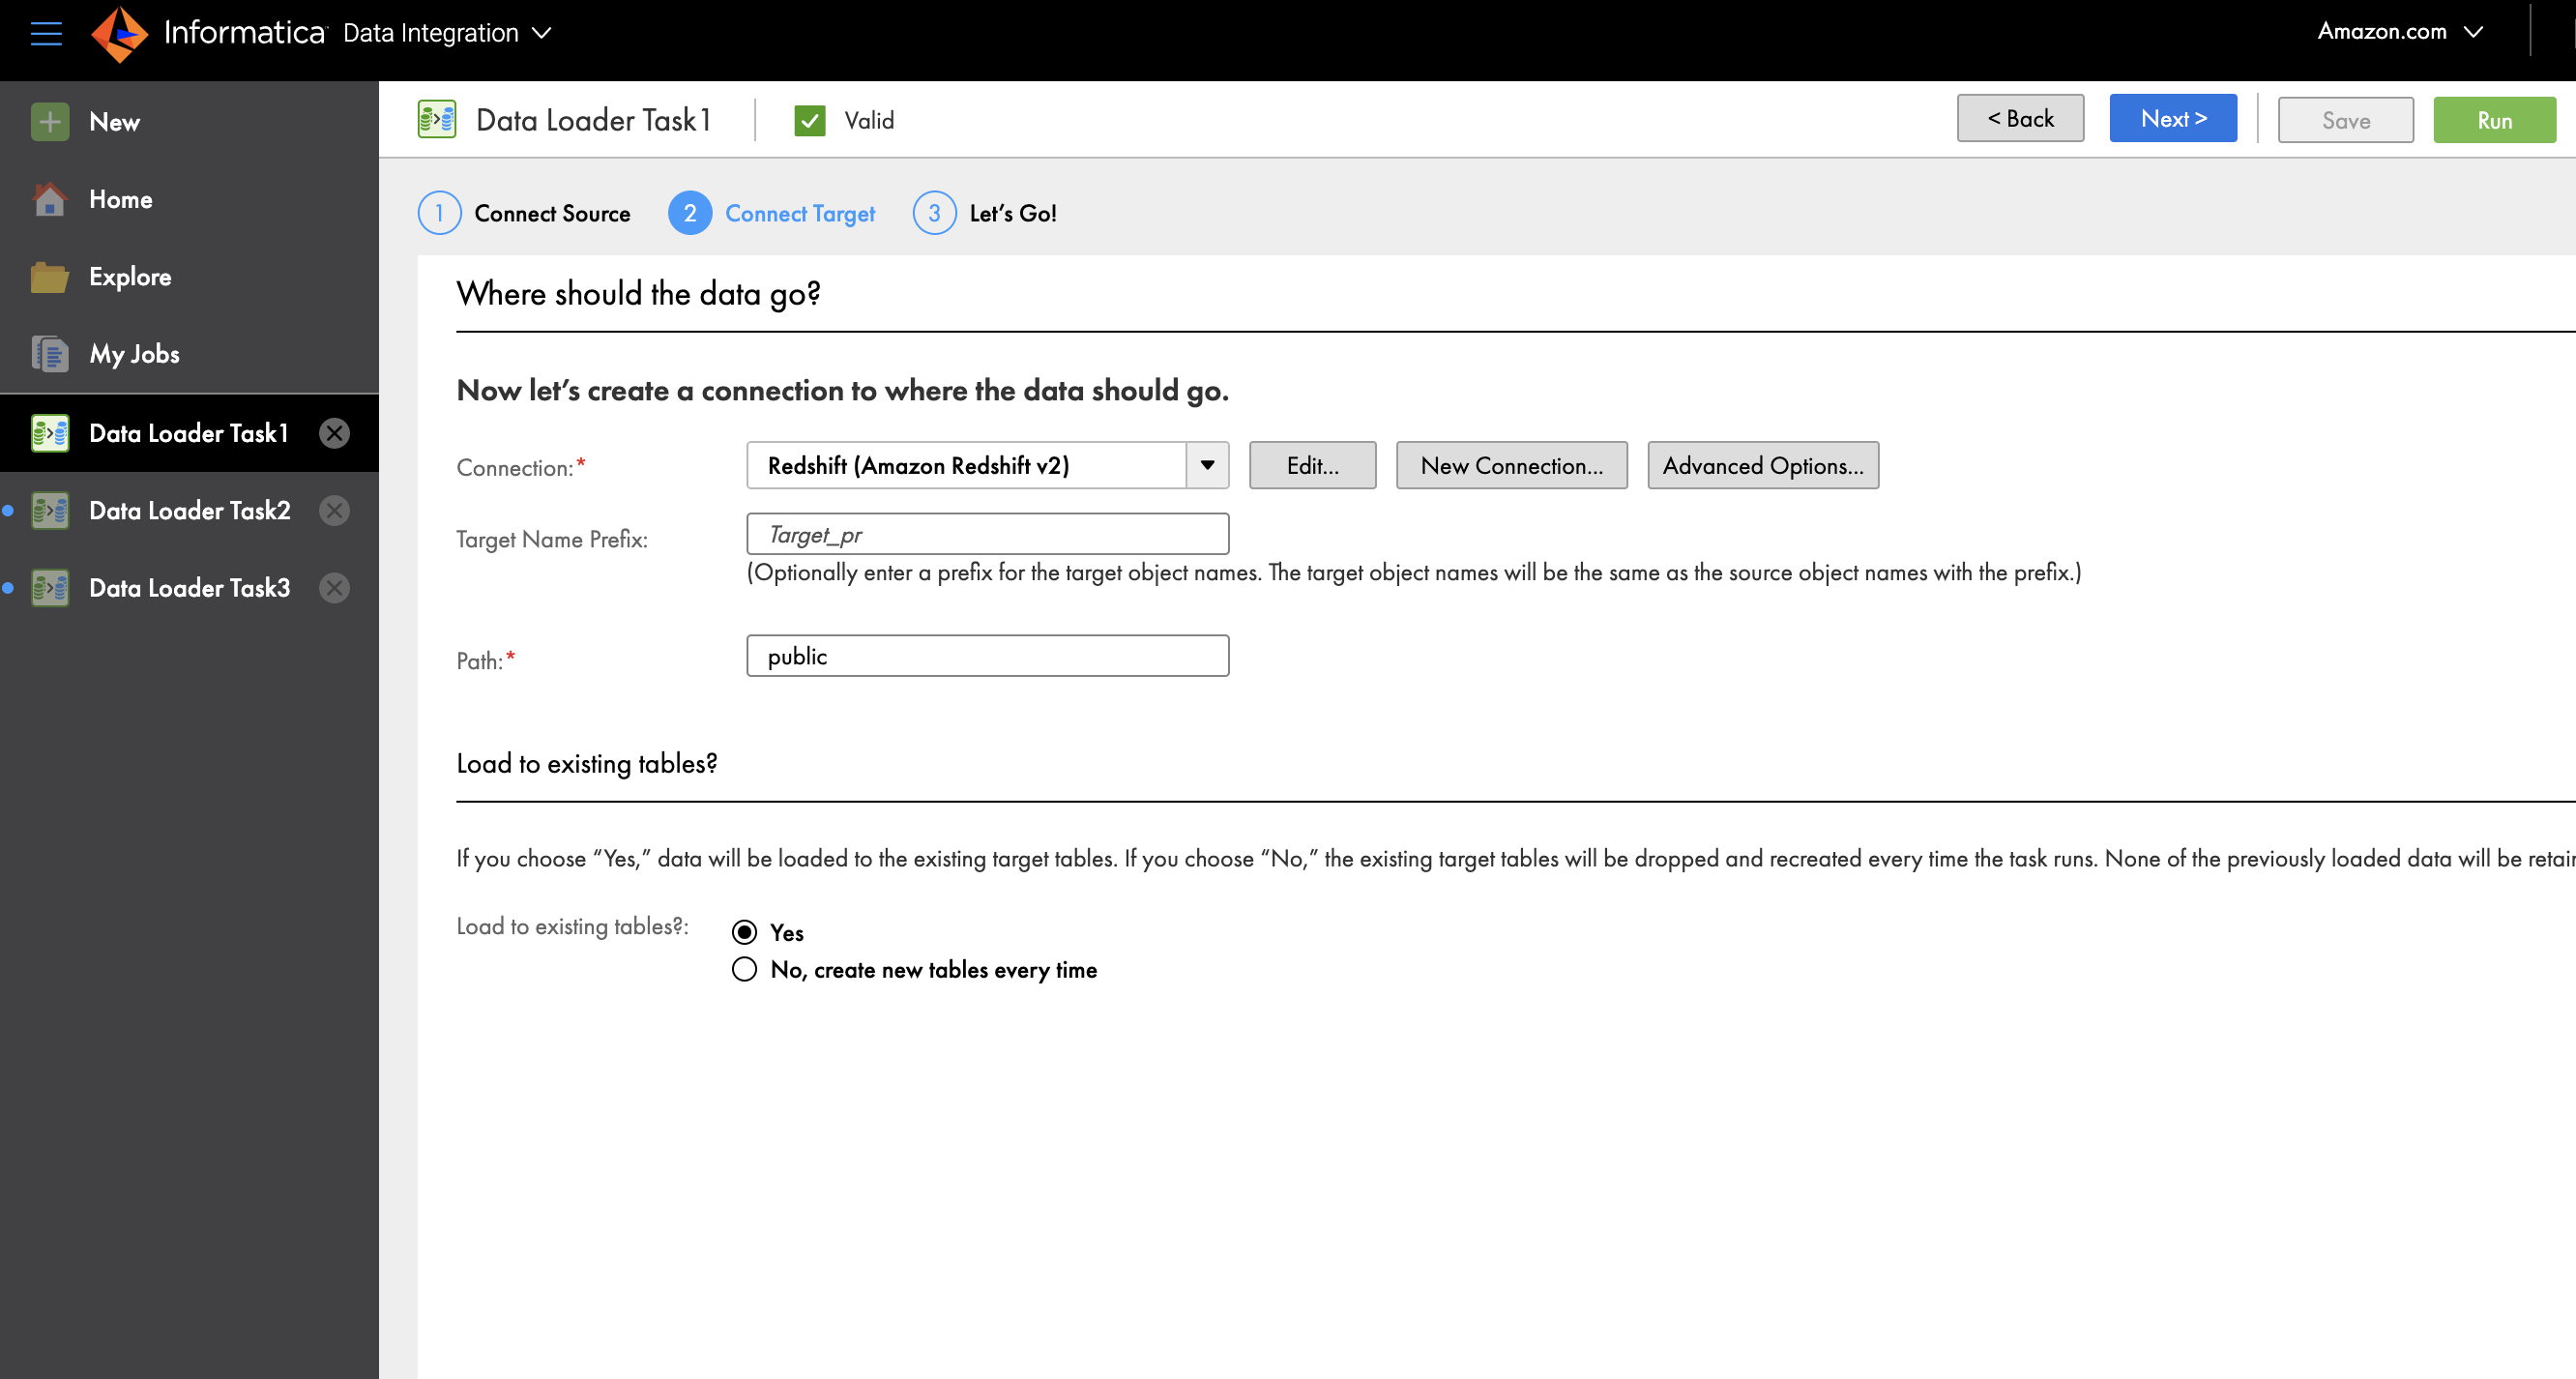
- Provide a connection name and optional description.
- Under Amazon Redshift Connection Section, enter your access key ID, secret access key, and the JDBC URL or your provisioned cluster or serverless workgroup.
- Choose Test to verify connectivity.
- After the connection is successful, choose Add.

- Optionally, for Target Name Prefix, enter the prefix to which the object name should be appended.
- For Path, enter the schema name public in Amazon Redshift where you want to load the data.
- For Load to existing tables, select No, create new tables every time.

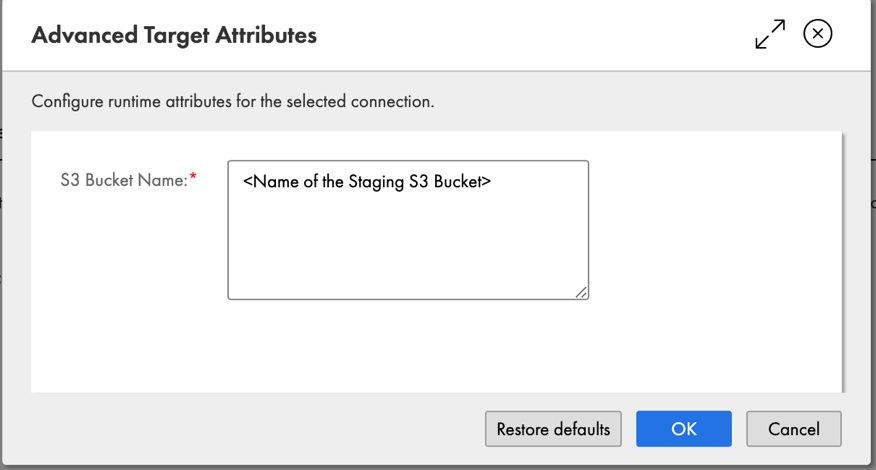
- Choose Advanced Options to enter the name of the staging S3 bucket.
- Choose OK.
You have now successfully connected to a target Amazon Redshift cluster.
Schedule or run a data load
You can run your data load by choosing Run or expand the Schedule section to schedule it.
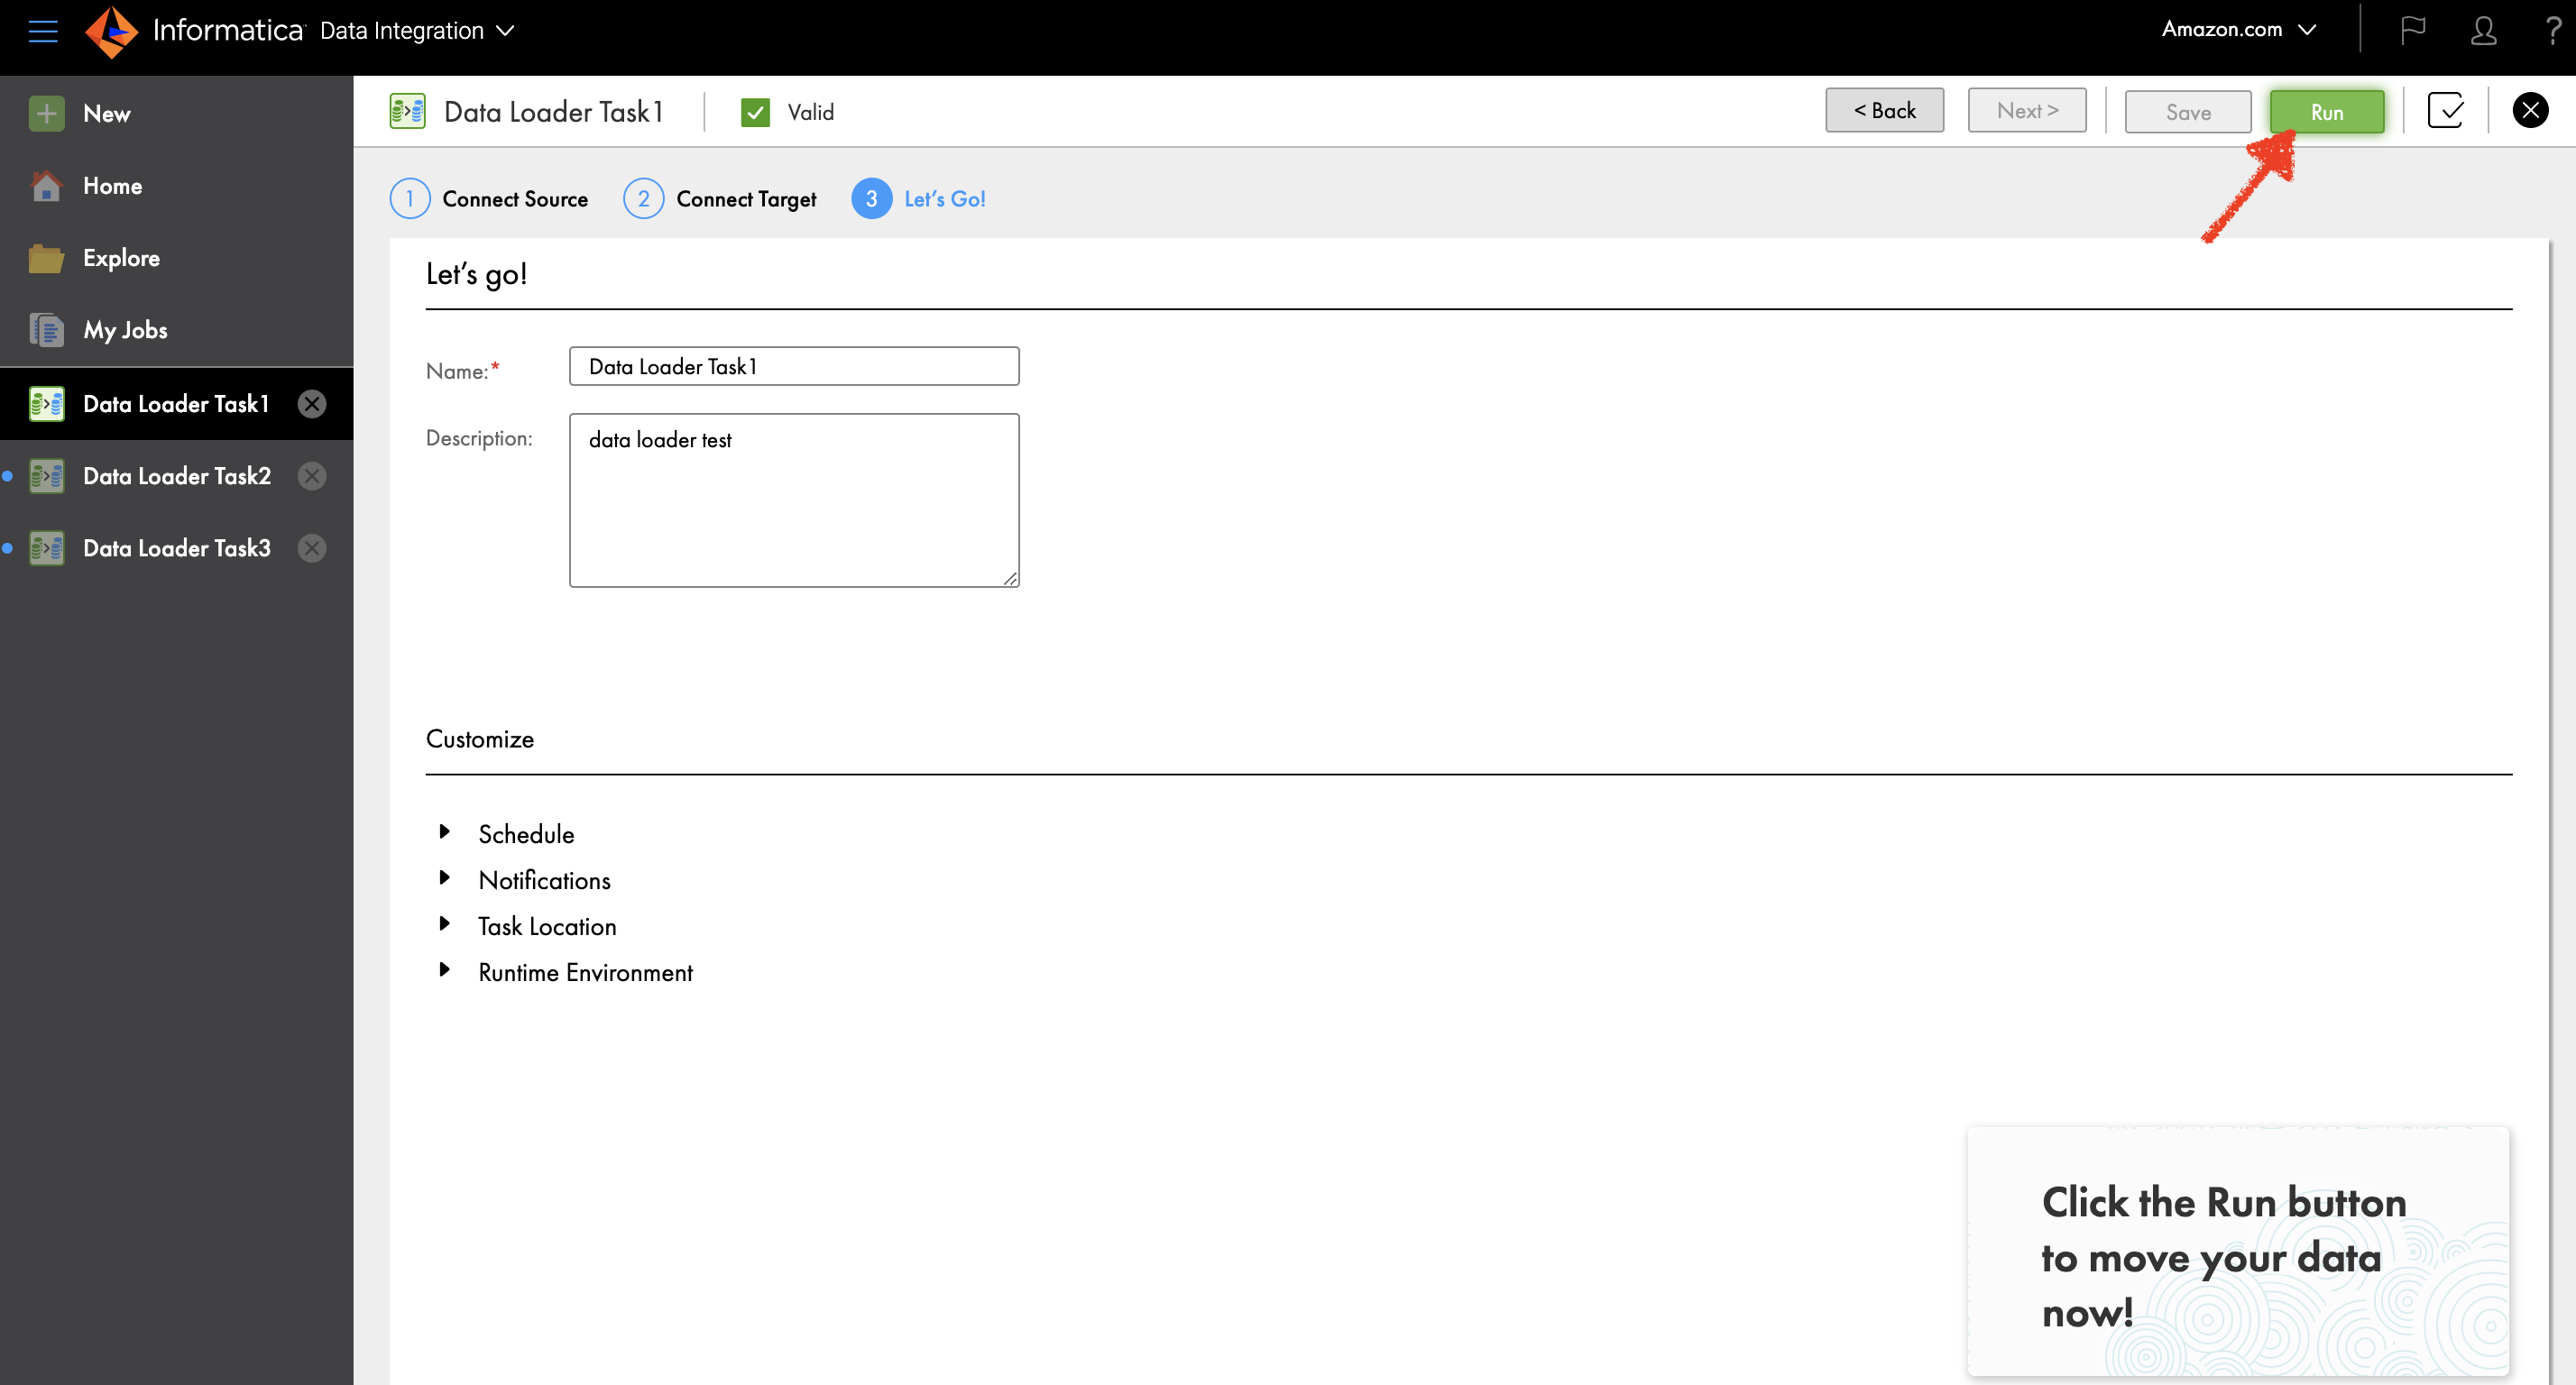
You can also monitor job status on the My Jobs page.

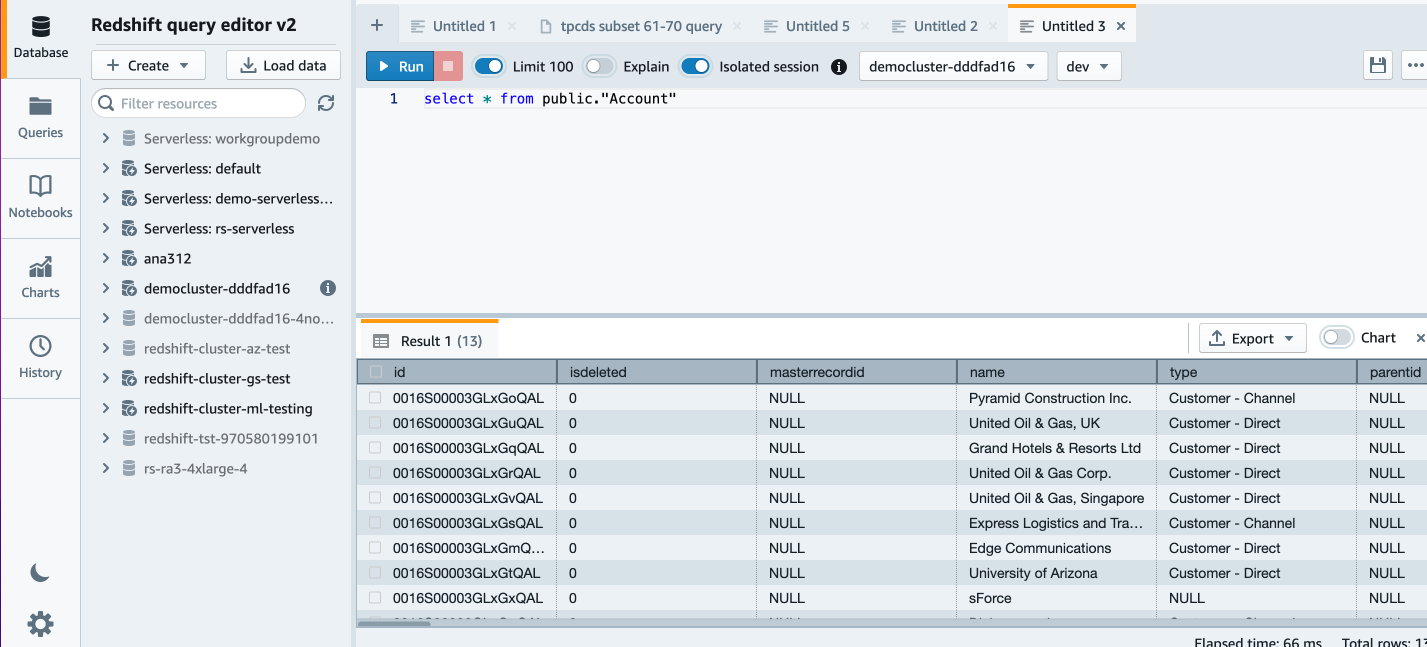
When your job status changes to Success, you can return to the Amazon Redshift console and open Query Editor V2.

In Amazon Redshift Query Editor v2.0, you can verify the loaded data by running the following query:
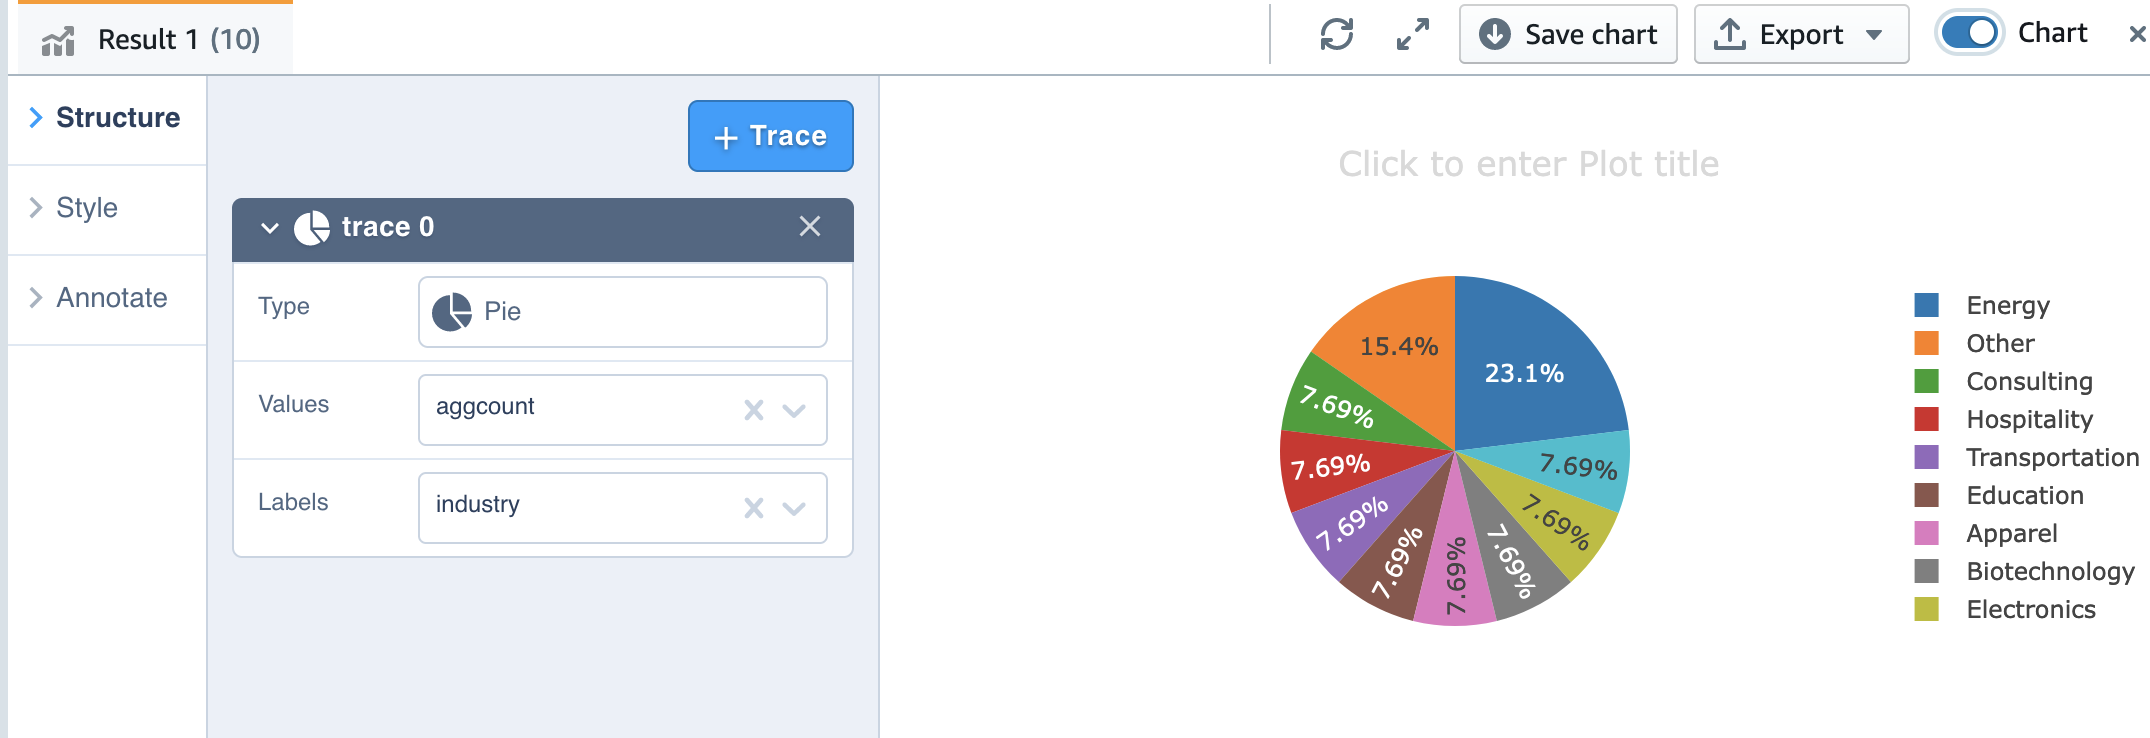
Now we can do some more analysis. Let’s look at customer account by industry:
Also, we can use the charting capability of Query Editor V2 for visualization.

Simply choose the chart type and the value and label you want to chart.
Conclusion
The post demonstrates the integrated Amazon Redshift console experience of loading data with Informatica Data Loader and querying the data with Amazon Redshift Query Editor. With Informatica Data Loader, Amazon Redshift customers can quickly onboard new data sources in three simple steps and just-in-time bring data at scale to drive data-driven decisions.
You can sign up for Informatica Data Loader for Amazon Redshift and start loading data to Amazon Redshift.
About the authors
 Deepak Rameswarapu is a Director of Product Management at Informatica. He is product leader with a strategic focus on new features and product launches, strategic product road map, AI/ML, cloud data integration, and data engineering and integration leadership. He brings 20 years of experience building best-of-breed products and solutions to address end-to-end data management challenges.
 Rajeev Srinivasan is a Director of Technical Alliance, Ecosystem at Informatica. He leads the strategic technical partnership with AWS to bring needed and innovative solutions and capabilities into the hands of the customers. Along with customer obsession, he has a passion for data and cloud technologies, and riding his Harley.
 Michael Yitayew is a Product Manager for Amazon Redshift based out of New York. He works with customers and engineering teams to build new features that enable data engineers and data analysts to more easily load data, manage data warehouse resources, and query their data. He has supported AWS customers for over 3 years in both product marketing and product management roles.
 Phil Bates is a Senior Analytics Specialist Solutions Architect at AWS. He has more than 25 years of experience implementing large-scale data warehouse solutions. He is passionate about helping customers through their cloud journey and using the power of ML within their data warehouse.
 Weifan Liang is a Senior Partner Solutions Architect at AWS. He works closely with AWS top strategic data analytics software partners to drive product integration, build optimized architecture, develop long-term strategy, and provide thought leadership. Innovating together with partners, Weifan strives to help customers accelerate business outcomes with cloud-powered digital transformation.