Business Productivity
Amazon Chime SDK launches live connector for streaming
A new Amazon Chime SDK feature, Live Connector, allows builders to connect live streams directly from their apps and websites to streaming platforms, enabling videos to reach millions of viewers through WebRTC. The Amazon Chime SDK is a set of APIs that removes the heavy lifting associated with designing and maintaining a back end media service, allowing focus to be on the application itself.
In this blog post, we will provide an example of how a builder could use the new Amazon Chime SDK media pipeline live connector with Amazon Interactive Video Services. IVS is an AWS service that accepts RTMPS streams and make low-latency live video to available to viewers around the world.
What are WebRTC and RTMP?
This feature utilizes WebRTC technology, an open source real-time communications project, through APIs for web and mobile applications, enabling builders to add real-time video and audio into their applications. RTMP (Real-Time Messaging Protocol) is a communication protocol for streaming audio, video, and data over the Internet. RTMPS is a secure version of the protocol for streaming audio, video, and data.
The Amazon Chime SDK Live Connector feature enables live streaming video and audio from a meeting to an RTMP or RTMPS ingestion URL from services like Amazon Interactive Video Service or Amazon Elemental allowing for millions of passive viewers to attend and watch with minimal delay. Other RTMP(s) streaming options include Twitch, YouTube, and Facebook Live to name a few. A builder can choose a composited layout, then start the Live Connector pipeline that works with the existing media pipelines feature of the Amazon Chime SDK already used for media capture. This new capability enables use-cases like hosting large virtual events, global town halls, and company-wide training with thousands or even millions of attendees.
In this blog post we chose to use Amazon IVS as our RTMPS destination, but Amazon Elemental MediaLive is another option. For more information setting up an RTMP input on MediaLive, click here.
Prerequisites
AWS SDK or AWS CLI installed
Basic knowledge of Amazon Chime SDK
Basic knowledge of Amazon Interactive Video Service (IVS)
Run a meeting session with Amazon Chime SDK
Let’s start by creating an Amazon Chime SDK meeting session that you will output to RTMPS. For details how to create a meeting with our demo app running, click here. Once you have a meeting session running, keep the meeting ID handy as you will need it when creating media live-connector pipeline.
*If you are running our demo app, you can see the meeting ID of the meeting session you are currently in on the left bottom corner of the page.
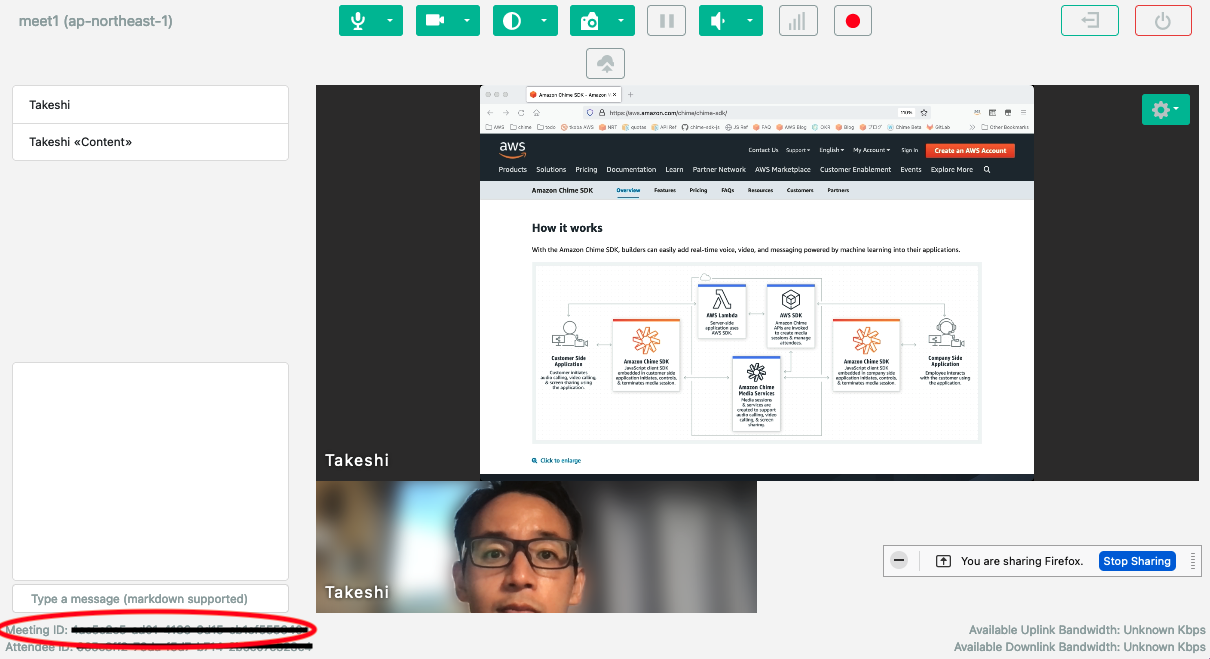
Amazon Chime SDK Meeting Demo
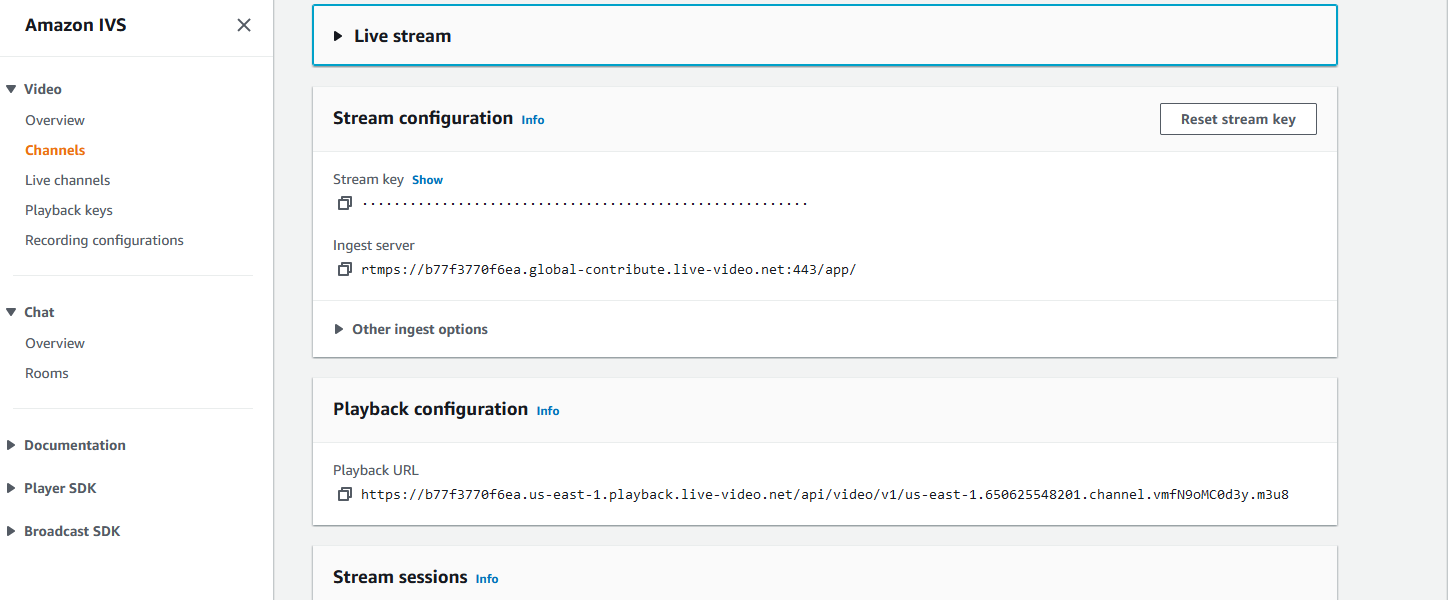
Create an Amazon IVS channel and RTMPS ingest server
In the AWS Console, search for Amazon Interactive Video Service. You will be brought to the page below. Click Create channel.

Title your channel a friendly name up to 128 characters and select Default for channel configuration then scroll down.

While Amazon IVS does have Amazon S3 recording capability, for this demo you can leave it disabled and click Create channel.

Once your channel has been created you will be presented with a stream key, ingest server, and playback URL. The playback URL can be played using any media player capable of playing HLS (.m3u8) streams. Amazon IVS has player SDKs for web and mobile for use in your applications, but that is beyond the scope of this blog post. If you don’t have an HLS player handy, Amazon IVS also has a preview built into the console by clicking the Live stream tab.
Choose your layout parameters and start the Live Connector pipeline
The Live Connector feature is accessed via the AWS SDK or AWS CLI. To get started you’ll first create a JSON file with configuration parameters and the active Amazon Chime SDK meeting ID. Then you’ll create a media live connector pipeline to start exporting to the RTMP(s) to your chosen destination. Also specified in the JSON file you can choose three layout options; active speaker only, content share with presenter only, or feature content share. For details on compositing see here.
Once you obtain the RTMP(s) ingest server and the stream key, that information will go into the JSON file as well. There are examples below of the JSON file and parameters to choose from. As a note, the RTMP(s) ingest server and stream key will be concatenated together like this: “<ingest-server>/<stream key>”
 1) Active Speaker has one video tile of the active speaker’s video stream and the meeting audio. The video tile will automatically switch to the current active speaker. If the active speaker doesn’t have their camera turned on, the video tile will display black screen until an active speaker with video stream appears. Note that in this layout content share is not displayed via the RTMP(s) stream even if content share is present in the Amazon Chime SDK meeting. If content share is needed, use option 2 or 3 below.
{
    "Sources": [
        {
            "SourceType": "ChimeSdkMeeting",
            "ChimeSdkMeetingLiveConnectorConfiguration": {
                "Arn": "arn:aws:chime::<account-id>:meeting:<meeting-id>",
                "MuxType": "AudioWithActiveSpeakerVideo"
            }
        }
    ],
    "Sinks": [
        {
            "SinkType": "RTMP",
            "RTMPConfiguration": {
                "Url": "<ingest-server>/<stream key>",
                "AudioChannels": "Stereo",
                "AudioSampleRate": "48000"
            }
        }
    ]
}
2) PresenterOnly is one of the two options with content share enabled. Content share will occupy majority of the screen with the presenter’s video overlayed on the corner you set with PresenterPosition.
{
    "Sources": [
        {
            "SourceType": "ChimeSdkMeeting",
            "ChimeSdkMeetingLiveConnectorConfiguration": {
                "Arn": "arn:aws:chime::<account-id>:meeting:<meeting-id>",
                "MuxType": "AudioWithCompositedVideo",
                "CompositedVideo": {
                  "Layout": "GridView",
                  "Resolution": "FHD",
                  "GridViewConfiguration": {
                    "ContentShareLayout": "PresenterOnly",
                    "PresenterOnlyConfiguration": {
                      "PresenterPosition": "TopRight"
                    }
                  }
                }
            }
        }
    ],
    "Sinks": [
        {
            "SinkType": "RTMP",
            "RTMPConfiguration": {
                "Url": "<ingest-server>/<stream key>",
                "AudioChannels": "Stereo",
                "AudioSampleRate": "48000"
            }
        }
    ]
}
3) Feature content share is the second option with content share enabled. Content share will occupy majority of the screen with other video tiles show on either horizontal or vertical depending on the configuration. The most recent enabled four videos will be shown with presenter video shown on the first tile.
{
    "Sources": [
        {
            "SourceType": "ChimeSdkMeeting",
            "ChimeSdkMeetingLiveConnectorConfiguration": {
                "Arn": "arn:aws:chime::<account-id>:meeting:<meeting-id>",
                "MuxType": "AudioWithCompositedVideo",
                "CompositedVideo": {
                    "Layout": "GridView",
                    "Resolution": "FHD",
                    "GridViewConfiguration": {
                        "ContentShareLayout": "Horizontal"
                    }
                }
            }
        }
    ],
    "Sinks": [
        {
            "SinkType": "RTMP",
            "RTMPConfiguration": {
                "Url": "<ingest-server>/<stream key>",
                "AudioChannels": "Stereo",
                "AudioSampleRate": "48000"
            }
        }
    ]
}
When content is not being shared in either “Presenter only” or “Feature content share,” Grid View will be the default layout. In this layout, each video stream will occupy a tile and will automatically scale based on the number of video streams in the meeting session. Tiles are automatically arranged in rows and columns based on number of video streams with a maximum of 25 video tiles. A builder can use the SourceConfiguration option in the JSON file parameters (shown below) to have only selected attendees in the meeting show up in in the RTMP(s) stream. Note that if content share begins during in the meeting, whatever content share layout you have chosen will be displayed and grid view will disappear until content share stops.

Grid View when no content is being shared on any of the above composited layouts.
Choosing only specific attendees to be streamed
If you would like to choose which attendees (up to 25) in the Amazon Chime SDK meeting are shown on the RTMP(s) stream, use the SourceConfiguration parameter in the JSON file to specify which attendees by ID. See that added code block in the example JSON file below. Note that external meeting ID is an optional field and is often the friendly name or other identifier of the attendee that the builder chooses.
{
    "Sources": [
        {
            "SourceType": "ChimeSdkMeeting",
            "ChimeSdkMeetingLiveConnectorConfiguration": {
                "Arn": "arn:aws:chime::<account-id>:meeting:<meeting-id>",
                "MuxType": "AudioWithCompositedVideo",
                "CompositedVideo": {
                    "Layout": "GridView",
                    "Resolution": "FHD",
                    "GridViewConfiguration": {
                        "ContentShareLayout": "Vertical"
                    }
                },
                "SourceConfiguration": {
                    "SelectedVideoStreams": {
                        "AttendeeIds": ["attendeeID1","attendeeID2"],
                        "ExternalUserIds": [ "string" ]
                    }
                }
            }
        }
    ],
    "Sinks": [
        {
            "SinkType": "RTMP",
            "RTMPConfiguration": {
                "Url": "<ingest-server>/<stream key>",
                "AudioChannels": "Stereo",
                "AudioSampleRate": "48000"
            }
        }
    ]
}
Starting the Live Connector pipeline to begin streaming
Once the layout parameters are determined, save the JSON file. Now you will call the API to create the Live Connector pipeline. When you call the API you will pass in the JSON file that contains the parameters including layout, meeting ID, AWS account ID, and RTMP(s) destination (see technical documentation for details).
With the AWS CLI, call the below command:
aws chime-sdk-media-pipelines create-media-live-connector-pipeline
--cli-input-json file://input.json --region <region>
Note: you could also use AWS Lambda and the AWS SDK with the programming language of your choice to create the pipeline. Please see the Amazon Chime SDK documentation for more details.
Note: API for Live Connector pipeline is available to specified regions (see here), but pipeline can run on meetings running on any regions that Amazon Chime SDK supports.
 Once the media live connector pipeline is successfully running, you will get a response with the media pipeline id which you will need later to delete or check on the pipeline status. You will also see and attendee named ‘MediaPipeline-XXXXX’ join into the meeting. In a production application you can choose to filter out this attendee so other attendees don’t see the Live Connector bot in the roster.
{
    "MediaLiveconnectorPipeline": {
        "Sources": [
            ....
        ],
        "Sinks": [
            ....
        ],
        "MediaPipelineId": "*****-****-****-****-**********",
        "Status": "Initializing",
        "CreatedTimestamp": "2022-07-11T08:09:37.841Z",
        "UpdatedTimestamp": "2022-07-11T08:09:38.090Z"
    }
}
Check your live stream in the IVS console
Once your Live Connector is running, navigate back to the IVS console and to the channel you created earlier. If you click on the “Live stream” tab and press the play button, you should see your video stream without the need to setup an HLS player to test.

Cleaning up the resources
There are two ways to stop the running media live connector pipeline. You can call delete-media-pipeline API to stop the pipeline explicitly but let the meeting continue or if the meeting ends, the pipeline will automatically stop as well.
aws chime-sdk-media-pipelines delete-media-pipeline
--media-pipeline-id ****-****-****-****** --region <region>
If you created an IVS channel following this post’s steps, go to the IVS Channels page on Management Console and select the IVS channel and click on Delete to clean up the resource.
If you run Amazon Chime SDK’s browser demo app, you can just stop the local server running to clean the resources. Or if you run Amazon Chime SDK’s serverless demo app, you can just follow the steps of cleaning up section of the page.
Conclusion
This blog post serves as one example of how a builder could use the new Live Connector feature of the Amazon Chime SDK. RTMP(s) is a common protocol for live streaming video and audio. Any service that supports RTMP or RTMPS ingestion could be used with this new feature and it is not limited to AWS destinations. If you have questions on any of the services mentioned, please see this links to get started:
Creating media live connector pipelines
Enabling compositing for media pipelines