AWS Compute Blog
Building High-Throughput Genomics Batch Workflows on AWS: Workflow Layer (Part 4 of 4)
This post is courtesy of Aaron Friedman – Healthcare and Life Sciences Partner Solutions Architect at AWS and Angel Pizarro – Scientific Computing Technical Business Development Manager at AWS
This post is the fourth in a series on how to build a genomics workflow on AWS. In Part 1, we introduced a general architecture, shown below, and highlighted the three common layers in a batch workflow:
- Job
- Batch
- Workflow
In Part 2, you built a Docker container for each job that needed to run as part of your workflow, and stored them in Amazon ECR.
In Part 3, you tackled the batch layer and built a scalable, elastic, and easily maintainable batch engine using AWS Batch. This solution took care of dynamically scaling your compute resources in response to the number of runnable jobs in your job queue length as well as managed job placement.

In part 4, you build out the workflow layer of your solution using AWS Step Functions and AWS Lambda. You then run an end-to-end genomic analysis―specifically known as exome secondary analysis―for many times at a cost of less than $1 per exome.
Step Functions makes it easy to coordinate the components of your applications using visual workflows. Building applications from individual components that each perform a single function lets you scale and change your workflow quickly. You can use the graphical console to arrange and visualize the components of your application as a series of steps, which simplify building and running multi-step applications. You can change and add steps without writing code, so you can easily evolve your application and innovate faster.
An added benefit of using Step Functions to define your workflows is that the state machines you create are immutable. While you can delete a state machine, you cannot alter it after it is created. For regulated workloads where auditing is important, you can be assured that state machines you used in production cannot be altered.
In this blog post, you will create a Lambda state machine to orchestrate your batch workflow. For more information on how to create a basic state machine, please see this Step Functions tutorial.
All code related to this blog series can be found in the associated GitHub repository here.
Build a state machine building block
To skip the following steps, we have provided an AWS CloudFormation template that can deploy your Step Functions state machine. You can use this in combination with the setup you did in part 3 to quickly set up the environment in which to run your analysis.
The state machine is composed of smaller state machines that submit a job to AWS Batch, and then poll and check its execution.

The steps in this building block state machine are as follows:
- A job is submitted.
Each analytical module/job has its own Lambda function for submission and calls the batchSubmitJob Lambda function that you built in the previous blog post. You will build these specialized Lambda functions in the following section. - The state machine queries the AWS Batch API for the job status.
This is also a Lambda function. - The job status is checked to see if the job has completed.
If the job status equals SUCCESS, proceed to log the final job status. If the job status equals FAILED, end the execution of the state machine. In all other cases, wait 30 seconds and go back to Step 2.
Here is the JSON representing this state machine.
{
  "Comment": "A simple example that submits a Job to AWS Batch",
  "StartAt": "SubmitJob",
  "States": {
    "SubmitJob": {
      "Type": "Task",
      "Resource": "arn:aws:lambda:us-east-1:<account-id>::function:batchSubmitJob",
      "Next": "GetJobStatus"
    },
    "GetJobStatus": {
      "Type": "Task",
      "Resource": "arn:aws:lambda:us-east-1:<account-id>:function:batchGetJobStatus",
      "Next": "CheckJobStatus",
      "InputPath": "$",
      "ResultPath": "$.status"
    },
    "CheckJobStatus": {
      "Type": "Choice",
      "Choices": [
        {
          "Variable": "$.status",
          "StringEquals": "FAILED",
          "End": true
        },
        {
          "Variable": "$.status",
          "StringEquals": "SUCCEEDED",
          "Next": "GetFinalJobStatus"
        }
      ],
      "Default": "Wait30Seconds"
    },
    "Wait30Seconds": {
      "Type": "Wait",
      "Seconds": 30,
      "Next": "GetJobStatus"
    },
    "GetFinalJobStatus": {
      "Type": "Task",
      "Resource": "arn:aws:lambda:us-east-1:<account-id>:function:batchGetJobStatus",
      "End": true
    }
  }
}
Building the Lambda functions for the state machine
You need two basic Lambda functions for this state machine. The first one submits a job to AWS Batch and the second checks the status of the AWS Batch job that was submitted.
In AWS Step Functions, you specify an input as JSON that is read into your state machine. Each state receives the aggregate of the steps immediately preceding it, and you can specify which components a state passes on to its children. Because you are using Lambda functions to execute tasks, one of the easiest routes to take is to modify the input JSON, represented as a Python dictionary, within the Lambda function and return the entire dictionary back for the next state to consume.
Building the batchSubmitIsaacJob Lambda function
For Step 1 above, you need a Lambda function for each of the steps in your analysis workflow. As you created a generic Lambda function in the previous post to submit a batch job (batchSubmitJob), you can use that function as the basis for the specialized functions you’ll include in this state machine. Here is such a Lambda function for the Isaac aligner.
from __future__ import print_function

import boto3
import json
import traceback

lambda_client = boto3.client('lambda')


def lambda_handler(event, context):
    try:
        # Generate output put
        bam_s3_path = '/'.join([event['resultsS3Path'], event['sampleId'], 'bam/'])

        depends_on = event['dependsOn'] if 'dependsOn' in event else []

        # Generate run command
        command = [
            '--bam_s3_folder_path', bam_s3_path,
            '--fastq1_s3_path', event['fastq1S3Path'],
            '--fastq2_s3_path', event['fastq2S3Path'],
            '--reference_s3_path', event['isaac']['referenceS3Path'],
            '--working_dir', event['workingDir']
        ]

        if 'cmdArgs' in event['isaac']:
            command.extend(['--cmd_args', event['isaac']['cmdArgs']])
        if 'memory' in event['isaac']:
            command.extend(['--memory', event['isaac']['memory']])

        # Submit Payload
        response = lambda_client.invoke(
            FunctionName='batchSubmitJob',
            InvocationType='RequestResponse',
            LogType='Tail',
            Payload=json.dumps(dict(
                dependsOn=depends_on,
                containerOverrides={
                    'command': command,
                },
                jobDefinition=event['isaac']['jobDefinition'],
                jobName='-'.join(['isaac', event['sampleId']]),
                jobQueue=event['isaac']['jobQueue']
            )))

        response_payload = response['Payload'].read()

        # Update event
        event['bamS3Path'] = bam_s3_path
        event['jobId'] = json.loads(response_payload)['jobId']

        return event
    except Exception as e:
        traceback.print_exc()
        raise e
In the Lambda console, create a Python 2.7 Lambda function named batchSubmitIsaacJob and paste in the above code. Use the LambdaBatchExecutionRole that you created in the previous post. For more information, see Step 2.1: Create a Hello World Lambda Function.
This Lambda function reads in the inputs passed to the state machine it is part of, formats the data for the batchSubmitJob Lambda function, invokes that Lambda function, and then modifies the event dictionary to pass onto the subsequent states. You can repeat these for each of the other tools, which can be found in the tools//lambda/lambda_function.py script in the GitHub repo.
Building the batchGetJobStatus Lambda function
For Step 2 above, the process queries the AWS Batch DescribeJobs API action with jobId to identify the state that the job is in. You can put this into a Lambda function to integrate it with Step Functions.
In the Lambda console, create a new Python 2.7 function with the LambdaBatchExecutionRole IAM role. Name your function batchGetJobStatus and paste in the following code. This is similar to the batch-get-job-python27 Lambda blueprint.
from __future__ import print_function

import boto3
import json

print('Loading function')

batch_client = boto3.client('batch')

def lambda_handler(event, context):
    # Log the received event
    print("Received event: " + json.dumps(event, indent=2))
    # Get jobId from the event
    job_id = event['jobId']

    try:
        response = batch_client.describe_jobs(
            jobs=[job_id]
        )
        job_status = response['jobs'][0]['status']
        return job_status
    except Exception as e:
        print(e)
        message = 'Error getting Batch Job status'
        print(message)
        raise Exception(message)
Structuring state machine input
You have structured the state machine input so that general file references are included at the top-level of the JSON object, and any job-specific items are contained within a nested JSON object. At a high level, this is what the input structure looks like:
{
        "general_field_1": "value1",
        "general_field_2": "value2",
        "general_field_3": "value3",
        "job1": {},
        "job2": {},
        "job3": {}
}
Building the full state machine
By chaining these state machine components together, you can quickly build flexible workflows that can process genomes in multiple ways. The development of the larger state machine that defines the entire workflow uses four of the above building blocks. You use the Lambda functions that you built in the previous section. Rename each building block submission to match the tool name.
We have provided a CloudFormation template to deploy your state machine and the associated IAM roles. In the CloudFormation console, select Create Stack, choose your template (deploy_state_machine.yaml), and enter in the ARNs for the Lambda functions you created.

Continue through the rest of the steps and deploy your stack. Be sure to check the box next to “I acknowledge that AWS CloudFormation might create IAM resources.”
Once the CloudFormation stack is finished deploying, you should see the following image of your state machine.
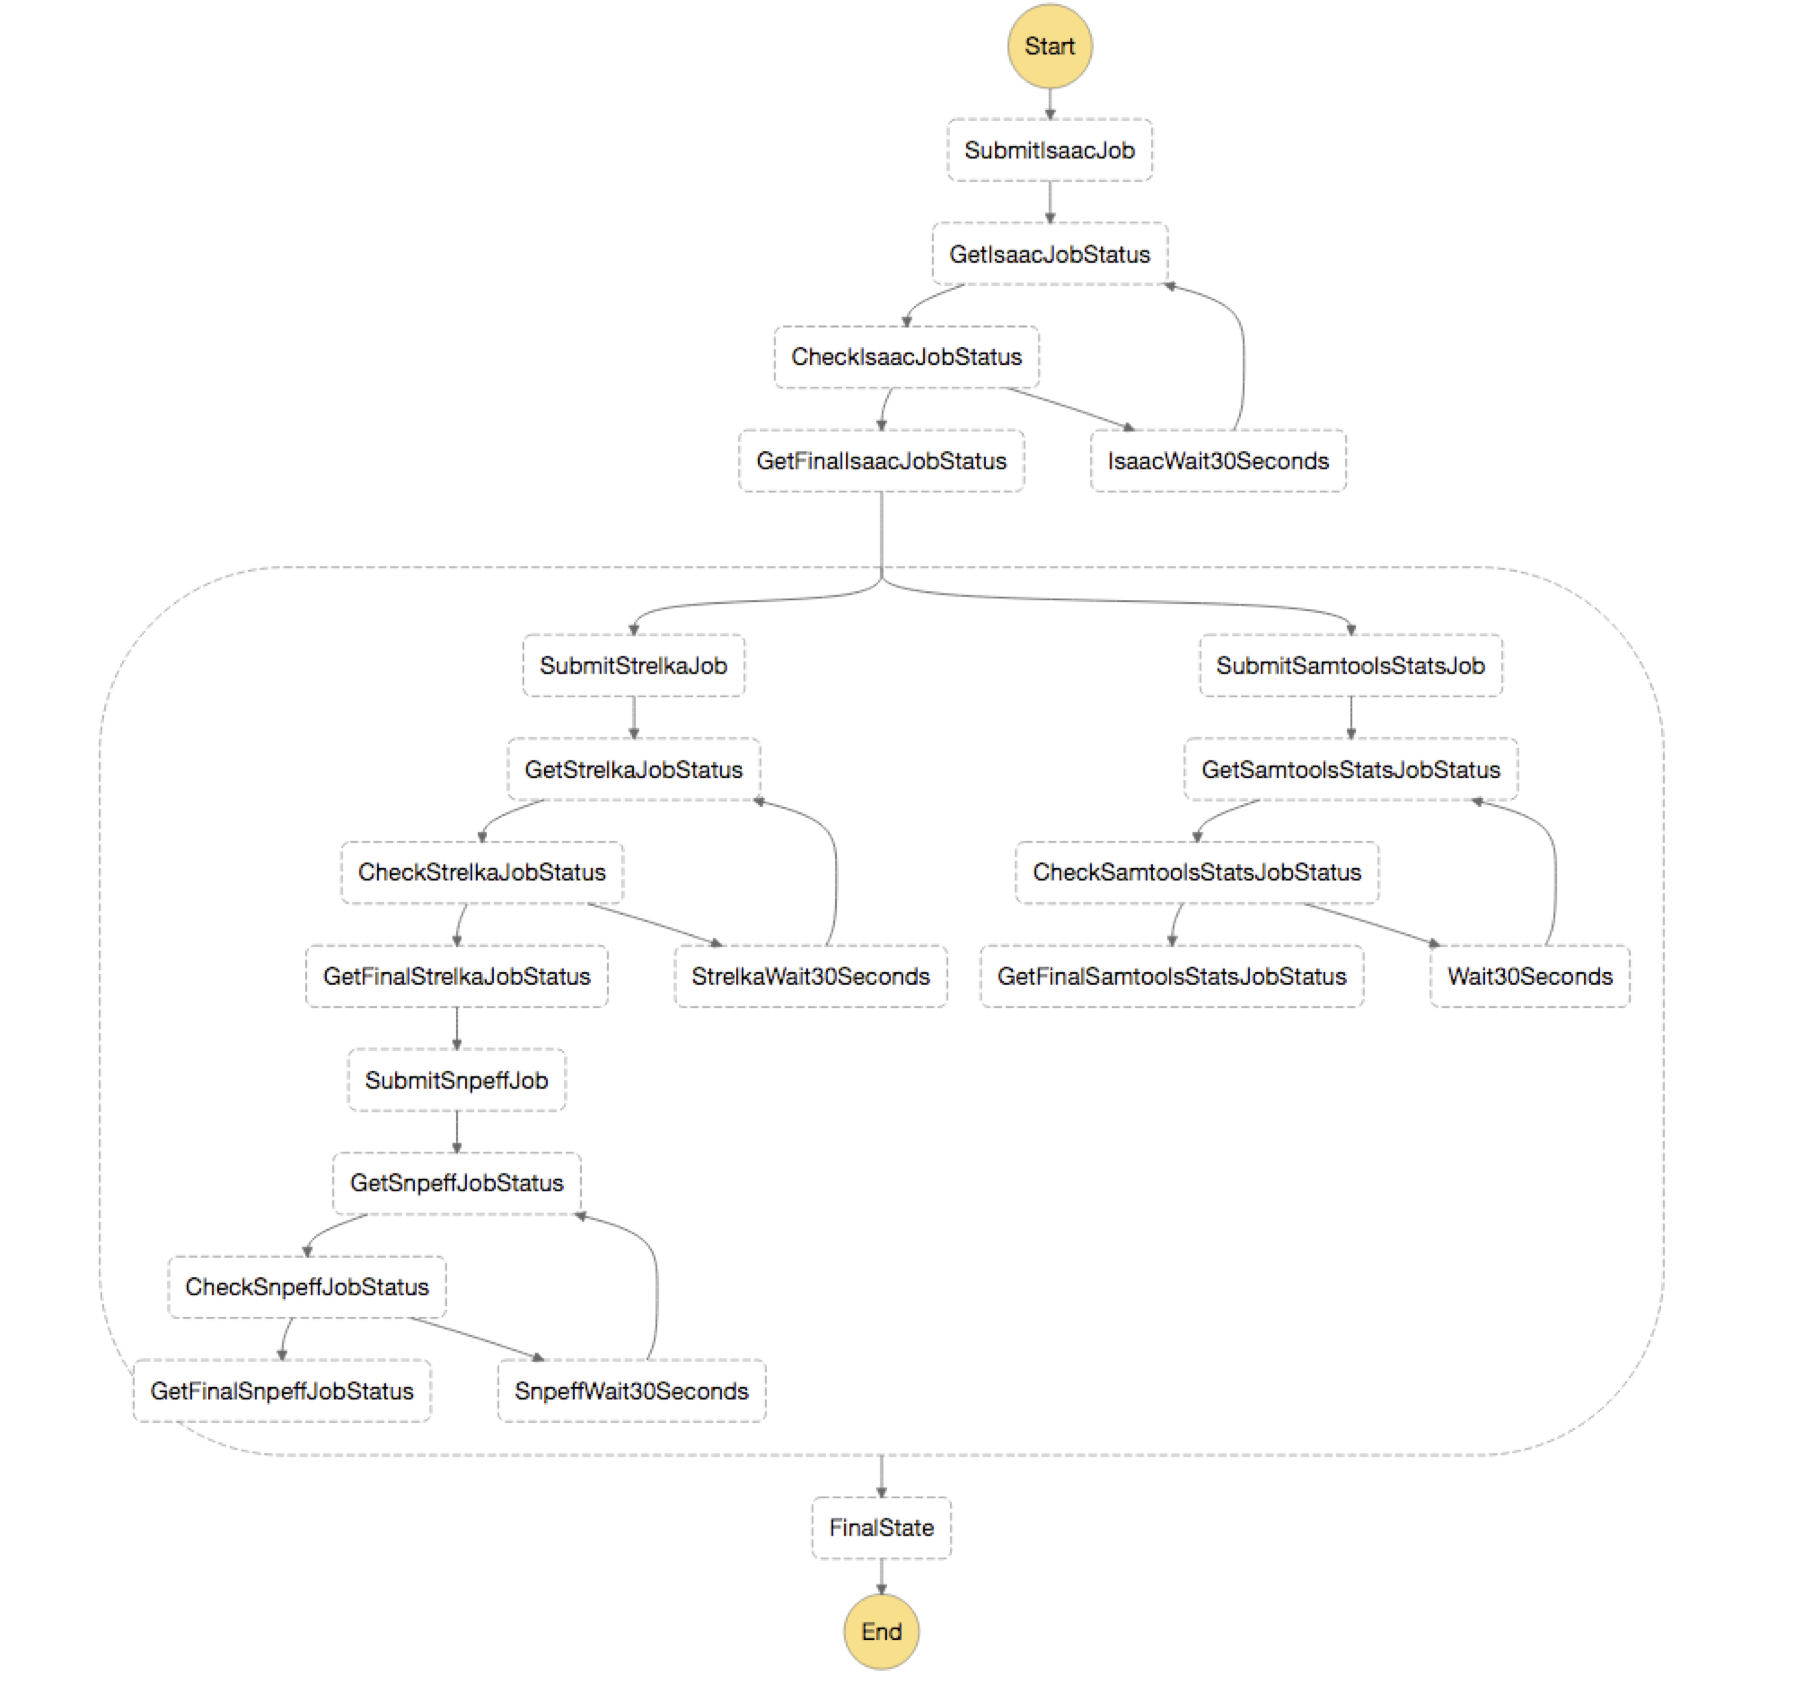
In short, you first submit a job for Isaac, which is the aligner you are using for the analysis. Next, you use parallel state to split your output from “GetFinalIsaacJobStatus” and send it to both your variant calling step, Strelka, and your QC step, Samtools Stats. These then are run in parallel and you annotate the results from your Strelka step with snpEff.
Putting it all together
Now that you have built all of the components for a genomics secondary analysis workflow, test the entire process.
We have provided sequences from an Illumina sequencer that cover a region of the genome known as the exome. Most of the positions in the genome that we have currently associated with disease or human traits reside in this region, which is 1–2% of the entire genome. The workflow that you have built works for both analyzing an exome, as well as an entire genome.
Additionally, we have provided prebuilt reference genomes for Isaac, located at:
s3://aws-batch-genomics-resources/reference/If you are interested, we have provided a script that sets up all of that data. To execute that script, run the following command on a large EC2 instance:
make reference REGISTRY=<your-ecr-registry>Indexing and preparing this reference takes many hours on a large-memory EC2 instance. Be careful about the costs involved and note that the data is available through the prebuilt reference genomes.
Starting the execution
In a previous section, you established a provenance for the JSON that is fed into your state machine. For ease, we have auto-populated the input JSON for you to the state machine. You can also find this in the GitHub repo under workflow/test.input.json:
{
  "fastq1S3Path": "s3://aws-batch-genomics-resources/fastq/SRR1919605_1.fastq.gz",
  "fastq2S3Path": "s3://aws-batch-genomics-resources/fastq/SRR1919605_2.fastq.gz",
  "referenceS3Path": "s3://aws-batch-genomics-resources/reference/hg38.fa",
  "resultsS3Path": "s3://<bucket>/genomic-workflow/results",
  "sampleId": "NA12878_states_1",
  "workingDir": "/scratch",
  "isaac": {
    "jobDefinition": "isaac-myenv:1",
    "jobQueue": "arn:aws:batch:us-east-1:<account-id>:job-queue/highPriority-myenv",
    "referenceS3Path": "s3://aws-batch-genomics-resources/reference/isaac/"
  },
  "samtoolsStats": {
    "jobDefinition": "samtools_stats-myenv:1",
    "jobQueue": "arn:aws:batch:us-east-1:<account-id>:job-queue/lowPriority-myenv"
  },
  "strelka": {
    "jobDefinition": "strelka-myenv:1",
    "jobQueue": "arn:aws:batch:us-east-1:<account-id>:job-queue/highPriority-myenv",
    "cmdArgs": " --exome "
  },
  "snpEff": {
    "jobDefinition": "snpeff-myenv:1",
    "jobQueue": "arn:aws:batch:us-east-1:<account-id>:job-queue/lowPriority-myenv",
    "cmdArgs": " -t hg38 "
  }
}
You are now at the stage to run your full genomic analysis. Copy the above to a new text file, change paths and ARNs to the ones that you created previously, and save your JSON input as input.states.json.
In the CLI, execute the following command. You need the ARN of the state machine that you created in the previous post:
aws stepfunctions start-execution --state-machine-arn <your-state-machine-arn> --input file://input.states.jsonYour analysis has now started. By using Spot Instances with AWS Batch, you can quickly scale out your workflows while concurrently optimizing for cost. While this is not guaranteed, most executions of the workflows presented here should cost under $1 for a full analysis.
Monitoring the execution
The output from the above CLI command gives you the ARN that describes the specific execution. Copy that and navigate to the Step Functions console. Select the state machine that you created previously and paste the ARN into the search bar.
The screen shows information about your specific execution. On the left, you see where your execution currently is in the workflow.
In the following screenshot, you can see that your workflow has successfully completed the alignment job and moved onto the subsequent steps, which are variant calling and generating quality information about your sample.

You can also navigate to the AWS Batch console and see that progress of all of your jobs reflected there as well.

Finally, after your workflow has completed successfully, check out the S3 path to which you wrote all of your files. If you run a ls –recursive command on the S3 results path, specified in the input to your state machine execution, you should see something similar to the following:
2017-05-02 13:46:32 6475144340 genomic-workflow/results/NA12878_run1/bam/sorted.bam
2017-05-02 13:46:34    7552576 genomic-workflow/results/NA12878_run1/bam/sorted.bam.bai
2017-05-02 13:46:32         45 genomic-workflow/results/NA12878_run1/bam/sorted.bam.md5
2017-05-02 13:53:20      68769 genomic-workflow/results/NA12878_run1/stats/bam_stats.dat
2017-05-02 14:05:12        100 genomic-workflow/results/NA12878_run1/vcf/stats/runStats.tsv
2017-05-02 14:05:12        359 genomic-workflow/results/NA12878_run1/vcf/stats/runStats.xml
2017-05-02 14:05:12  507577928 genomic-workflow/results/NA12878_run1/vcf/variants/genome.S1.vcf.gz
2017-05-02 14:05:12     723144 genomic-workflow/results/NA12878_run1/vcf/variants/genome.S1.vcf.gz.tbi
2017-05-02 14:05:12  507577928 genomic-workflow/results/NA12878_run1/vcf/variants/genome.vcf.gz
2017-05-02 14:05:12     723144 genomic-workflow/results/NA12878_run1/vcf/variants/genome.vcf.gz.tbi
2017-05-02 14:05:12   30783484 genomic-workflow/results/NA12878_run1/vcf/variants/variants.vcf.gz
2017-05-02 14:05:12    1566596 genomic-workflow/results/NA12878_run1/vcf/variants/variants.vcf.gz.tbi
Modifications to the workflow
You have now built and run your genomics workflow. While diving deep into modifications to this architecture are beyond the scope of these posts, we wanted to leave you with several suggestions of how you might modify this workflow to satisfy additional business requirements.
- Job tracking with Amazon DynamoDB
In many cases, such as if you are offering Genomics-as-a-Service, you might want to track the state of your jobs with DynamoDB to get fine-grained records of how your jobs are running. This way, you can easily identify the cost of individual jobs and workflows that you run. - Resuming from failure
Both AWS Batch and Step Functions natively support job retries and can cover many of the standard cases where a job might be interrupted. There may be cases, however, where your workflow might fail in a way that is unpredictable. In this case, you can use custom error handling with AWS Step Functions to build out a workflow that is even more resilient. Also, you can build in fail states into your state machine to fail at any point, such as if a batch job fails after a certain number of retries. - Invoking Step Functions from Amazon API Gateway
You can use API Gateway to build an API that acts as a “front door” to Step Functions. You can create a POST method that contains the input JSON to feed into the state machine you built. For more information, see the Implementing Serverless Manual Approval Steps in AWS Step Functions and Amazon API Gateway blog post.
Conclusion
While the approach we have demonstrated in this series has been focused on genomics, it is important to note that this can be generalized to nearly any high-throughput batch workload. We hope that you have found the information useful and that it can serve as a jump-start to building your own batch workloads on AWS with native AWS services.
For more information about how AWS can enable your genomics workloads, be sure to check out the AWS Genomics page.
Other posts in this four-part series:
Please leave any questions and comments below.