AWS Compute Blog
Building for Cost optimization and Resilience for EKS with Spot Instances
This post is contributed by Chris Foote, Sr. EC2 Spot Specialist Solutions Architect
Running your Kubernetes and containerized workloads on Amazon EC2 Spot Instances is a great way to save costs. Kubernetes is a popular open-source container management system that allows you to deploy and manage containerized applications at scale. AWS makes it easy to run Kubernetes with Amazon Elastic Kubernetes Service (EKS) a managed Kubernetes service to run production-grade workloads on AWS. To cost optimize these workloads, run them on Spot Instances. Spot Instances are available at up to a 90% discount compared to On-Demand prices. These instances are best used for various fault-tolerant and instance type flexible applications. Spot Instances and containers are an excellent combination, because containerized applications are often stateless and instance flexible.
In this blog, I illustrate the best practices of using Spot Instances such as diversification, automated interruption handling, and leveraging Auto Scaling groups to acquire capacity. You then adapt these Spot Instance best practices to EKS with the goal of cost optimizing and increasing the resilience of container-based workloads.
Spot Instances Overview
Spot Instances are spare Amazon EC2 capacity that allows customers to save up to 90% over On-Demand prices. Spot capacity is split into pools determined by instance type, Availability Zone (AZ), and AWS Region. The Spot Instance price changes slowly determined by long-term trends in supply and demand of a particular Spot capacity pool, as shown below:

Prices listed are an example, and may not represent current prices. Spot Instance pricing is illustrated in orange blocks, and On-Demand is illustrated in dark-blue.
When EC2 needs the capacity back, the Spot Instance service arbitrarily sends Spot interruption notifications to instances within the associated Spot capacity pool. This Spot interruption notification lands in both the EC2 instance metadata and Eventbridge. Two minutes after the Spot interruption notification, the instance is reclaimed. You can set up your infrastructure to automate a response to this two-minute notification. Examples include draining containers, draining ELB connections, or post-processing.
Instance flexibility is important when following Spot Instance best practices, because it allows you to provision from many different pools of Spot capacity. Leveraging multiple Spot capacity pools help reduce interruptions depending on your defined Spot Allocation Strategy, and decrease time to provision capacity. Tapping into multiple Spot capacity pools across instance types and AZs, allows you to achieve your desired scale — even for applications that require 500K concurrent cores:
Spot capacity pools = (Availability Zones) * (Instance Types)
If your application is deployed across two AZs and uses only an c5.4xlarge then you are only using (2 * 1 = 2) two Spot capacity pools. To follow Spot Instance best practices, consider using six AZs and allowing your application to use c5.4xlarge, c5d.4xlarge, c5n.4xlarge, and c4.4xlarge. This gives us (6 * 4 = 24) 24 Spot capacity pools, greatly increasing the stability and resilience of your application.
Auto Scaling groups support deploying applications across multiple instance types, and automatically replace instances if they become unhealthy, or terminated due to Spot interruption. To decrease the chance of interruption, use the capacity-optimized Spot allocation strategy. This automatically launches Spot Instances into the most available pools by looking at real-time capacity data, and identifying which are the most available.
Now that I’ve covered Spot best practices, you can apply them to Kubernetes and build an architecture for EKS with Spot Instances.
Solution architecture
The goals of this architecture are as follows:
- Automatically scaling the worker nodes of Kubernetes clusters to meet the needs of the application
- Leveraging Spot Instances to cost-optimize workloads on Kubernetes
- Adapt Spot Instance best practices (like diversification) to EKS and Cluster Autoscaler
You achieve these goals via the following components:
| Component | Role | Details | Deployment Method |
| Cluster Autoscaler | Scales EC2 instances automatically according to pods running in the cluster | Open Source | A Deployment on On-Demand Instances |
| EC2 Auto Scaling group | Provisions and maintains EC2 instance capacity | AWS | Cloudformation via eksctl |
| AWS Node Termination Handler | Detects EC2 Spot interruptions and automatically drains nodes | Open Source | A DaemonSet on Spot and On-Demand Instances |
The architecture deploys the EKS worker nodes over three AZs, and leverages three Auto Scaling groups – two for Spot Instances, and one for On-Demand. The Kubernetes Cluster Autoscaler is deployed on On-Demand worker nodes, and the AWS Node Termination Handler is deployed on all worker nodes.
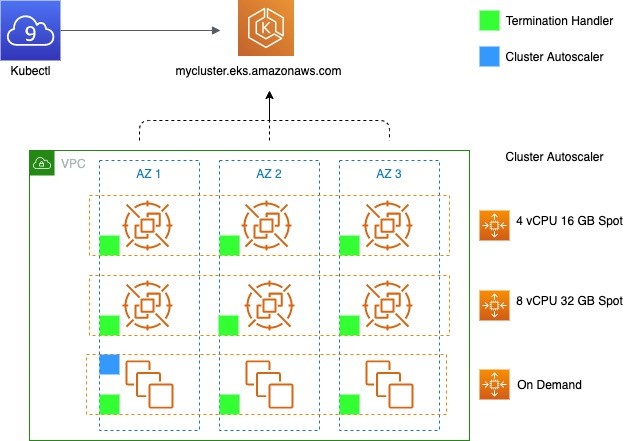
Additional detail on Kubernetes interaction with Auto Scaling group:
- Cluster Autoscaler can be used to control scaling activities by changing the DesiredCapacity of the Auto Scaling group, and directly terminating instances. Auto Scaling groups can be used to find capacity, and automatically replace any instances that become unhealthy, or terminated through Spot Instance interruptions.
- The Cluster Autoscaler can be provisioned as a Deployment of one pod to an instance of the On-Demand Auto Scaling group. The proceeding diagram shows the pod in AZ1, however this may not necessarily be the case.
- Each node group maps to a single Auto Scaling group. However, Cluster Autoscaler requires all instances within a node group to share the same number of vCPU and amount of RAM. To adhere to Spot Instance best practices and maximize diversification, you use multiple node groups. Each of these node groups is a mixed-instance Auto Scaling group with capacity-optimized Spot allocation strategy.
Autoscaling in Kubernetes Clusters
There are two common ways to scale Kubernetes clusters:
- Horizontal Pod Autoscaler (HPA) scales the pods in deployment or a replica set to meet the demand of the application. Scaling policies are based on observed CPU utilization or custom metrics.
- Cluster Autoscaler (CA) is a standalone program that adjusts the size of a Kubernetes cluster to meet the current needs. It increases the size of the cluster when there are pods that failed to schedule on any of the current nodes due to insufficient resources. It attempts to remove underutilized nodes, when its pods can run elsewhere.
When a pod cannot be scheduled due to lack of available resources, Cluster Autoscaler determines that the cluster must scale out and increases the size of the node group. When multiple node groups are used, Cluster Autoscaler chooses one based on the Expander configuration. Currently, the following strategies are supported: random, most-pods, least-waste, and priority
You use random placement strategy in this example for the Expander in Cluster Autoscaler. This is the default expander, and arbitrarily chooses a node-group when the cluster must scale out. The random expander maximizes your ability to leverage multiple Spot capacity pools. However, you can evaluate the others and may find another more appropriate for your workload.
Atlassian Escalator:
An alternative to Cluster Autoscaler for batch workloads is Escalator. It is designed for large batch or job-based workloads that cannot be force-drained and moved when the cluster needs to scale down.
Auto Scaling group
Following best practices for Spot Instances means deploying a fleet across a diversified set of instance families, sizes, and AZs. An Auto Scaling group is one of the best mechanisms to accomplish this. Auto Scaling groups automatically replace Spot Instances that have been terminated due to a Spot interruption with an instance from another capacity pool.
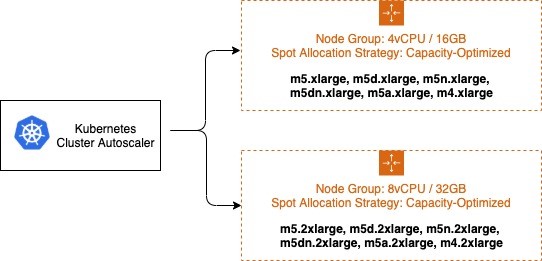
Auto Scaling groups support launching capacity from multiple instances types, and using multiple purchase options. For the example in this blog post, I’m maintaining a 1:4 vCPU to memory ratio for all instances chosen. For your application, there may be a different set of requirements. The instances chosen for the two Auto Scaling groups are below:
- 4vCPU / 16GB ASG: m5.xlarge, m5d.xlarge, m5n.xlarge, m5dn.xlarge, m5a.xlarge, m4.xlarge
- 8vCPU / 32GB ASG: m5.2xlarge, m5d.2xlarge, m5n.2xlarge, m5dn.2xlarge, m5a.2xlarge, m4.2xlarge
In this example I use a total of 12 different instance types and three different AZs, for a total of (12 * 3 = 36) 36 different Spot capacity pools. The Auto Scaling group chooses which instance types to deploy based on the Spot allocation strategy. To minimize the chance of Spot Instance interruptions, you use the capacity-optimized allocation strategy. The capacity-optimized strategy automatically launches Spot Instances into the most available pools by looking at real-time capacity data and predicting which are the most available.

Example of capacity-optimized Spot allocation strategy.
For Cluster Autoscaler, other cluster administration/management pods, and stateful workloads that run on EKS worker nodes, you create a third Auto Scaling group using On-Demand Instances. This ensures that Cluster Autoscaler is not impacted by Spot Instance interruptions. In Kubernetes, labels and nodeSelectors can be used to control where pods are placed. You use the nodeSelector to place Cluster Autoscaler on an instance in the On-Demand Auto Scaling group.
Note: The Auto Scaling groups continually work to balance the number of instances in each AZ they are deployed over. This may cause worker nodes to be terminated while ASG is scaling in the number of instances within an AZ. You can disable this functionality by suspending the AZRebalance process, but this can result in capacity becoming unbalanced across AZs. Another option is running a tool to drain instances upon ASG scale-in such as the EKS Node Drainer. The code provides an AWS Lambda function that integrates as an Amazon EC2 Auto Scaling Lifecycle Hook. When called, the Lambda function calls the Kubernetes API to cordon and evicts all evictable pods from the node being terminated. It then waits until all pods are evicted before the Auto Scaling group continues to terminate the EC2 instance.
Spot Instance Interruption Handling
To mitigate the impact of potential Spot Instance interruptions, leverage the ‘node termination handler’. The DaemonSet deploys a pod on each Spot Instance to detect the Spot Instance interruption notification, so that it can both terminate gracefully any pod that was running on that node, drain from load balancers and allow the Kubernetes scheduler to reschedule the evicted pods elsewhere on the cluster.
The workflow can be summarized as:
- Identify that a Spot Instance is about to be interrupted in two minutes.
- Use the two-minute notification window to gracefully prepare the node for termination.
- Taint the node and cordon it off to prevent new pods from being placed on it.
- Drain connections on the running pods.
Consequently:
- Controllers that manage K8s objects like Deployments and ReplicaSet will understand that one or more pods are not available and create a new replica.
- Cluster Autoscaler and the Auto Scaling group will re-provision capacity as needed.
Walkthrough
Getting started (launch EKS)
First, you use eksctl to create an EKS cluster with the name spotcluster-eksctl in combination with a managed node group. The managed node group will have three On-Demand t3.medium nodes and it will bootstrap with the labels lifecycle=OnDemand and intent=control-apps. Be sure to replace <YOUR REGION> with the region you’ll be launching your cluster into.
This takes approximately 15 minutes. Once cluster creation is complete, test the node connectivity:
Provision the worker nodes
You use eksctl create nodegroup and eksctl configuration files to add the new nodes to the cluster. First, create the configuration file spot_nodegroups.yml. Then, paste the code and replace <YOUR REGION> with the region you launched your EKS cluster in.
This configuration file adds two diversified Spot Instance node groups with 4vCPU/16GB and 8vCPU/32GB instance types. These node groups use the capacity-optimized Spot allocation strategy as described above. Last, you label all nodes created with the instance lifecycle “Ec2Spot” and later use nodeSelectors, to guide your application front-end to your Spot Instance nodes. To create both node groups, run:
Install the Node Termination Handler
You can install the .yaml file from the official GitHub site.
This installs the Node Termination Handler to both Spot Instance and On-Demand nodes, which is helpful because the handler responds to both EC2 maintenance events and Spot Instance interruptions. However, if you are interested in limiting deployment to just Spot Instance nodes, the site has additional instructions to accomplish this.
Verify the Node Termination Handler is running:
Deploy the Cluster Autoscaler
For additional detail, see the EKS page here. Export the Cluster Autoscaler into a configuration file:
Open the file created and edit the cluster-autoscaler container command to replace <YOUR CLUSTER NAME> with your cluster’s name, and add the following options.
You also need to change the expander configuration. Search for - --expander= and replace least-waste with random
Example:
Deploy the sample application
Create a new file web-app.yaml, paste the following specification into it and save the file:
To deploy the application:
Remove the AWS Node Termination Handler:
If you used a new cluster and not your existing cluster, delete the EKS cluster.
eksctl confirms the deletion of the cluster’s CloudFormation stack immediately but the deletion could take up to 15 minutes. You can optionally track it in the CloudFormation Console.
Conclusion
By following best practices, Kubernetes workloads can be deployed onto Spot Instances, achieving both resilience and cost optimization. Instance and Availability Zone flexibility are the cornerstones of pulling from multiple capacity pools and obtaining the scale your application requires. In addition, there are pre-built tools to handle Spot Instance interruptions, if they do occur. EKS makes this even easier by reducing operational overhead through offering a highly-available managed control-plane and managed node groups. You’re now ready to begin integrating Spot Instances into your Kubernetes clusters to reduce workload cost, and if needed, achieve massive scale.