AWS Compute Blog
Securing credentials using AWS Secrets Manager with AWS Fargate
This post is contributed by Massimo Re Ferre – Principal Developer Advocate, AWS Container Services.
Cloud security at AWS is the highest priority and the work that the Containers team is doing is a testament to that. A month ago, the team introduced an integration between AWS Secrets Manager and AWS Systems Manager Parameter Store with AWS Fargate tasks. Now, Fargate customers can easily consume secrets securely and parameters transparently from their own task definitions.
In this post, I show you an example of how to use Secrets Manager and Fargate integration to ensure that your secrets are never exposed in the wild.
Overview
AWS has engineered Fargate to be highly secure, with multiple, important security measures. One of these measures is ensuring that each Fargate task has its own isolation boundary and does not share the underlying kernel, CPU resources, memory resources, or elastic network interface with other tasks.
Another area of security focus is the Amazon VPC networking integration, which ensures that tasks can be protected the way that an Amazon EC2 instance can be protected from a networking perspective.
This specific announcement, however, is important in the context of our shared responsibility model. For example, DevOps teams building and running solutions on the AWS platform require proper tooling and functionalities to securely manage secrets, passwords, and sensitive parameters at runtime in their application code. Our job is to empower them with platform capabilities to do exactly that and make it as easy as possible.
Sometimes, in a rush to get things out the door quick, we have seen some users trading off some security aspects for agility, from embedding AWS credentials in source code pushed to public repositories all the way to embedding passwords in clear text in privately stored configuration files. We have solved this problem for developers consuming various AWS services by letting them assign IAM roles to Fargate tasks so that their AWS credentials are transparently handled.
This was useful for consuming native AWS services, but what about accessing services and applications that are outside of the scope of IAM roles and IAM policies? Often, the burden of having to deal with these credentials is pushed onto the developers and AWS users in general. It doesn’t have to be this way. Enter the Secrets Manager and Fargate integration!
Starting with Fargate platform version 1.3.0 and later, it is now possible for you to instruct Fargate tasks to securely grab secrets from Secrets Manager so that these secrets are never exposed in the wild—not even in private configuration files.
In addition, this frees you from the burden of having to implement the undifferentiated heavy lifting of securing these secrets. As a bonus, because Secrets Manager supports secrets rotation, you also gain an additional level of security with no additional effort.
Twitter matcher example
In this example, you create a Fargate task that reads a stream of data from Twitter, matches a particular pattern in the messages, and records some information about the tweet in a DynamoDB table.
To do this, use a Python Twitter library called Tweepy to read the stream from Twitter and the AWS Boto 3 Python library to write to Amazon DynamoDB.
The following diagram shows the high-level flow:
 The objective of this example is to show a simple use case where you could use IAM roles assigned to tasks to consume AWS services (such as DynamoDB). It also includes consuming external services (such as Twitter), for which explicit non-AWS credentials need to be stored securely.
This is what happens when you launch the Fargate task:
- The task starts and inherits the task execution role (1) and the task role (2) from IAM.
- It queries Secrets Manager (3) using the credentials inherited by the task execution role to retrieve the Twitter credentials and pass them onto the task as variables.
- It reads the stream from Twitter (4) using the credentials that are stored in Secrets Manager.
- It matches the stream with a configurable pattern and writes to the DynamoDB table (5) using the credentials inherited by the task role.
- It matches the stream with a configurable pattern and writes to the DynamoDB table (5) and logs to CloudWatch (6) using the credentials inherited by the task role.
As a side note, while for this specific example I use Twitter as an external service that requires sensitive credentials, any external service that has some form of authentication using passwords or keys is acceptable. Modify the Python script as needed to capture relevant data from your own service to write to the DynamoDB table.
Here are the solution steps:
- Create the Python script
- Create the Dockerfile
- Build the container image
- Create the image repository
- Create the DynamoDB table
- Store the credentials securely
- Create the IAM roles and IAM policies for the Fargate task
- Create the Fargate task
- Clean up
Prerequisites
To be able to execute this exercise, you need an environment configured with the following dependencies:
- The latest version of the AWS Command Line Interface (AWS CLI) installed
- The Docker runtime
- Access credentials to an AWS account
You can also skip this configuration part and launch an AWS Cloud9 instance.
For the purpose of this example, I am working with the AWS CLI, configured to work with the us-west-2 Region. You can opt to work in a different Region. Make sure that the code examples in this post are modified accordingly.
In addition to the list of AWS prerequisites, you need a Twitter developer account. From there, create an application and use the credentials provided that allow you to connect to the Twitter APIs. We will use them later in the blog post when we will add them to AWS Secrets Manager.
Note: many of the commands suggested in this blog post use $REGION and $AWSACCOUNT in them. You can either set environmental variables that point to the region you want to deploy to and to your own account or you can replace those in the command itself with the region and account number. Also, there are some configuration files (json) that use the same patterns; for those the easiest option is to replace the $REGION and $AWSACCOUNT placeholders with the actual region and account number.
Create the Python script
This script is based on the Tweepy streaming example. I modified the script to include the Boto 3 library and instructions that write data to a DynamoDB table. In addition, the script prints the same data to standard output (to be captured in the container log).
This is the Python script:
Save this file in a directory and call it twitterstream.py.
This image requires seven parameters, which are clearly visible at the beginning of the script as system variables:
- The name of the DynamoDB table
- The Region where you are operating
- The word or pattern for which to filter
- The four keys to use to connect to the Twitter API services. Later, I explore how to pass these variables to the container, keeping in mind that some are more sensitive than others.
Create the Dockerfile
Now onto building the actual Docker image. To do that, create a Dockerfile that contains these instructions:
Save it as Dockerfile in the same directory with the twitterstream.py file.
Build the container image
Next, create the container image that you later instantiate as a Fargate task. Build the container image running the following command in the same directory:
docker build -t twitterstream:latest .
Don’t overlook the period (.) at the end of the command: it tells Docker to find the Dockerfile in the current directory.
You now have a local Docker image that, after being properly parameterized, can eventually read from the Twitter APIs and save data in a DynamoDB table.
Create the image repository
Now, store this image in a proper container registry. Create an Amazon ECR repository with the following command:
You should see something like the following code example as a result:
Tag the local image with the following command:
docker tag twitterstream:latest $AWSACCOUNT.dkr.ecr.$REGION.amazonaws.com/twitterstream:latest
Make sure that you refer to the proper repository by using your AWS account ID and the Region to which you are deploying.
Grab an authorization token from AWS STS:
$(aws ecr get-login --no-include-email --region $REGION)
Now, push the local image to the ECR repository that you just created:
docker push $AWSACCOUNT.dkr.ecr.$REGION.amazonaws.com/twitterstream:latest
You should see something similar to the following result:
Now the image is safely stored in its ECR repository.
Create the DynamoDB table
Now turn to the backend DynamoDB table. This is where you store the extract of the Twitter stream being generated. Specifically, you store the user that published the Tweet, the date when the Tweet was published, and the text of the Tweet.
For the purpose of this example, create a table called twitterStream. This can be customized as one of the parameters that you have to pass to the Fargate task.
Run this command to create the table:
Store the credentials securely
As I hinted earlier, the Python script requires the Fargate task to pass some information as variables. You pass the table name, the Region, and the text to filter as standard task variables. Because this is not sensitive information, it can be shared without raising any concern.
However, other configurations are sensitive and should not be passed over in plaintext, like the Twitter API key. For this reason, use Secrets Manager to store that sensitive information and then read them within the Fargate task securely. This is what the newly announced integration between Fargate and Secrets Manager allows you to accomplish.
You can use the Secrets Manager console or the CLI to store sensitive data.
If you opt to use the console, choose other types of secrets. Under Plaintext, enter your consumer key. Under Select the encryption key, choose DefaultEncryptionKey, as shown in the following screenshot. For more information, see Creating a Basic Secret.
 For this example, however, it is easier to use the AWS CLI to create the four secrets required. Run the following commands, but customize them with your own Twitter credentials:
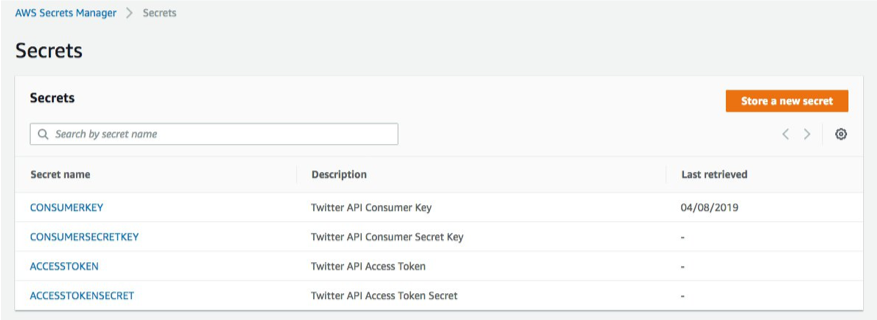
Each of those commands reports a message confirming that the secret has been created:
From now on, these four API keys no longer appear in any configuration.
The following screenshot shows the console after the commands have been executed:
Create the IAM roles and IAM policies for the Fargate task
To run the Python code properly, your Fargate task must have some specific capabilities. The Fargate task must be able to do the following:
- Pull the
twitterstreamcontainer image (created earlier) from ECR. - Retrieve the Twitter credentials (securely stored earlier) from Secrets Manager.
- Log in to a specific Amazon CloudWatch log group (logging is optional but a best practice).
- Write to the DynamoDB table (created earlier).
The first three capabilities should be attached to the ECS task execution role. The fourth should be attached to the ECS task role. For more information, see Amazon ECS Task Execution IAM Role.
In other words, the capabilities that are associated with the ECS agent and container instance need to be configured in the ECS task execution role. Capabilities that must be available from within the task itself are configured in the ECS task role.
First, create the two IAM roles that are eventually attached to the Fargate task.
Create a file called ecs-task-role-trust-policy.json with the following content (make sure you replace the $REGION, $AWSACCOUNT placeholders as well as the proper secrets ARNs):
Now, run the following commands to create the twitterstream-task-role role, as well as the twitterstream-task-execution-role:
aws iam create-role --region $REGION --role-name twitterstream-task-role --assume-role-policy-document file://ecs-task-role-trust-policy.json
aws iam create-role --region $REGION --role-name twitterstream-task-execution-role --assume-role-policy-document file://ecs-task-role-trust-policy.json
Next, create a JSON file that codifies the capabilities required for the ECS task role (twitterstream-task-role):
Save the file as twitterstream-iam-policy-task-role.json.
Now, create a JSON file that codifies the capabilities required for the ECS task execution role (twitterstream-task-execution-role):
Save the file as twitterstream-iam-policy-task-execution-role.json.
The following two commands create IAM policy documents and associate them with the IAM roles that you created earlier:
aws iam put-role-policy --region $REGION --role-name twitterstream-task-role --policy-name twitterstream-iam-policy-task-role --policy-document file://twitterstream-iam-policy-task-role.json
aws iam put-role-policy --region $REGION --role-name twitterstream-task-execution-role --policy-name twitterstream-iam-policy-task-execution-role --policy-document file://twitterstream-iam-policy-task-execution-role.json
Create the Fargate task
Now it’s time to tie everything together. As a recap, so far you have:
- Created the container image that contains your Python code.
- Created the DynamoDB table where the code is going to save the extract from the Twitter stream.
- Securely stored the Twitter API credentials in Secrets Manager.
- Created IAM roles with specific IAM policies that can write to DynamoDB and read from Secrets Manager (among other things).
Now you can tie everything together by creating a Fargate task that executes the container image. To do so, create a file called twitterstream-task.json and populate it with the following configuration:
To tweak the search string, change the value of the FILTER variable (currently set to “Cloud Computing”).
The Twitter API credentials are never exposed in clear text in these configuration files. There is only a reference to the Amazon Resource Names (ARNs) of the secret names. For example, this is the system variable CONSUMERKEY in the Fargate task configuration:
This directive asks the ECS agent running on the Fargate instance (that has assumed the specified IAM execution role) to do the following:
- Connect to Secrets Manager.
- Get the secret securely.
- Assign its value to the
CONSUMERKEYsystem variable to be made available to the Fargate task.
Register this task by running the following command:
aws ecs register-task-definition --region $REGION --cli-input-json file://twitterstream-task.json
In preparation to run the task, create the CloudWatch log group with the following command:
aws logs create-log-group --log-group-name twitterstream --region $REGION
If you don’t create the log group upfront, the task fails to start.
Create the ECS cluster
The last step before launching the Fargate task is creating an ECS cluster. An ECS cluster has two distinct dimensions:
- The EC2 dimension, where the compute capacity is managed by the customer as ECS container instances)
- The Fargate dimension, where the compute capacity is managed transparently by AWS.
For this example, you use the Fargate dimension, so you are essentially using the ECS cluster as a logical namespace.
Run the following command to create a cluster called twitterstream_cluster (change the name as needed). If you have a default cluster already created in your Region of choice, you can use that, too.
aws ecs create-cluster --cluster-name "twitterstream_cluster" --region $REGION
Now launch the task in the ECS cluster just created (in the us-west-2 Region) with a Fargate launch type. Run the following command:
A few things to pay attention to with this command:
- If you created more than one revision of the task (by re-running the
aws ecs register-task-definitioncommand), make sure to run theaws ecs run-taskcommand with the proper revision number at the end. - Customize the network section of the command for your own environment:
- Use the default security group in your VPC, as the Fargate task only needs outbound connectivity.
- Use two public subnets in which to start the Fargate task.
The Fargate task comes up in a few seconds and you can see it from the ECS console, as shown in the following screenshot:
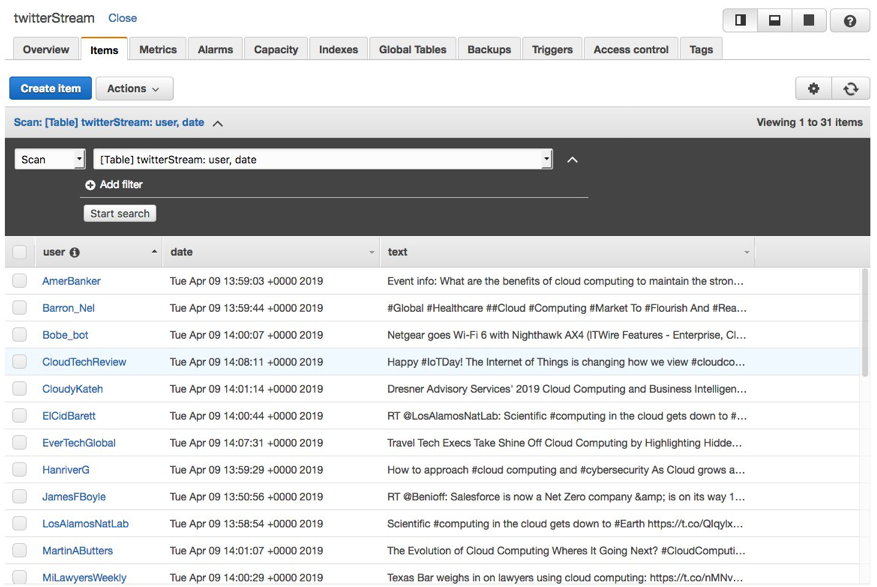
 Similarly, the DynamoDB table starts being populated with the information collected by the script running in the task, as shown in the following screenshot:
 Finally, the Fargate task logs all the activities in the CloudWatch Log group, as shown in the following screenshot:
 The log may take a few minutes to populate and be consolidated in CloudWatch.
Clean up
Now that you have completed the walkthrough, you can tear down all the resources that you created to avoid incurring future charges.
First, stop the ECS task that you started:
aws ecs stop-task --cluster twitterstream_cluster --region $REGION --task 4553111a-748e-4f6f-beb5-f95242235fb5
Your task number is different. You can grab it either from the ECS console or from the AWS CLI. This is how you read it from the AWS CLI:
Then, delete the ECS cluster that you created:
aws ecs delete-cluster --cluster "twitterstream_cluster" --region $REGION
Next, delete the CloudWatch log group:
aws logs delete-log-group --log-group-name twitterstream --region $REGION
The console provides a fast workflow to delete the IAM roles. In the IAM console, choose Roles and filter your search for twitter. You should see the two roles that you created:

Select the two roles and choose Delete role.
Cleaning up the secrets created is straightforward. Run a delete-secret command for each one:
aws secretsmanager delete-secret --region $REGION --secret-id CONSUMERKEY
aws secretsmanager delete-secret --region $REGION --secret-id CONSUMERSECRETKEY
aws secretsmanager delete-secret --region $REGION --secret-id ACCESSTOKEN
aws secretsmanager delete-secret --region $REGION --secret-id ACCESSTOKENSECRET
The next step is to delete the DynamoDB table:
aws dynamodb delete-table --table-name twitterStream --region $REGION
The last step is to delete the ECR repository. By default, you cannot delete a repository that still has container images in it. To address that, add the –force directive:
aws ecr delete-repository --region $REGION --repository-name twitterstream --force
You can de-register the twitterstream task definition by following this procedure in the ECS console. The task definitions remain inactive but visible in the system.
With this, you have deleted all the resources that you created.
Conclusion
In this post, I demonstrated how Fargate can interact with Secrets Manager to retrieve sensitive data (for example, Twitter API credentials). You can securely make the sensitive data available to the code running in the container inside the Fargate task.
I also demonstrated how a Fargate task with a specific IAM role can access other AWS services (for example, DynamoDB).