AWS Contact Center
Provide real-time customer sentiment analytics to agents using Contact Lens API for Amazon Connect
A contact center has a large amount of valuable customer data that supervisors and quality assurance managers can use to easily understand the sentiment, trends, and compliance risks of customer conversations. These insights allow companies to effectively train agents, replicate successful interactions, and identify important customer feedback. This said, many companies find it difficult to quickly detect customer experience issues and provide feedback to customer service agents and supervisors because of the speed and precision necessary to parse relevant insights from massive pools of data. Contact Lens for Amazon Connect solves these challenges by providing an out-of-the-box analytics experience as a part of Amazon Connect. Contact Lens automatically transcribes voice conversations, enables search, redacts sensitive personal information, and extracts customer and agent sentiment in real time. It also detects customer issues, interruptions and non-talk time, and categorizes customer conversations based on your specified criteria.
To go one step further, many customers wish to use these underlying capabilities provided by Contact Lens in their custom built web applications. They also want to harness the analysis and data provided by Contact Lens using an API to augment their internal or external applications. To help them do this, Contact Lens for Amazon Connect provides the real-time analytics API, which builders can use to build solutions that make their contact center more efficient.
In this blog post, we will walk through how you can build a custom web application that integrates the Amazon Connect Contact Control Panel (CCP) and Contact Lens real-time analytics to empower contact center agents and supervisors with real-time analysis of customer conversations. This blog will help you build a fully deployable sample app that includes real-time analysis from Contact Lens including live transcripts, sentiment analysis, and contact categories.
Real world applications for the Contact Lens Real-Time APIs
Here’s how our customers are using the Contact Lens Real-Time Analytics API in their contact centers.
Better call transfers
Customers want to enhance their contact center experience by avoiding redundant questions during call transfers. With the Contact Lens Real-Time Analytics API, your agent facing web apps can transfer a transcript of the conversation from the original agent to the new agent during a call transfer. The new agent then has context for why the customer is calling, and the customer doesn’t need to repeat everything they already said. Your builders can use the ListRealtimeContactAnalysisSegments API to get the entire transcript of the conversation up to a certain point, and share it with the new agent.
Automatic call summaries
While handling a call, agents may need to make notes, such as listing action items. Since you have the entire transcript available, you can build machine learning models to identify the key notes and summarize them at the end of the conversation. These notes are then available for any other agent or supervisor to reference. This helps agents focus on the conversation and the customer rather than focus on taking notes for the call summary.
Solution Architecture
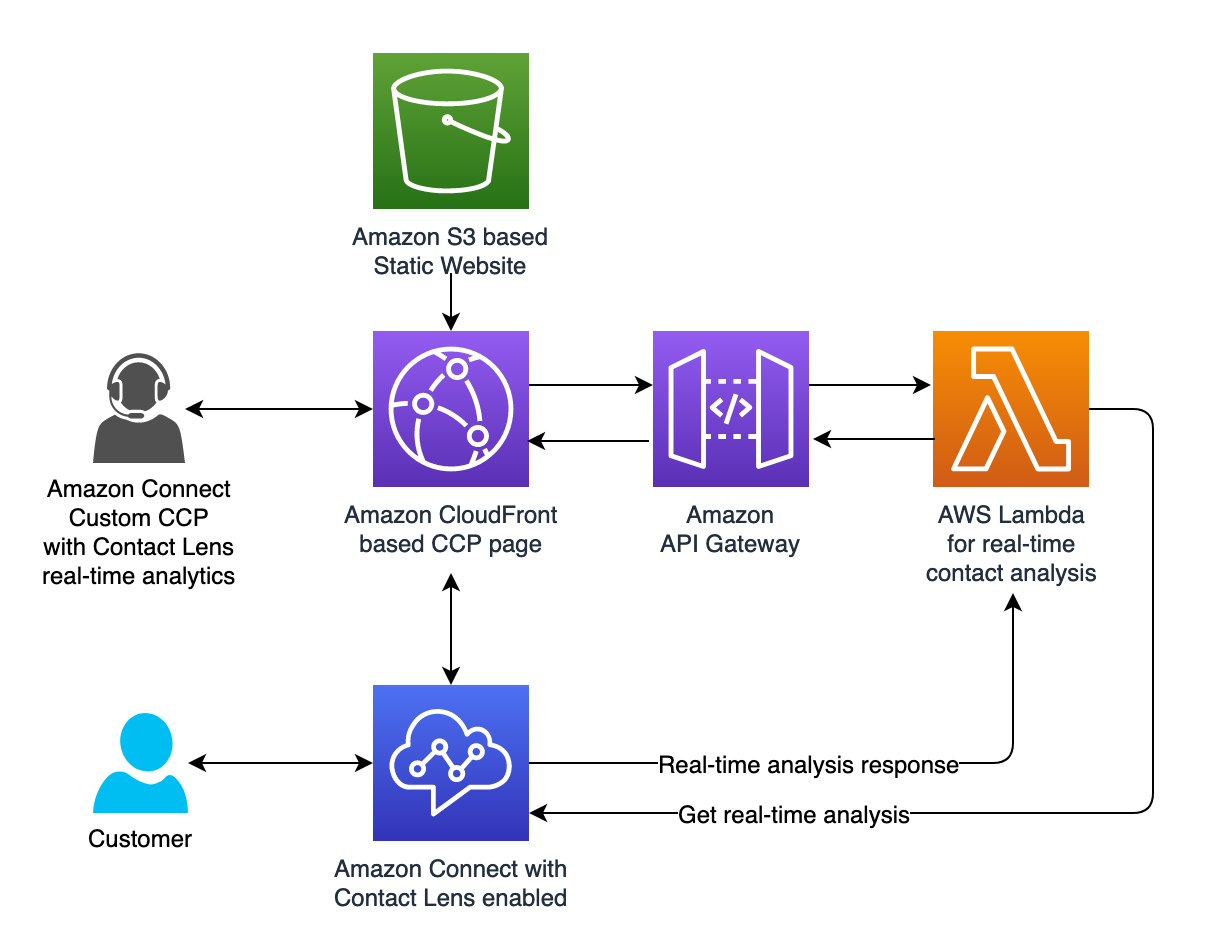
Figure – Architecture diagram for enabling real-time API based analytics using Contact Lens for Amazon Connect
Walkthrough
In this section, we will guide you through the steps required to enable Amazon Connect interactive messaging in your AWS account, and perform some light testing on the Amazon Connect Test Chat page.
The high-level steps we will follow are as follows:
- Set up Amazon Connect with a contact flow that enables Contact Lens real-time capabilities
- Assign a phone number to the created contact flow
- Set up a sample Contact Lens real-time rule to enable categorization of phone calls
- Deploy an AWS CloudFormation template to set up a web app to provide a custom CCP experience enabled with Amazon Connect Contact Lens real-time analytics
- Add the CloudFront URL from the deployment outputs to your Amazon Connect instance as an approved origin
- Test your agent web application real-time capabilities by placing a call on the phone number assigned to the contact flow
Pre-requisites
For this walkthrough, you should have the following pre-requisites:
- An AWS account with administrator access
- An Amazon Connect Instance
- How to create Amazon Connect Contact Flows
- A Call Center Manager or Admin user account for Amazon Connect Instance
Set Up Steps
Step 1: Create and Import Contact Flow
- Open the Amazon Connect console
- Click on the LoginURL for your instance, and sign in to your Amazon Connect instance
- Amazon Connect creates a default BasicQueue when the instance is created, but some users prefer to rename that queue. If you do not already have a BasicQueue, create a queue named BasicQueue.
- On the left navigation pane, choose Routing → Contact flows → Create contact flow
- On the top right of the page, choose Import Flow. On the Import Flow dialog, choose Select and upload the contact flow.
- Download the contact flow and upload it by selecting Import contact flow. The contact flow should look like the image below.

- Choose Save, and then Publish.
Step 2: Claim a number and assign it your contact flow
- In the Amazon Connect console, click on the 3 arrow heads on the left bar to choose Routing and then click on Phone Numbers.
- Under Manage Phone Numbers, claim a phone number or edit an existing phone number by clicking on it.
- Select your contact flow from the previous step, and choose Save.
Step 3: Configure Contact Lens rules in your Amazon Connect instance
- Navigate to your Amazon Connect instance user interface.
- On the Navigation menu, choose Rules. Create a rule for Contact Lens real time analysis.
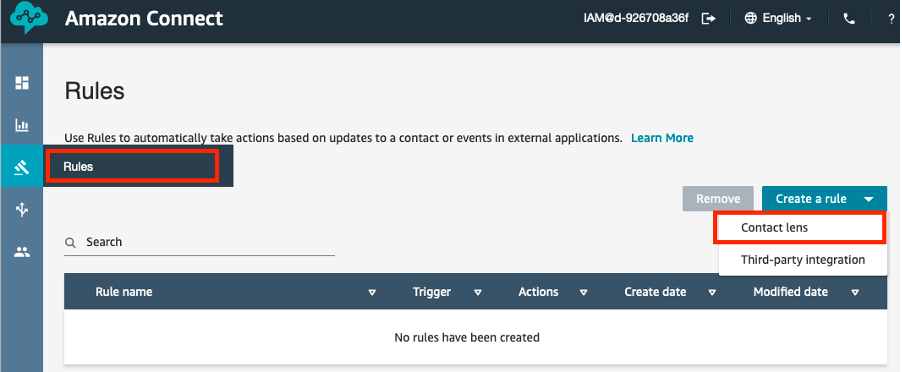
- Name it ‘CUSTOMER_UPSET_REALTIME’. Your rule may contain key phrases such as ‘I am unhappy’, ‘I will cancel my account’, or ‘This is unacceptable’.
- Please ensure that the rule type you create is for real-time analysis. Feel free to add any other phrases, keywords, or conditions as you see fit. Make sure that the speaker in the condition Words or phrases –Exact Match is changed to customer.
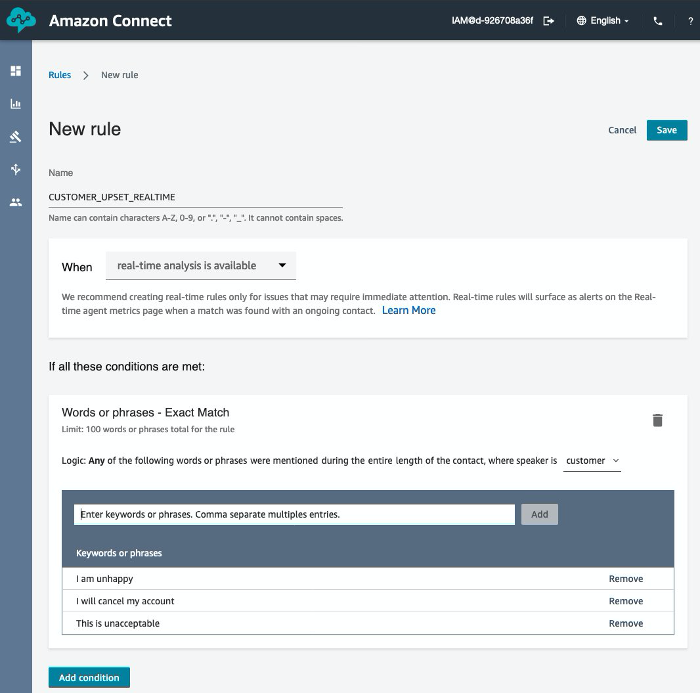
- Choose Save
Step 4: Create and deploy the CloudFormation stack
- Use the following easy click Launch buttons to deploy the CloudFormation template from the provided regions, OR download to deploy this template in your desired region.
| Region | Launch Button |
| us-east-1 (N. Virginia) |

|
| us-west-2 (Oregon) |
|
| ap-southeast-2 (Sydney) |
|
| ap-northeast-1 (Tokyo) |
|
| eu-central-1 (Frankfurt) |
|
| eu-west-2 (London) |
|
| ap-southeast-1 (Singapore) |
|
- Note: Your Amazon Connect instance from the previous step must be in the same region as the CloudFormation deployment
- Click Next on the Create Stack page.
- On the Specify stack details page, update the following Parameters:
- WebsiteS3BucketName: this should be the name of a new bucket that will be created on your behalf to store the website contents
- instanceAlias: Open the Amazon Connect console. Under Instance Alias, choose your instance’s alias.
- instanceId: This is the id of the Amazon Connect instance you want to use. You can find this on the Amazon Connect console or when viewing the contact flow. For example, if the arn for your flow is ‘arn:aws:connect:us-west-2:123456789012:instance/11111111-1111-1111-1111-111111111111/contact-flow/22222222-2222-2222-2222-222222222222’, the instance id is ‘11111111-1111-1111-1111-111111111111’
- Click Next once you’ve added the correct parameters
- On the Configure stack options page, select Next.
- On the Review page, check the check box for I acknowledge that AWS CloudFormation might create IAM resources., and select Create Stack.
- Once status of the stack changes to CREATE_COMPLETE, select the stack and open the Outputs tab to see the output values.
- In the AWS CloudFormation Outputs section, copy the key and value column contents for cloudFrontDistribution. You will use this value in the following section.
Step 5: Configure Amazon Connect Approved Origin
- On the AWS console, navigate to Amazon Connect -> Your instance alias -> Approved origins
- On the left navigation, choose Approved Origins, and then choose + Add Origin.
- Enter your Amazon CloudFront Distribution URL from the previous step in the CloudFormation Outputs section, where the key name is cloudFrontDistribution, and click Add.

Testing Steps
Once the CloudFront distribution is ready, test!
- Go to CloudFront URL that was created. You can find the CloudFront URL under the Outputs tab of the CloudFormation stack by the key cloudFrontDistribution. If you get an Access Denied error saying it cannot read the file from S3, the CDN is not ready. It could take over 25 minutes to be ready.
- A login pop-up for Amazon Connect should come up once the webpage loads. You can enter the login information for your agent in Amazon Connect to proceed.
- Once log in is successful, you can call the number you set up in Step 2 to begin a sample test.
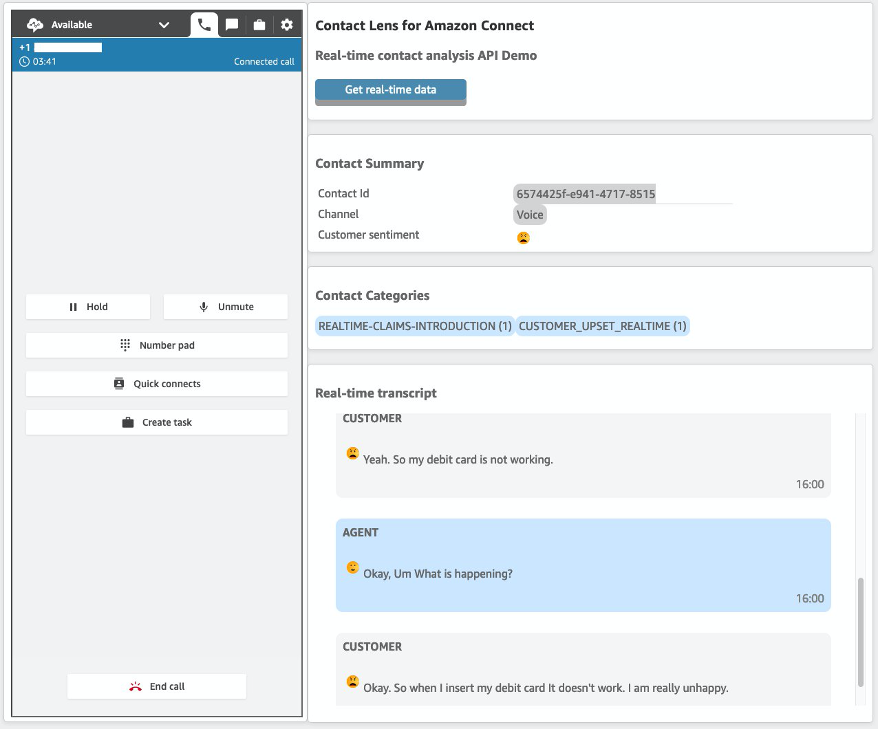
- Answer the call in the Amazon Connect Contact Control Panel (CCP) on the webpage, and start talking. You can mute the customer or agent to switch between conversations.
- Using the customer side of the conversation (your phone), utter the phrases you set up in Step 3 such as ‘I am unhappy’.
- Once you are ready, you can click the Get real-time data button on the webpage to receive analysis of the current call. Note: this web app also supports getting real-time analytics for transferred calls between agents.
Clean up
To avoid incurring future charges, delete all the AWS resources created as a part of this blog walkthrough.
Because you created the stack by running an AWS CloudFormation template, you can delete the stack in the AWS CloudFormation console. Here’s how you can do it:
- Open the AWS CloudFormation console.
- In the AWS CloudFormation console dashboard, select the stack you created. On the Actions menu, choose Delete Stack. When you are prompted to confirm, choose Yes, Delete.
- Wait for DELETE_COMPLETE to appear in the Status column for the stack.
If you created an Amazon Connect instance for this blog, you can delete the Amazon Connect instance in the Amazon Connect service console.
Conclusion
Contact Lens for Amazon Connect enables customers to conduct analysis on customer records in real-time. In this blog, we walked through how you can use Contact Lens features in your custom built contact center applications based on Amazon Connect. You can use the sample solution that we deployed to integrate the Contact Lens real-time analytics API in your own web applications that use the Amazon Connect CCP. This will help you build a modern contact center to help your staff delight customers using real-time analysis from Contact Lens including live transcripts, sentiment analysis, and contact categories.