AWS Database Blog
Integrating Teradata with Amazon Redshift Using the AWS Schema Conversion Tool
David Gardner is a solutions architect and Pratim Das is a specialist solutions architect for Analytics at Amazon Web Services.
Teradata provides long-standing data warehouse solutions, with many customers and applications running on its platforms. As companies migrate to the cloud, they are using Amazon Redshift as part of their cloud adoption. Recently AWS announced support for Teradata as a source for the AWS Schema Conversion Tool (AWS SCT). With this capability, you can easily integrate Teradata schemas into an Amazon Redshift model. Once both source and target schemas are in place, you can use AWS SCT to set up agents that collect and migrate data to the target Amazon Redshift schema. In this post, we provide an example of how to integrate these two technologies easily and securely.
Introduction to the use case
At a high level, the architecture looks like the following diagram:
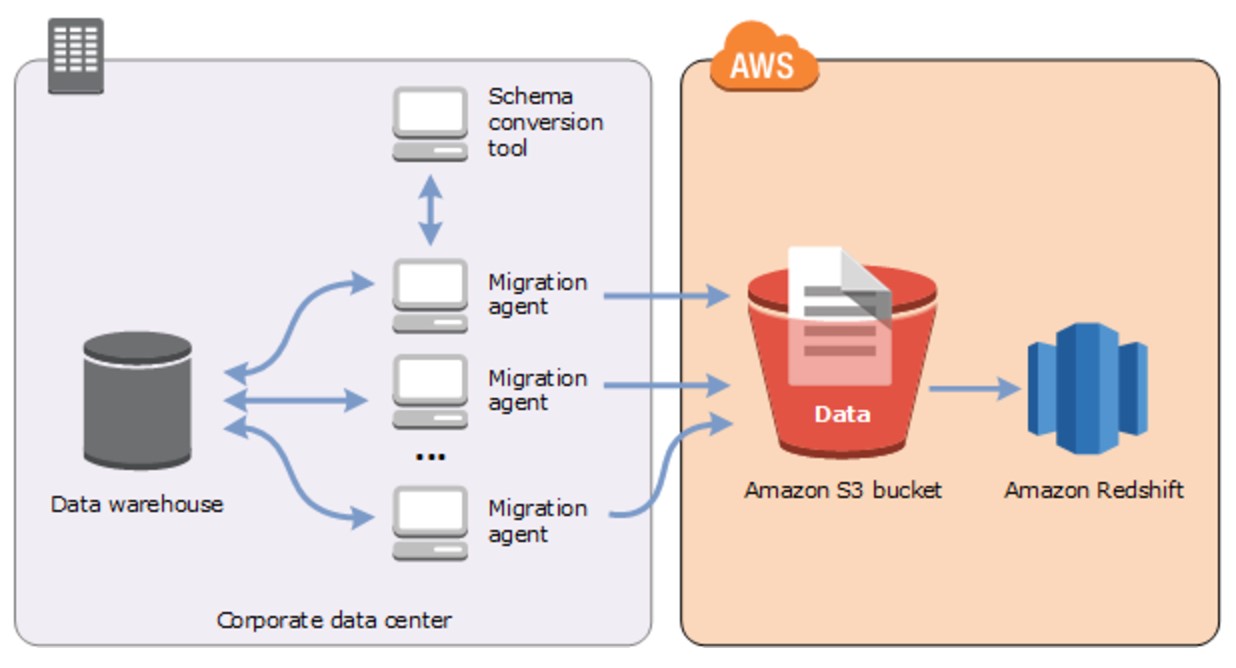
Figure 1: Teradata to Amazon Redshift migration using AWS SCT agents
About Teradata
Teradata has been a leading solution provider in the data warehousing space for decades, with many customers and workloads running on its solutions. Most of these solutions run within the customer’s data center. As companies begin to move to the cloud for its elasticity and speed to market, there is a need to integrate the rich datasets in these Teradata systems with systems in the cloud.
About Amazon Redshift
Amazon Redshift is a fast, fully managed, petabyte-scale, columnar, ANSI SQL-compliant data warehouse. It provides a simple and cost-effective way to analyze all your data using your existing business intelligence (BI) tools. Amazon Redshift delivers fast query performance by using columnar storage technology to improve I/O efficiency and parallelizing queries across multiple nodes. Amazon Redshift has custom JDBC and ODBC drivers that you can download from the Connect Client tab of the Amazon Redshift console, allowing you to use a wide range of familiar SQL clients. You can also use standard PostgreSQL JDBC and ODBC drivers. Data load speed scales linearly with cluster size, with integrations to Amazon S3, Amazon DynamoDB, Amazon EMR, Amazon Kinesis, or any SSH-enabled host.
About AWS SCT
The AWS Schema Conversion Tool makes heterogeneous database migrations easy by automatically converting the source database schema and most of the custom code to a format that is compatible with the target database. The custom code that the tool converts includes views, stored procedures, and functions. Any code that the tool can’t convert automatically is clearly marked so that you can convert it yourself. For information about supported source and target databases, see the AWS SCT User Guide.
Your source database/data warehouse can be on-premises or in Amazon RDS or Amazon EC2. The target database can be in Amazon RDS, Amazon EC2, or Amazon Redshift. AWS SCT supports the conversions shown in the following diagram. In this post, we focus on conversion from Teradata to Amazon Redshift. You can use a similar approach to other data warehouses such as Oracle, IBM Netezza, Greenplum, HPE Vertica, and others.

Figure 2: Supported conversion in AWS Schema Conversion Tool
Unlike OLTP databases, in which you can do a one-off full load followed by change data capture (CDC), for data warehouses, you can typically extract data and then load subsequent changes in batches using your application.
The AWS SCT extractors were designed to facilitate the full load process. The extractors were designed with the following two key capabilities to support the full load process:
- Quickly move large numbers of records using multi-threaded data extraction and load processes.
- In case of failure, an extraction process can restart from the point of failure, rather than from the beginning of the entire data extract.
Lastly, AWS SCT supports point-in-time data extracts so that “change deltas” since the full load can be captured and migrated in a second step.
Setting up Teradata
For this post, we use a Teradata instance from the AWS Marketplace to emulate a customer Teradata system. We selected a Teradata Database Developer instance on an i2.xlarge instance type. For details on how to do this, see the Teradata on AWS Getting Started Guide. You can complete this process in a few minutes, which is impressive for all those who have waited days or weeks to get a Teradata onsite up and running.
A few things that you should consider in advance are your key pair, virtual private cloud (VPC), and the security group to use with your Teradata instance. These pre-steps are important to ensure a clean, easy setup. If you have issues, visit the Teradata Community.

Figure 3: AWS Marketplace and Teradata options
We chose to launch with the AWS CloudFormation console to an existing VPC. With this deployment option, you only have to define your system name, password, VPC, security group, key pair, and several other options. When the CloudFormation template is complete, your Teradata database is ready for you to create users, databases, etc. If you are setting up a new Teradata instance and have an existing hierarchy setup script, follow that script for adding users and databases. If you have connectivity challenges, it’s likely due to your security group settings. So start there, and you can also connect to the server directly using SSH and check the database.
Loading data to Teradata
For this example, we used the TPC-DS database on Teradata as our source database. For those not familiar with TPC-DS, it is an industry-standard benchmarking tool for databases and big data solutions. For details, see the TPC-DS information page. TPC-DS includes a data model of 25 tables, a data generator for these tables, and about 100 pre-canned analytic queries.
To get the TPC-DS database set up on Teradata, we used Teradata TdBench tool 7.2. It is a free tool available on the Teradata developer exchange. TdBench is a great tool for benchmarking on Teradata. It also includes setup scripts and automation to build a TPC-DS repository.
In this example, we downloaded and installed TdBench directly on a Teradata instance and ran the interface there via SSH shell. The TdBench instructions are self-explanatory, so we don’t cover that process here. After doing the initial setup, we went into the benchmarking submenu and set up the TPC-DS database.
To run the TPC-DS database in TdBench, follow these basic steps:
- Create a TPC-DS database on your Teradata instance, and grant your tdc_benchmark user full access to this database.
- In the TDB.sh, choose option 4 benchmark and run step 1 to build the tables in the database you created.
- Run step 2 to generate the datasets for the tables in step 1. We picked a 10 GB dataset size because it was the biggest dataset our disk volume could support.
- Exit the sh menu, start TdBench.sh, and execute the load process in the
EXECframework. Your command should look something like the following:In the background, this runs Teradata Parallel Transporter jobs to load the raw CSV files into Teradata for all 25 tables. This usually takes a few minutes to execute.
- Verify that the loads ran successfully by checking the logs or with a quick row count in the tables.
The following is an example of what you might see in Teradata Administrator after this process is complete:

Figure 4: Teradata Administrator
Testing queries on Teradata
Now that your TPC-DS database is created and loaded, you can use the TPC-DS query set to exercise the Teradata instance. The TdBench tool builds a file that runs all 99 queries serially to launch this file. Follow these steps:
- Start the TdBench menu via tdbench.sh.
- Run
EXEC scripts/tpcds_serial.cmd. Let the process run until it completes, which might take a few minutes. - Check the log files for query execution details.
The following screenshot provides an example of these steps:

Figure 5: Testing queries on Teradata
Setting up Amazon Redshift as a target
Sign in to the AWS Management Console, and choose the AWS Region where you launched your Teradata instance from AWS Marketplace. Choose Services, choose Database, and then choose Amazon Redshift.
In the Amazon Redshift console, choose Launch cluster. Provide values for the cluster identifier, database name, etc., and follow the remaining steps in the console.
After the cluster starts, you are provided with an endpoint that looks something like the following:

Figure 6: Cluster properties and status
Solution architecture
For simplicity, you can set up Teradata SQL Assistant to connect to Teradata, and SQL Workbench to connect to Amazon Redshift on the same box where the AWS SCT agent is installed.

Figure 7: AWS SCT agent, SQL Workbench, and SQL Assistant working on the same EC2 Instance
Setting up AWS SCT
To create a target schema in Amazon Redshift, you need to install AWS SCT. To do this, follow the steps in Installing and Updating the AWS Schema Conversion Tool.
Here is a step-by-step guide for setting up AWS SCT for the initial schema conversion and migration from Teradata to Amazon Redshift:
-
- Create a new project and give it a name. Choose the Data Warehouse (OLAP) For the Source Database Engine, choose Teradata. For Target Database Engine, choose Amazon Redshift, and then choose OK.

Figure 8: Creating a new project
- Configure the connection parameters to your Teradata cluster by providing the user name, password, etc. Also provide the two JDBC drivers that are available for download from the Teradata website.
- AWS SCT displays all the databases and schemas in the left panel. Clear all the check boxes and select only the TPCDS database that you plan to migrate, as shown here:

Figure 9: Choosing the candidate database for migration
- Connect to your target (the Amazon Redshift cluster) by providing the endpoints and credentials.
- Open the context (right-click) menu for TPCDS, and choose Convert Schema. When the Collect statistics prompt appears, choose Collect and continue.

Figure 10: Convert schema step also collects statistics
- The schema conversion summary report appears, as shown in the following screenshot. You can also save the report as a PDF file.
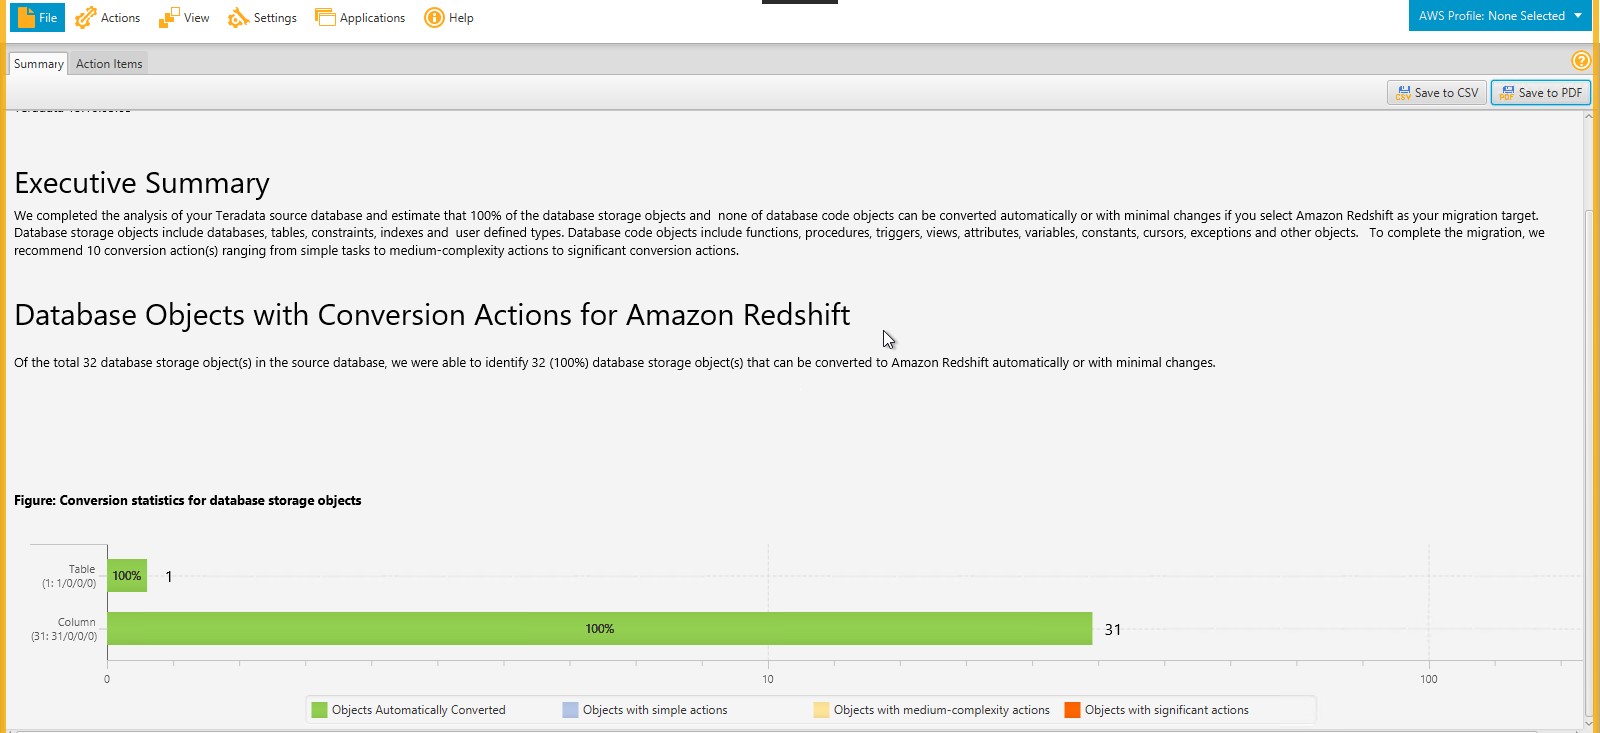
Figure 11: Schema migration summary report
- Look at the detailed report to see if there are action items to address.Teradata supports multi-column primary indexes. Amazon Redshift supports one-column hash distributions, so it distributes the data based on the first column in the Teradata primary index. You may want to make changes to this before applying the schema to your environment. If you see issues around double-byte and the character 1, you can ignore those, assuming you don’t have double-byte data.

Figure 12: AWS SCT warns of any changes that will be applied to target tables
- To start the schema conversion, open the context (right-click) menu on the Amazon Redshift target, and choose Apply to database.

Figure 13: Starting the schema conversion process
- Create a new project and give it a name. Choose the Data Warehouse (OLAP) For the Source Database Engine, choose Teradata. For Target Database Engine, choose Amazon Redshift, and then choose OK.
Validate the target schema on Amazon Redshift
Once the target schema is on Amazon Redshift, validate it by running a few queries on target tables, as shown in the following screenshot.
Congratulations! You now have your TPC-DS tables on Amazon Redshift, but you haven’t moved any data yet. That’s next.
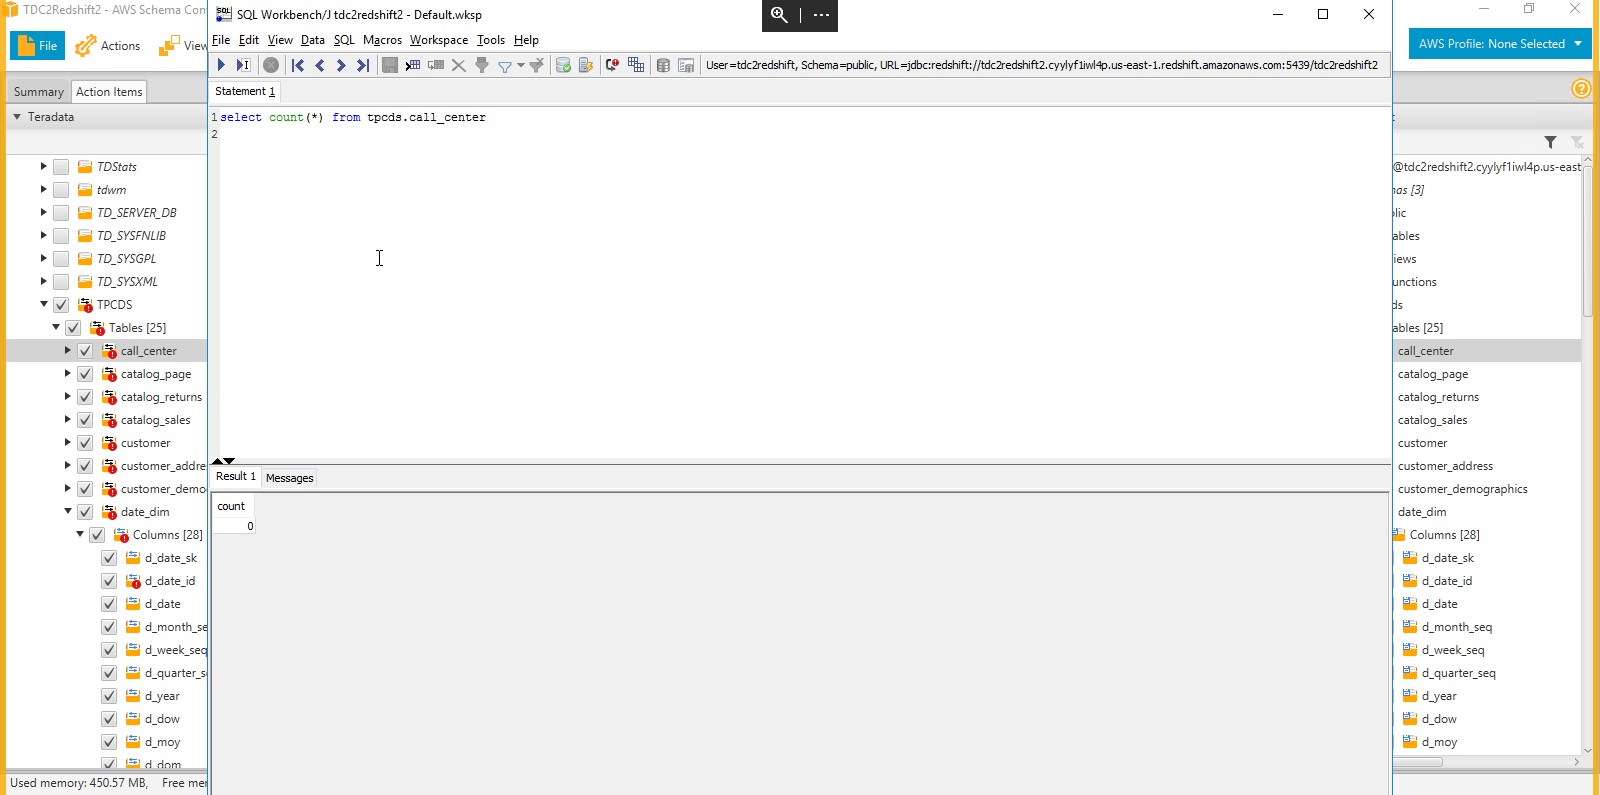
Figure 14: Validating objects in the target Amazon Redshift cluster
Data migration
The AWS SCT agents are responsible for moving data from the Teradata source to Amazon S3 as an intermediate source, and then orchestrating the load to the target schema/tables on Amazon Redshift from Amazon S3.
You can find more details about data migration in How to Migrate Your Data Warehouse to Amazon Redshift Using the AWS Schema Conversion Tool Data Extractors. You can install multiple extractors on the same machine or separate them as needed across many machines, depending on your available server resources and network capacities. In general, a best practice is to locate the data extractors close to your data warehouse to reduce network traffic and latency. The extractors provide a fully managed framework for your data warehouse migration.
The data extractors write their extract files to local storage. The extract files are compressed, using lossless LZO compression, and then copied to an Amazon S3 bucket. The files are compressed to reduce network transfer time and to reduce storage costs on Amazon S3. After the files are uploaded to Amazon S3, the extractor triggers Amazon Redshift to copy the data into the target tables using the standard Amazon Redshift COPY command.
You can repeat each of these steps if necessary with no unexpected consequences on the target database.
To set up agents, follow these steps:
- The AWS Schema Conversion Tool and the extraction agents can communicate through Secure Sockets Layer (SSL). To enable SSL, set up a trust store and key store:

Figure 15: Setting up security for AWS SCT agents
- Now provide the security settings by generating a trust and key store, or choose an existing one:
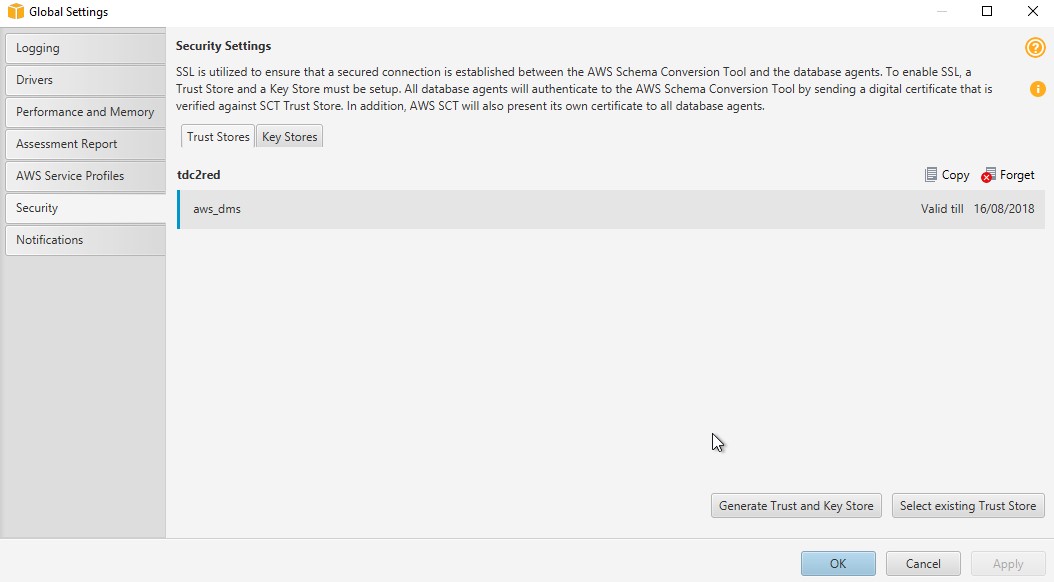
Figure 16: Generating trust store and key
- Finally, add a new service profile to enable AWS SCT to access the appropriate AWS resources:
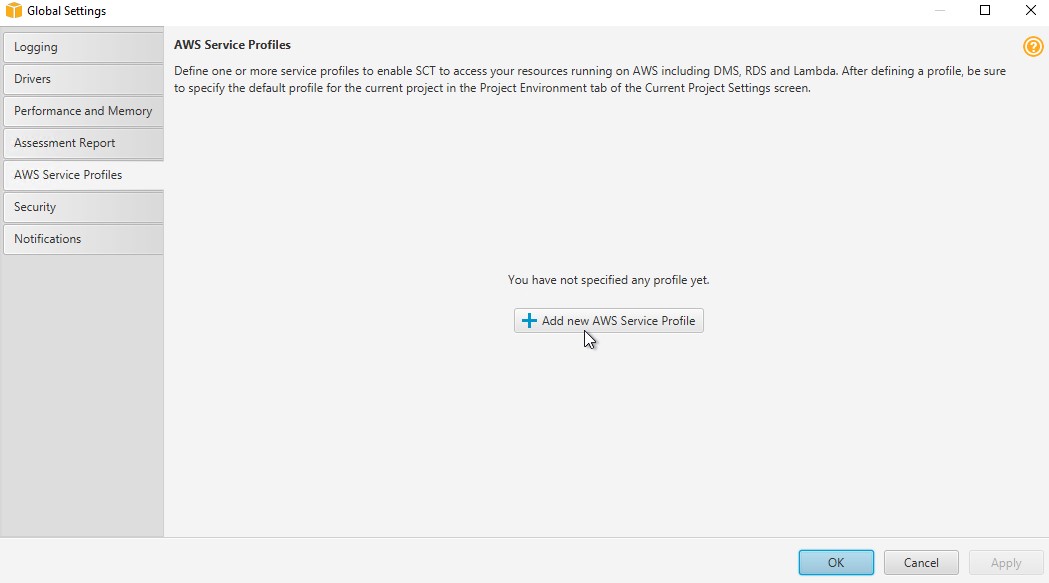
Figure 17: Associating with an AWS service profile
- Enter your access key and secret key, AWS Region, and S3 bucket to use as a test connection. Choose Save.

Figure 18: Saving the service profile
- On the Agents tab, register your agent by providing details like those shown in the following screenshot:

Figure 19: Creating an AWS SCT migration agent
- Now you can create a local task to extract, upload, and copy table data. You can create one task for all of the migration or table by table. In a real production environment, you will want to break this into multiple jobs and group certain tables on each based on their size and I/O characteristics, as shown in the following images.

Figure 20: Extract, Upload and Copy task for the call_center table

Figure 21: Extract, Upload and Copy task for the customer table
- Continue setting up the local tasks for all the tables you need.
- You can choose to watch the transfers in your S3 bucket, although data only passes through there and is removed after the job completes.

Figure 22: Data is first staged to S3 bucket by the agents
- Open the Amazon Redshift console, and choose the Queries tab to see AWS SCT in action, copying data to the target tables.

Figure 23: Confirming that data is being loaded to Amazon Redshift cluster by AWS SCT
Post-migration tasks
You have now completed converting the schema and moving the data. You can now run your row count compares, database tests, and any data catch-up processes that are needed. Here’s some example SQL that might help you generate these types of checks:
- Row counts:
- Teradata: Use the following SQL. Remove union all on the last row, and add order by 1. Then resubmit the block of SQL.
- Amazon Redshift: Use the following SQL. Remove union all on the last row, and add order by 1. Then resubmit the block of SQL.
- Run your query tests, such as TPC-DS sample queries. Each database engine has different syntax, so you might need to make some adjustments.
- Run any catch-up processing to complete your migration.
While converting the schema, AWS SCT tries to optimize the schema for Amazon Redshift. However, we recommend that you review the schema with your specific workload to ensure that you do the following:
- Choose the best distribution key and sort key for your workload.
- Create tables with compression encodings for your data.
- Define primary keys and foreign keys. Even though Amazon Redshift doesn’t enforce constraints, it helps the optimizer come up with an optimal plan.
For Amazon Redshift optimization, we recommend that you refer to the five-part blog series detailed in Amazon Redshift Engineering’s Advanced Table Design Playbook: Preamble, Prerequisites, and Prioritization.
A few key differences to consider
Although Teradata and Amazon Redshift have some similarities in architecture, such as massively parallel processing (MPP) systems and shared nothing architecture, they still have some conceptual and feature differences. Your AWS team or partner can help you work through those in detail. This section presents some common findings about the differences between the two technologies.
Amazon Redshift supports permanent and temporary table types, which are similar to permanent and volatile tables (discarded automatically at the end of the session) in Teradata. Other table types in Teradata, like Queue, Error Logging, and Global Temporary, are not directly supported in Amazon Redshift. If you have one of these table types, it must be migrated as either permanent or temporary in Amazon Redshift. For more information about designing tables, see Amazon Redshift Best Practices for Designing Tables.
When you look at column types, Teradata supports CLOB and BLOB data types, whereas Amazon Redshift currently does not support LOB data types. One option is to store the CLOB and BLOB data types as Amazon S3 objects and store the link to an S3 object in the Amazon Redshift table. Also, with the recent release of Amazon Redshift Spectrum, based on the content of your LOB, you can now query that directly using SQL from Amazon Redshift.
In Amazon Redshift, there is no concept of materialized views, in Teradata it is called Join Index (JI). All the Join Indexes must be converted to aggregate tables in Amazon Redshift, and data loading scripts must be defined separately to populate them.
Amazon Redshift supports custom user-defined scalar functions (UDF) to extend function capabilities & processing based on a SQL or Python program. The new function is stored in the database and is available for any user with sufficient privileges to run it, in much the same way as you run existing Amazon Redshift functions. In addition to using the standard Python functionality, you can import your own custom Python modules.
When migrating Stored Procedures, external UDFs, or UDFs written in C, C++, or Java programming languages from Teradata, those objects will need to be converted to either SQL, ETL scripts, or UDFs in the supported languages of Amazon Redshift (SQL or Python).
Trigger logic must be rewritten as a series of DELETEs, SELECTs, and INSERTs. One workaround is to move the trigger logic to an external script (for example, Python or Java), which would poll for a specific event to trigger that script. In general, you should avoid using triggers in MPP systems because of their complexity and performance overhead.
In terms of ETL (extract, transform, and load), in the Amazon Redshift world there are many options, such as Amazon EMR, AWS Glue, or one of our many ETL Partner solutions. For complex workloads, you can use Amazon EMR to enable Apache Pig, Apache Hive, MapReduce, or Apache Spark, and then perform bulk load into the Amazon Redshift database. In August 2017, AWS Glue became generally available as a fully managed ETL solution that integrates with Amazon Redshift. Amazon Redshift also has a vibrant echo-system of partner ETL solutions, like Informatica, Attunity, Matillion, and others listed on our Data Integration Partners page.
Conclusion
This post described design considerations and methods for migrating Teradata Database to Amazon Redshift. Depending on your business needs and your migration strategy, you likely will use a combination of methods to migrate your database.
With AWS SCT, you can run such migrations with little or no downtime. It’s easy to get started with a smaller dataset, and to try testing your target data warehouse on Amazon Redshift with your existing applications, ETL, and BI solutions.
With Amazon Redshift as your data warehouse on AWS, you get many benefits of a simple, secure, fast, inexpensive petabyte-scale analytical data store. Amazon Redshift also complements your greater data strategy and data lake architecture. With Amazon Redshift Spectrum, you can run queries against exabytes of data in Amazon S3 as easily as you run queries against petabytes of data stored on local disks in Amazon Redshift, using the same SQL syntax and BI tools you use today. You can store highly structured, frequently accessed data on Amazon Redshift local disks, keep vast amounts of unstructured data in an Amazon S3 data lake, and query seamlessly across both.