AWS Database Blog
Stream data into an Aurora PostgreSQL Database using AWS DMS and Amazon Data Firehose
August 30, 2023: Amazon Kinesis Data Analytics has been renamed to Amazon Managed Service for Apache Flink. Read the announcement in the AWS News Blog and learn more.
February 9, 2024: Amazon Kinesis Data Firehose has been renamed to Amazon Data Firehose. Read the AWS What’s New post to learn more.
Using AWS Database Migration Service (AWS DMS), you can migrate data from various sources to most widely used commercial and open-source databases. The service supports homogenous migrations such as Oracle to Oracle. It also supports heterogeneous migrations between different database platforms, such as Oracle to Amazon Aurora or Microsoft SQL Server to MySQL. In addition, the service supports streaming data from Amazon S3 into any of the supported targets, including Amazon Aurora, PostgreSQL, MySQL, MariaDB, Oracle, and SQL Server.
Amazon Data Firehose is the easiest way to load streaming data into AWS. It can capture, transform, and load streaming data into Amazon Kinesis Data Analytics, Amazon S3, Amazon Redshift, and Amazon OpenSearch Service. Using Firehose enables near real-time analytics with existing business intelligence tools and dashboards you’re already using today. Firehose is a fully managed service that automatically scales to match the throughput of your data and requires no ongoing administration. It can also batch, compress, and encrypt the data before loading it, minimizing the amount of storage used at the destination and increasing security.
By using AWS DMS and Firehose, you can get streaming data into a supported database for further analysis or reporting.
In this blog post, we explore a solution to create a pipeline for streaming data from Firehose to Amazon Aurora with PostgreSQL compatibility. You can then perform visualization on the data using existing business intelligence tools and dashboards.
At a high level, the pipeline looks like the following diagram.
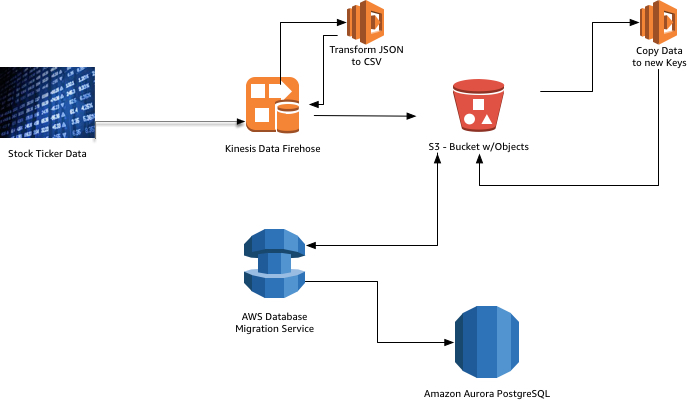
Service overview
Amazon Data Firehose (S3 as a target)
Using Firehose, you can stream data into an Amazon S3 bucket at a predefined buffer size and interval. The buffer size is in megabytes, and the buffer interval is in seconds. You can send data to your Firehose delivery stream using different sources: You can use a Kinesis stream, the Kinesis Agent, or the Firehose API using the AWS SDK. You can also use Amazon CloudWatch Logs, CloudWatch Events, or AWS IoT as your data source.
Firehose can also invoke your AWS Lambda function to transform incoming source data and deliver the transformed data to destinations.
For data delivery to Amazon S3, Firehose concatenates multiple incoming records based on buffering configuration of your delivery stream. It then delivers them to Amazon S3 as an S3 object.
Firehose adds a UTC time prefix in the format YYYY/MM/DD/HH before writing objects to Amazon S3. This prefix creates a logical hierarchy in the bucket, where each forward slash (/) creates a level in the hierarchy. You can modify this structure by adding to the start of the prefix when you create the Firehose delivery stream. For example, add myApp/ to use the myApp/YYYY/MM/DD/HH prefix or myApp to use the myApp YYYY/MM/DD/HH prefix. The S3 object name follows the pattern DeliveryStreamName-DeliveryStreamVersion-YYYY-MM-DD-HH-MM-SS-RandomString. Here, DeliveryStreamVersion begins with 1 and increases by 1 for every configuration change of the Firehose delivery stream.
AWS DMS (S3 as a source)
AWS DMS can read data from source S3 buckets and load them into a target database. To do this, provide access to an S3 bucket containing one or more data files. In that S3 bucket, include a JSON file that describes the mapping between the data and the database tables of the data in those files.
The source data files must be in comma-separated value (CSV) format. Name the files using the naming convention shown following. In this convention, schemaName is the source schema and tableName is the name of a table within that schema.
/schemaName/tableName/LOAD001.csv
/schemaName/tableName/LOAD002.csv
/schemaName/tableName/LOAD003.csv
…
In addition to the data files, you must also provide an external table definition. An external table definition is a JSON document that describes how AWS DMS should interpret the data from S3.
After AWS DMS performs a full data load, it can optionally replicate data changes to the target endpoint. To do this, you upload change data capture files (CDC files) to your S3 bucket. AWS DMS reads these CDC files when you upload them, and then applies the changes at the target endpoint.
The CDC files are named as follows:
CDC00001.csv
CDC00002.csv
CDC00003.csv
…
To indicate where AWS DMS can find the files, you must specify the cdcPath parameter in the console under the S3 settings. If you set cdcPath to changedata, then AWS DMS reads the CDC files at the following path.
s3://mybucket/changedata
The records in a CDC file are formatted as follows:
- Operation – the change operation to be performed: INSERT, UPDATE, or DELETE. These keywords are case-insensitive.
- Table name – the name of the source table.
- Schema name – the name of the source schema.
- Data – one or more columns that represent the data to be changed.
Following is an example CDC file for a table named ticker in schema named stock .
Solution overview
Our goal in the solution is to move data written into a Firehose stream into a S3 bucket that can be consumed by the Database Migration Service by using CDC.
The solution involves the following:
- Firehose – To stream data to S3.
- Lambda Function – To convert JSON data into CSV data and format it to follow DMS requirements.
- Lambda Function – To copy the data into the appropriate keys for DMS to consume.
- Aurora PostgreSQL Database – The target database to store data.
- Database Migration Service – To read data from S3 and load into Aurora with PostgreSQL compatibility.
Creating the database table
First, connect to your Aurora PostgreSQL database and run the following SQL statements.
Creating an IAM role for S3 access
Next, create an IAM role to access the specified S3 bucket that DMS is to read the data from. In my use case, I have given S3 read permission to bucket/changedata and bucket/stock/ticker keys for DMS to read. Take note of the Amazon Resource Name (ARN).
Also create an IAM role for the Lambda function to write to the S3 buckets. In my case, I have created a Lambda execution policy that has the rights to write into my changedata key in my bucket. Take note of the ARN.
Configuring the Kinesis Stream
 Firehose console
Next, open the Firehose console to create a delivery stream and use direct put as the method to send data to the Firehose stream.
![]()
Firehose transform
On the next console page, enable record transformation and choose Create New.

Lambda blueprints
For a Lambda blueprint, choose General Firehose Processing. We provide multiple blueprints for you to choose from if you are transforming any of the standard log files.
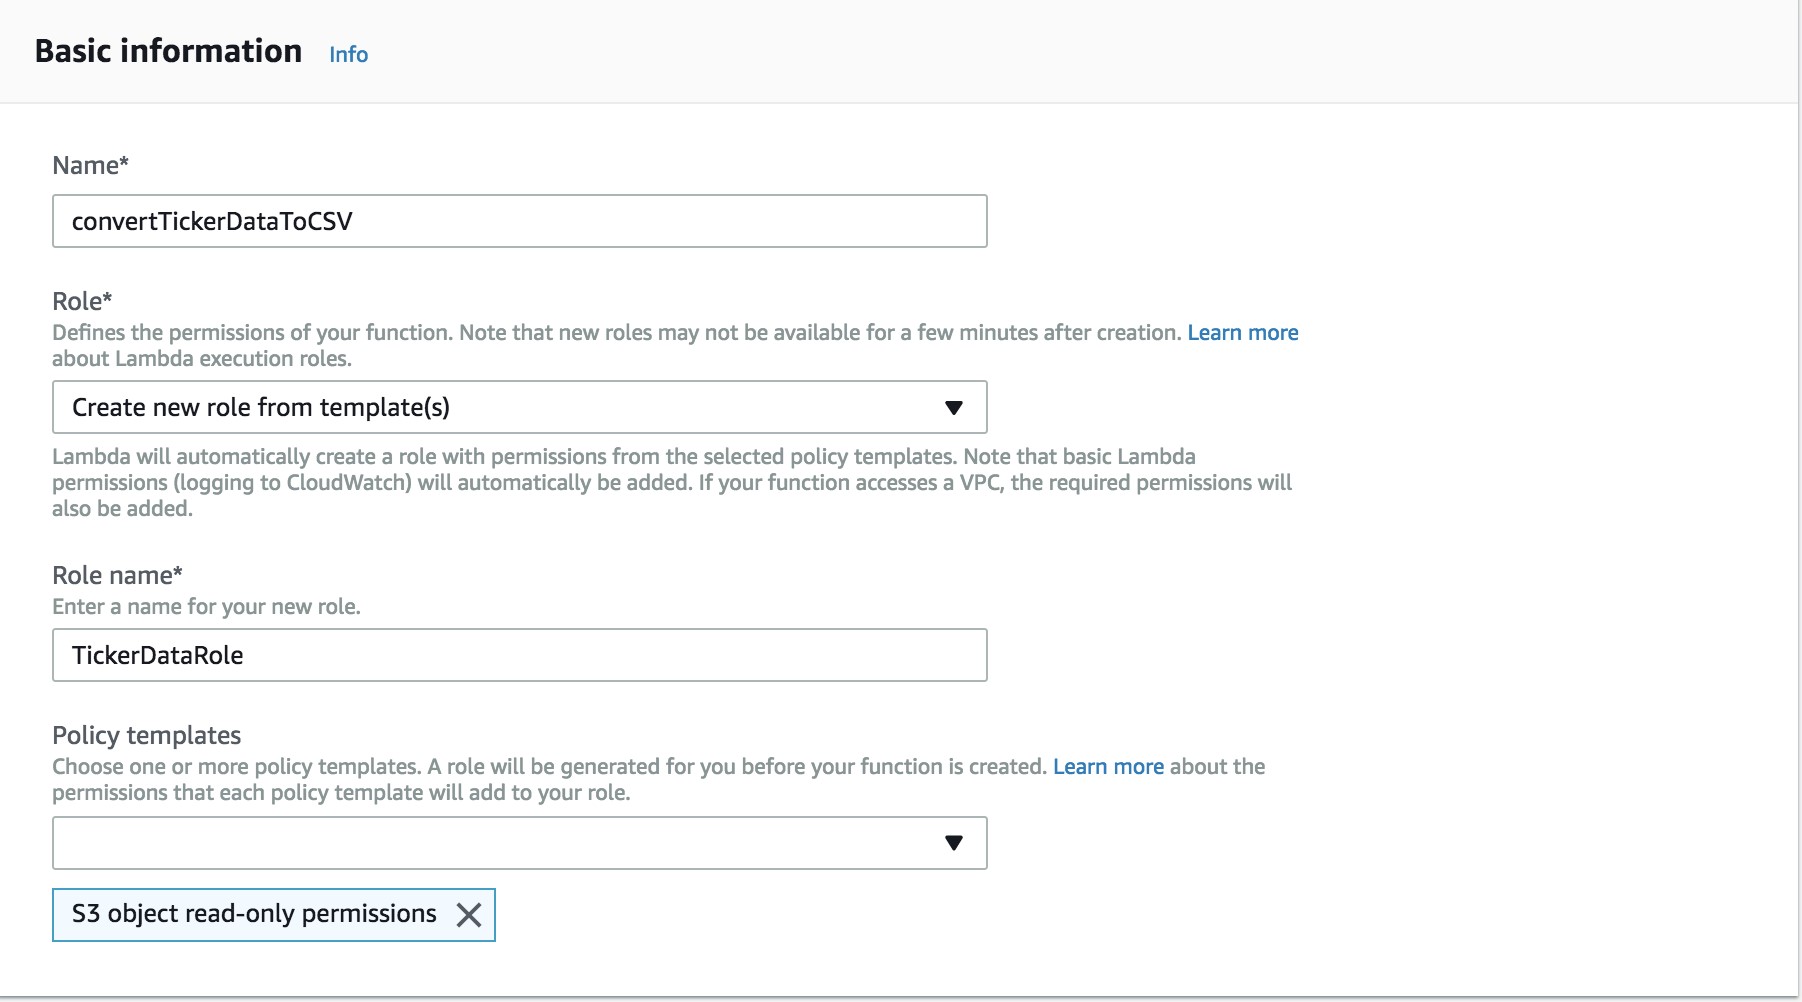
Basic information
On the following Create Function page, name the function convertTickerDataToCSV. Choose Create a new role from template(s), and enter the role name as TickerDataRole. Choose S3 Object read-only permission from the policy template list.

Code inline
When you choose Next, your function is created. At this time, choose the runtime as Python 2.7. Specify the handler as lambda_function.lambda_handler, paste the following code into the code window, and then choose Save and test.

Basic settings
In the Basic settings section, change the timeout to five minutes.
Test event
In the following dialog box, name your test event TickerTestData, and then choose Create.![]() Transform record
Transform record
Go back to the Firehose console’s Create Delivery Stream window. Choose Refresh, choose the function convertTickerDataToCSV, and then choose Next. Destination
Choose Destination as S3 Bucket.
Destination config
In the bottom part of the window, choose the S3 bucket. Provide a path prefix for transformed records and an S3 bucket and path prefix for the source record backup.
Configure settings
In the Configure Settings section, leave Buffer size and Buffer interval as 5 MB and 300 seconds.
IAM role
For IAM Role, choose Create new or Choose.
IAM role details
In the tab that appears, choose Create a new IAM Role, type the role name as firehose_delivery_to_S3_role, and choose Allow.
Review the details on the Delivery Stream page, and then choose Create Delivery Stream.
Creating a Lambda function to copy S3 objects
Files are delivered from Firehose in a different key structure than what DMS uses for CDC. That being the case, we need to write a Lambda function to copy the data into the right keys.
To do this, open the Lambda console, and then choose Create Function. On the next screen, choose Author from Scratch.
Author from scratch
For Name for the function, type ProvideDataToDMS, and then choose an existing role for Role. For the existing role, choose the role that you created in the first section, “Creating an IAM role for S3 access,” and then choose Create Function.
Function code
On the next screen, choose Python 2.7 for Runtime and lambda_function.lambda_handler for Handler. Paste the following code into the code window.
Choose the Triggers tab.
Trigger
For the bucket name and prefix, specify tickerdata/ . For Event Type, choose ObjectCreated. Doing this makes sure that the Lambda function is called every time a new object is put into the tickerdata key.
Save and test this function.
Setting up the DMS endpoints
Open the AWS Database Migration Service console.
DMS landing page
Choose Replication instances, and on the following page choose Create Replication Instance.
Replication instance
Create the replication instance in your VPC for the AWS Region that VPC occupies. Also, assign a security group that has access to the underlying Amazon RDS DB instance. Then choose Create.
Choose Endpoints, and on the following page choose Create Endpoint.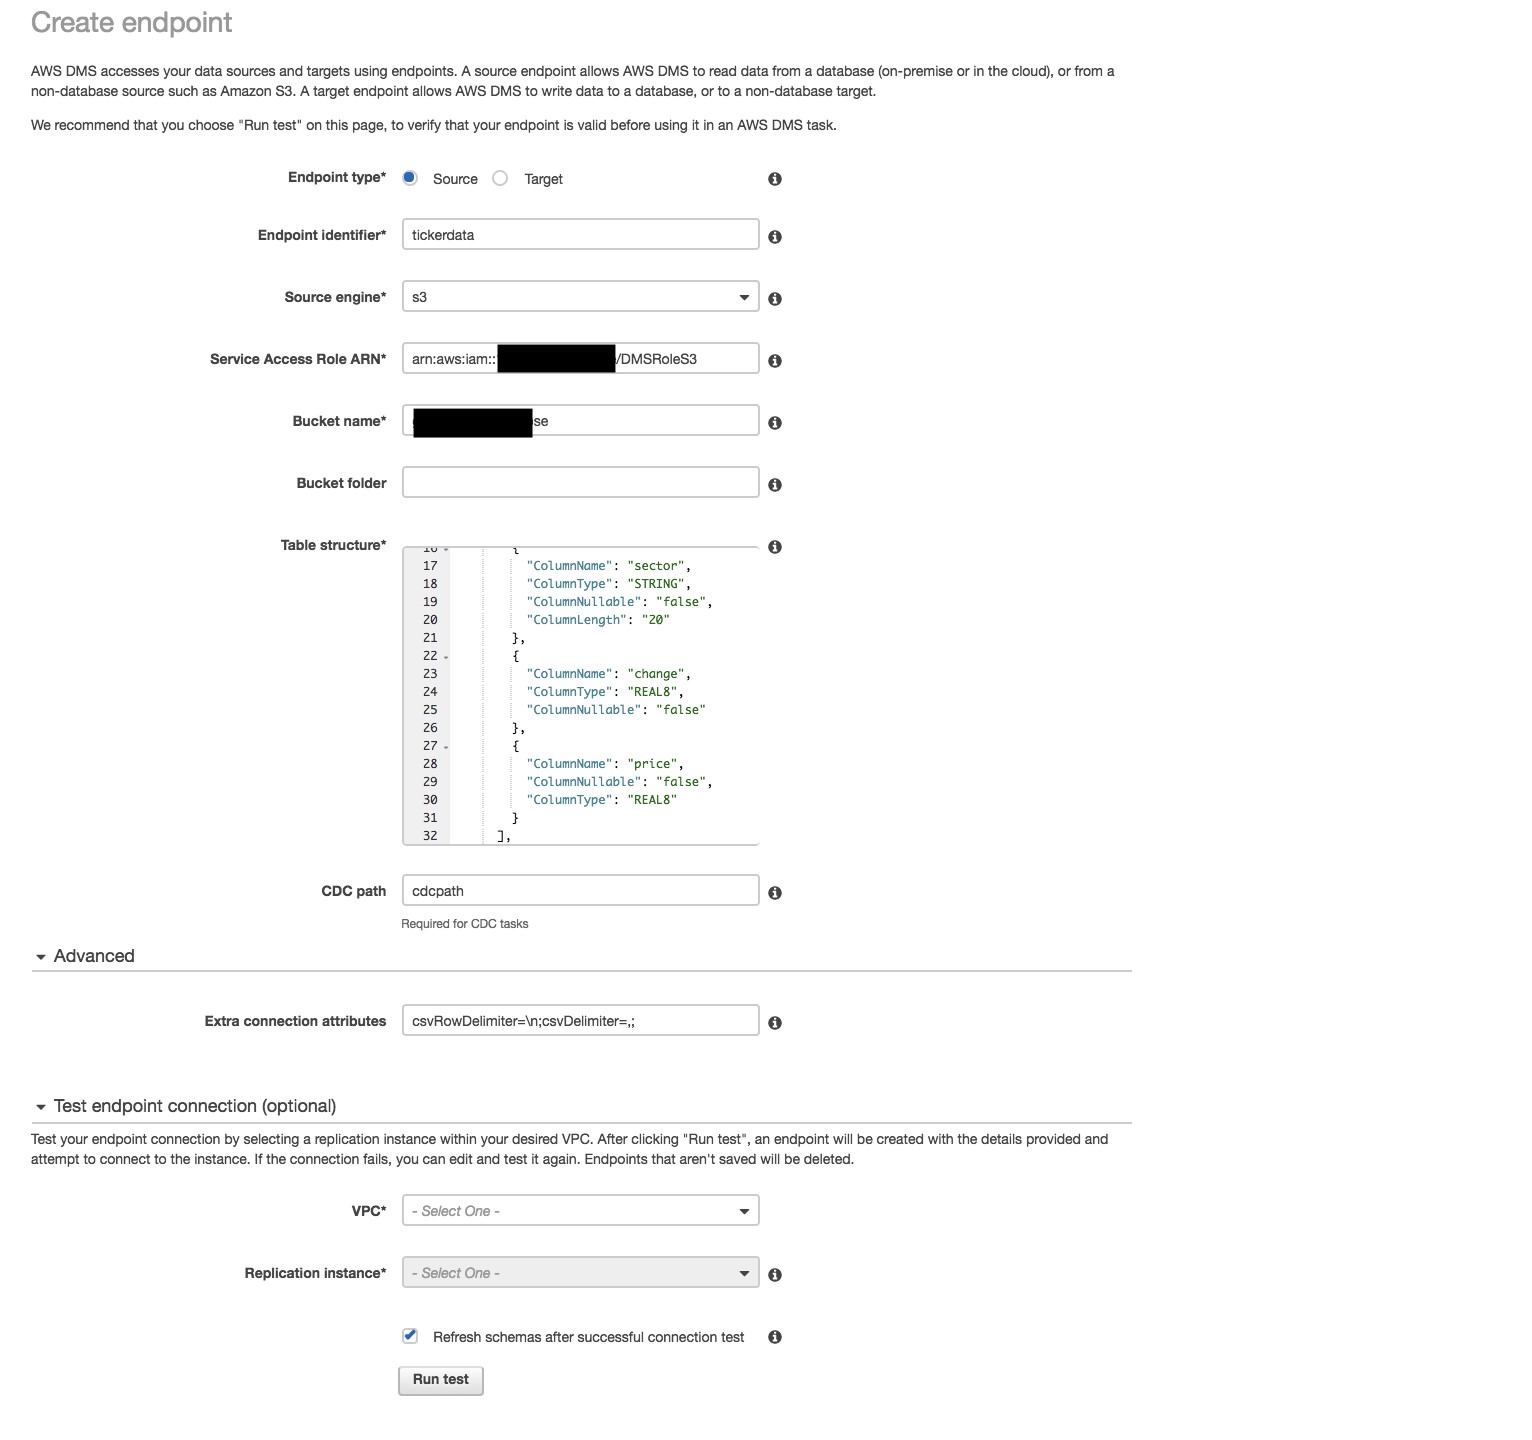
Create endpoint
Paste the following table structure into the table structure box.
In the Advanced section under Extra connection attributes, specify the following.
Choose Create to create the endpoint. Once the endpoint is created, for Target endpoint specify the endpoint pointing to the Aurora PostgreSQL database where you have created the connection.
Next, you create your AWS DMS task. Before doing so, make sure that you test your connections on the endpoints page. This test makes sure that the replication instance is able to connect to the source and target.
When you’re ready, choose Tasks from the navigation pane, and then choose Create Task.
Create task
For Source endpoint and Target endpoint, choose the source and target endpoints that you created in the previous section. For Migration type, choose Migrate existing data and replicate ongoing changes. Be sure to choose Enable logging.
Once the task is created and started, you can start testing the stream.
Test with demo data
On the Firehose console, you can find an option to test the stream with sample data. Choose Start Sending Demo Data, and you eventually see files under the source_records key and changedata keys. Table stats
On the DMS console, for Tasks you can see table statistics that show the number of records being inserted into the database.
To find out the number of records being inserted, connect to your Amazon Aurora PostgreSQL database and run the following query.
Conclusion
In this blog post, we demonstrate how to move data from Firehose to an Aurora PostgreSQL database. Although we use an Aurora PostgreSQL database as an example here, you can move your data to any database that DMS supports as a target.
About the Author
 Ganesh Raja is a solutions architect at Amazon Web Services. He works with our customers to provide guidance and technical assistance on database projects, helping them improving the value of their solutions when using AWS.