Desktop and Application Streaming
Network Separation and Data Sanitization using Amazon WorkSpaces, Amazon AppStream 2.0, and Amazon Macie
Data security and privacy are the top priorities of most organizations. Most of the data leakage happens not at the data center, but outside it. Most common reasons of data theft are unpatched desktops, malware attacks, and accidental data sharing. Network separation is a common way to secure desktop environments. Most organizations achieve this by giving two desktops per user. One is used for internet access and another for internal corporate applications and critical data. These two networks remain isolated from each other. Though this solution prevents data-theft and malicious attacks, it doubles hardware, software, and management overheads. Data exchange between these isolated environments is not possible.
Using AWS services, you can achieve network separation in a much easier way. Amazon WorkSpaces is a managed, secure Desktop-as-a-Service (DaaS) solution. It helps you reduce the complexity in managing hardware inventory, OS versions and patches, and simplify your desktop delivery strategy. With flexible billing options, Amazon WorkSpaces help you save money when compared to traditional desktops. You can further reduce the management overhead by application streaming using Amazon AppStream 2.0. You centrally manage your desktop applications on AppStream 2.0 and securely deliver them to any computer.
The separated networks still hold sensitive data and to avoid human errors, it becomes important to classify and protect sensitive data. This capability is provided by Amazon Macie. Macie is a security service that uses machine learning to automatically discover, classify, and protect sensitive data in AWS. Macie recognizes sensitive data such as personally identifiable information (PII) or intellectual property.
In this post, I show you how to configure network separation and protect sensitive data using data sanitization.
Overview of solution
The solution uses following services and assumes you have 100 level knowledge on how to use them:
- Amazon WorkSpaces
- Amazon AppStream 2.0
- AWS Storage Gateway
- AWS Directory Service
- Amazon Simple Storage Service (Amazon S3)
- Amazon Simple Notification Service (Amazon SNS)
- Amazon CloudWatch
- AWS Lambda
- Amazon Macie
- Amazon Elastic Compute Cloud (Amazon EC2)
- Amazon Simple Queue Service (Amazon SQS)
Most of corporate applications run on internal network. These applications range from browser to thick client. To maintain full desktop experience Amazon WorkSpaces is an excellent solution. Internet applications are used for accessing internet or SaaS based apps. A browser published through AppStream 2.0 solves this problem.
To achieve network isolation, we create WorkSpaces in a private subnet with no outbound traffic to internet. AppStream 2.0 fleets reside in private subnet with route to NAT Gateway. Both WorkSpaces and AppStream 2.0 use Active Directory for authentication. This solution can work with AWS Directory Service for Microsoft Active Directory or an AD Connector, to connect to an Active Directory on-premises.
WorkSpaces are connected to a network drive exposed using AWS Storage Gateway. Any data saved by user in this network drive moves to an S3 bucket. AppStream 2.0 expose another S3 bucket as a home folder to users. Both these S3 buckets are monitored by Amazon Macie for categorized data like PII, IP, and hazardous content. If Macie identifies classified data or data meets risk conditions, it raises a CloudWatch alert. CloudWatch triggers a Lambda function to move this content to a quarantine S3 bucket for investigation. This Lambda also triggers Amazon SNS notification to inform SecOps team to investigate this event, validate content type and take appropriate actions.
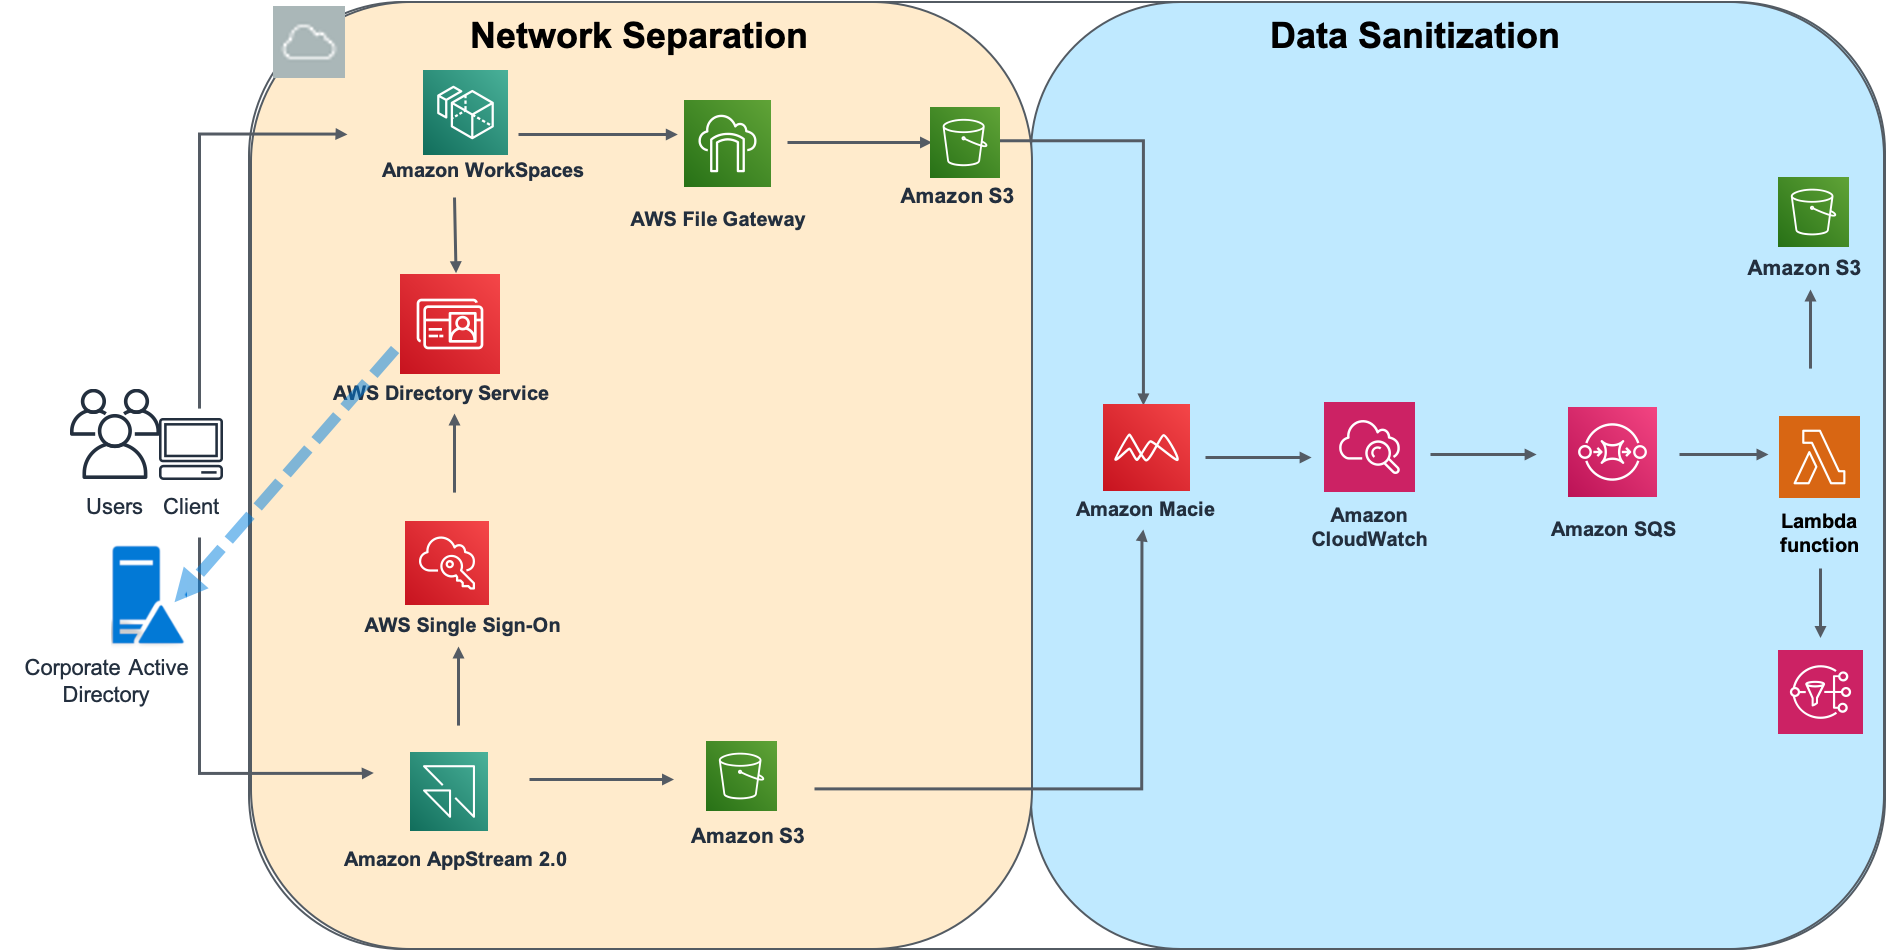
Figure 1. Architecture diagram for the solution
Prerequisites
The prerequisites for this solution include:
· An AWS account
· Two VPCs with one public subnet and two private subnets, each in a different Availability Zone (AZ) for high availability (HA)
· A NAT Gateway in public subnet
· AWS Directory Service integration with on-premises Active Directory
· Amazon WorkSpaces environment in VPC1 private subnets
· Amazon AppStream 2.0 environment in VPC2 private subnets
· Amazon S3 Bucket
Configure file share for WorkSpaces
Once you have configured WorkSpaces and AppStream 2.0 in their respective VPCs, we have to assign data repositories for each.
Step 1. Configure AWS Storage Gateway for Files (File gateway)
In this step, we set up AWS Storage Gateway and use Server Message Block (SMB) file share as a home directory for WorkSpaces. File gateway offers SMB or NFS-based access to data in Amazon S3 with local caching. We need this to move data saved by a user in home directory to S3 bucket. The SMB share from file gateway could be used for roaming profile and folder redirection. If you want folder redirection to work only for WorkSpaces, you can configure WorkSpaces as the primary computer in folder redirection policies.
- Creating a File gateway and activating it.
- To create File gateway, open the AWS Storage Gateway console and choose Get started.
- On the Select gateway type page, choose File gateway, and then choose Next.
- Select Amazon EC2 as the host platform and choose Launch instance.
- Configure the EC2 instance and launch it. We recommend starting with the m4.xlarge instance type, which meets the minimum requirements for your gateway to function properly.
- On the File gateway configuration page, configure a service endpoint to define how the gateway talks to S3. You can create a Gateway Endpoint for S3. All communication from your gateway to AWS services occurs through the VPC endpoint in your VPC.
- Choose Next, to connect to gateway use the private IP address of the EC2 instance.
- Activate your gateway
- Select the disk for cached storage.
- Creating an SMB file share
- On the File gateway page, select the File gateway and go to Actions to edit SMB settings.
- Provide the security settings and Microsoft Active Directory access settings.
Note: The Active Directory status should change to Joined.
- Configuring S3 bucket with File gateway.
- Go to the File Shares tab and choose Create file share
- Provide details of your S3 bucket (a pre-created bucket in the same Region).
- Access objects using SMB
- Select your Gateway.
- Choose Next and provide details about S3 storage tier to use, IAM role to allow file gateway to access your Amazon S3 bucket, and encryption options.
- Choose Next and review the settings.
- Make sure that Active Directory appears for Select authentication method
- For the File/directory access controlled by option, choose Windows access control list (ACL).
- Add one or more user groups you want to give permission to access this share, for example, @fileshareusers
- Choose Create a File share
The File share status should be now Available.
Step 2. Apply Active Directory group policy for folder redirection for WorkSpaces users.
Apply Active Directory group policy for folder redirection for WorkSpaces users. Set the Root Path to the File share you created in previous steps.
Every time the user saves something to Desktop, Downloads, and Documents folders, the policy uploads that data to S3 bucket “filegateway-WorkSpaces”.
Configure Home Folders for AppStream 2.0
AppStream 2.0 does not require additional FileServer mapping. You can configure Home Folders for AppStream 2.0 so that the data is automatically backed up to S3 bucket.
- In the AppStream 2.0 Console navigation pane, choose Stacks, and select the stack for which to enable home folders.
- Choose Storage tab and select Enable Home Folders check box.
AppStream 2.0 creates a bucket in your account, which is made available to user in every session.
Configure Amazon Macie for data sanitization
Macie enables you to identify business-critical data and analyze access patterns and user behavior. It continuously monitors new data in selected S3 buckets, uses artificial intelligence to understand access patterns of historical data. By using natural language processing (NLP), it intelligently and accurately assigns business value to data and prioritize business-critical data based on your unique organization. You can create your own security alerts and custom policy definitions to be proactive with security compliance and achieve preventive security.
Step 1. Configure Amazon Macie
- Log in to AWS with the credentials of the account that is serving as your Macie Classic master account. The account that you use to sign in to AWS at the time when you first enabled Macie Classic is designated as the master account.
- Open the Amazon Macie console and choose Macie Classic in the navigation pane.
- Select Macie general settings from the assumed role dropdown in the top-right corner.
- Chose Enable Macie
- On the page integrate S3 resources with Macie Classic, choose Add.
- Add the buckets to be monitored with full logging. Here, you can select the S3 bucket mapped to File Gateway file share and bucket mapped as home folder for AppStream 2.0.
Step 2. Monitor Macie events and alerts
Macie generates alerts when it classifies a high-risk content being uploaded to S3 buckets. If user uploads any classified content to their file share or home folder, Macie raises an alert. For example, in the figure 2, a user saved a private key to their home folder, this home folder connects to internet-based application. Macie identifies that data and raises an alert.

Figure 2. Screenshot of Macie alert
The dashboard also shows the classified content being added to monitored S3 buckets.
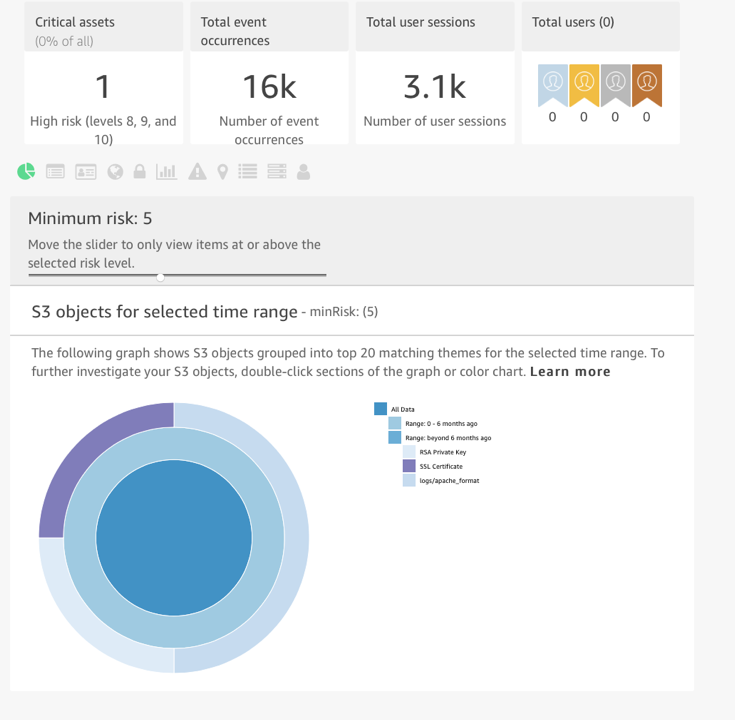
Figure 3. Screenshot of Macie dashboard event
Macie provides integration with CloudWatch Events, which can capture Macie alerts and send it to Amazon SQS. To configure a CloudWatch event raised by Macie Alert, follow the steps in Amazon CloudWatch User Guide.
The Macie alerts sent to Amazon SQS can trigger a Lambda function to raise an SNS notification to administrators and user, whenever an out of compliance data is found. This Lambda function can also move this sensitive data to a quarantine bucket for further investigation.
Lambda code looks like this (replace the <destination-bucket-name> in new_path in handler code with your S3 bucket name):
#!/usr/bin/env python3
import boto3
import json
import logging
import os
logging.basicConfig(level=logging.INFO)
logger = logging.getLogger(__name__)
class AWS(object):
"""Base class"""
def __init__(self):
self.s3 = boto3.resource('s3')
self.sns = boto3.client('sns')
self.sns_topic = os.getenv('SNS_TOPIC')
def get_file(self, path):
"""Reads a file from S3"""
original_bucket = path.split('/')[0]
key = str.join('/', path.split('/')[1:])
logger.debug(key)
self.s3.Bucket(original_bucket).download_file(key, '/tmp/' + path.split('/')[-1])
logger.info('Saved file to: ' + '/tmp/' + path.split('/')[-1])
return '/tmp/' + path.split('/')[-1]
def write_file(self, path, local_file):
"""Writes a file to S3"""
handle = open(local_file, 'r')
body = handle.read()
handle.close()
object_handle = self.s3.Object(path.split('/')[0], str.join('/', path.split('/')[1:]))
object_handle.put(Body=body)
def delete_file(self, path):
"""Deletes a file from S3"""
object_handle = self.s3.Object(path.split('/')[0], str.join('/', path.split('/')[1:]))
object_handle.delete()
def send_sns_message(self, path, original_message):
"""Sends a message to SNS"""
response = self.sns.publish(
TopicArn=self.sns_topic,
Message="Object failing policy validation moved to: " + path + "\n\n Details: \n\n" + str(original_message)
)
def sanitize_file(path):
"""Sanitizes a local file"""
handle = open(path, 'a')
handle.write('\n\n Contact data governance team\n')
handle.close()
def lambda_handler(event=None, context=None):
"""Lambda entry point"""
# print(event)
# return True
aws = AWS()
for record in event['Records']:
print(record)
body = json.loads(record['body'])
for key, value in body['detail']['summary']['Object'].items():
logger.info('Found file: ' + key)
local_file = original_file = aws.get_file(key)
original_prefix = str.join('/', key.split('/')[0:-1])
new_path = os.getenv('DESTINATION_BUCKET', <destination-bucket-name>) + '/' + str.join('/',
key.split('/')[1:])
logger.info(new_path)
sanitize_file(local_file)
aws.write_file(new_path, local_file)
aws.delete_file(key)
aws.send_sns_message(key, record)
Figure 4 shows an example of SNS notification:

Figure 4. Screenshot of SNS notification
Clean Up
After you have finished testing, to avoid incurring future charges, stop and delete unused resources.
- Delete the WorkSpace through AWS Management Console. Ensure you delete any custom images or bundles.
- Delete AppStream stack and fleet.
- Disable Macie
- Delete Lambda function, SNS topic, and SQS queue
Conclusion
AWS services Amazon WorkSpaces and AppStreams 2.0 give you the power to manage your desktops and applications securely. These services help you save money when compared to traditional desktops, without compromising the user experience. The security service integration used in this post meets the security and privacy needs of highly regulated industries.
Learn more about data protection in Amazon WorkSpaces and in Amazon AppStream 2.0. Explore other Amazon Macie features.
About the Author: Pratima Bhardwaj is a Solution Architect with AWS Canada and is based in Toronto. She works with Enterprise customers in varied industry sectors.