AWS Developer Tools Blog
Authenticate applications through facial recognition with Amazon Cognito and Amazon Rekognition
With increased use of different applications, social networks, financial platforms, emails and cloud storage solutions, managing different passwords and credentials can become a burden. In many cases, sharing one password across all these applications and platforms is just not possible. Different security standards may be required, such as passwords composed by only numeric characters, password renewal policies, and providing security questions.
But what if you could enhance the ways users authenticate themselves in their application in a more convenient, simpler and above everything, more secure way? In this post, I will show how to leverage Amazon Cognito user pools to customize your authentication flows and allow logging into your applications using Amazon Rekognition for facial recognition using a sample application.
Solution Overview
We will build a Mobile or Web application that allows users to sign in using an email and require the user to upload a document containing his or her photo. We will use the AWS Amplify Framework to integrate our Front-End application with Amazon S3 and store this image in a secure and encrypted bucket. Our solution will trigger a Lambda function for each new image uploaded to this bucket so that we can index the images inside Amazon Rekognition and save the metadata in a DynamoDB table for later queries.
For authentication, this solution uses Amazon Cognito User Pools combined with Lambda functions to customize the authentication flows together with the Amazon Rekognition CompareFaces API to identify the confidence level between user photos provided during Sign Up and Sign In. Here is the architecture of the solution:
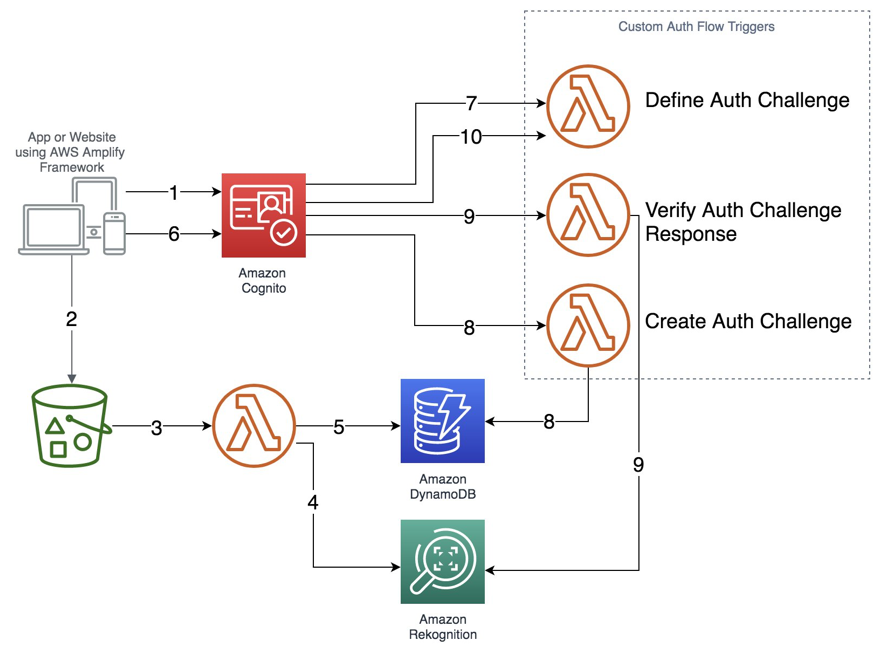
Here’s a step-wise description of the above data-flow architecture diagram:
- User signs up into the Cognito User Pool.
- User uploads – during Sign Up – a document image containing his/her photo and name, to an S3 Bucket (e.g. Passport).
- A Lambda function is triggered containing the uploaded image as payload.
- The function first indexes the image in a specific Amazon Rekognition Collection to store these user documents.
- The same function then persists in a DynamoDB table as the indexed image metadata, together with the email registered in Amazon Cognito User Pool for later queries.
- User enters an email in the custom Sign In page, which makes a request to Cognito User Pool.
- Amazon Cognito User Pool triggers the “Define Auth Challenge” trigger that determines which custom challenges are to be created at this moment.
- The User Pool then invokes the “Create Auth Challenge” trigger. This trigger queries the DynamoDB table for the user containing the given email id to retrieve its indexed photo from the Amazon Rekognition Collection.
- The User Pool invokes the “Verify Auth Challenge” trigger. This verifies if the challenge was indeed successfully completed; if it finds an image, it will compare it with the photo taken during Sign In to measure its confidence between both the images.
- The User Pool, once again, invokes the “Define Auth Challenge” trigger that verifies if the challenge was answered. No no further challenges are created, if the ‘Define Auth challenge’ is able to verify the user-supplied answer. The trigger response, back to the User Poll will include an “issueTokens:true” attribute to authenticate itself and finally issue the user a JSON Web Token (JWT) (see step 6).
Serverless Application and the different Lambdas invoked
The following solution is available as a Serverless application. You can deploy it directly from AWS Serverless Application Repository. Core parts of this implementation are:
- Users are required to use a valid email as user name.
- The solution includes a Cognito App Client configured to “Only allow custom authentication” as Amazon Cognito requires a password for user sign up. We are creating a random password to these users, since we don’t want them to Sign In using these passwords later.
- We use two Amazon S3 Buckets: one to store document images uploaded during Sign Up and one to store user photos taken when Signing In for face comparisons.
- We use two different Lambda runtimes (Python and Node.js) to demonstrate how AWS Serverless Application Model (SAM) handles multiple runtimes in the same project and development environment for the developer’s perspective.
The following Lambda functions are triggered to implement the images indexing in Amazon Rekognition and customize Amazon Cognito User Pools custom authentication challenges:
- Create Rekognition Collection (Python 3.6) – This Lambda function gets triggered only once, at the beginning of deployment, to create a Custom Collection in Amazon Rekognition to index documents for user Sign Ups.
- Index Images (Python 3.6) – This Lambda function gets triggered for each new document upload to Amazon S3 during Sign Up and indexes the uploaded document in the Amazon Rekognition Collection (mentioned in the previous step) and then persists its metadata into DynamoDB.
- Define Auth Challenge (Node.js 8.10) – This Lambda function tracks the custom authentication flow, which is comparable to a decider function in a state machine. It determines which challenges are presented, in what order, to the user. At the end, it reports back to the user pool if the user succeeded or failed authentication. The Lambda function is invoked at the start of the custom authentication flow and also after each completion of the “Verify Auth Challenge Response” trigger.
- Create Auth Challenge (Node.js 8.10) – This Lambda function gets invoked, based on the instruction of the “Define Auth Challenge” trigger, to create a unique challenge for the user. We will use this function to query DynamoDB for existing user records and if their given metadata are valid.
- Verify Auth Challenge Response (Node.js 8.10) – This Lambda function gets invoked by the user pool when the user provides the answer to the challenge. Its only job is to determine if that answer is correct. In this case, it compares both images provided during Sign Up and Sign In, using the Amazon Rekognition CompareFaces API and considers a API responses containing a confidence level equals or greater than 90% as a valid challenge response.
In the sections below, let’s step through the code for the different Lambda functions we described above.
1. Create an Amazon Rekognition Collection
As described above, this function creates a Collection in Amazon Rekognition that will later receive user photos uploaded during Sign Up.
2. Index Images into Amazon Rekognition
This function is responsible for receiving uploaded images during the sign up from users and index the images in the Amazon Rekognition Collection created by the Lambda described above to persist its metadata in an Amazon Dynamodb table.
3. Define Auth Challenge Function
This is the decider function that manages the authentication flow. In the session array that’s provided to this Lambda function (event.request.session), the entire state of the authentication flow is present. If it’s empty, it means the custom authentication flow just started. If it has items, the custom authentication flow is underway, i.e. a challenge was presented to the user, the user provided an answer, and it was verified to be right or wrong. In either case, the decider function has to decide what to do next:
4. Create Auth Challenge Function
This function queries DynamoDB for a record containing the given e-mail to retrieve its image ID inside Amazon Rekognition Collection and define as a challenge that the user must provide a photo that relates to the same person.
5. Verify Auth Challenge Response Function
This function verifies within Amazon Rekognition if it can find an image with the confidence level equals or over 90% compared to the image uploaded during Sign In, and if this image refers to the user claims to be through the given e-mail address.
The Front End Application
Now that we’ve stepped through all the Lambdas, let’s create a custom Sign In page, in order to orchestrate and test our scenario. You can use AWS Amplify Framework to integrate your Sign In page to Amazon Cognito and the photo uploads to Amazon S3.
The AWS Amplify Framework allows you to implement your application using your favourite framework (React, Angular, Vue, HTML/JavaScript, etc). You can customize the snippets below as per your requirements. The snippets below demonstrate how to import and initialize AWS Amplify Framework on React:
Signing Up
For users to be able to sign themselves up, as mentioned above, we will “generate” a random password on their behalf since it is required by Amazon Cognito for user sign up. However, once we create our Cognito User Pool Client, we ensure that authentication only happens following the custom authentication flow – never using user and password.
Signing in
Starts the custom authentication flow to the user.
Answering the Custom Challenge
In this step, we open the camera through Browser to take a user photo and then upload it to Amazon S3, so we can start the face comparison.
Conclusion
In this blog post, we implemented an authentication mechanism using facial recognition using the custom authentication flows provided by Amazon Cognito combined with Amazon Rekognition. Depending on your organization and workload security criteria and requirements, this scenario might work from both security and user experience point of views. Additionally, we can enhance the security factor by chaining multiple Auth Challenges not only based on the user photo, but also a combination of Liveness Detection, a combination of their document numbers used for signing up and other additional MFA’s.
Since this is an entirely Serverless-based solution, you can customize it as your requirements arise using AWS Lambda functions. You can read more on custom authentication in our developer guide.
Resources
- All the resources from the implementation mentioned above are available at GitHub. You can clone, change, deploy and run it yourself.
- You can deploy this solution directly from the AWS Serverless Application Repository.
About the author
 Enrico is a Solutions Architect at Amazon Web Services. He works in the Enterprise segment and works helping customers from different business leveraging their Cloud Journey. With more than 10 years working in Solutions Architecture and Engineering, and DevOps, Enrico acted directly with many customers designing, implementing and deploying several enterprise solutions.