AWS Developer Tools Blog
AWS Toolkit for IntelliJ – Now generally available
Last year at re:Invent we told you that we were working on the AWS Toolkit for IntelliJ. Since then, the toolkit has been in active development on GitHub.
I’m happy to share that the AWS Toolkit for IntelliJ is now generally available!
The toolkit provides an integrated experience for developing serverless applications. For example, you can:
- Create a new, ready-to-deploy serverless application in Java.
- Locally test your code with step-through debugging in an execution environment similar to that of AWS Lambda.
- Deploy your applications to the AWS Region of your choice.
- Invoke your Lambda functions locally or remotely.
- Use and customize sample payloads from different event sources such as Amazon S3, Amazon API Gateway, and Amazon SNS.
Installation
First, install the AWS Serverless Application Model (SAM) CLI. It provides a Lambda-like execution environment and enables you to step-through and debug your code. This toolkit also uses SAM CLI to build and create deployment packages for your applications. You can find installation instructions for your system here.
Next, install the AWS Toolkit for IntelliJ via the JetBrains plugins repository. In the Settings/Preferences dialog, click on Plugins, select Marketplace, search for “AWS Toolkit”, and click the Install button. Then restart the IDE for the changes to take effect.
Building a serverless application with IntelliJ
Now that the IDE is configured and ready, I create a new project, select AWS on the left, and then choose AWS Serverless Application.

In the next window, I choose a name for my project and finish.
I’m using Maven to manage the project and the Project Object Model (pom.xml) file is not in the root directory. I have to select it and right click to add it as a Maven project.

Before I start deploying the application, I choose the AWS Region from the bottom-right menu. Let’s use Stockholm.

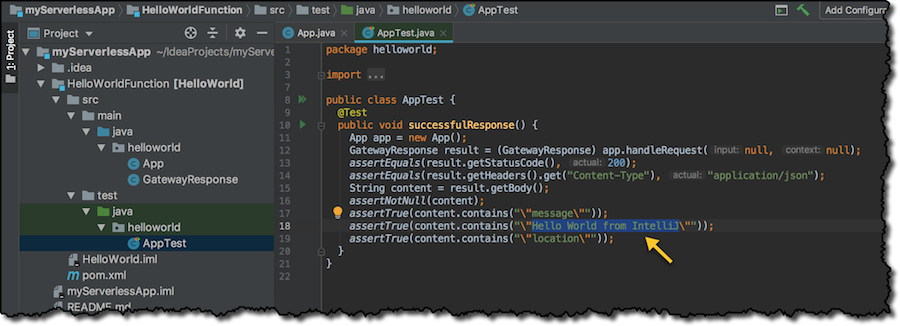
The default application is composed of a single Lambda function that you can call via HTTP using Amazon API Gateway. I open the code in the src/main/java/helloworld directory and change the message to be “Hello World from IntelliJ”.

The default application comes with unit tests that make it easy to build high-quality applications. Let’s update the assertion to make the test pass.
Running a function locally
Back to the function, I click Lambda icon on the left of the class definition to see the option to run the function locally or have a local step-through debugging session.
![]()
Let’s run the function locally. The first time I run the function, I can edit the configuration to choose the AWS credentials I want to use, the Region (for AWS services used by the function), and the input event to provide. I select the API Gateway AWS Proxy to simulate an invocation by API Gateway. I can customize the HTTP request using the syntax described here. I can also pass environment variables to customize the behavior of the function.

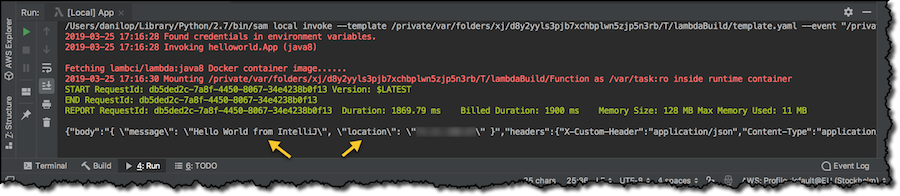
I select Run, and two tabs appears:
- The Build tab, using the SAM CLI to do the build.
- The Run tab, where I can check the output of my function.
The local invocation of the function is using Docker containers to emulate the Lambda environment.
Debugging a function locally
I’m not really sure how the location, part of the output message, is computed by this application, so I add a breakpoint where the pageContents variable is given a value. I select the option to debug locally, by clicking the gutter icon.

I can now use the IntelliJ debugger to get a better understanding of my function. I click Step Into to go in the getPageContents method. There I Step Over a few times to see how the location is taken from the public https://checkip.amazonaws.com website.

I finally resume the program execution to get a similar result as before.
Deploying a serverless application
Everything works as expected, I am ready to go in production. I deploy the serverless application in the AWS Region of my choice. To do so, I select the template.yaml file in the root directory. This template is using AWS SAM to describe the deployment in terms of:
- Infrastructure, in this case a Lambda function, API, permissions, and so on.
- Code, because the Handler property of the function is specifying the source file and the method that is invoked by the Lambda platform.
Right-clicking the template.yaml file I choose to Deploy Serverless Application. AWS SAM is using AWS CloudFormation to create and update the required resources. I choose to create a new AWS CloudFormation stack, but you can use the same deployment option to update an existing stack. I create an S3 bucket to host the deployment packages that the build process creates. The new bucket is automatically created in the AWS Region I selected before. You can reuse the bucket for multiple deployments. The SAM CLI automatically creates unique names for each build.
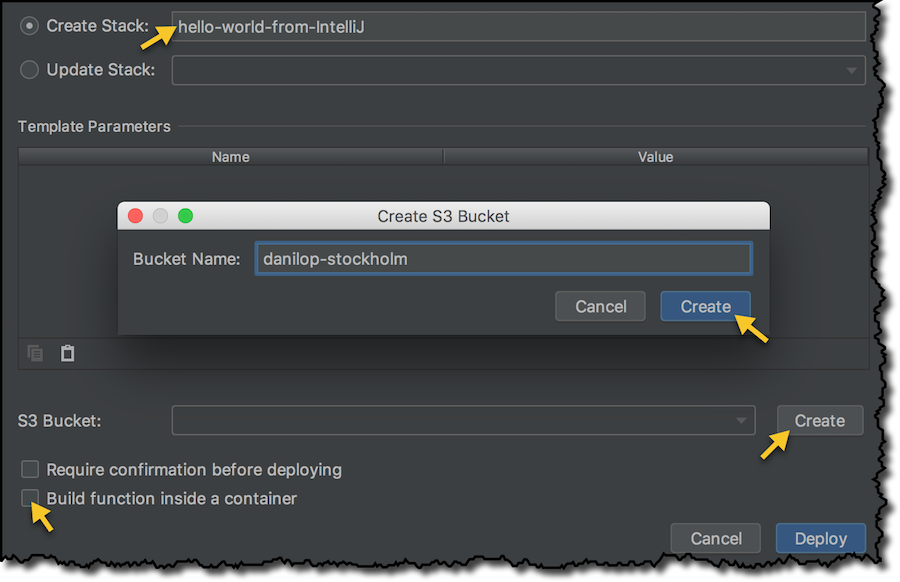
I don’t have template parameters to pass here, but they can be used by SAM or AWS CloudFormation to customize the behavior of a template for different environments.
If your build process depends on the actual Lambda execution environment, you can choose to run it inside a container to provide the necessary emulation.
I choose Deploy, and after a few minutes, the AWS CloudFormation stack is created.

Running a function remotely
Now I can invoke the Lambda function remotely. In the AWS Explorer on the left, I find the function under Lambda, where all functions in the selected Region are listed, and under AWS CloudFormation, where all stacks that have a Lambda function are listed.

I right-click the Lambda function to run it remotely. You can also jump to the source code of the function from here. Again, I create a configuration similar to what I did for the local invocation: I choose the API Gateway AWS Proxy input event, then choose Run to get the output of my serverless application. I can also see the logs of the function here, including the duration, the billed duration, the memory size, and the memory actually used by the invocation.

Invoking the HTTP endpoint
To invoke the API via HTTP, I need to know the API endpoint. I can get it from the output of the AWS CloudFormation stack, for example, using the AWS CLI:
$ aws cloudformation describe-stacks --stack-name hello-world-from-IntelliJ --region eu-north-1
In the output, there is a section similar to this, with the API endpoint in the OutputValue:
{
  "Description": "API Gateway endpoint URL for Prod stage for Hello World function",
  "OutputKey": "HelloWorldApi",
  "OutputValue": "https://<API_ID>.execute-api.eu-north-1.amazonaws.com/Prod/hello/"
}
Now I can invoke the API using curl, for example:
$ curl -s https://<API_ID>.execute-api.eu-north-1.amazonaws.com/Prod/hello/
{
  "message": "Hello World from IntelliJ",
  "location": "x.x.x.x"
}
Available now
This toolkit is distributed under the open source Apache License, Version 2.0.
More information is available on the AWS Toolkit for IntelliJ product page.
There are lots of other features I didn’t have time to describe in this post. Just start using this toolkit to discover more. And let us know what you use it for!