AWS Developer Tools Blog
CDK Pipelines: Continuous delivery for AWS CDK applications
The AWS Cloud Development Kit (AWS CDK) is an open-source software development framework to define cloud infrastructure in familiar programming languages and provision it through AWS CloudFormation. The AWS CDK consists of three major components:
- The core framework for modeling reusable infrastructure components
- A CLI for deploying CDK applications
- The AWS Construct Library, a set of high-level components that abstract cloud resources and encapsulate proven defaults
The CDK makes it easy to deploy an application to the AWS Cloud from your workstation by simply running cdk deploy. This is great when you’re doing initial development and testing, but you should deploy production workloads through more reliable, automated pipelines.
It has always been possible to configure your preferred CI/CD system to deploy CDK applications continuously, but customers have been asking us to make it even easier and more turnkey. This makes perfect sense: one of the core tenets of the CDK has always been to simplify cloud application development as much as possible, so you can focus on the parts that are relevant to you.
Today, we’re happy to announce the release of CDK Pipelines. CDK Pipelines is a high-level construct library that makes it easy to set up a continuous deployment pipeline for your CDK applications, powered by AWS CodePipeline. In this post, you learn how to use CDK Pipelines to deploy an AWS Lambda-powered Amazon API Gateway endpoint to two different accounts.
The API of CDK Pipelines has changed since this blog post was initially published. This blog post now describes the modern version of the API, introduced in version 1.114.0; a description of the original API and a migration guide can be found on the GitHub project page.
Prerequisites
The following tutorial uses TypeScript, and requires version 1.114.0 or later of the AWS CDK.
To follow this tutorial, you’ll need a GitHub account and have created a GitHub repository to hold the source code. When you see OWNER or REPO in this post, replace that with the owner and name of your forked GitHub repo.
To have AWS CodePipeline read from this GitHub repo, you also need to have a GitHub personal access token stored as a plaintext secret (not a JSON secret) in AWS Secrets Manager under the name github-token. For instructions, see Tutorial: Creating and Retrieving a Secret. The token should have the scopes repo and admin:repo_hook.
With CDK Pipelines, it’s as straightforward to deploy to a different account and Region as it is to deploy to the same account. To completely follow this tutorial, you should have administrator access to at least one but preferably two AWS accounts, which we call ACCOUNT1 and ACCOUNT2. To create multiple AWS accounts, you can use AWS Control Tower. For instructions, see AWS Control Tower – Set up & Govern a Multi-Account AWS Environment. This tutorial assumes you have credentials for those accounts configured in the AWS Command Line Interface (AWS CLI) credential profiles named account1–profile and account2–profile.
Concepts
CDK Pipelines is a construct library that’s a little higher level and opinionated than the ones you find in the AWS Construct Library. It makes some choices for you, but you can put in less effort to use it.
The most important construct in the library is CodePipeline, which configures a CodePipeline pipeline for you to deploy your CDK application. A pipeline consists of several stages, which represent logical phases of the deployment. Each stage contains one or more actions that describe what to do in that particular stage. A CDK pipeline starts with several predefined stages and actions, but you can add stages and actions to it to suit the needs of your application.
The pipeline created by CDK pipelines is self-mutating. This means you only need to run cdk deploy one time to get the pipeline started. After that, the pipeline automatically updates itself if you add new CDK applications or stages in the source code.
The following diagram illustrates the stages of a CDK pipeline.
 |
|
All subsequent stages deploy your CDK application to the account and Region you specify in your source code.
The account and Region combinations you want to deploy have to be bootstrapped first, which means some minimal infrastructure is provisioned into the account so that the CDK can access it. You also have to add a trust relationship to the account that contains the pipeline. You learn how to do that later in this post.
Use case application
For this use case, you deploy a simple application. It consists of a Lambda function that returns a fixed response, fronted by an API Gateway so you can access it from the internet.
Create the starter application and install the necessary dependencies by running the following commands:
Change lib/cdkpipelines-demo-stack.ts which defines the application’s infrastructure, to look like the following code:
Add lib/lambda/handler.ts and put in the following code. This defines a simple AWS Lambda handler:
Defining an empty pipeline
After you define the stack that makes up your application, you can deploy it through a pipeline.
The first step is to define your own subclass of Stage, which describes a single logical, cohesive deployable unit of your application. This is similar to how you define custom subclasses of Stack to describe CloudFormation stacks. The difference is that a Stage can contain one or more Stacks, so it gives you the flexibility to make multiple copies of your potentially complex application via the pipeline. For this use case, your stage consists of only one stack.
Create lib/cdkpipelines-demo-stage.ts and put the following code in it:
To organize things neatly, put the pipeline definition into its own stack file, lib/cdkpipelines-demo-pipeline-stack.ts (remember to replace OWNER and REPO in the code below):
The preceding code defines the following basic properties of the pipeline:
- Its name.
- Where to find the source. You need to change that part to match the name of your own GitHub repo.
- How to do the build and synthesis. For this use case, you use a standard NPM build (this type of build runs
npm run buildfollowed bynpx cdk synth).
You also need to instantiate CdkpipelinesDemoPipelineStack with the account and Region where you want to deploy the pipeline. Put the following code in bin/cdkpipelines-demo.ts (be sure to replace ACCOUNT1 and the Region in there if necessary):
CDK Pipelines uses some new features of the CDK framework that you need to explicitly turn on. Add the following to your cdk.json file:
Bootstrapping
You’re almost ready to deploy the pipeline. First, you need to make sure the environment where you’re planning to deploy the pipeline has been bootstrapped, specifically with the newest version of the bootstrapping stack, because the CDK bootstrapping resources have changed in version 1.109.0 to accommodate the new CDK Pipelines experience.
You have to bootstrap every environment you plan to deploy a CDK application to. In this tutorial:
- Where you want to provision the pipeline
- Where you plan to deploy applications to using the pipeline
You only need to do this one time per environment where you want to deploy CDK applications. If you’re unsure whether your environment has been bootstrapped already, you can always run the command again.
Make sure you have credentials for ACCOUNT1 in a profile named account1-profile. For more information, see Named profiles. Run the following command in the directory where cdk.json exists:
Two things are important in this command:
- Because you run this command in the directory where
cdk.jsoncontains the"@aws-cdk/core:newStyleStackSynthesis"context key, the CLI switches to the new (post-1.46.0) bootstrapping resources, which are required for CDK Pipelines to work. This new bootstrapping stack creates a bucket and several roles in your account, which the CDK CLI and the CDK Pipeline use to deploy to it. In the future, the new bootstrapping resources will become the default, but as of this writing they’re still opt-in. --cloudformation-execution-policiescontrols the permissions that the deployment role has to your account. In the past, the CDK CLI had the same permissions as the user that was running the tool. With the new bootstrapping resources, the person who bootstraps the account controls the deployment permissions that the CDK has in the account. You need to explicitly opt in for the CDK to have full control over your account, and you can change this to a different policy (or set of policies) if you want.
After you bootstrap the environment, it’s time to provision the pipeline.
Provisioning the pipeline
As soon as the pipeline is created, it’s going to run, check out the code from GitHub, and update itself based on the code it finds there. Therefore, it’s very important that the code it finds in GitHub is the code you just wrote. The very first thing you need to do is commit and push all the changes you just made. Run the following commands:
git add -A .
git commit -m 'Initial deployment of our empty pipeline'
git push
As a one-time operation, deploy the pipeline stack:
This take a couple of minutes to finish. At the end, you can find a pipeline in your CodePipeline console, as in the following screenshot.
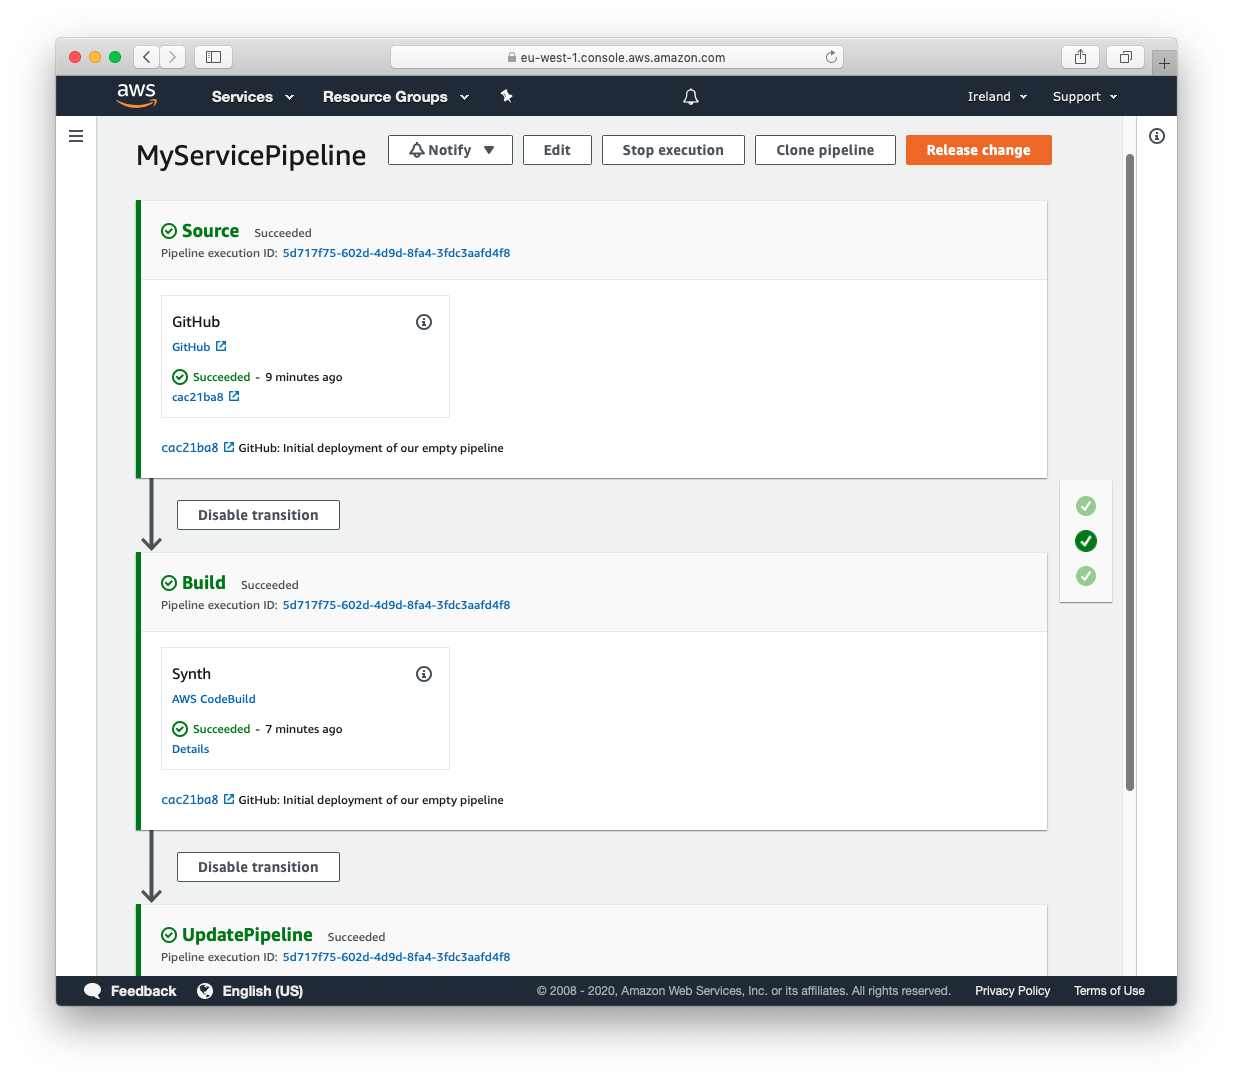
Troubleshooting tip: if you see an Internal Failure error during this step while the pipeline is being created, double check you have a Secrets Manager secret with the right name configured with your GitHub token in it.
Adding the first stage
So far, you’ve provisioned a pipeline, but the pipeline isn’t deploying your application yet. You can do that by adding instances of your MyServiceStage to the pipeline.
Add a new import at the top of lib/cdkpipelines-demo-pipeline-stack.ts and then put the following lines of code underneath // This is where we add the application stages. Be sure to replace ACCOUNT1 with your actual account number and replace us-east-2 with your preferred Region:
All you have to do now is to commit and push this, and the pipeline automatically reconfigures itself to add the new stage and deploy to it. Run the following commands to do so:

After the pipeline finishes, you can confirm that the service is up and running. Go to the CloudFormation console, select the PreProd-WebService stack, go to the outputs tab, and click on the GatewayEndpoint URL. You will see ‘Hello from a Lambda Function’.
You may notice that the UpdatePipeline stage shows as failed when it updates itself. This is expected, and nothing to worry about. The pipeline automatically restarts itself and proceeds to deploy to the new stages.
The same happens if you add a new stack to CdkpipelinesDemoStage: the pipeline automatically updates itself to deploy this new stack to all stages, and if there are dependencies between the stacks, it automatically deploys them in the right order. You don’t do that in this tutorial, but feel free to try it out!
Deploying to a different account and Region
It’s just as easy to deploy additional stages to a different account. You have to bootstrap the accounts and Regions you want to deploy to, and they must have a trust relationship added to the pipeline account.
With credentials for ACCOUNT2 available in a profile named account2-profile, run the following command:
npx cdk bootstrap \
  --profile account2-profile \
  --trust ACCOUNT1 \
  --cloudformation-execution-policies arn:aws:iam::aws:policy/AdministratorAccess \
  aws://ACCOUNT2/us-west-2
The preceding code adds --trust ACCOUNT1 to allow ACCOUNT1 to deploy into ACCOUNT2. You are now using this to allow the pipeline to deploy into ACCOUNT2, but you can use the same mechanism to allow developers to deploy into a different account using the CDK CLI with only the credentials of their developer account.
After bootstrapping ACCOUNT2 and Region us-west-2, you can add the new stage. For this post, call it Prod. Add the following code to lib/cdkpipelines-demo-pipeline-stack.ts:
You also need to add one thing to the pipeline initialization: cross-account deployments using CodePipeline require that the artifact bucket is encrypted using a Customer-Managed KMS Key. You will be charged for this key so it is not created by default, but now you have to turn it on. Add the following property to the definition of the CodePipeline class:
const pipeline = new CodePipeline(this, 'Pipeline', {
  // ...
  crossAccountKeys: true,
});
Again, you commit and push this, and your pipeline deploys to a different Region and account. Run the following commands:
# 'npm run build' first to make sure there are no typos
npm run build
git commit -am 'Add Prod stage'
git push
Adding validations
In the pipeline you just built, new code is automatically being pushed to production. Obviously, this pipeline is missing something! A real continuous delivery pipeline needs to run tests to make sure the new code works.
In this tutorial, you add a test that uses curl to perform a web request against the endpoint you just deployed, which you run on AWS CodeBuild. In a real-world scenario, you plug in your more elaborate integration test suite in this step.
The test needs to know the URL of the HTTP endpoint of your service, but that endpoint is an API Gateway with a randomly generated name. Fortunately, you already added an AWS CloudFormation output that contains the address of the service. Now all you have to do is to wire the stack’s output into the test. Edit cdkpipelines-demo-pipeline-stack.ts and change the code that adds the PreProd stage to read as follows:
Commit and push this with the following commands:
# 'npm run build' first to make sure there are no typos
npm run build
git commit -am 'Add tests to PreProd stage'
git push
In the following screenshot, you can see the test being added to the end of the PreProd stage.

Development stacks
Although the pipeline deploys your testing and production stacks, it’s still very useful for developers to have their own private copies of the application stacks in their AWS developer accounts to iterate on while they’re working.
cdk deploy is excellently suited for this use case. The only thing you have to do is add another instance of CdkpipelinesDemoStage, and define the env to use the environment variables that indicate the CLI’s current configuration. For more information, see Environments.
Add the following code to bin/cdkpipelines-demo.ts:
Every developer on the team must make sure their developer account and Region has been bootstrapped by running the following command:
npx cdk bootstrap \
  --cloudformation-execution-policies arn:aws:iam::aws:policy/AdministratorAccess \
  aws://DEVELOPER_ACCOUNT/us-east-1
They can now deploy a personal copy of the application to test against into their account (determined by the CLI’s current credentials) by running the following commands:
npm run build # If necessary, to recompile the Lambda sources
npx cdk synth
npx cdk deploy Dev/*
Cleanup
To clean up after this tutorial: log into the AWS console of the different accounts you used, go to the AWS CloudFormation console of the Region(s) where you chose to deploy, and select and click Delete on the following stacks: CdkpipelinesDemoPipelineStack, WebService, CDKToolkit.
The pipeline stack (CdkpipelinesDemoPipelineStack) and bootstrapping stack (CDKToolkit) each contain an AWS Key Management Service key that you will be charged $1/month for if you do not delete them.
Conclusion
We’re very excited to make it even quicker and easier for you to develop and deploy your AWS applications using the CDK. For more information on CDK Pipelines and all the ways it can be used, see the CDK Pipelines reference documentation. You can learn more about how Amazon development teams define application infrastructure in code and deploy it in stages across multiple AWS accounts and Regions, in the Amazon Builders’ Library article, Automating safe, hands-off deployments. If you want to see a demonstration of the library in action, see the Tech Talk Enhanced CI/CD with AWS CDK.
We hope we’ve made the process as straightforward and enjoyable as possible. If you you’ve tried out this solution, and especially if you think we’ve missed something or you have a use case we didn’t cover, we would love to hear from you! Let us know your progress on our GitHub project page.