AWS Developer Tools Blog
.NET Core Lambda Deployment task enhancements in the AWS Tools for VSTS
In the recent version 1.1 update of the AWS Tools for Microsoft Visual Studio Team Services (VSTS), we added some enhancements to the AWS .NET Core Lambda Deployment task. These enhancements are based on user feedback requesting help with CI/CD scenarios, where users wanted their builds to package their AWS Lambda functions or serverless applications, and then perform the actual deployment of the package from their release pipelines. In this blog post, we examine the changes and how you can use them with AWS Lambda functions and serverless applications that are based on .NET Core when building and releasing from VSTS pipelines. First, let’s discuss what we mean by the term “packaging” in these scenarios.
Lambda function and serverless application package artifacts
Knowing the artifacts that are produced during a build of a Lambda function or a serverless application is key to understanding the workflows for having separate packaging (build) and deployment (release) pipelines in VSTS.
For a Lambda function, the packaged artifact produced by the build and used in deployment is a single .zip file containing the built code. This .zip file is uploaded directly to AWS Lambda when the function is deployed, the same as for functions written using other languages supported by the service.
For a serverless application, two packaging artifacts are produced by the build. The first artifact is a .zip file containing the built application code, just as with a Lambda function. The build task automatically uploads this .zip file to a bucket in Amazon S3, staging it for subsequent deployment. The second artifact is a modified copy of the AWS CloudFormation template for the serverless application. In the New Project blueprints that AWS provides for serverless applications, this file is typically named serverless.template. The modification that the build process performs on the source template is to update the properties in the template that point to the code bundle that the build staged for us in Amazon S3. When we subsequently deploy our serverless application, we use the modified template as our deployment artifact, sending it to AWS CloudFormation. We don’t need to consider the .zip file that the build staged for us in S3. The changes the build makes to the template to update the code location properties are done to a copy in your build’s output. The original template in your source code is not modified.

For both Lambda functions and serverless applications, our build pipeline will use the AWS Lambda .NET Core Deployment task to produce the build artifacts we want to subsequently deploy from our release pipeline. In the release pipeline, the tasks we use depend on the packaged artifacts that we will supply as a “drop” by using the VSTS-provided Publish Build Artifacts task. Thus:
- For the .zip file for a Lambda function deployment, we’ll use the general-purpose AWS Lambda Deployment task to submit the code to Lambda.
- For a serverless application, we’ll use the AWS CloudFormation Create/Update Stack task to submit the template.
Let’s now see in detail how to set up our build and release pipelines using these tasks.
Packaging and separately deploying a .NET Core Lambda function
To create a package for deployment of a Lambda function that’s based on .NET Core, we first add the AWS Lambda .NET Core Deployment task to our build pipeline.

After we add the task, we can set about configuring it to produce the packaged artifact (the .zip file of the built code) that will be consumed in our release pipeline. The following image shows that we’ve enabled the package-only option and specified the path and file name of the output .zip file to be created. Notice that I can choose any name I want for the .zip file. It doesn’t have to match the name of the project. I’ve also chosen to place the .zip file into the folder identified by the variable $(Build.ArtifactStagingDirectory) in my build workspace. Finally, as my VSTS project contains multiple source code projects, I’ve specified the folder location of the project to build.

A couple of other things to notice:
- The AWS task handles the
dotnet restore,dotnet buildanddotnet publishoperations you’d expect in a .NET Core build. You do not need to include tasks for these operations. - When we are performing a package-only build the values in the Lambda Function Properties group such as Function Name are ignored and can be left blank. These properties are needed only when deploying the code.
With the task configured to perform the package we now need another task to deliver the build output, shown in the Package-only output file field in the screenshot above, to the release pipeline. We do this using the VSTS-provided Publish Build Artifacts task. I’ve set the logical name of the artifact to be PackagedFunction (some users might also use “drop” to match VSTS terminology). We’ll use the artifact name when we add the release pipeline to link the artifacts from our build pipeline into the release pipeline. Path to Publish must match the output from our Lambda .NET Core Deployment task, $(Build.ArtifactStagingDirectory)\MyPackagedFunction.zip.

Because our build is now ready, we can go ahead and run it to check out our changes. This also causes an initial build artifact to be created and available to us to select in pickers, to save typing, when configuring the deployment task in our release pipeline. Next, we’ll configure the release to complete our setup.
Configuring the release pipeline
With a successful build, we’re ready to configure a release pipeline, linked to our build, to perform the actual deployment of our packaged function code to Lambda. Deployment will be performed using the general-purpose AWS Lambda Deployment task in our release pipeline.
We start by creating a release definition. As my release will only deploy my packaged function to AWS Lambda, I’ve selected to use an empty release definition. The source for my release will be my build pipeline (PackageFunction in the image below) and I want the release to run whenever a build is successfully completed.

In the new release definition, we then add the AWS Lambda Deployment task. If your function is already deployed to Lambda, you can configure the task to perform a “code only” update. You can also elect to perform a code and configuration update (which also handles creation of the function, if it doesn’t exist already). Note that if you choose a code+configuration update, you must also supply the name of the function handler, the role it will run under, and the runtime. This is because the task doesn’t have access to the aws-lambda-tools-defaults.json file in our project that contains these settings (as we’re not copying source code between the build and release pipelines).

The final step is to select our built package, which we can do using the browse button next to Zip File Path. This presents a picker which, if we have linked the output from our build into our release pipeline, we can simply browse to. Note the path shown in the selector: the original build definition name (PackageFunction), followed by the logical name of the artifact we chose in the Publish Build Artifacts task (PackagedFunction), and finally the name of the .zip file we specified in the Lambda .NET Core Deployment task (MyPackagedFunction.zip). Selecting the .zip file will update the Zip File Path field in the task with $(System.DefaultWorkingDirectory)/Package Function/PackagedFunction/MyPackagedFunction.zip (good to know if you hadn’t already run the build and so had no published artifacts to browse to).

That’s all we need to perform packaging from our build pipeline and deployment of the package from our release pipeline. Assuming your release is configured to trigger after a successful build, go ahead and queue the build we configured earlier. Then when the release pipeline is invoked, you’ll see the function code get deployed to Lambda!
Packaging and separately deploying a .NET Core serverless application
Our process for configuring separate packaging and deployment for a serverless application is similar. Recall from the start of this post that our build will automatically upload (stage) our application code to a .zip file in Amazon S3, and the build output that we’ll pass to our release pipeline is the AWS CloudFormation template file defining our serverless resources. This template file is updated to point to our staged .zip file in S3. As a result, in our build pipeline for a serverless application we have the following task configurations.
First, we have the AWS Lambda .NET Core Deployment task to perform our packaging (.zip file upload and updated template output). In this example we’ve chosen to keep the name of the output template to match that in the source code, but we could change it. Note that because the task will upload the built code, we need to set the name of the Amazon S3 bucket that it will be uploaded to. However, we don’t need to set the stack name field, as this is relevant only if the task will do build and deployment.

Second, we have the Publish Build Artifacts task to output the template, again to our build workspace’s staging location:

That’s it for the build pipeline. Again, we can run an initial build so that we can use the file picker when configuring tasks in our release to select the built output (the serverless template file).
In our release pipeline this time we use the AWS CloudFormation Create/Update Stack task because serverless applications are deployed as an AWS CloudFormation stack. You should note the Template Source, which is set to Local file (because we’re consuming the artifact published locally by our build). Template File is then set to the incoming serverless.template artifact. The task will upload this template to S3, so we also specify a bucket name. Finally, when deploying serverless applications to AWS CloudFormation, we must use a change set. We’ve enabled Create or update the stack using a change set, and set a name for the change set. The default behavior for the task is to automatically execute the change set.
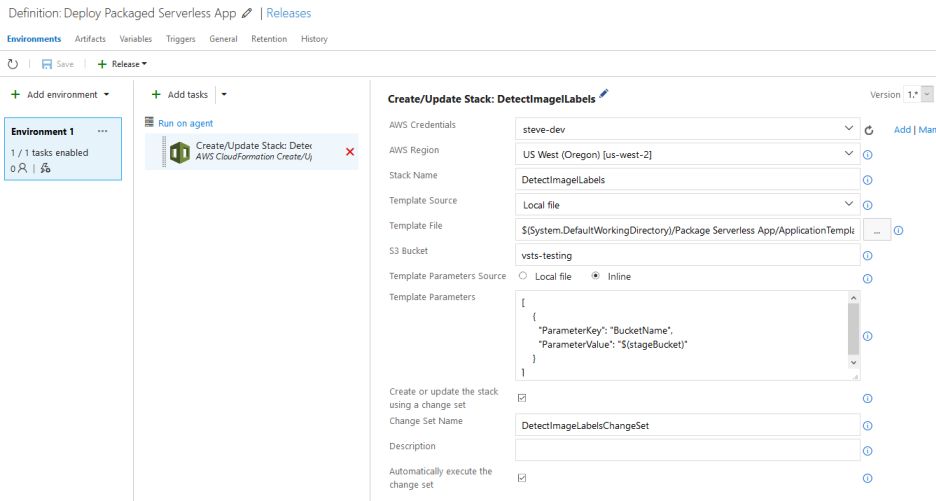
The application we’re deploying here also takes parameters for the template (in this case, the name of an Amazon S3 bucket). In the previous image, you can see how we specify template parameters and, in this case, notice that we’re using a VSTS build variable we’ve associated with the release to supply the bucket name. If we were to also parameterize Stack Name, we’d now be able to perform multiple deployments for different build stages (dev, alpha, gamma, etc.), all consuming a single build input.
Again, assuming we’ve configured our release to run automatically on successful completion of a build, if we now queue a new build, we’ll see our application code get built and uploaded to Amazon S3. The revised template will be published, and then the release we’ve just configured will start and dispatch the template to AWS CloudFormation to perform deployment of our application.
Thanks for the feature requests!
The changes to the AWS Lambda .NET Core Deployment task in version 1.1 were driven by user requests for a more flexible way to handle packaging in build pipelines, and deployments from release pipelines. We hope you enjoy the new flexibility. As always, feel free to send feature requests, bug reports, or other questions to our GitHub repository for the tools!