AWS DevOps Blog
Creating CI/CD pipelines for ASP.NET 4.x with AWS CodePipeline and AWS Elastic Beanstalk
By Kirk Davis, Specialized Solutions Architect, Microsoft Platform team
As customers migrate ASP.NET (on .NET Framework) applications to AWS, many choose to deploy these apps with AWS Elastic Beanstalk, which provides a managed .NET platform to deploy, scale, and update the apps. Customers often ask how to create CI/CD pipelines for these ASP.NET 4.x (.NET Framework) apps without needing to set up or manage Jenkins instances or other infrastructure.
You can easily create these pipelines using AWS CodePipeline as the orchestrator, AWS CodeBuild for performing builds, and AWS CodeCommit, GitHub, or other systems for source control. This blog post demonstrates how to set up a simplified CI/CD pipeline that you could expand on later to include unit tests, using a CodeCommit Git repository for source control.
Update: Microsoft is no longer publishing the .NET Framework 4.7.x SDK container images, per the GitHub issue page here. This means that a February 2020 security update for Windows Server container hosts, which requires updates to the Windows Server container images that run on them, breaks the CodeBuild step in this blog, because AWS CodeBuild’s underlying Windows Server hosts have been patched, but the .NET Framework 4.7.2 SDK container image has not (and will not be). Per the advice from the GitHub issue linked above, the .NET Framework SDK 4.8 image tag should be used instead. The steps in the blog below have been updated to reflect this.
Creating a project and adding a buildspec.yml file
The first step in setting up this simplified CI/CD pipeline is to create a project and add a buildspec.yml file.
Creating or choosing an ASP.NET web application (.NET Framework)
First, either create a new ASP.NET Web Application (.NET Framework) project or choose an existing application to use. You can choose MVC, Web API, or even Web Forms project types based on ASP.NET 4.x. Whichever type you choose, make sure it builds and runs locally.
To set up your first CodePipeline for an ASP.NET (.NET Framework) application, you may wish to use a simple app that doesn’t require databases or other resources and which consists of a single project. The following screenshot shows the project type to choose when you create a new project in Visual Studio 2019.
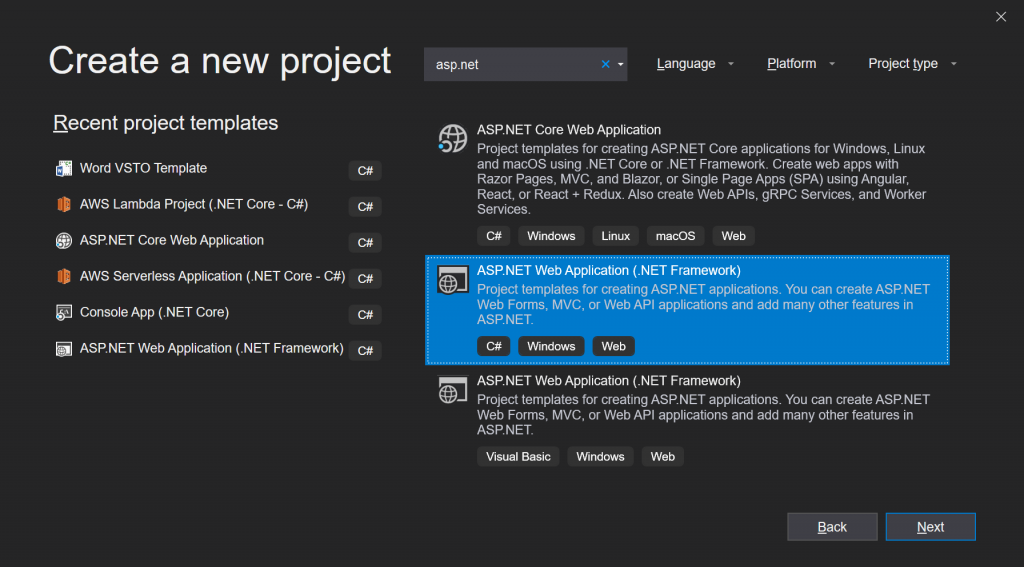
Visual Studio Create New Project dialog
Adding the project to CodeCommit
Next, add your project to a CodeCommit Git repository. You can either create a new repository in the CodeCommit web console and then add your new or legacy application to it by following the steps in the CodeCommit documentation or create the new repository from within Visual Studio’s Team Explorer by taking advantage of AWS Toolkit for Visual Studio’s integration with CodeCommit.
If you wish to use Team Explorer to create and interact with the CodeCommit Git repository for your project, follow Step 2 in the Integrate Visual Studio with AWS CodeCommit documentation to create the connection, and then follow the steps under Create a CodeCommit Repository from Visual Studio in the same section. Alternatively, you can work with Git from the command line.
You can reduce the number of files being stored in Git by adding a .gitignore file specific to .NET projects using Visual Studio’s Team Explorer:
- Choose the Home icon in the Team Explorer toolbar.
- Choose Settings, then Repository Settings.
- Choose the Add option for Ignore file under Ignore & Attributes Files, as shown in the following screenshot.

Team Explorer – Repository Settings
After adding a .gitignore file and optionally connecting Visual Studio to CodeCommit, push your code up to the remote in CodeCommit using either git push or Team Explorer. After pushing your changes, you can use the CodeCommit management console in your browser to verify that all your files are there.
Adding a buildspec.yml file to your project
CodeBuild, which does the actual compilation, essentially launches a container using a docker image you specify, then runs a series of commands to install any required software and perform the actual build or tests that you want. Finally, it takes whatever output files you specify—artifacts—and uploads them in a .zip file to Amazon S3 for the next stage of the CodePipeline pipeline. The commands that CodeBuild executes in the container are specified in a buildspec.yml file, which is part of the source code of your project. You can also add it directly to the CodeBuild configuration, but it’s more convenient to edit and track in source control. When running CodeBuild with Windows containers, the default shell for these commands is PowerShell.
Add a plain text file to the root of your ASP.NET project named buildspec.yml and then open the file in an editor. Ensure you add the file to your project to easily find and edit it later. For details on the structure and contents of buildspec.yml files, refer to the CodeBuild documentation.
You can use the following sample buildspec.yml file and simply replace the values for PROJECT and DOTNET_FRAMEWORK with the name and .NET Framework target version for your project.
version: 0.2

env:
  variables:
    PROJECT: AspNetMvcSampleApp
    DOTNET_FRAMEWORK: 4.6.1
phases:
  build:
    commands:
      - nuget restore
      - msbuild $env:PROJECT.csproj /p:TargetFrameworkVersion=v$env:DOTNET_FRAMEWORK /p:Configuration=Release /p:DeployIisAppPath="Default Web Site" /p:PackageAsSingleFile=false /p:OutDir=C:\codebuild\artifacts\ /t:Package
artifacts:
  files:
    - '**/*'
  base-directory: 'C:\codebuild\artifacts\_PublishedWebsites\${env:PROJECT}_Package\Archive\'
Walkthrough of the buildspec commands
Looking at the buildspec.yml file above, you can see that the only phase defined for this sample application is build. If you need to perform some action either before or after the build, you can add pre_build and post_build phases.
The first command executed in the build phase is nuget restore to download any NuGet packages your project references. Then, MS build kicks off the build itself. Using the /t:Package parameter generates the web deployment folder structure that Elastic Beanstalk expects for ASP.NET Framework applications, and includes the archive.xml, parameters.xml, and systemInfo.xml files.
By default, the output of this type of build is a .zip file. However, when used in conjunction with CodePipeline, CodeBuild always zips up the artifact files that you specify, even if they’re already zipped. To avoid this double zipping, use the /p:PackageAsSingleFile=false parameter, which outputs the folder structure in a folder called Archive instead. The /p:OutDir parameter specifies where MSBuild should write the files. This example uses C:\codebuild\artifacts\.
Finally, in the artifacts node, specify which files (or artifacts) CodeBuild should compress and provide to CodePipeline. The sample above includes all the files (the ‘**/*’) in the C:\codebuild\artifacts\_PublishedWebsites\${env:PROJECT}_Package\Archive\ folder, in which ${env:PROJECT} is automatically replaced by the value of the variable for the project name specified at the top of the file.
After you finish editing the buildspec.yml file, commit and push your changes to ensure the file is in your CodeCommit Git repository.
Create an Elastic Beanstalk application and initial deployment
The CodePipeline deployment provider for Elastic Beanstalk deploys to an existing Elastic Beanstalk application environment. So before you build out your pipeline, manually deploy your application and create the destination application and environment in Elastic Beanstalk. The easiest way to do this is using the AWS Toolkit for Visual Studio. If you don’t have it installed, use the Visual Studio Extensions tool to search for aws and install the toolkit.
Once it’s installed, open your project in Visual Studio, right-click the project node in the Solutions Explorer pane, and choose Publish to AWS Elastic Beanstalk. This launches the publish wizard.
For step-by-step instructions on using the publishing wizard, see Deploy a Traditional ASP.NET Application to Elastic Beanstalk.
Once the publish wizard has finished deploying to Elastic Beanstalk, you should see the URL in the Elastic Beanstalk environment pane in Visual Studio, as shown in the following screenshot.
Alternately, you can navigate to the Elastic Beanstalk management console in your browser, select your application and environment, and see the URL in the environment dashboard. Verify that your application is viewable in your browser.
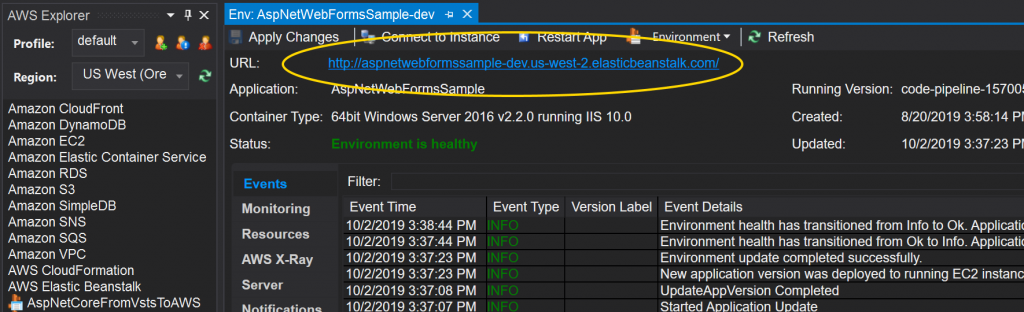
AWS Toolkit – Elastic Beanstalk Environment
Creating the CI/CD pipeline
Next, create the CodePipeline pipeline.
Adding the source stage
Now that your source code is in CodeCommit, and you have an existing Elastic Beanstalk app, create your pipeline:
- In your browser, navigate to the CodePipeline management console.
- Choose Create pipeline and give your pipeline a name. To keep things simple, you might want to use the same name as your CodeCommit repo.
- Choose Next.
- Under Source, choose CodeCommit.
- Select your repository name from the drop-down, and choose the branch you wish to use. If you haven’t added any branches, your only choice will be the master branch.
Creating the build stage
Next, create the build stage:
- After choosing Next, select AWS CodeBuild as the build provider.
- Select your region, then choose Create project, which will open CodeBuild in another browser window.
- In the CodeBuild window, you can optionally assign your build project a name and description.
- Under Environment, select the Custom image option, and select Windows as the environment type.
- For building ASP.NET 4.x (.NET Framework) web projects, it’s easiest to start out with Microsoft’s .NET Framework SDK docker image, which they host on their registry.
Select Other registry, and use mcr.microsoft.com/dotnet/framework/sdk:[version-tag] as the registry URL. Replace version-tag with the .NET framework version. For .NET Framework 4.x, the most likely options are 4.7.1, 4.7.2 or 4.8. This example uses mcr.microsoft.com/dotnet/framework/sdk:4.7.2.
UPDATE: The 4.7.x container images are no longer being published or updated. Use the 4.8 version tag instead, as shown below. See the “Update” notice at the top of this blog for more details.
mcr.microsoft.com/dotnet/framework/sdk:4.8
For details about the .NET Framework SDK container image, see the container image page on Dockerhub. The SDK includes the Visual Studio Build Tools, the NuGet CLI, and ASP.NET Web Targets.
Next, choose a group name for Amazon CloudWatch logs under Logs (near the bottom of the page). This will output detailed build logs for each build to CloudWatch. Leave the rest of the settings as they are.
Then choose Continue to CodePipeline to save the CodeBuild configuration and return to the CodePipeline wizard’s Add build stage step. Ensure your newly created build project is specified in Project name, then choose Next.
Adding the deploy stage
In the Add deploy stage step:
- Select AWS Elastic Beanstalk as the Deploy provider.
- Select your region.
- In the Application name field, select the Elastic Beanstalk application you previously deployed.
- Select the environment you previously deployed and choose Next.
- Review all your settings and choose Create pipeline.
Testing out the pipeline
To test out your pipeline, make an easily visible change to your application’s code, such as adding some text to the home page. Then, commit your changes and push.
Within a few moments, the Source stage in your pipeline should move to in progress, followed by the Build stage. It can take 10 minutes or more for the build stage to complete, and then the Deploy stage should finish quickly.
After the Deploy stage status changes to Succeeded, choose AWS Elastic Beanstalk in that stage in the pipeline view, as shown in the following screenshot, to navigate to your Elastic Beanstalk application.
Select the environment to which you’re deploying and select the URL. You should see that your changes are now live.
After a successful build and deploy, your pipeline should appear as it does in the following screenshot.
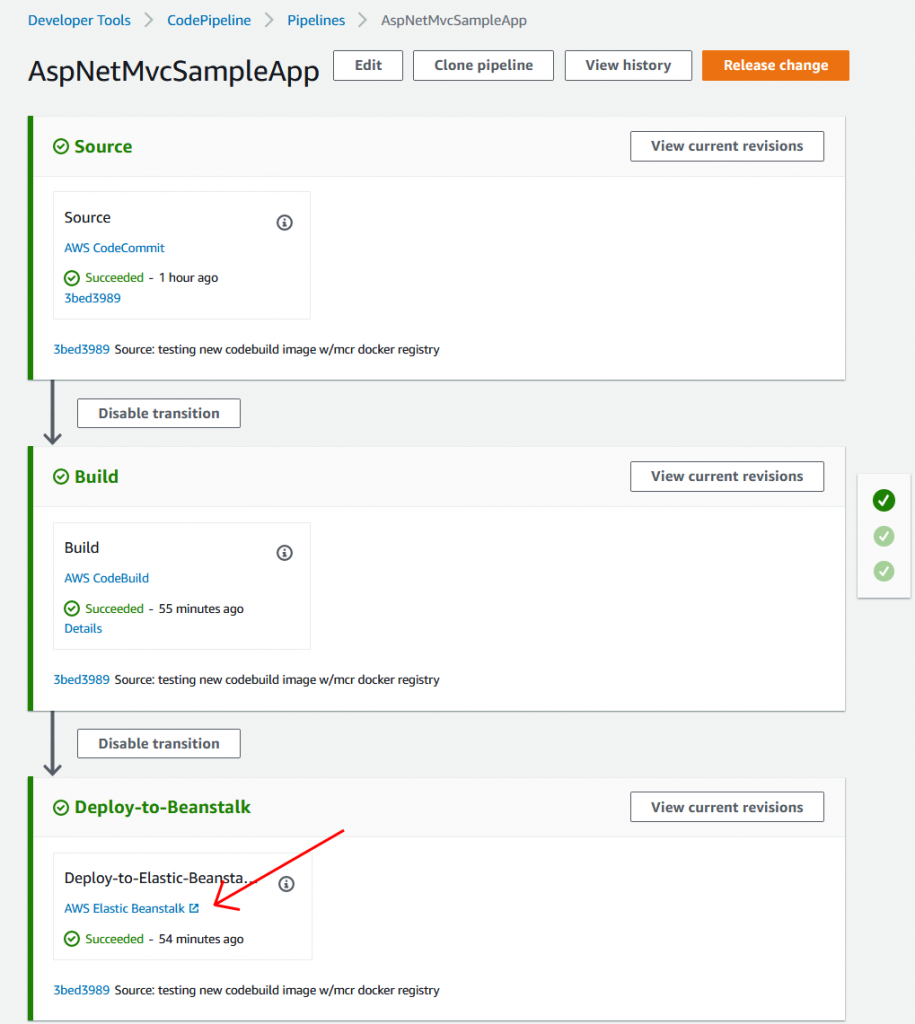
Screenshot of successful CodePipeline pipeline
Conclusion
In this blog post, I showed you how to create a simple CI/CD pipeline for ASP.NET 4.x web applications, built with the .NET Framework, using AWS services including CodeCommit, CodePipeline, CodeBuild and Elastic Beanstalk. You can extend this pipeline with additional build actions for things like unit tests, or by adding manual approval steps.
We welcome your feedback.