AWS DevOps Blog
Scalable agile development practices based on AWS CodeCommit
Development teams use agile development processes based on Git services extensively. AWS provides AWS CodeCommit, a managed, Git protocol-based, secure, and highly available code service. The capabilities of CodeCommit combined with other developer tools, like AWS CodeBuild and AWS CodePipeline, make it easy to manage collaborative, scalable development process with fine-grained permissions and on-demand resources.
You can manage user roles with different AWS Identity and Access Management (IAM) policies in the code repository of CodeCommit. You can build your collaborative development process with pull requests and approval rules. The process described in this post only requires you to manage the developers’ role, without forking the source repository for individual developers. CodeCommit pull requests can integrate numerous code analysis services as approvers to improve code quality and mitigate security vulnerabilities, such as SonarQube static scanning and the ML-based code analysis service Amazon CodeGuru Reviewer.
The CodeCommit-based agile development process described in this post has the following characteristics:
- Control permissions of the CodeCommit repository via IAM.
- Any code repository has at least two user roles:
- Development collaborator – Participates in the development of the project.
- Repository owner – Has code review permission and partial management permissions of the repository. The repository owner is also the collaborator of the repository.
- Both development collaborator and owner have read permissions of the repository and can pull code to local disk via the Git-supported protocols.
- The development collaborator can push new code to branches with a specific prefix, for example,
features/orbugs/. Multiple collaborators can work on a particular branch for one pull request. Collaborators can create new pull requests to request merging code into the main branch, such as themainlinebranch. - The repository owner has permission to review pull requests with approval voting and merge pull requests.
- Directly pushing code to the main branch of repository is denied.
- Any code repository has at least two user roles:
- Development workflow. This includes the following:
- Creating an approval template rule of CodeCommit that requires at least two approvals from the sanity checking build of the pull request and repository owner. The workflow also applies the approval rule to require mandatory approvals for pull requests of the repository.
- The creation and update of source branch events of pull requests via Amazon EventBridge triggers a sanity checking build of CodeBuild to compile, test, and analyze the pull request code. If all checks pass, the pull request gets an approval voting from the sanity checking build.
- Watching the main branch of the repository triggers a continuous integration for any commit. You can continuously publish artifacts of your project to the artifact repository or integrate the latest version of the service to your business system.
This agile development process can use AWS CloudFormation and AWS Cloud Development Kit (AWS CDK) to orchestrate AWS resources with the best practice of infrastructure as code. You can manage hundreds of repositories in your organization and automatically provision new repositories and related DevOps resources from AWS after the pull request of your IaC as a new application is approved. This makes sure that you’re managing the code repository and DevOps resources in a secure and compliant way. You can use it as a reference solution for your organization to manage large-scale R&D resources.
Solution overview
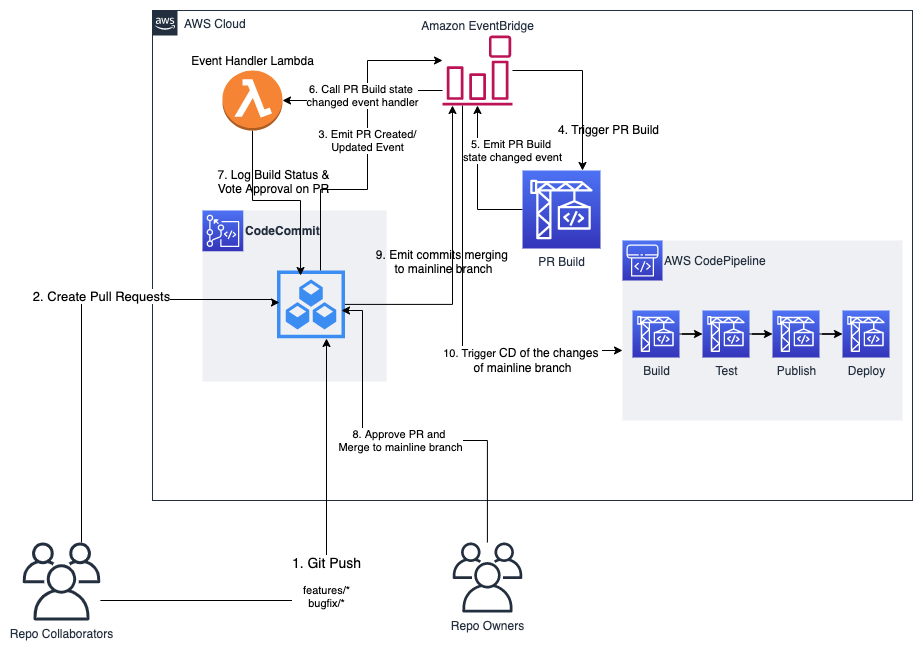
In the following use case, you’re working on a Java-based project AWS Toolkit for JetBrains. This application has developers that can submit code via pull requests. Each pull request is automatically checked and validated by CodeBuild builds. The owners of the project can review the pull request and merge it to the main branch. The code submitted to the main branch triggers the continuous integration to build the project artifacts.
The following diagram illustrates the components built in this post and their role in the DevOps process.
Prerequisites
For this walkthrough, you should meet the following prerequisites:
- Have an AWS account
- Have a Git client or an IDE that has Git support
- Install Node.js LTS version, for example, 12.x
- Install Docker Engine
- Install AWS Command Line Interface (AWS CLI) and configure it
Preparing the code
Clone the sample code from the Github repo with your preferred Git client or IDE and view branch aws-toolkit-jetbrains, or download the sample code directly and unzip it into an empty folder.
Initializing the environment
Open the terminal or command prompt of your operating system, enter the directory where the sample code is located, enter the following code to initialize the environment, and install the dependency packages:
npm run initDeploying application
After successfully initializing the AWS CDK environment and installing the dependencies of the sample application, enter the following code to deploy the application:
npm run deployBecause the application creates the IAM roles and policies, AWS CDK requires you to confirm security-related changes before deploying it. You see the following outputs from the command line.

Enter y to confirm the security changes, and AWS CDK begins to deploy the application. After a few minutes, you see output similar to the following code, indicating that the application stack has been successfully deployed in your AWS account:
✅  CodecommitDevopsModelStack

Outputs:
CodecommitDevopsModelStack.Repo1AdminRoleOutput = arn:aws:iam::012345678912:role/codecommitmodel/CodecommitDevopsModelStack-Repo1AdminRole0648F018-OQGKZPM6T0HP
CodecommitDevopsModelStack.Repo1CollaboratorRoleOutput = arn:aws:iam::012345678912:role/codecommitmodel/CodecommitDevopsModelStac-Repo1CollaboratorRole1EB-15KURO7Z9VNOY

Stack ARN:
arn:aws:cloudformation:ap-southeast-1:012345678912:stack/CodecommitDevopsModelStack/5ecd1c50-b56b-11ea-8061-020de04cec9a
As shown in the preceding code, the output of successful deployment indicates that the ARN of two IAM roles were created on behalf of the owner and development collaborator of the source code repository.
Checking deployment results
After successfully deploying the app, you can sign in to the CodeCommit console and browse repositories. The following screenshot shows three repositories.

For this post, we use three repositories to demonstrate configuring the different access permissions for different teams in your organization. As shown in the following screenshot, the repository CodeCommitDevopsModelStack-MyApp1 is tagged to grant permissions to the specific team abc.

The IAM roles for the owner and development collaborator only have access to the code repository with the following tags combination:
{
 'app': 'my-app-1',
 'team': 'abc',
}
Configuring CodeCommit repository access on behalf of owner and collaborator
Next, you configure the current user to simulate the owner and development collaborator via IAM’s AssumeRole.
Edit the AWS CLI profile file with your preferred text editor and add the following configuration lines:
[profile codecommit-repo1-owner]

role_arn = <the ARN of owner role after successfully deploying sample app>

source_profile = default

region = ap-southeast-1

cli_pager=

[profile codecommit-repo1-collaborator]

role_arn = <the ARN of collaborator role after successfully deploying sample app>

source_profile = default

region = ap-southeast-1

cli_pager=
Replace the role_arn in the owner and collaborator sections with the corresponding output after successfully deploying the sample app.
If the AWS CLI isn’t using the default profile, replace the value of source_profile with the profile name you’re currently using.
Make the region consistent with the value configured in source_profile. For example, this post uses ap-southeast-1.
After saving the modification of the profile, you can test this configuration from the command line. See the following code:
export AWS_DEFAULT_PROFILE=codecommit-repo1-owner # assume owner role of repository

aws sts get-caller-identity # get current user identity, you should see output like below,
{
    "UserId": "AROAQP3VLCVWYYTPJL2GW:botocore-session-1587717914",
    "Account": "0123456789xx",
    "Arn": "arn:aws:sts::0123456789xx:assumed-role/CodecommitDevopsModelStack-Repo1AdminRole0648F018-1SNXR23P4XVYZ/botocore-session-1587717914"
}

aws codecommit list-repositories # list of all repositories of AWS CodeCommit in configured region
{
    "repositories": [
        {
            "repositoryName": "CodecommitDevopsModelStack-MyApp1",
            "repositoryId": "208dd6d1-ade4-4633-a2a3-fe1a9a8f3d1c "
        },
        {
            "repositoryName": "CodecommitDevopsModelStack-MyApp2",
            "repositoryId": "44421652-d12e-413e-85e3-e0db894ab018"
        },
        {
            "repositoryName": "CodecommitDevopsModelStack-MyApp3",
            "repositoryId": "8d146b34-f659-4b17-98d8-85ebaa07283c"
        }
    ]
}

aws codecommit get-repository --repository-name CodecommitDevopsModelStack-MyApp1 # get detail information of repository name ends with MyApp1
{
    "repositoryMetadata": {
        "accountId": "0123456789xx",
        "repositoryId": "208dd6d1-ade4-4633-a2a3-fe1a9a8f3d1c",
        "repositoryName": "CodecommitDevopsModelStack-MyApp1",
        "repositoryDescription": "Repo for App1.",
        "lastModifiedDate": "2020-06-24T00:06:24.734000+08:00",
        "creationDate": "2020-06-24T00:06:24.734000+08:00",
        "cloneUrlHttp": "https://git-codecommit.ap-southeast-1.amazonaws.com/v1/repos/CodecommitDevopsModelStack-MyApp1",
        "cloneUrlSsh": "ssh://git-codecommit.ap-southeast-1.amazonaws.com/v1/repos/CodecommitDevopsModelStack-MyApp1",
        "Arn": "arn:aws:codecommit:ap-southeast-1:0123456789xx:CodecommitDevopsModelStack-MyApp1"
    }
}

aws codecommit get-repository --repository-name CodecommitDevopsModelStack-MyApp2 # try to get detail information of repository MyApp2 that does not have accessing permission by the role

An error occurred (AccessDeniedException) when calling the GetRepository operation: User: arn:aws:sts::0123456789xx:assumed-role/CodecommitDevopsModelStack-Repo1AdminRole0648F018-OQGKZPM6T0HP/botocore-session-1593325146 is not authorized to perform: codecommit:GetRepository on resource: arn:aws:codecommit:ap-southeast-1:0123456789xx:CodecommitDevopsModelStack-MyApp2
You can also grant IAM policies starting with CodecommitDevopsmodelStack-CodecommitCollaborationModel to existing IAM users for the corresponding owner or collaborator permissions.
Initializing the repository
The new code repository CodecommitdevopsmodelStack-MyApp1 is an empty Git repository without any commit. You can use the AWS Toolkit for JetBrains project as the existing local codebase and push the code to the repository hosted by CodeCommit.
Enter the following code from the command line:
export AWS_DEFAULT_PROFILE=codecommit-repo1-owner # assume owner role of repository

git clone https://github.com/aws/aws-toolkit-jetbrains.git # clone aws-toolkit-jetbrains to local as existing codebase

cd aws-toolkit-jetbrains

git remote add codecommit codecommit::ap-southeast-1://CodecommitDevopsModelStack-MyApp1 # add CodeCommit hosted repo as new remote named as codecommit. Follow the doc set up AWS CodeCommit with git-remote-codecommit, or use remote url of repository via https/ssh protocol

git push codecommit master:init  # push existing codebase to a temporary branch named 'init'

aws codecommit create-branch --repository-name CodecommitDevopsModelStack-MyApp1 --branch-name master --commit-id `git rev-parse master` # create new branch 'master'

aws codecommit update-default-branch --repository-name CodecommitDevopsModelStack-MyApp1 --default-branch-name master # set branch 'master' as main branch of repository

aws codecommit delete-branch --repository-name CodecommitDevopsModelStack-MyApp1 --branch-name init # clean up 'init' branch
Agile development practices
For this use case, you act as the collaborator of the repository implementing a new feature for aws-toolkit-jetbrains, then follow the development process to submit your code changes to the main branch.
Enter the following code from the command line:
export AWS_DEFAULT_PROFILE=codecommit-repo1-collaborator # assume collaborator role of repository

# add/modify/delete source files for your new feature

git commit -m 'This is my new feature.' -a

git push codecommit HEAD:refs/heads/features/my-feature # push code to new branch with prefix /features/

aws codecommit create-pull-request --title 'My feature "Short Description".' --description 'Detail description of feature request'  --targets repositoryName=CodecommitDevopsModelStack-MyApp1,sourceReference=features/my-feature,destinationReference=master # create pull request for new feature
The preceding code submits the changes of the new feature to a branch with the prefix features/ and creates a pull request to merge the change into the main branch.
On the CodeCommit console, you can see that a pull request called My feature "Short Description". created by the development collaborator has passed the sanity checking build of the pull request and gets an approval voting (it takes about 15 minutes to complete the checking build in this project).

The owner of the repository also needs to review the pull request with one approval at least, then they can merge the repository to the main branch. The pull request on the CodeCommit console supports several code review features, such as change comparison, in-line comments, and code discussions. For more information, see Using AWS CodeCommit Pull Requests to request code reviews and discuss code. The following screenshot shows the review tool on the CodeCommit console, on the Changes tab.

The following screenshot shows the approval details of the pull request, on the Approvals tab.

When browsing the continuous integration deployment project after merging the pull request, you can see that a new continuous integration build has been triggered by the event of merging the pull request to the main branch.

Cleaning up
When you’re finished exploring this use case and discovering the deployed resources, the last step is to clean up your account. The following code deletes all the resources you created:
npm run cleanupSummary
This post discussed agile development practices based on CodeCommit, including implementation mechanisms and practice processes, and demonstrated how to collaborate in development under those processes. AWS powers the code that manages the code repository itself and the DevOps processes built around it in the example application. You can use the IaC capability of AWS and apply those practices in your organization to build compliant and secure R&D processes.