AWS for Games Blog
Creating a Battle Royale Game Using Unity and Amazon GameLift
Multiplayer battle royale games are getting big, and I don’t just mean in terms of sales! Pitting dozens to hundreds of players against each other to be the last one standing, these games are all the rage. In fact, according to a recent survey, over 40% of gamers in the US played a battle royale in the last year (source).
Amazon GameLift recently introduced new features to FlexMatch so you can bring automatic scaling and matchmaking functionality to large games like these.
Today, we’re happy to bring you a ready-to-use game sample called Ultra Frog Royale to help you get started and you can find here it on GitHub.
![]()
Ultra Frog Royale is an 80 player, last frog hopping game developed in Unity that shows you how to easily integrate and use the latest large match capabilities of GameLift. Ultra Frog Royale is a simple game where you skim your frog around the pond and try to grab other frogs with your tongue. If you catch them you gain size based on the size of the frog you catch, but you also become a bigger target. The last frog standing wins the game.
To help you get started, I’ve outlined some of the main differences from the standard FlexMatch and steps you’ll need to take to integrate your Unity game with GameLift.
Throughout this article I’ll refer to another walkthrough guide on using GameLift Realtime Servers. Many of the steps outlined in that article are the same steps you’ll need to take for this sample, though there are some differences that are pointed out below.
At the time of writing, this sample uses UNet, the deprecated Unity multiplayer system, as the new multiplayer system is still in alpha. Therefore, to build and run this sample, you’ll need to have the 2018.4 LTS version of the Unity editor. Also please note that for the purposes of the demo, the maximum number is players is limited to 80. More information can be found in this article.

Unity code supporting GameLift
First, you’ll need to prepare your game server to respond to GameLift callbacks. This will allow you to upload a build of your server to GameLift and create a fleet for your game. You’ll find a step by step guide to preparing and uploading your server here.
For this game, we’ll be capturing game session changes triggered by automatic backfill. This addition is not covered in the above guide. You need to make an addition to the ProcessParameters sent to GameLiftServerAPI.ProcessReady, adding a callback delegate for UpdateGameSession:
var processParams = new ProcessParameters(
                (gameSession) =>
                {
                    // onStartGameSession callback
                    GameLiftServerAPI.ActivateGameSession();
                },
                // Added UpdateGameSession delegate
                (updateGameSession) =>
                {

                },
                () =>
                {
                    // onProcessTerminate callback
                    GameLiftServerAPI.ProcessEnding();
                },
                () =>
                {
                    // healthCheck callback
                    return true;
                },
                LISTEN_PORT,
                new LogParameters(new List<string>()
                {
                    "/local/game/logs/myserver.log"
                })
            );
Implementing those callbacks will get your server GameLift ready. For clarity and simplicity in this sample most of the callbacks remain default. These callbacks are where you’d typically manage adding players to the client and triggering gameplay to start.
For the client, we need to add code to call our client service. The call uses Amazon Cognito anonymous authentication and AWS Lambda invoke, and follows very similar steps to the GameLift Realtime server guide. The only change is passing a list of player latencies and a player skill level to the Lambda.
var payload = JsonUtility.ToJson(lambdaParamters);
AmazonLambdaClient client = new AmazonLambdaClient(credentials, RegionEndpoint.USEast1);
InvokeRequest request = new InvokeRequest
{
    FunctionName = "ConnectClientToServer",
    InvocationType = InvocationType.RequestResponse,
    Payload = payload;
};
The list of latencies is gathered by pinging each AWS region where you’re considering placing a GameLift fleet. The endpoints for all of the regions can be found here.
Note: To simplify the demo, I allow the player to select their skill level from the client. In the real world, you would authenticate players and retrieve their data, including skill level, from a database using services like Amazon Cognito and Amazon DynamoDB. This information would then be directly queried by the client service rather than being sent from the game client.
Once you’d added code to integrate GameLift in to the server and client, you’ll build the server. In the Unity Build Settings dialog, check the “Server Build” box before building.
At this point you can also build the client. I’d recommend building them to different folders so they don’t overwrite one another.
Upload the server executable to GameLift using the AWS command line interface, which is required for uploading custom servers directly to the service. Here’s the command I used to upload the Unity server:
Setting up GameLift
Here you are going to set up your game server fleets, queues, and matchmaking. To do that, open the GameLift console and you’ll be presented with a handy checklist. To enable large match support, there are some unique steps.
I chose to use c4.large instance types for my fleet as they are included with the AWS free tier, and the demo game is so lightweight they handle the game very well, even with 80 players.
When setting up your fleet, make sure you choose UDP as the protocol, as that is what UNet uses to communicate between the client and server. Set your port range as needed. For this demo we use 7777-7778. Set the default IP address range of 0.0.0.0/0. This allows GameLift to manage the IP address for you.
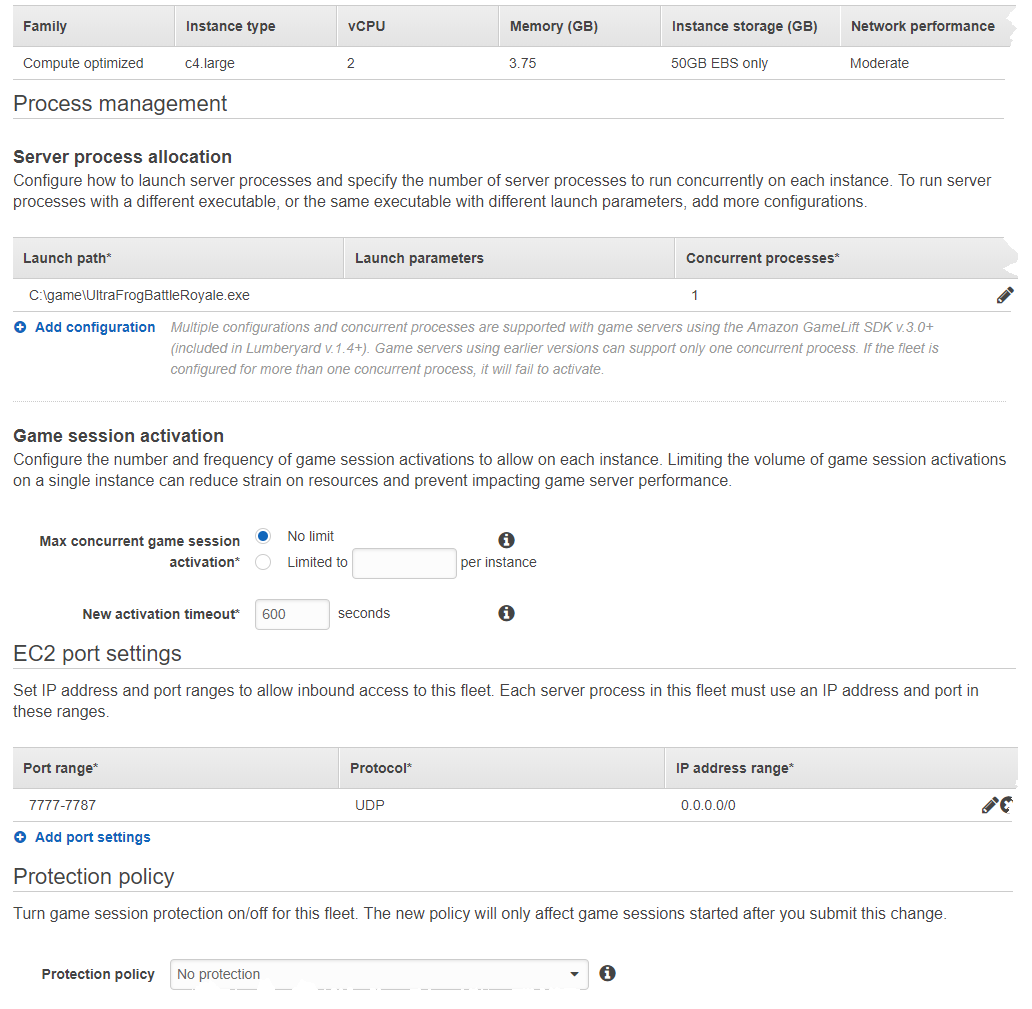
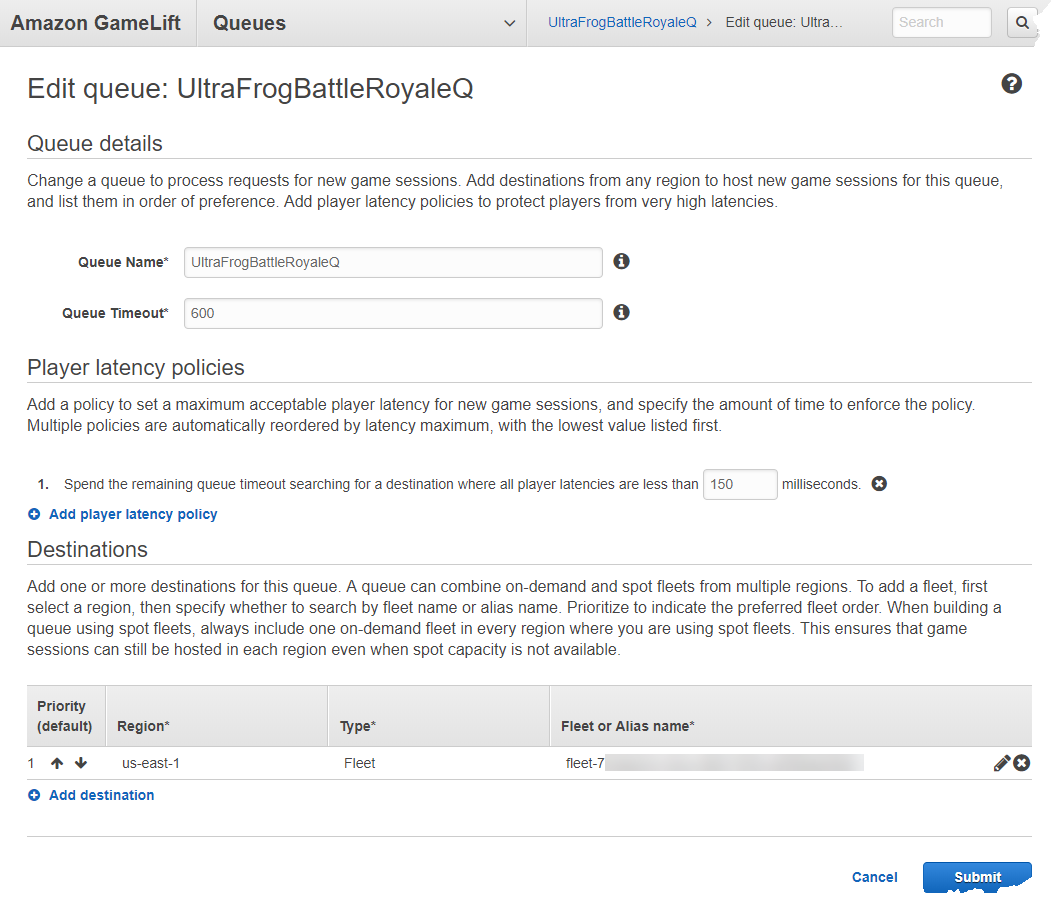
FlexMatch requires the use of a GameLift queue. You can create one now that you’ve got your fleet up and running. For the sake of the demo, don’t worry about implementing auto-scaling or multi-region.
Next, create the matchmaking rule set and configuration. You can find the rule set in the AWS folder of the demo project.
The rules for Ultra Frog Royale aren’t very different from the example in the GameLift documentation. As the game is a free for all, only one team is formed. The rules allow a maximum of 80 players, and minimum of 50 to start a match. Then, every 5 seconds the amount of players needed to start is eased, eventually reaching a very small number so that it’s easy to test multiple connections from one computer. You don’t want to have to open 80 game clients every time you want to test!
{
    "name" : "UltraFrogBattleRoyaleFreeForAll-debug",
    "ruleLanguageVersion" : "1.0",
    "playerAttributes" : [{
        "name" : "skill",
        "type" : "number"
    }],
    "algorithm" : {
        "balancedAttribute" : "skill",
        "strategy" : "balanced",
        "batchingPreference": "largestPopulation"
    },
    "teams" : [{
        "name": "allplayers",
        "maxPlayers" : 80,
        "minPlayers" : 50
    }],
    "rules" : [{
        "name" : "low-latency",
        "description" : "Sets maximum acceptable latency",
        "type" : "latency",
        "maxLatency" : 300
    }],
    "expansions" : [{
        "target" : "teams[allplayers].minPlayers",
        "steps" : [{
            "waitTimeSeconds" : 10,
            "value" : 40
        } , {
            "waitTimeSeconds" : 15,
            "value" : 25
        } , {
            "waitTimeSeconds" : 20,
            "value" : 10
        } , {
            "waitTimeSeconds" : 25,
            "value" : 3
        }]
    }]
}
The matchmaking configuration is fairly straightforward. It has a 10-minute timeout (which coincides nicely with how long a Lambda will run), doesn’t need player acceptance (whatever game you’re matched to is what you get), and enables automatic backfill mode. Don’t miss that last setting, it’s at the bottom of the page.

Creating the client service
Now you need to make a small client service that can be called by the game client to make a match.
Creating this client service is very similar to steps in the GameLift Reatltime server guide (look at Step 2: The glue between your game and GameLift.) You create Lambda, set up IAM roles to support it, and configure Amazon Cognito to allow anonymous authentication for calls to the service Lambda.
However, there are a few differences. First, the GameLift actions for matchmaking, at the time of this writing, don’t show up in the IAM visual editor so you’ll need to add them manually. You can either do this through the visual editors manual control, or you can switch to the JSON tab and use this configuration (also found in the AWS folder in the sample):
{
    "Version": "2012-10-17",
    "Statement": [{
        "Sid": "VisualEditor0",
	  "Effect": "Allow",
	  "Action": [
	      "gamelift:StopMatchmaking",
	      "gamelift:DescribeMatchmaking",
	      "gamelift:StartMatchmaking",
	      "gamelift:AcceptMatch"
	  ],
	  "Resource": "*"
    }]
}
The client service code is also different, though it shares some common themes.
Note: At the time of this writing, Node.JS 10.x is the default language for Lambda’s using JavaScript. I found that the required UUID library wasn’t part of the 10.x runtime, so I switched to Node.JS 8.
The client service looks like the following, and can also be found in the AWS folder of the demo project:
const uuid = require('uuid');
const AWS = require('aws-sdk');
const GameLift = new AWS.GameLift({region: 'us-east-1'});

const UltraFrogBattleQueueID = 'UltraFrogBattleRoyaleQ';
const MaxPlayersPerSession = 80;
const MaxDescribeAttempts = 12; // this will allow 2 minutes for matchmaking with a 10 second sleep

const sleep = delay => new Promise(result => setTimeout(result, delay));

exports.handler = async (event) => {
    let response;
    let raisedError = false;
    const latencyMap = event.latencyMap;    // map of AWS regions to latency
    const playerSkill = event.playerSkill;

    await GameLift.startMatchmaking({
            ConfigurationName: "UltraFrogBattleRoyaleMatching",
            Players: [{
                "LatencyInMs" : latencyMap,
                "PlayerId" : uuid.v4(),
                "PlayerAttributes" : {
                    "skill" : {
                        "N" : playerSkill.toString()
                    }
                }
            }]
        }).
        promise().then(data => {
            response = data.MatchmakingTicket;
        }).
        catch(err => {
            raisedError = true;
            response = err;
        });

    if(raisedError) {
        return response;
    }

    if(response.Status == "FAILED" || response.Status == "CANCELLED" || response.Status == "TIMED_OUT") {
        return response;
    }

    let ticketId = [response.TicketId];

    console.log("Got ticket id: " + ticketId.toString());

    let attempts = 0;
    let foundSession = false;
    while(!raisedError && !foundSession) {
        attempts++;
        console.log("describeMatchmaking attempt #" + attempts);
        await GameLift.describeMatchmaking({
            TicketIds: [ticketId.toString()]
        }).
        promise().then(data => {
            response = data.TicketList[0];    // only 1 ticket requested
            console.log("Matchmaking request status: " + response);
            if(response.Status == "COMPLETED") {
                console.log("** Status COMPLETED **\n");
                foundSession = true;
            } else if(response.Status == "FAILED" || response.Status == "CANCELLED" || response.Status == "TIMED_OUT") {
                console.log("** Status " + response.Status.toString() + " **\n");
                raisedError = true;
            }
        }).
        catch(err => {
            raisedError = true;
            response = err;
        });

        if(attempts < MaxDescribeAttempts) {
            await sleep(10000);
        } else {
            await GameLift.stopMatchmaking({
                TicketId: ticketId.toString()
            }).
            promise().then(data => {
                response = data; // this will be empty if the stop succeeds
            }).
            catch(err => {
               response = err;
            });
            break;
        }
    }

    return response;
};
And that’s it! Your Unity battle royale game should now be up and running! As always, we want to hear from you. Please visit the official GameLift forum or the AWS subreddit. Show us your own GameLift battle royale game using the hashtag #mybattleroyale. I’d love to see what you come up with!
Further reading
Announcing large match support