AWS for Industries
Using ESG data from AWS Data Exchange in Amazon FinSpace to correlate news sentiment with social and governance industry scores
Introduction
Environmental, social and governance (ESG) data has become an indispensable data set for financial institutions – used to assess a company’s risk and performance. ESG is broadly defined as a set of non-financial criteria or metrics that reflect how a company performs as a steward of nature (measuring carbon emissions, water usage, waste management policies), how a company manages relationships with employees, suppliers, customers and communities (measuring workforce diversity, equal pay policies, health and safety policies), and how a company puts in place the right leadership and internal controls (measuring board structure, executive compensation, tax strategy).
In particular, institutional investors and asset managers are increasingly integrating ESG data into investment decisions, as responsible or sustainable investing moves from niche to mainstream offering. This is highlighted by the fact that 40% of the $110 trillion professionally managed global financial assets have an ESG consideration. With this, comes a greater demand for granular ESG data, and a need to align such data quickly and effectively with company fundamentals and stock prices – in turn helping investors and asset managers determine, for example, if better corporate governance can result in outperformance.
Amazon FinSpace makes it simpler for customers to incorporate ESG data into their investment analysis. FinSpace provides a turnkey solution for quants and analysts to discover, aggregate, analyze, and share data. Using FinSpace’s integrated Jupyter notebooks, scalable Spark analytics engine, and capital markets time series library, analysts can easily incorporate ESG data into their investment strategies.
How to use this blog
In this blog I’ll show you options to load ESG data, available on AWS Data Exchange, into Amazon FinSpace and how to get started analyzing ESG data, discovering trends and correlations. I’ll also briefly discuss how to address broader requirements like ESG – financial data correlation.
This blog is composed of the following chapters providing prescriptive guidance from creating a new AWS account to analyzing data in FinSpace. Select the chapters you have not completed to help you integrate data from ADX into FinSpace and perform your analysis. For example, if you already have a FinSpace Environment, you can skip the chapter explaining how to create a new FinSpace Environment.
ESG Dataset Used: this chapter describes, and provide direct link to, the AWS Data Exchange ESG dataset used in this blog.
How to get data from AWS Data Exchange: this chapter describes how to get data from Data Exchange. If you already know how to do this or already have the above dataset ready, you can skip this chapter
Set-up FinSpace Environment: this chapter describes how to create a new FinSpace Environment. If you already have a FinSpace Environment, you can skip this chapter and go directly to next chapter.
How to manually load data into Amazon FinSpace: If you are new to FinSpace and/or want to quickly load the Data Exchange dataset and get started with data analysis, you can follow this chapter, skip the next two (that you can read later) and go directly to “How to get started analyzing data in Amazon FinSpace”
How to programmatically load data into Amazon FinSpace: this chapter explains how to programmatically load data into FinSpace; if you already loaded data manually, you can skip this chapter and use it at a later stage, when you need to repeat or automate this step.
General considerations for loading data into FinSpace: this chapter provides guidance and concepts to consider when loading other datasets into FinSpace. If you want to go straight to the FinSpace analysis, you can skip this chapter and read it at a later stage.
How to get started analyzing data in Amazon FinSpace: this chapter shows how to analyze and view data in Amazon FinSpace
ESG dataset used
The ESG dataset used in this blog is published on AWS Data Exchange by Amenity Analytics and it contains sentiment scores, based on news data, related to ESG domain. As stated in the dataset description:
This trial dataset is industrial-scale NLP applied to thousands of news sources to develop in-depth, real-time scoring at the company level on ESG issues. It provides company-specific scoring on 12,000 companies globally to track portfolio and company exposures. The score is the result of the net sentiment divided by the total negative and positive extractions in the previous 3 days, and per ESG topic. Also includes counts making up those scores.
ESG News Sentiment Dataset Trial is available at this link
How to get data from AWS Data Exchange
In this section I’ll export ESG data from Data Exchange into an Amazon Simple Storage Service (Amazon S3) bucket.
- First, I need to create a new S3 bucket in US East (N. Virginia) region. If you’re not sure how to do this, please follow the “Create your first S3 bucket” guide.
- Go to “ESG News Sentiment Dataset – Trial” on Data Exchange to start the subscription process. Go to the bottom of the page, select “No” to “Offer auto-renewal” and click Subscribe, as shown in the following screenshot.

- Once the subscription is completed, select US East (N. Virginia) region at top right of the window, go to Entitled data, select the asset file (i.e. ADX_ESG_NEWS_2020-09-01.zip), click on “Export to Amazon S3,” select the bucket created in the first step and under “Encryption” select “Amazon S3-manager encryption key (SSE-S3)”.
- Encryption is not strictly necessary to complete the deployment, but it’s recommended for security reasons. For further information on the different options available to encrypt data stored on Amazon S3, review the user guide on protecting data using server-side encryption.
- Download the ZIP file. Unzip it locally to extract the CSV file (named “ADX_ESG_NEWS_2020-09-01.csv”), then upload the CSV file to the S3 bucket. Delete the ZIP file from the S3 bucket, or move the ZIP file to another bucket. It’s important that the S3 bucket you use to execute the following tasks contains the uploaded CSV only.
Set-up FinSpace environment
Whether you load data into FinSpace manually or programmatically, you need an Amazon FinSpace environment. An Amazon FinSpace environment is created from the AWS console and provides a turnkey service with integrated data management with versioning, integrated business data catalog, Jupiter notebooks, and scalable Spark engine for analysis. If you already have a FinSpace environment available, you can skip the procedure described in this section, which explains how to create one.
To create an Amazon FinSpace environment, you need an AWS account. If you do not have one, you can create it following the “Sign up for AWS” guide.
It’s also a best practice to avoid using AWS account root user for these tasks. You can follow the “Create an IAM User” guide to create an IAM User to execute the tasks described in this blog.
To create a new FinSpace environment in US East (N. Virginia) follow the user guide.
It’s important to take note of:
- Superuser credentials created at the prior step
- FinSpace environment infrastructure account. You can find it in the environment section of FinSpace, as shown in the following screenshot. I’ll use this account number later, to allow FinSpace to access the S3 bucket where data is stored.

How to manually load data into Amazon FinSpace
When you need to do a one-time load of a few files into Amazon FinSpace, you can easily load them using the FinSpace UI. The steps to be followed are summarized in the following process flow:

Figure 1: Process Flow for Loading Data into Amazon FinSpace
Following are the steps to be executed to load our ESG dataset into FinSpace:
- Sign-in into Amazon FinSpace Web Application. To do this, go to FinSpace Environment and click the Environment domain URL, shown in the following screenshot:

- When prompted for your login information, use the Superuser credentials you noted in the section “Set-up FinSpace Environment”
- Click “ADD DATA”, as shown in the following screenshot.

- You’ll get the image shown in the next screenshot. Drag and drop from your local machine the CSV file extracted in the section “How to get data from AWS Data Exchange”

- Now you need to select the User Group which will have access to this dataset. Select Analyst, as shown in the following screenshot.

Now you can review the schema derived automatically by FinSpace and, optionally, you can edit it. In this case, I am leaving the schema as is.
- Go to the bottom of the screen and click on “CONFIRM SCHEMA & UPLOAD FILE” as shown in the screenshot above.
Once the file loading is complete, you will have a new dataset and data view created so you can analyze using the FinSpace notebook.
As a general note, when you upload a dataset, always check that the derived schema is coherent with the uploaded dataset. If you’re not sure, verify your dataset: check that the column names and column types (i.e. data type) are correct and check that the actual values correspond to the data type defined.
How to programmatically load data into Amazon FinSpace
When you need to load many files into Amazon FinSpace or when you need to set-up a recurring load of file(s) into Amazon FinSpace, you can load them programmatically. Since AWS Data Exchange data is available on S3, I will use a notebook created for this blog, to load our ESG dataset. The notebook I use in this blog is derived from s3_import notebook, available on Amazon FinSpace github repo, which provides an example of how to load data into Amazon FinSpace from S3.
In this section I’ll also execute a few tasks on the FinSpace UI. These are one-time set-up tasks.
- First, I need to edit the bucket policy of the S3 bucket created in the “How to get data from AWS Data Exchange” section. If you don’t know how to edit the bucket policy, follow the “Adding a bucket policy using the Amazon S3 console” guide. Copy and paste the following bucket policy, replacing:
- INFRASTRUCTURE_ACCOUNT_ID with the FinSpace environment infrastructure account you noted in section “Set-up FinSpace Environment”.
- S3_BUCKET with the S3 bucket name created in “How to get data from AWS Data Exchange” section
{
    "Version": "2012-10-17",
    "Id": "CrossAccountAccess",
    "Statement": [
        {
            "Effect": "Allow",
            "Principal": {
                "AWS": [
                    "arn:aws:iam::INFRASTRUCTURE_ACCOUNT_ID:role/FinSpaceServiceRole"
                ]
            },
            "Action": "s3:GetObject",
            "Resource": "arn:aws:s3:::S3_BUCKET/*"
        },
        {
            "Effect": "Allow",
            "Principal": {
                "AWS": [
                    "arn:aws:iam::INFRASTRUCTURE_ACCOUNT_ID:role/FinSpaceServiceRole"
                ]
            },
            "Action": "s3:ListBucket",
            "Resource": "arn:aws:s3:::S3_BUCKET"
        }
    ]
}
- Sign-in into Amazon FinSpace Web Application. To do this, go to FinSpace Environment and click the Environment domain URL, shown in the following screenshot:

- When prompted for your login information, use the Superuser credentials you noted in the section “Set-up FinSpace Environment”
- Click the gear icon at the top right of the screen and select Users and Groups:
- Click the group you want to give access to dataset, in this case select Admin:
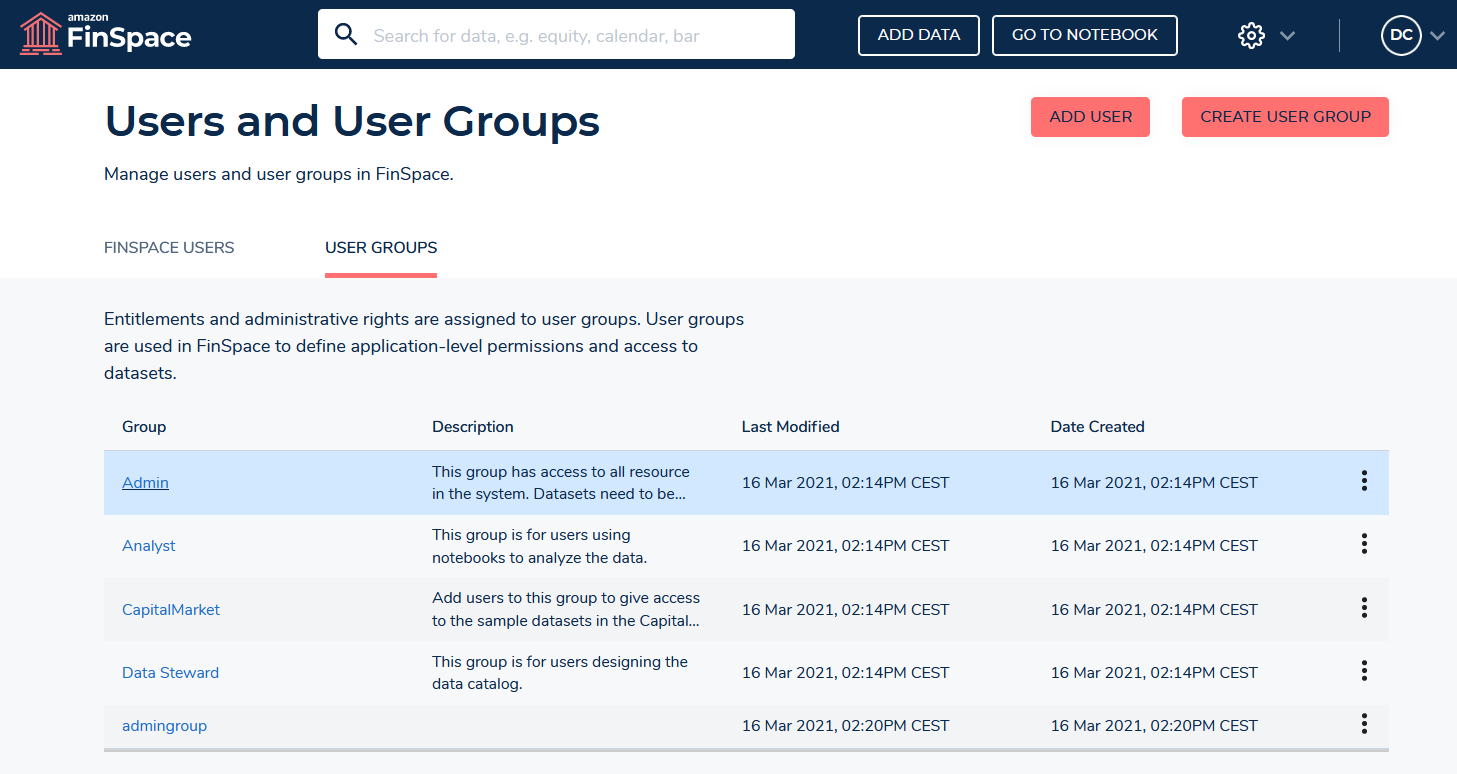
- You’ll get the Admin group detail page. Take note of the Admin group ID from the browser URL, as shown in the following screenshot:

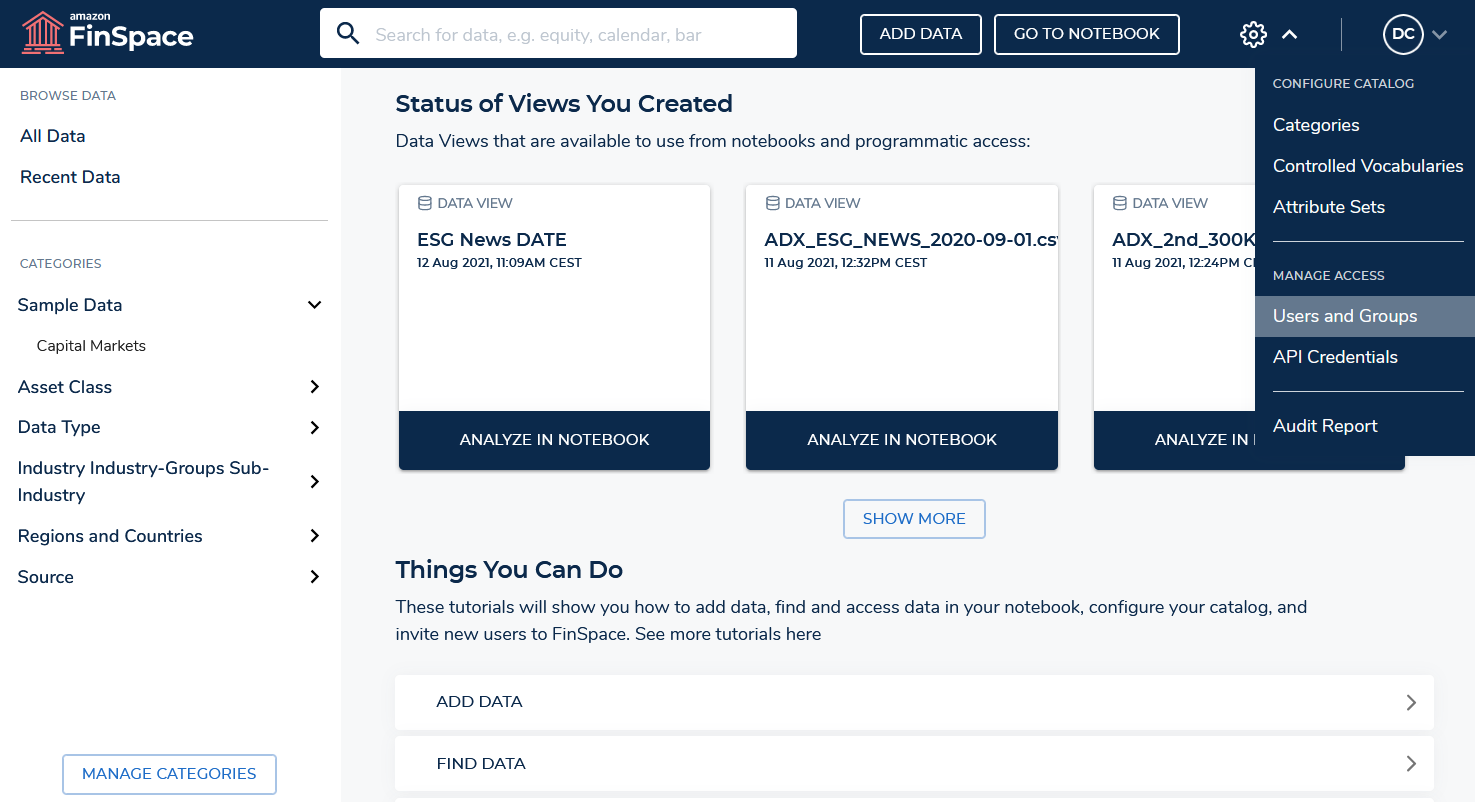
- Click on GO TO NOTEBOOK, as shown in the following screenshot:

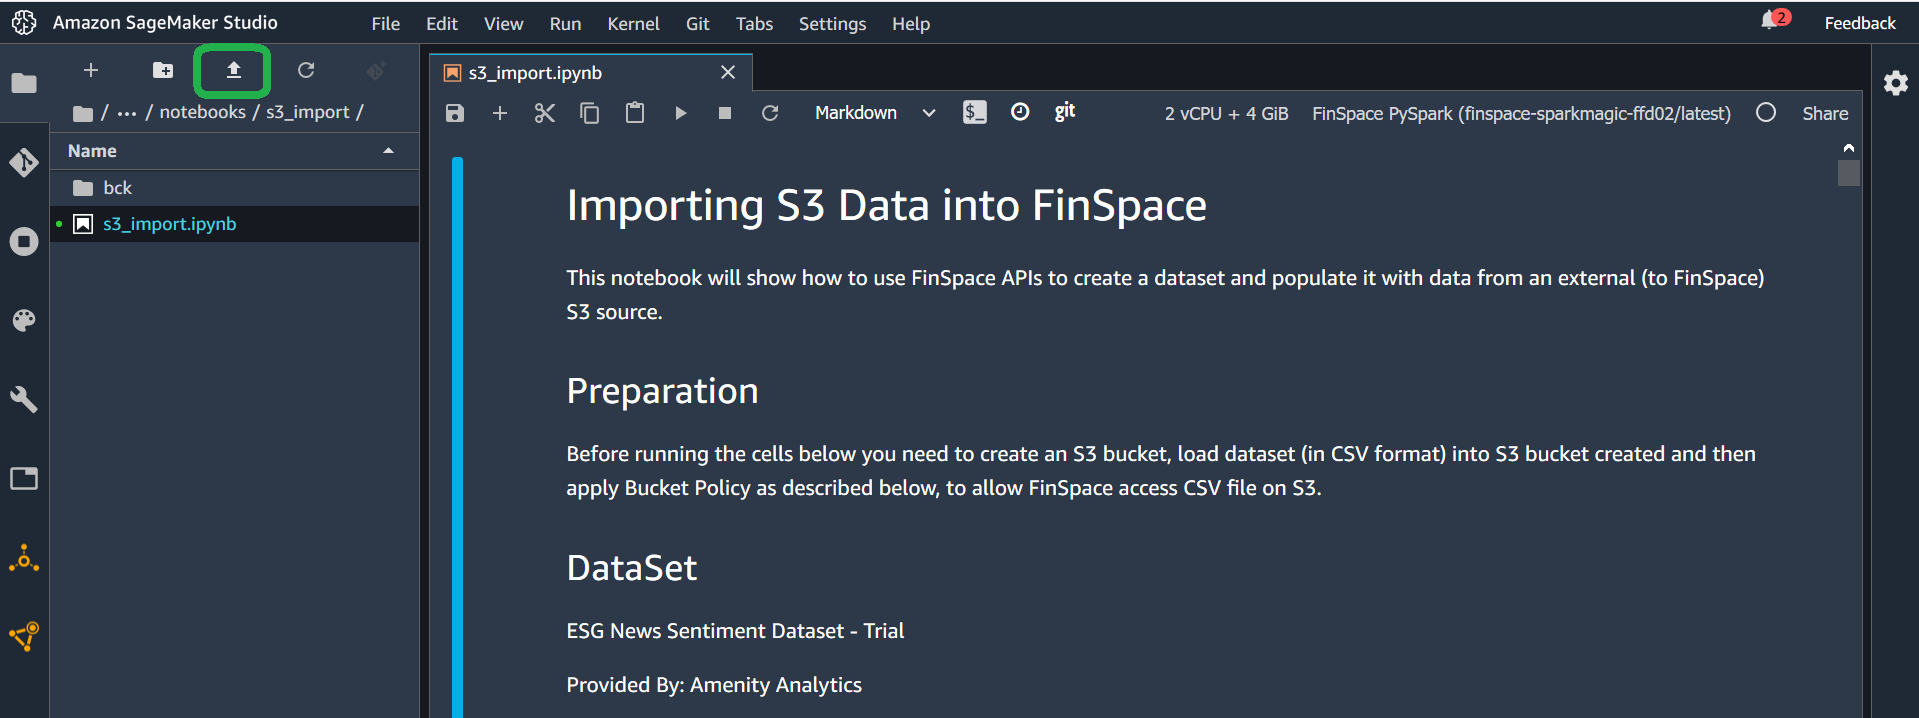
- Download “s3_import.ipynb”notebook and upload it clicking the icon highlighted in the screenshot (you can also drag and drop it). Select FinSpace PySpark kernel.
- In the fourth code cell, insert the S3 bucket name and Admin group ID you noted in two steps prior from the browser URL.

- The fifth code cell, as shown in the following screenshot, contains dataset information. For the purposes of this blog, this cell is already populated with valid and sample values to complete the import with no changes required.

General considerations for loading data into FinSpace
In the previous sections I showed how you can manually drag and drop files and programmatically use FinSpace APIs to load data into FinSpace. In general, depending on the dataset you want to load, you can adapt the configurations and/or steps described to your dataset.
As a general consideration, when loading data into FinSpace, be sure to check the schema you configure in FinSpace to ensure it matches the data you want to load into FinSpace, as FinSpace uses these details when creating views of data for use in notebooks. For example, I’ve found that sometimes users configure a FinSpace schema containing a column that doesn’t exist in your data (or vice-versa) or configure the wrong field type, like inserting a data or numeric field as a string. If you’re not sure about the dataset schema, check or open the dataset to verify column names, column numbers, and column types.More specifically, when loading Data Exchange data into FinSpace, consider that Data Exchange enables you to find and use a wide variety of datasets and different datasets may have different data formats. For example, you could find a Data Exchange dataset:
- Provided as zipped file (like the dataset used in this blog) or unzipped file. In addition to unzipping files manually, it’s also possible to unzip them programmatically, i.e. without downloading them locally, using AWS services like AWS Lambda or AWS Glue.
- Provided as CSV or other file format (Json, Parquet, XML). In this blog we’ve seen how to load a CSV file, check “Supported Data Types and File Formats” to see file formats natively supported by FinSpace.
- Composed by one single file (like the dataset used in this blog) or by multiple files. In the latter case, if you’re loading file(s) manually, you can follow the instructions provided in this blog, repeating the file loading step for the all the files you want to load. If you want to load all files programmatically, you can use a cycle in notebook, as show in ”s3_import.ipynb” notebook
- Composed by different files spread across different directories (maybe one directory for each month, day or other timeframe). Also in this case you can refer to ”s3_import.ipynb” notebook, showing how to get files from different directories and load them all into FinSpace
You can also review the “Find and acquire new data sets and retrieve new updates automatically using AWS Data Exchange” blog to automate the download, from Data Exchange to S3, of data updates available on your data product subscription.
How to get started analyzing data in Amazon FinSpace
Once your dataset is loaded into FinSpace, you can start analyzing it.
- Download this notebook and upload it clicking the icon highlighted below (you can also drag and drop it). Select FinSpace PySpark kernel.

- Go to cell 3 and insert dataset_id and view_it

- Run all cells in the notebook.
- Some notes about the output you’ll get; Cell 5 will show you the columns available in the dataset
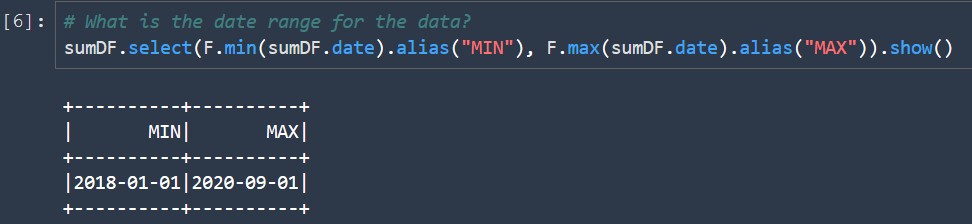
- Cell 6 will show the dataset time range, so that we you can tailor the analysis to this timeframe. Notice that we have data from three years and 2020 covers from January to September.
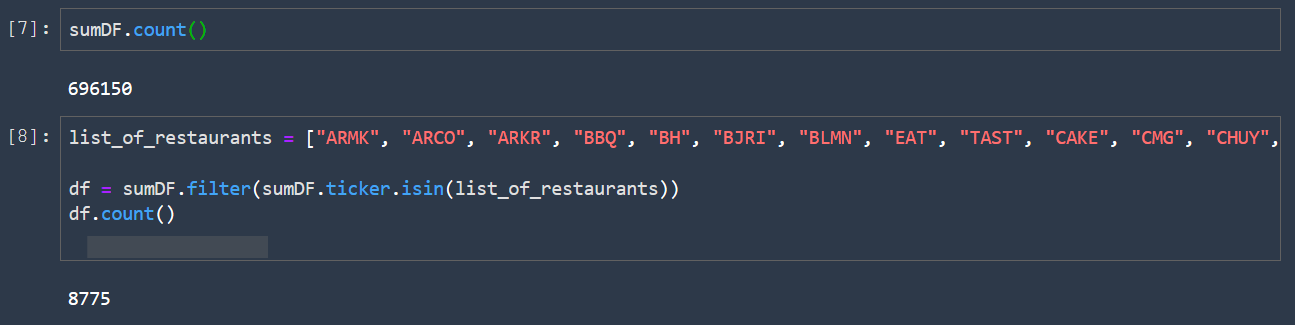
- Cell 7 will show the total number of rows in our data set, and then in cell 8 I’ll restrict our analysis to a list of companies belonging to restaurant segment. Of course, you can later decide to select a single company, e.g., Amazon, or use another segment or industry, e.g., retail or financial services. To do this you can insert the ticker(s) you want to select in cell 8.
- You then count the rows in the filtered dataset. Consider that the trial dataset I’m using contains only the S&P 500 and STOXX 600 tickers. The complete dataset contains all tickers, so, if you apply the same filter to the complete dataset you’ll get more results.
- Cell 11 creates three dataframes, one for each year
- Cells 12 to 14 show the number of rows for year 2018, 2019 and 2020
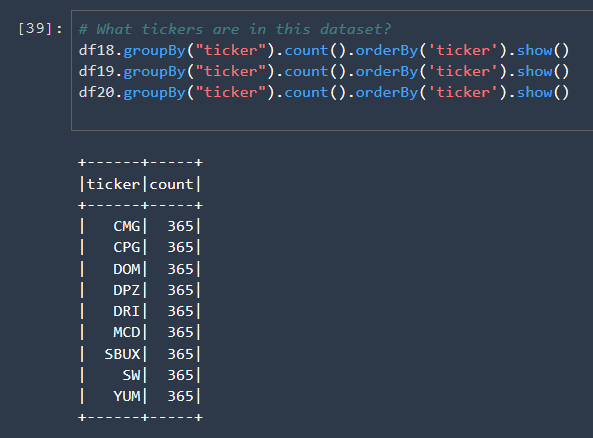
- Cell 15 shows the tickers in each dataframe and the count of rows for each ticker. The following Image shows only the first one, but in the notebook you’ll see all three.
- Cell 17, 18 and 19 show the total positive counts for each month; the total positive count for 2020 is clearly higher than in the previous years
- Cell 20 plots the 2020 total positive count trend in monthly average values

- Cells 21, 22, 23 plot one correlation matrix for each year including Total Weighted Positive Count, Governance Weighted Count, Social Weighted Count.

From this correlation matrix you can see a correlation between Social Count and Total Count and between Governance Negative Count and Total Negative Count.
Possible extensions to this analysis are:
- Evaluating other companies or industries; to do this, you just need to insert the ticker(s) you want to analyze into cell 8.
- Evaluating other correlations or trends among the values in this dataset. For example, you can easily reuse the cells above to correlate other values like Total Positive/Negative scores (instead of counts) and Governance, Social and Environmental scores. To do this you can change the columns you want to add to the correlation matrix in cell 21, 22, 23.
- Correlating ESG sentiment data with financial data (such as stock prices) of the ticker selected in cell 8.
Clean up
The following procedure shows how to clean up resources to avoid incurring unwanted costs. Be aware that when you delete an environment, you’re deleting all the assets (Jupyter notebooks, data) that you have in that environment.
- Go to Amazon FinSpace landing page and select Environments
- Click on environment name and then click the “Delete” button, as shown in the following image. Repeat the previous steps for each environment you have created.

Additionally, if you want to prevent unwanted expenses, you can see how to track your AWS costs and configure alerts by following the Control your AWS costs tutorial.
Conclusion
In this blog you’ve seen how to subscribe to a Data Exchange dataset, specifically an ESG news sentiment dataset; how to set-up a new FinSpace environment; how to load Data Exchange ESG dataset into FinSpace, both manually and programmatically; and how to evaluate dataset trends and correlations by timeframe and tickers.
I’ve also reviewed recommendations to load other datasets, containing ESG data or not and coming from Data Exchange or not, into FinSpace and I’ve suggested some of the possible data analysis extensions you can do with FinSpace, including the correlation with financial data.
I welcome any feedback you may have on possible extensions you’d like to see implemented in future blog posts. Look out for upcoming financial data analysis we’ll publish on AWS Financial Services Blog channel.