The Internet of Things on AWS – Official Blog
IoT for Non-IP Devices
Connected devices have found their way into a myriad of commercial and consumer applications. Industries have already moved, or are in the process of moving to, operational models that require them to measure broad data points in real time and optimize their operations based on their analysis of this data. The move to smart connected devices can become expensive if expensive components must be upgraded across the infrastructure. This blog post explores how AWS IoT can be used to gather remote sensor telemetry and control legacy non-IP devices through remote infrared (IR) commands over the Internet.
In agriculture, greenhouses are used to create ideal growing conditions to maximize yield. Smart devices allow metrics like light level, temperature, humidity, and wind to be captured not just for historical purposes, but to react quickly to a changing environment. The example used in this blog post involves gathering light readings and activating an infrared-controlled sun shade in the greenhouse based on the current illuminance levels. A lux sensor will be placed directly under the area that we are going to control. Readings will be captured on a minute-by-minute basis. For more complex implementations, you can configure additional sensors and control devices.
Solution Architecture
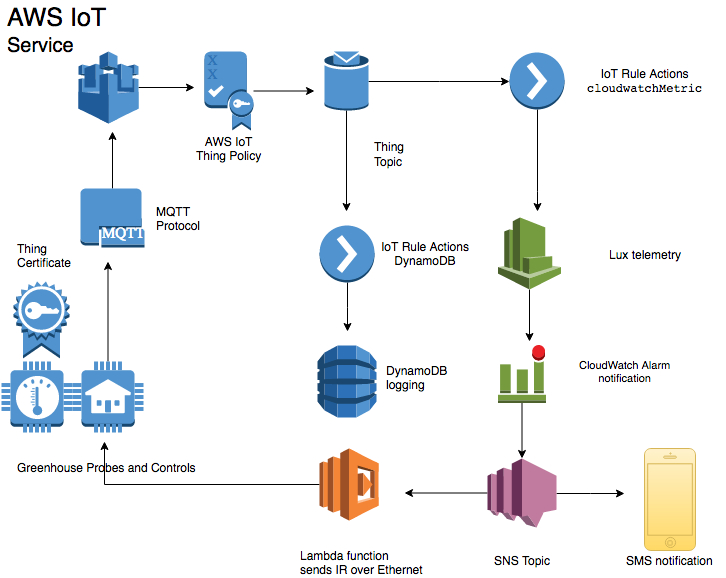
The IoT implementation has the following features:
- Measures and transmits telemetry once a minute.
- Uses TLS encryption to send telemetry.
- Monitors telemetry and issues alarms when thresholds are exceeded.
- Event notifications are delivered to mobile device through SMS messages.
- IR commands over Ethernet are sent to operate the greenhouse controls.
- Telemetry is logged for reporting purposes.
The implementation includes the following hardware components:
We’re using the MQTT protocol because it is a lightweight yet reliable mechanism for sending telemetry. You can access other AWS services through IoT actions. In this implementation, we used actions to integrate with Amazon CloudWatch and Amazon DynamoDB. CloudWatch logs the telemetry and then raises an alarm if a threshold is breached. Amazon SNS invokes a Lambda function, which sends the IR command in an SNS topic to the remote devices. DynamoDB is used as a long-term, durable store of historic telemetry for reporting purposes.
AWS Services Setup
This implementation uses several AWS services to create an end-to-end application to monitor and control greenhouse devices. In addition to the configuration of each service, we also need to create the roles and policies that will allow these services to work together.
IAM
We use IAM roles to provide the appropriate amount of access to the AWS services.
Create the CloudWatch role
Step 1. Create the CloudWatch Events role for AWS IoT to use.
Copy and paste the following into a file named
aws_iot_role_policy_document.json.
This document contains a policy that will ensure that the
aws_iot_cloudwatchMetric
role we create in the next step can assume this role.
{
  "Version": "2012-10-17",
  "Statement": {
    "Effect": "Allow",
    "Principal": {"Service": "iot.amazonaws.com"},
    "Action": "sts:AssumeRole"
  }
}
Step 2. Create an IAM role named aws_iot_cloudwatchMetric.
This is the identity used by the AWS IoT action to send telemetry to CloudWatch.
From the command line, run the following command.
aws iam create-role --role-name aws_iot_cloudwatchMetric --
assume-role-policy-document
file://aws_iot_role_policy_document.json
Upon successful execution of this command, an ARN for this role will be returned. Make a note of the ARN for the
aws_iot_cloudwatchMetric.
You will need it during the IoT action setup.
Step 3. Create a policy document named
aws_iot_cloudwatchMetric.json.
It will allow the
aws_iot_cloudwatchMetric
role to access Amazon CloudWatch.
{
    "Version": "2012-10-17",
    "Statement": {
        "Effect": "Allow",
        "Action": "cloudwatch:PutMetricData",
        "Resource": [
           "*"
        ]
    }
}
Step 4. Attach
aws_iot_cloudwatchMetric.json
to the
aws_iot_cloudwatchMetric
role.
aws iam put-role-policy --role-name aws_iot_cloudwatchMetric --
policy-name aws_iot_cloudwatch_access --policy-document
file://aws_iot_cloudwatchMetric.json
Create the Lambda role
Now we’ll create a second role that will allow AWS Lambda to execute our function.
Step 1. Copy and paste the following to a file named aws_lambda_role_policy_document.json.
This document contains a policy that will allow AWS Lambda to assume the role we will create in the next step.
{
   "Version": "2012-10-17",
   "Statement": {
     "Effect": "Allow",
     "Principal": {"Service": "lambda.amazonaws.com"},
     "Action": "sts:AssumeRole"
   }
}
Step 2. Create an IAM role named aws_lambda_execution.
This is the identity used by Lambda to execute the function.
aws iam create-role --role-name aws_lambda_execution --assume-
role-policy-document file://aws_lambda_role_policy_document.json
Upon successful execution of this command, an ARN for this role will be returned. Make a note of the ARN for the
aws_lambda_execution
role. You will need it during the Lambda setup.
Step 3. Create the policy document named aws_lambda_execution.json
that will allow the
aws_lambda_execution
role to put events into CloudWatch.
{
  "Version": "2012-10-17",
  "Statement": [
    {
      "Effect": "Allow",
      "Action": [
        "logs:CreateLogGroup",
        "logs:CreateLogStream",
        "logs:PutLogEvents"
      ],
      "Resource": "arn:aws:logs:*:*:*"
    }
  ]
}
Step 4. Attach the
aws_lambda_execution.json
to the
aws_lambda_execution
role.
aws iam put-role-policy --role-name aws_lambda_execution --
policy-name aws_iot_lambda_access --policy-document
file://aws_lambda_execution.json
Create the DynamoDB role
In order to store the telemetry to a persistent data store, we will create a role for AWS IoT to use.
Step 1. Create the Lambda execution policy document. Copy and paste the following to a file named aws_dynamodb_role_policy_document.json.
This document contains a policy that will allow DynamoDB to assume this role.
{
   "Version": "2012-10-17",
   "Statement": {
     "Effect": "Allow",
     "Principal": {"Service": "iot.amazonaws.com"},
     "Action": "sts:AssumeRole"
   }
}
Step 2. Create an IAM role named aws_iot_dynamoDB.
This is the identity used by AWS IoT to send telemetry to DynamoDB.
aws iam create-role --role-name aws_iot_dynamoDB --assume-role-
policy-document file://aws_iot_dynamoDB_role_policy_document.json
Upon successful execution of this command, an ARN for this role will be returned. Make a note of the ARN for the
aws_iot_dynamoDB
role. You will need it during the DynamoDB setup.
Step 3. Create a policy document named aws_iot_dynamoDB.json
that will allow the
aws_iot_dyanmoDB
role to execute.
{
   "Version": "2012-10-17",
   "Statement": {
     "Effect": "Allow",
     "Action": "dynamodb:PutItem",
     "Resource": "arn:aws:dynamodb:us-east-1:000000000000:table/IoTSensor"
   }
}
Step 4. Attach
aws_iot_dynamoDB.json
to the
aws_iot_dynamoDB
role.
aws iam put-role-policy --role-name aws_iot_dynamoDB --policy-
name aws_iot_dynamoDB_access --policy-document
file://aws_iot_dynamoDB.json
Now that the IAM roles and policies are in place, we can configure AWS IoT and the associated rules.
Set up AWS IoT
Let’s set up AWS IoT as the entry point for device communications. As soon as AWS IoT is communicating with the greenhouse sensors, we will use the AWS IoT rules engine to take further action on the sensor telemetry. The AWS IoT rules engine makes it easy to create highly scalable solutions that integrate with other AWS services, such as DynamoDB, CloudWatch, SNS, Lambda, Amazon Kinesis, Amazon ElasticSearch Service, Amazon S3, and Amazon SQS.
Create a thing
From the AWS CLI, follow these steps to create a thing.
Step 1. Create a thing that represents the lux meter.
aws iot create-thing --thing-name "greenhouse_lux_probe_1"
Step 2. Create the policy.
Start by creating a JSON policy document. It will be linked to the
create policy
statement. Copy and paste the following into a document. Be sure to replace 000000000000 with your AWS account number.
   "Version": "2012-10-17",
   "Statement": [
{
       "Effect": "Allow",
       "Action": [
         "iot:Connect"
       ],
       "Resource": [
         "arn:aws:iot:us-east-1:000000000000:client/${iot:ClientId}"
       ]
     },
     {
        "Effect": "Allow",
        "Action": [
          "iot:Publish"
        ],
        "Resource": [
          "arn:aws:iot:us-east-1:000000000000:topic/Greenhouse/${iot:ClientId}"
      ]
    }
  ]
}
Now, run the following command to create the policy. Be sure to include the full path to the policy document.
aws iot create-policy --policy-name "greenhouse_lux_policy" --
policy-document file://iot_greenhouse_lux_probe_policy.json
Step 3. Create a certificate.
Creating a certificate pair is a simple process when you use the AWS IoT CLI. Use the following command to create the certificate, mark it as active, and then save the keys to the local file system. These keys will be required for authentication between the thing and AWS IoT.
aws iot create-keys-and-certificate --set-as-active --
certificate-pem-outfile IoTCert.pem.crt --public-key-outfile
publicKey.pem.key --private-key-outfile privateKey.pem.key
Step 4. Attach the thing and policy to the certificate.
Using the following as an example, replace 000000000000 with your AWS account number and 22222222222222222222222222222222222222222222 with your certificate ARN. This will attach the thing to the certificate.
aws iot attach-thing-principal –thing-name
greenhouse_lux_probe_1 –principal arn:aws:iot:us-east-
1:000000000000:cert/22222222222222222222222222222222222222222222
Now, attach the policy to the certificate.
aws iot attach-principal-policy --policy-name
greenhouse_lux_policy --principal arn:aws:iot:us-east-
1:000000000000:cert/22222222222222222222222222222222222222222222
Now that you have created a thing, policy, and certificate, you might also want to test connectivity to AWS IoT using a program like aws-iot-elf, which is available from the AWS Labs Github repo. After you have confirmed connectivity, you can build out the remainder of the application pipeline.
Configure the AWS IoT rules engine
Creating rules is an extremely powerful and straightforward way to build a responsive, extensible architecture. In this example, we will record and respond to telemetry as fast as we can record and report it. Letís imagine we need to ensure that the crop is not exposed to light intensity greater than 35,000 lux. First, we will integrate AWS IoT with CloudWatch, so it can be used to decide what to do based on the received telemetry. Two rules are required to support this case: one rule called TooBright and a second rule called NotTooBright.
Step 1. Create a JSON file named create-TooBright-rule.json
with the following content to serve as the rule policy. Be sure to use your AWS account number and the ARN for the
aws_iot_cloudwatchMetric
role.
{
   "sql": "SELECT * FROM '/topic/Greenhouse/LuxSensors' WHERE
lux > 35000",
   "description": "Sends telemetry above 35,000 lux to
CloudWatch to generate an alert",
   "actions": [
   {
       "cloudwatchMetric": {
           "metricUnit" : "Count",
           "roleArn":
"arn:aws:iam::000000000000:role/aws_iot_cloudwatchMetric",
           "metricValue" : "1",
           "metricNamespace" : "Greenhouse Lux Sensors",
           "metricName" : "ShadePosition"
               }
           }
       ],
    "awsIotSqlVersion": "2016-03-23",
    "ruleDisabled": false
}
Step 2. From the command line, run this command to create the rule.
aws iot create-topic-rule --rule-name TooBright --topic-rule-
payload file://create-TooBright-rule.json
Step 3. Create a JSON file named create-NotTooBright-rule.json
with the following content to serve as the rule policy. Be sure to use the AWS account number and ARN for the
aws_iot_cloudwatchMetric
role that you created earlier. Change the WHERE clause to < 35000 and the metricValue to 0.
{
   "sql": "SELECT * FROM '/topic/Greenhouse/LuxSensors' WHERE
lux < 35000",
   "description": "Sends telemetry above 35,000 lux to
CloudWatch to generate an alert",
   "actions": [
   {
       "cloudwatchMetric": {
           "metricUnit" : "Count",
           "roleArn":
"arn:aws:iam::000000000000:role/aws_iot_cloudwatchMetric",
           "metricValue" : "0",
           "metricNamespace" : "Greenhouse Lux Sensors",
           "metricName" : "ShadePosition"
               }
           }
       ],
   "awsIotSqlVersion": "2016-03-23",
   "ruleDisabled": false
}
Step 4. From the command line, run this command to create the rule.
aws iot create-topic-rule --rule-name NotTooBright --topic-rule-
payload file://create-NotTooBright-rule.json
Set up SNS
We will configure SNS to invoke the Lambda function and deliver an SMS message to a mobile phone. The SMS notification functionality is useful for letting the greenhouse operations team know the system is actively monitoring and controlling the greenhouse devices. Setting up SNS for this purpose is a simple process.
Step 1. Create the SNS topic.
aws sns create-topic --name Sunshades
The SNS service returns the ARN of the topic.
{
    "TopicArn": "arn:aws:sns:us-east-1:000000000000:Sunshades"
}
Step 2. Using the topic ARN and a phone number where the SMS message should be sent, create a subscription.
aws sns subscribe --topic-arn arn:aws:sns:us-east-
1:000000000000:Sunshades --protocol SMS --notification-endpoint "1 555 555 5555"
The SNS service confirms the subscription ID.
{
    "SubscriptionArn": "arn:aws:sns:us-east-
1:000000000000:Sunshades:0f1412d1-767f-4ef9-9304-7e5a513a2ac1"
}
Set up Lambda
We are going to use a Lambda function written in Python to make a socket connection to the remote Ethernet-to-IR device that controls the sun shade.
Step 1. Sign in to the AWS Management Console, and then open the AWS Lambda console. Choose the Create a Lambda function button.
Step 2. On the blueprint page, choose Configure triggers.
Step 3. On the Configure triggers page, choose SNS. From the SNS topic drop-down list, choose the Sunshades topic.
Step 4. Select the Enable trigger check box to allow the SNS topic to invoke the Lambda function, and then choose Next.
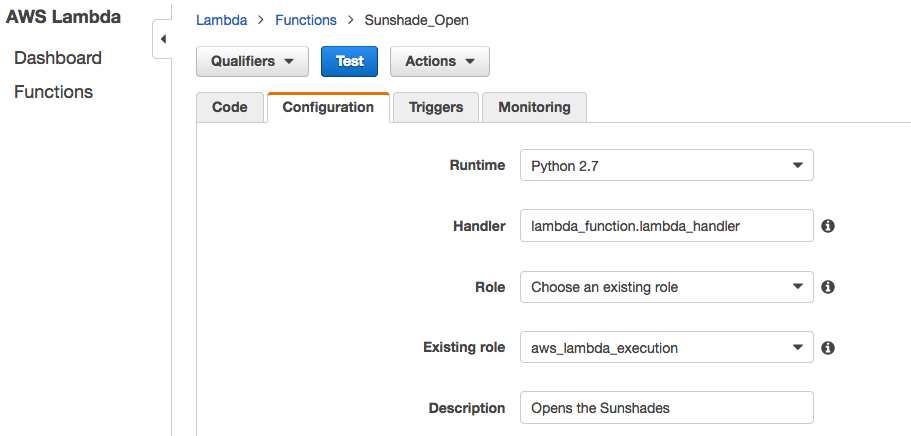
Step 6. On the Configure function page, type a name for your function (for example, Sunshade_Open).
Step 7. From the Runtime drop-down box, choose Python 2.7.
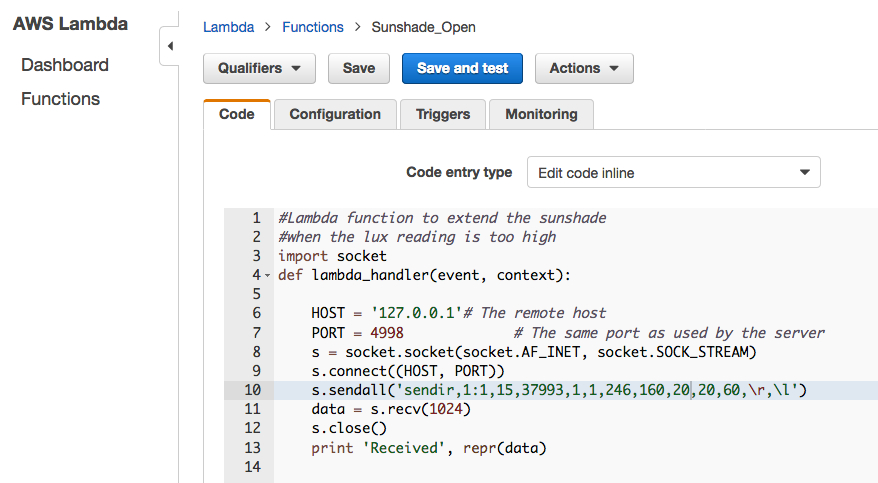
Step 8. Copy and paste the following Python code to create the Lambda functions that will open the sun shades. Be sure to use the IP address and port of the remote Ethernet-to-IR communication device. Include the IR code for your device as provided by the manufacturer.
You can get the IR code through the learning function of the IR repeater. This process typically requires sending an IR signal to the IR repeater so that it can capture and save the code as binary. The binary values for the IR command are then sent as part of the IP packet destined for the IR repeater.
Lambda function to open the sun shade
#Lambda function to extend the sunshade
#when the lux reading is too high
import socket
def lambda_handler(event, context):
HOST = 'xxx.xxx.xxx.xxx'# The remote host
PORT = 4998             # The same port as used by the server
s = socket.socket(socket.AF_INET, socket.SOCK_STREAM)
s.connect((HOST, PORT))
s.sendall('sendir,1:1,15,37993,1,1,246,160,20,20,60,\r,\l')
data = s.recv(1024)
s.close()
print 'Received', repr(data)
In Role, choose an existing role. In Existing role, choose the
aws_lambda_execution
role you created earlier, and then choose Next.
On the following page, review the configuration, and then choose Create function.
Choose the blue Test button and leave the default Hello World template as it is. Choose Save and Test to see if the function ran successfully. The Lambda function should have issued the remote IR command, so check to see if the sun shade device responded to the Lambda invocation. If the execution result is marked failed, review the logs on the test page to determine the root cause. If the Lambda function was successful but the sun shade did not move, double-check that you used the appropriate IR codes.
Now create the second Lambda function. ‘Sunshade_Close’ will be similar to ìSunshade_Open,’ except it will contain the IR code for closing the shade.
Set up CloudWatch
We send a metric value of either 0 or 1 from the AWS IoT action to CloudWatch to indicate whether the sun shade should be opened or closed. In this example, 0 indicates that the lux level is below 35,000 and the shades should be open. 1 indicates a higher lux level that requires the sun shades to be closed. Weíll have a problem if the power to the devices is cycled too frequently. Not only is this an inefficient way to control devices, it can also damage the equipment. For this reason, we will use CloudWatch alarms to set a threshold of 15 minutes to prevent devices from cycling between open and closed states too frequently. Each alarm will have triggers that respond to the value you put in the metric name type when you created the AWS IoT action.
The first alarm is called Trigger_SunShade_Open. This alarm will trigger when the variable ShadePosition value is greater or equal to 1 for 15 consecutive minutes. We will treat the ShadePosition value as a binary value where 1 indicates the lux is above the threshold and the sun shade should be opened. A value of 0 indicates that the sun shade should be closed. We define the period as a one-minute interval, which means the sun shade will change states no sooner than every 15 minutes. A second alarm called Trigger_SunShade_Close is created in the same way, except that the ShadePosition must be less than 1 for 15 minutes. Both alarms are configured with an action to send a notification to the appropriate SNS topic.
aws cloudwatch put-metric-alarm --alarm-name "Trigger_SunShade_Open"
--namespace "Greenhouse Lux Sensors" --metric-name "ShadePosition"
--statistic Sum --evaluation-periods "15"
--comparison-operator "GreaterThanOrEqualToThreshold"
--alarm-actions arn:aws:sns:us-east-1:000000000000:Sunshades
--period "60" --threshold "1.0" --actions-enabled
Next, create the
Trigger_Sunshade_Close
alarm in a similar manner to
Trigger_SunShade_Open.
This alarm will trigger when the ShadePosition value is 1.
aws cloudwatch put-metric-alarm --alarm-name "Trigger_SunShade_Close"
--namespace "Greenhouse Lux Sensors" --metric-name "ShadePosition"
--statistic Sum --evaluation-periods "15"
--comparison-operator "LessThanOrEqualToThreshold"
--alarm-actions arn:aws:sns:us-east-1:000000000000:Sunshades
--period "60" --threshold "0" --actions-enabled
Sign in to the AWS Management Console, open the CloudWatch console, and then look at the alarms.
Confirm the two alarms were created. Because of the 15-minute evaluation period, you need to wait 15 minutes to verify the alarms are working.

Depending on the reported value of the ShadePosition variable, the state displayed for one alarm should be OK and the other should be ALARM.
After 15 minutes, we see the
Trigger_Sunshade_Close
alarm is in the OK state, which means the alarm has not been raised and therefore the sun shade should be not closed.

Conversely,
Trigger_Sunshade_Open
is in an ALARM state, which indicates the sun shade should be open.

This alarm state should also have generated an SMS message to the mobile device that was configured in the SNS topic.
Set up DynamoDB
DynamoDB is the repository for the historical lux readings because of its ease of management, low operating costs, and reliability. We’ll use an AWS IoT action to stream telemetry directly to DynamoDB. To get started, create a new DynamoDB table.
aws dynamodb create-table --table-name Greenhouse_Lux_Sensor --
attribute-definitions AttributeName=item,AttributeType=S
AttributeName=timestamp,AttributeType=S --key-schema
AttributeName=item,KeyType=HASH
AttributeName=timestamp,KeyType=RANGE --provisioned-throughput
ReadCapacityUnits=1,WriteCapacityUnits=1
DynamoDB will return a description of the table to confirm it was created.
AWS IoT DynamoDB Action
Step 1. Create a JSON file named create-dynamoDB-rule.json
with the following content to serve as the rule policy. Use your AWS account number and the ARN for the
aws_iot_dynamoDB
role you created earlier.
{
   "sql": "SELECT * FROM '/topic/Greenhouse/LuxSensors/#'",
   "ruleDisabled": false,
   "awsIotSqlVersion": "2016-03-23",
   "actions": [{
       "dynamoDB": {
           "tableName": "Greenhouse_Lux_Sensor",
           "roleArn":
"arn:aws:iam::000000000000:role/aws_iot_dynamoDB",
           "hashKeyField": "item",
           "hashKeyValue": "${Thing}",
           "rangeKeyField": "timestamp",
           "rangeKeyValue": "${timestamp()}"
       }
   }]
}
Step 2. From the command line, run this command to create the rule.
aws iot create-topic-rule --rule-name Lux_telemetry_to_DynamoDB -
-topic-rule-payload file://crate-dynamoDB-rule.json
Execute this command to verify that telemetry is successfully being sent to DynamoDB.
aws dynamodb scan --table-name Greenhouse_Lux_Sensor --return-
consumed-capacity TOTAL
This command will scan the DynamoDB table and return any data that was written to it. In addition, it will return a ScannedCount with the number of objects in the table. If the ScannedCount is 0, make sure that telemetry is being sent to and received by AWS IoT.
Summary
You now have a fully functional AWS IoT implementation that provides intelligent control of not-so-smart devices. You have also created a completely serverless solution that can serve a single device or billions of them, all without changing the underlying architecture. Lastly, charges for the services used in this implementation are based on consumption, which yields a very low TCO.
There are infinite uses for AWS IoT when you combine its cloud logic with the devices and sensors on the market. This post has shown the power of this AWS service can be extended to non-IP devices, which can now be managed and controlled as if they were designed for IoT applications.