AWS Machine Learning Blog
Serving PyTorch models in production with the Amazon SageMaker native TorchServe integration
In April 2020, AWS and Facebook announced the launch of TorchServe to allow researches and machine learning (ML) developers from the PyTorch community to bring their models to production more quickly and without needing to write custom code. TorchServe is an open-source project that answers the industry question of how to go from a notebook to production using PyTorch and customers around the world, such as Matroid, are experiencing the benefits firsthand. Similarly, over 10,000 customers have adopted Amazon SageMaker to quickly build, train, and deploy ML models at scale, and many of them have made it their standard platform for ML. From a model serving perspective, Amazon SageMaker abstracts all the infrastructure-centric heavy lifting and allows you to deliver low-latency predictions securely and reliably to millions of concurrent users around the world.
TorchServe’s native integration with Amazon SageMaker
AWS is excited to announce that TorchServe is now natively supported in Amazon SageMaker as the default model server for PyTorch inference. Previously, you could use TorchServe with Amazon SageMaker by installing it on a notebook instance and starting a server to perform local inference or by building a TorchServe container and referencing its image to create a hosted endpoint. However, full notebook installations can be time-intensive and some data scientists and ML developers may not prefer to manage all the steps and AWS Identity and Access Management (IAM) permissions involved with building the Docker container and storing the image on Amazon Elastic Container Registry (Amazon ECR) before ultimately uploading the model to Amazon Simple Storage Service (Amazon S3) and deploying the model endpoint. With this release, you can use the native Amazon SageMaker SDK to serve PyTorch models with TorchServe.
To support TorchServe natively in Amazon SageMaker, the AWS engineering teams submitted pull requests to the aws/sagemaker-pytorch-inference-toolkit and the aws/deep-learning-containers repositories. After these were merged, we could use TorchServe via the Amazon SageMaker APIs for PyTorch inference. This change introduces a tighter integration with the PyTorch community. As more features related to the TorchServe serving framework are released in the future, they are tested, ported over, and made available as an AWS Deep Learning Container image. It’s important to note that our implementation hides the .mar from the user while still using the Amazon SageMaker PyTorch API everyone is used to.
The TorchServe architecture in Amazon SageMaker
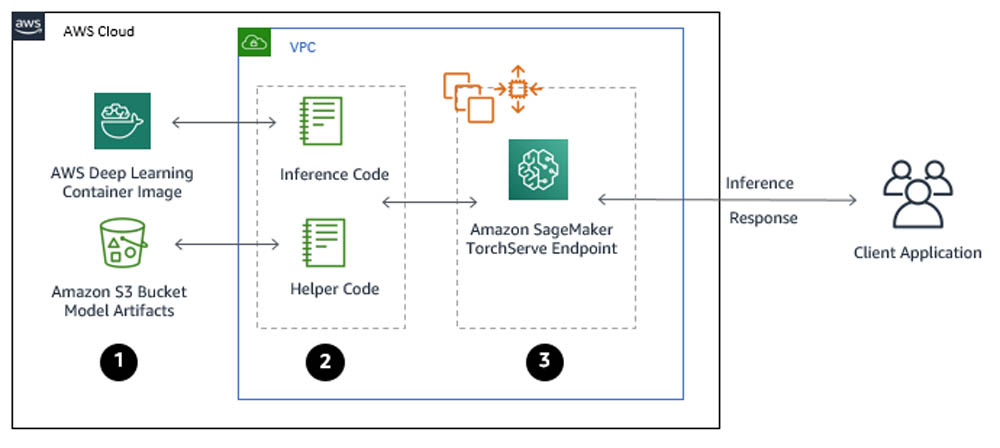
You can use TorchServe natively with Amazon SageMaker through the following steps:
- Create a model in Amazon SageMaker. By creating a model, you tell Amazon SageMaker where it can find the model components. This includes the Amazon S3 path where the model artifacts are stored and the Docker registry path for the Amazon SageMaker TorchServe image. In subsequent deployment steps, you specify the model by name. For more information, see CreateModel.
- Create an endpoint configuration for an HTTPS endpoint. You specify the name of one or more models in production variants and the ML compute instances that you want Amazon SageMaker to launch to host each production variant. When hosting models in production, you can configure the endpoint to elastically scale the deployed ML compute instances. For each production variant, you specify the number of ML compute instances that you want to deploy. When you specify two or more instances, Amazon SageMaker launches them in multiple Availability Zones. This provides continuous availability. Amazon SageMaker manages deploying the instances. For more information, see CreateEndpointConfig.
- Create an HTTPS endpoint. Provide the endpoint configuration to Amazon SageMaker. The service launches the ML compute instances and deploys the model or models as specified in the configuration. For more information, see CreateEndpoint. To get inferences from the model, client applications send requests to the Amazon SageMaker Runtime HTTPS endpoint. For more information about the API, see InvokeEndpoint.
The Amazon SageMaker Python SDK simplifies these steps as we will demonstrate in the following example notebook.
Using a fine-tuned HuggingFace base transformer (RoBERTa)
For this post, we use a HuggingFace transformer, which provides us with a general-purpose architecture for Natural Language Understanding (NLU). Specifically, we present you with a RoBERTa base transformer that was fined tuned to perform sentiment analysis. The pre-trained checkpoint loads the additional head layers and the model will outputs positive, neutral, and negative sentiment of text.

Deploying a CloudFormation Stack and verifying notebook creation
You will deploy an ml.m5.xlarge Amazon SageMaker notebook instance. For more information about pricing, see Amazon SageMaker Pricing.
- Sign in to the AWS Management Console.
- Choose from the following table to launch your template.
| Launch Template | Region |
| N.Virginia (us-east-1) | |
| Ireland (eu-west-1) | |
| Singapore (ap-southeast-1) |
You can launch this stack for any Region by updating the hyperlink’s Region value.
- In the Capabilities and transforms section, select the three acknowledgement boxes.
- Choose Create stack.

Your CloudFormation stack takes about 5 minutes to complete creating the Amazon SageMaker notebook instance and its IAM role.
- When the stack creation is complete, check the output on the Resources tab.

- On the Amazon SageMaker console, under Notebook, choose Notebook instances.
- Locate your newly created notebook and choose Open Jupyter.

Accessing the Lab
From within the notebook instance, navigate to the serving_natively_with_amazon_sagemaker directory and open deploy.ipynb.
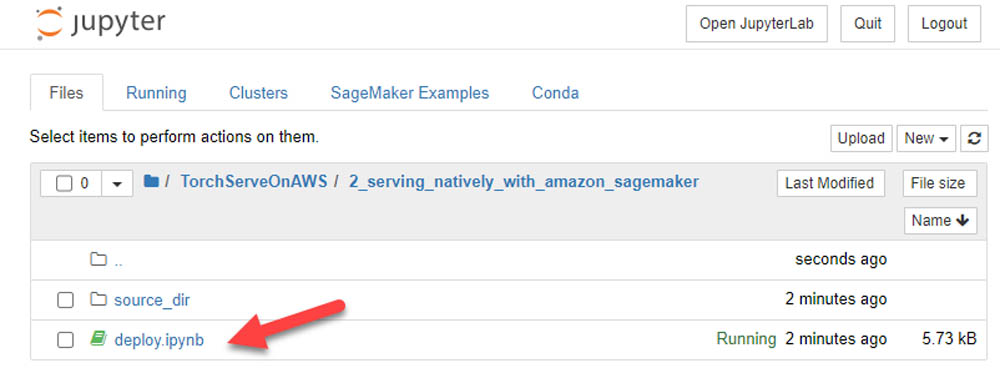
You can now run through the steps within the Jupyter notebook:
- Set up your hosting environment.
- Create your endpoint.
- Perform predictions with a TorchServe backend Amazon SageMaker endpoint.
After setting up your hosting environment, creating an Amazon SageMaker endpoint using the native TorchServe estimator is as easy as:
Cleaning Up
When you’re finished with this lab, your Amazon SageMaker endpoint should have already been deleted. If not, complete the following steps to delete it:
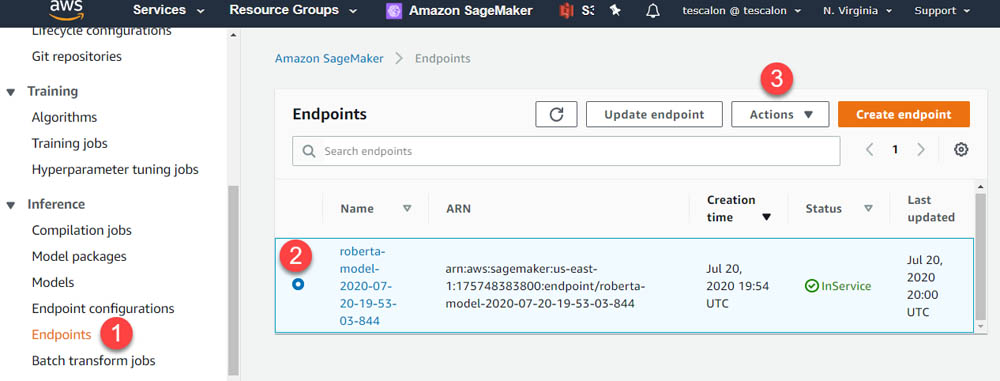
- On the Amazon SageMaker console, under Inference, choose Endpoints.
- Select the endpoint (it should begin with
roberta-model). - From the Actions drop-down menu, choose Delete.
On the AWS CloudFormation console, delete the rest of your environment choosing the torchserve-on-aws stack and choosing Delete.

You can see two other stack names that were built based off of the original CloudFormation template. These are nested stacks and are automatically deleted with the main stack. The cleanup process takes just over 3 minutes to spin down your environment and will delete your notebook instance and the associated IAM role.
Conclusion
As TorchServe continues to evolve around the very specific needs of the PyTorch community, AWS is focused on ensuring that you have a common and performant way to serve models with PyTorch. Whether you’re using Amazon SageMaker, Amazon Elastic Compute Cloud (Amazon EC2), or Amazon Elastic Kubernetes Service (Amazon EKS), you can expect AWS to continue to optimize the backend infrastructure in support of our open-source community. We encourage all of you to submit pull requests and/or create issues in our repositories (TorchServe, AWS Deep learning containers, PyTorch inference toolkit, etc) as needed.
About the Author
 As a Principal Solutions Architect, Todd spends his time working with strategic and global customers to define business requirements, provide architectural guidance around specific use cases, and design applications and services that are scalable, reliable, and performant. He has helped launch and scale the reinforcement learning powered AWS DeepRacer service, is a host for the AWS video series “This is My Architecture”, and speaks regularly at AWS re:Invent, AWS Summits, and technology conferences around the world.