Front-End Web & Mobile
Deploy a React App to S3 and CloudFront with AWS Mobile Hub
Single page applications (SPAs) are now ubiquitous. Every web developer needs to understand how to build them and how to deploy them to a web hosting facility of their choice. In this article, I am going to look at what it takes to create and build a basic React app and deploy it globally to the AWS Cloud.
Before you start, you need to create a suitable cloud environment for your app. This is shown in the following architectural diagram.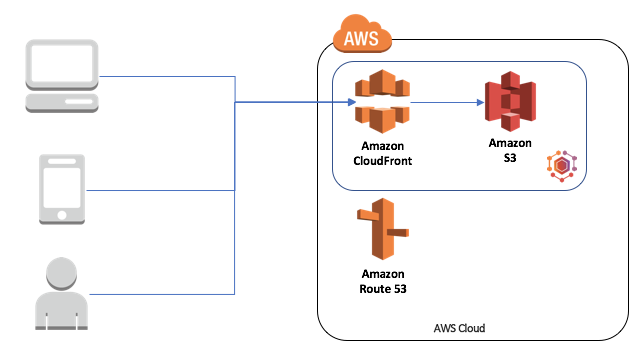
All users of your app will load the single page application resources (which are all static resources) from Amazon CloudFront, which provides a global set of edge caching services. CloudFront is a caching facility –the resources it caches are from an Amazon S3 bucket. This ensures that the application is provided securely and efficiently across the globe. Amazon Route 53 provides DNS services so your service has the right name.
Prepare your development workstation
To create and deploy React applications to AWS, you need the following:
- A text editor for editing JavaScript (I like Atom personally).
- The Node application environment for running JavaScript tools.
- The AWS CLI.
After you install and configure the AWS CLI, make sure that you have access to your AWS account via the CLI before continuing.
Create the cloud backend
Use AWS Mobile Hub to create this architecture.
- Sign in to the AWS Mobile Hub console.
- Create a project.
- Click Hosting and Streaming.
- Check the box to acknowledge the security implications, and then click Enable.
Ensure you read about the security implications of the Hosting and Streaming feature. The service creates an Amazon S3 bucket and an Amazon CloudFront distribution for you. Make a note of the Amazon S3 bucket; you need this later.

(Optional) Create a domain name for your app
The default name for your app is a little cryptic. In the picture above, you can see the URL in the CloudFront section. Amazon Route 53 can be used to give your application a more friendly URL. For details on how to accomplish this, see the Amazon Route 53 Developer Guide.
Create a React application
There are many ways to create a React application. You can integrate the components yourself, use a Yeoman generator, or use one of the many templates available. My favorite mechanism is to use create-react-app. To install create-react-app, type the following at the command line:
After you install the tool, run create-react-app on the command line. Change directory to a working directory and type the following:
This starts the application on your local machine. A browser starts and your application loads. Changes to the source code are then reflected in the browser. For more information on writing a React app, see the React tutorial and documentation. This is just the starting point and a great place to begin your exploration of React.
Deploy the React application to your AWS project
Deploying to your AWS project is a two-step process. First, build the deployable artifacts for your project by running the following command:
Next, copy the deployable artifacts to your S3 bucket by running the following command:
Replace <your-s3-bucket-name> with the name of your S3 bucket. You can add this command to the scripts section of the package.json file. For example, the scripts section for my package.json looks like this:
Only users who have access to the S3 bucket can run this script. The AWS CLI credentials are separate from your application code. However, you can place the S3 bucket name in an environment variable and use the environment variable instead of the specific name in your package.json file. This ensures that your package.json file does not contain specific references to your AWS resources and that the project can be shared between multiple developers.
After the process is complete, you can browse to your S3 bucket to see your app deployed. By default, your files are available on the CloudFront edge cache servers within an hour. If you have a production app, you can also invalidate the contents of the CloudFront edge cache servers. The URL of the CloudFront edge cache servers is displayed on the Hosting and Streaming feature page in AWS Mobile Hub.
The CloudFront CLI is currently in preview. You can enable it by running the following command:
After you configure the preview feature, list the distributions. On macOS, you can run the following:
Replace d21o with enough of the URL for your CloudFront distribution to uniquely identify it. I don’t have that many CloudFront distributions, so using the first few characters is enough to limit the output to just 1 line:

The highlighted text is the distribution ID associated with the URL. I can create an invalidation as follows:
I need to quote the wildcard character. If I do not properly quote the *, the shell expands it to all the files in the directory. This is definitely not what you want. You can monitor the invalidation by running the following command:
Best Practices
When working with any architecture, there are inevitably some best practices to discuss. Content delivery networks are no different. The best practice that you should definitely follow is to ensure you version each file. The easiest way to do this is to use a task runner automation tool (broccoli, grunt, or gulp) for the distribution. Use the version from the package.json file as part of the directory so that your build directory is copied to a new directory each time it is built. When you deploy, you can adjust the version that is distributed to your end users by running the following command:
For example, if you are using gulp and have a Gulpfile.js, you can include the following task:
const gulp = require('gulp');
const exec = require('child_process').exec;
const version = require('./package.json').version;

// Make sure you assign your distribution ID here
const distributionid = '<your-distribution-id>'
gulp.task('update-cloudfront', (cb) => {
    const cmd = 'aws cloudfront update-distribution';
    exec(`${cmd} --id ${distributionid} --default-root-object ${version}/index.html`, cb);
});
Call the update-cloudfront task as the last task in the deployment pipeline to do the adjustment. You can get the distribution ID programatically from a file.
There are many plugins for the task runners to handle AWS resources. These can be used as an aid to produce an automated workflow for deploying from your web development workflow.
Wrap up
Now that you have a React app running within the AWS Cloud, you can use AWS Cloud features within your app. In future blog posts, I’ll describe how to use AWS Cloud features in your React application.