Networking & Content Delivery
Introducing AWS Cloud WAN (Preview)
Update 7/12/22: AWS Cloud WAN is now generally available.
Today, AWS announced the preview release of a new networking service, AWS Cloud WAN. Cloud WAN is a managed wide area networking (WAN) service that makes it easy for you to build, manage, and monitor a global network that connects resources running across your cloud and on-premises environments. AWS gives customers many powerful, yet simple services for Cloud networking. Just think about one of the most useful and central features – Amazon Virtual Private Cloud (VPC). Or AWS Transit Gateway, which allows you to build a hub-and-spoke network topology within an AWS Region. Cloud WAN provides an easy way to connect your data centers, branch offices, and cloud resources into a unified, centrally managed network, reducing the operational cost and complexity involved with running a global network.
Over the years, we’ve seen a change in how customers use the AWS network. More than ever, customers are looking to decrease the complexity of their infrastructure so they can focus on their applications and other business priorities, their network is stretched over a global footprint, and customers are using a mix of technologies to make this happen. However, the complexity of managing this combination of requirements can slow customers down. We’re excited to provide Cloud WAN as it is global, managed by AWS, and allows you to choose how you want to reach AWS—whether that’s through VPNs, Software-Defined WANs (SD-WAN), or fixed lines.
In this blog post, we look at the main use cases for Cloud WAN. We cover how you can get started, and look at the key functionality available in the public preview.
Industry leading partners
We’re excited to be working with industry leading partners at the launch of Cloud WAN. Before we jump into the use cases, we want to highlight the great things they have been doing and saying:
- Aviatrix – blog post >>
- Cisco Systems – announcement >>
- Fortinet – blog post >>
- Prosimo – quick start guide >>
- VMware – blog post >>
- Aruba – blog post >>
- Alkira – blog post >>
- Intercloud – blog post >>
- DXC Technologies – blog post >>
- Kyndryl – blog post >>
- Ubyon- announcement >>
Primary use cases for AWS Cloud WAN
Cloud WAN helps with connectivity within AWS, connectivity to your data centers, and connectivity to your branches—several of the use cases described in our Introduction to Network Transformation on AWS blog series.
Cloud WAN connects your networks, but also allows you to define network segments and consistently propagate them across your global WAN. It does so through a centrally defined policy and automation.
Cloud WAN is a good choice for customers that are building VPCs across multiple regions (either for disaster recovery or multi-region applications), customers looking at extending SD-WAN to AWS, and customers that would like to replace or augment part of their existing network with AWS’s backbone.
You may have heard about AWS Direct Connect SiteLink, and wonder how it relates to Cloud WAN. The simple answer is that they complement each other. SiteLink lets you send data between Direct Connect locations while bypassing AWS Regions. It’s one of several connectivity options that you will be able to use with a Cloud WAN network, and we expect many customers will want to use both.
Overview & key terminology
Before we look into how to get started, let’s review the core components and the associated concepts in the diagram that follows (Figure 1).
- AWS Network Manager – the user interface in the AWS Management Console and associated APIs to centrally manage your global network.
- Global Network – a single private network that acts as the root-level container for your network objects. A global network can contain both Transit Gateways and a Core Network.
- Core Network – the part of your global network managed by AWS.
- Core Network Policy – a single, versioned policy document which defines all aspects of your core network.
- Attachments – any connections or resources you want to add to your core network. Supported attachments include VPCs, VPNs, and Connect attachments.
- Core Network Edge (CNE) – a Regional connection point for your attachments as defined in the policy. Under the hood, Cloud WAN is using technology similar to Transit Gateway. It’s managed by AWS, but there are differences (dynamic routing is one example).
- Network Segments – routing domains that by default only allow communication within a segment, consistently throughout the global network. These are strongly enforced layer 3 routing domains (unless you create sharing relationships in your network policy).
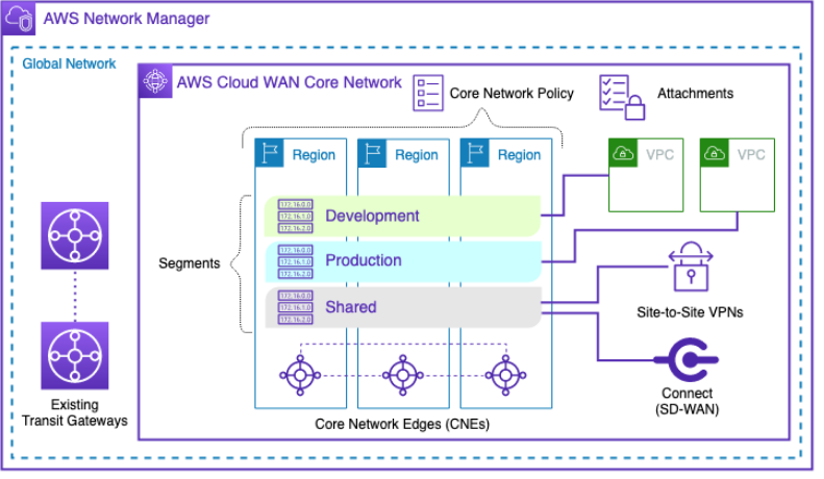
Figure 1: AWS Cloud WAN components
What can you do with Cloud WAN that you couldn’t do before?
It has been possible to build multi-Region applications with our networking services, such as inter-Region VPC peering and inter-region Transit Gateway peering, for multiple years, and customers like Engie and Zendesk are using this model. Cloud WAN adds several additional dimensions on top of what’s available today:
- Single unified global point of control. You can configure your entire network from one network policy, AWS takes the intent from that policy, and makes it true across your network.
- More managed and opinionated service. Cloud WAN builds part of the network for you – you define AWS Regions in your core network policy, and AWS handles peering and dynamic routing between those Regions. Full mesh connectivity is configured in a few clicks in the AWS Management Console (or lines of JSON, if you prefer).
- Centralized dashboard, monitoring, and events. Cloud WAN uses the AWS Network Manager console to show physical and logical topologies, a central dashboard (that includes your own Transit Gateways), detailed monitoring, and a centralized event bus through Amazon EventBridge.
- Built in automation for attachments. With Transit Gateway, you define your own routing, propagations, and how attachments map to route tables. Often, adding a new route table or attachment results in a dozen or more downstream changes. With Cloud WAN, you can use attachment tags to automatically map attachments to segments, where you define relationships between segments through policy.
Cloud WAN is using technology similar to Transit Gateway. It’s managed by AWS, but has a different feature set (like dynamic routing), so there are some differences. However, you’ll be able to use the same integrations and routing patterns you have developed over the years and Transit Gateway has made available. This includes integration with SD-WAN vendors through the Connect attachment type, firewall insertion patterns, and centralized ingress/egress internet access.
Getting started
AWS Network Manager centrally manages your Cloud WAN core network and your Transit Gateways across AWS and on-premises locations. Network Manager is available from a global Console UI. We show this in the following screenshot (Figure 2).
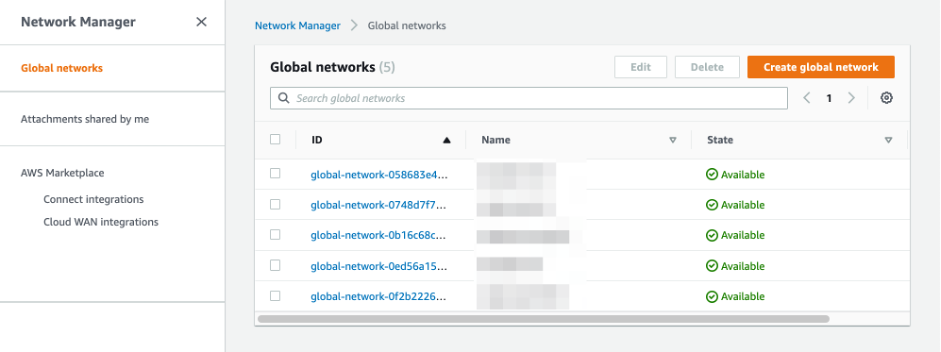
Figure 2: AWS Network Manager console
Connect your on-premises environments to AWS with the help of a telecommunications service provider. These connections bridge the gap between your data centers or colocation facilities and the AWS network, extending your existing WAN network to the cloud.
To get started with Cloud WAN, you first create a global network and the core network that initiates all the basic components. If you prefer, you can follow the steps in the Getting Started with AWS Cloud WAN section of our documentation. An overview of the process is shown in the diagram that follows (Figure 3). We recommend that your create your global network within an AWS account dedicated to network and connectivity management.
You start by naming your network, choosing the Regions where you want to create your CNEs, and the name of the default network segment. You also provide a range of autonomous system numbers (ASNs) when using the core network creation wizard. Cloud WAN automatically allocates ASNs to each CNE from the range you provide. If you want granular allocation, you can explicitly define ASNs for each CNE within the network policy.

Figure 3: Global network high level creation steps
Once you have created your Core Network, you can review the details in AWS Console, the topology, and information about your policy, and attachments. We show this in the following screenshot (Figure 4).
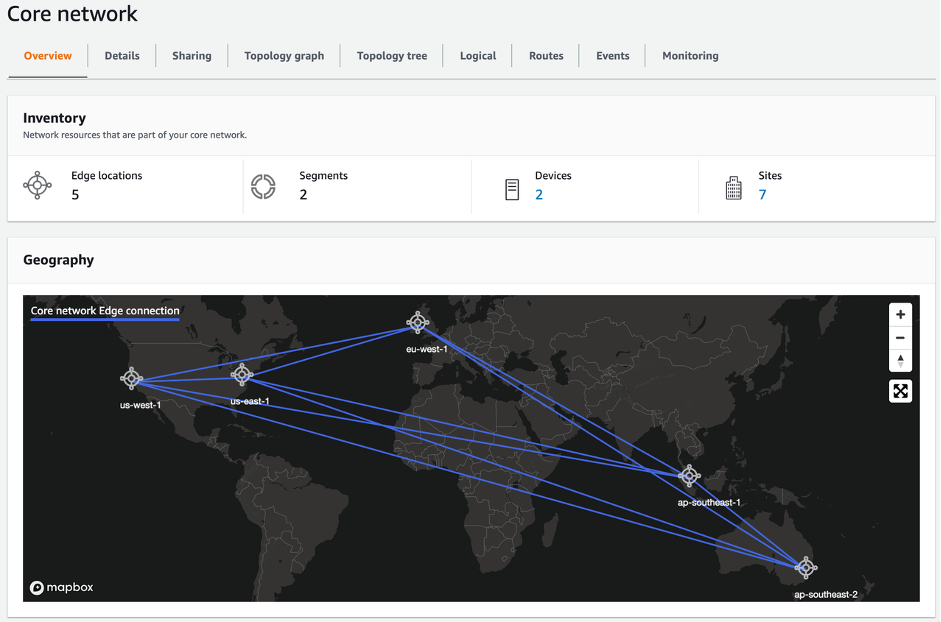
Figure 4: Core network at-a-glance
Attachments and core network sharing
The next step after creating your core network is to attach your cloud resources and on-premises networks. You do so by creating an attachment, as shown in the following screenshot (Figure 5). Note that the Cloud WAN Preview initially supports VPC, VPN, and Connect attachments.

Figure 5: Creation of AWS Cloud WAN attachment
One important aspect of attachment creation is tagging. Cloud WAN can use attachment tags to automatically associate your attachments to desired segments as defined in attachment policies. You can choose to map attachments to segments with two methods: by explicitly mapping a resource (like a vpc-id) to a segment, or by using the tags on the attachment.
To complete the attachment of core network, update your VPC routing tables with prefixes corresponding to your WAN with a target of core network attachment. A screenshot of this follows (Figure 6)—note that the core network attachment target uses full ARN.
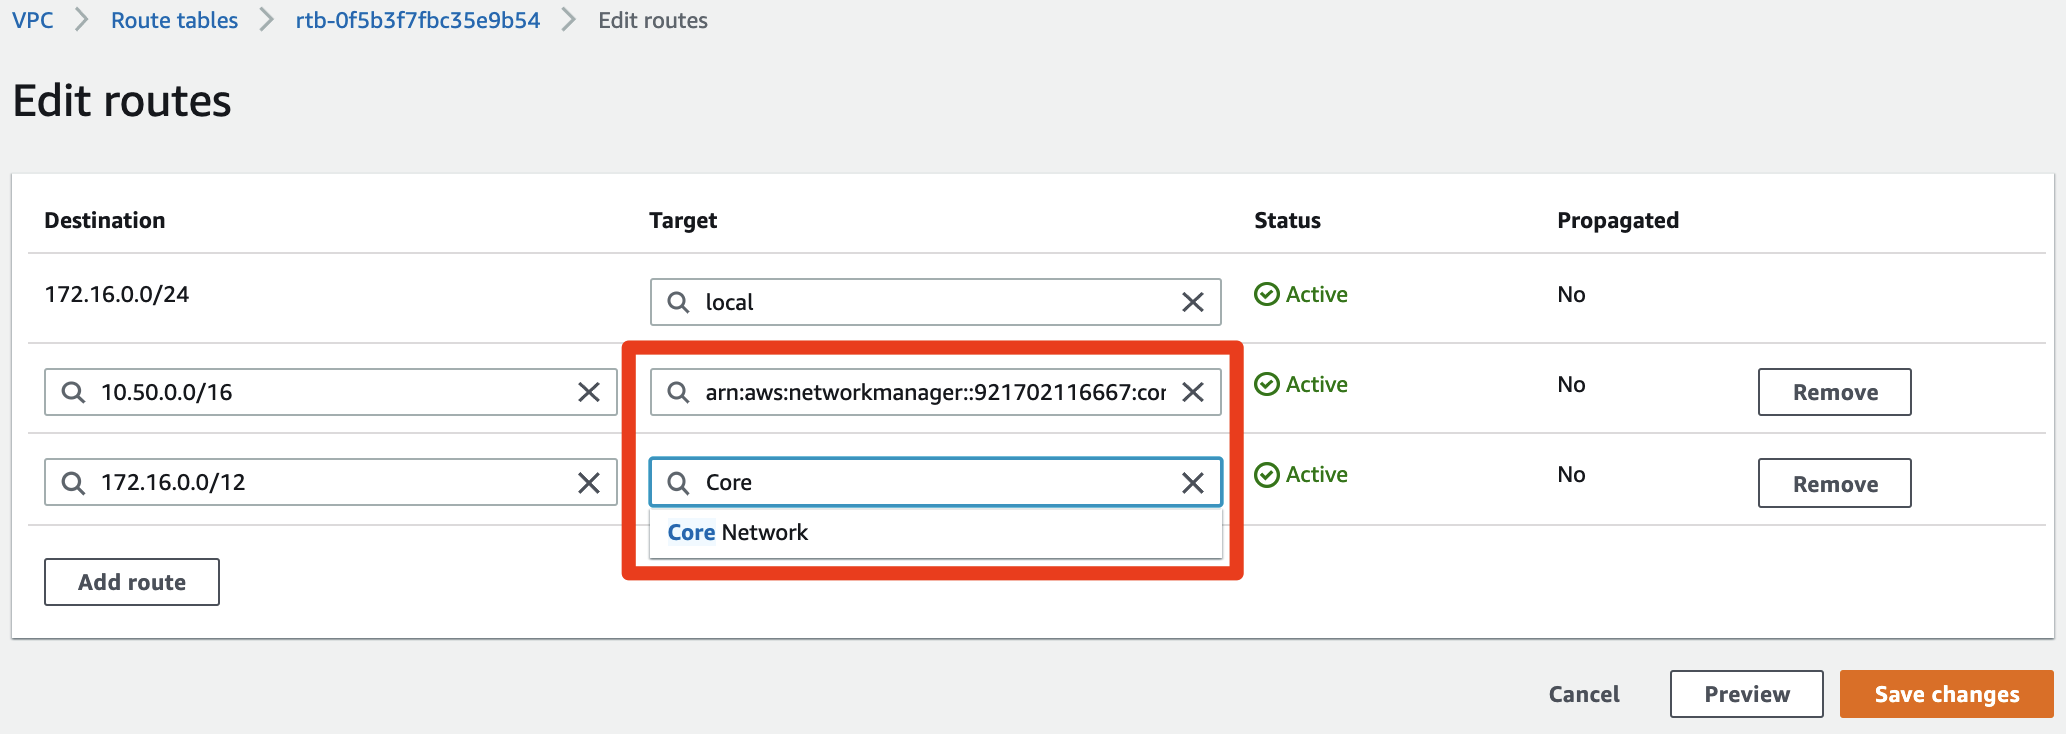
Figure 6: VPC route table modified with prefixes targeting core network attachment
Many of your VPCs are likely located in different AWS accounts as part of your AWS Organization. To attach them, you must first share your core network with AWS Resource Access Manager (RAM), as per the screenshot Figure 7. In fact, core networks are the first global resource you can share within RAM. One side-effect is you must share your global resources from the N. Virginia (us-east-1) Region, so that all other Regions can see the global resource. You must create VPN and Connect attachments within the same AWS account that owns the core network. You can share your core network with an AWS Organization and Organization Units. You can also explicitly share with specific AWS account IDs (that may be outside your AWS Organization).
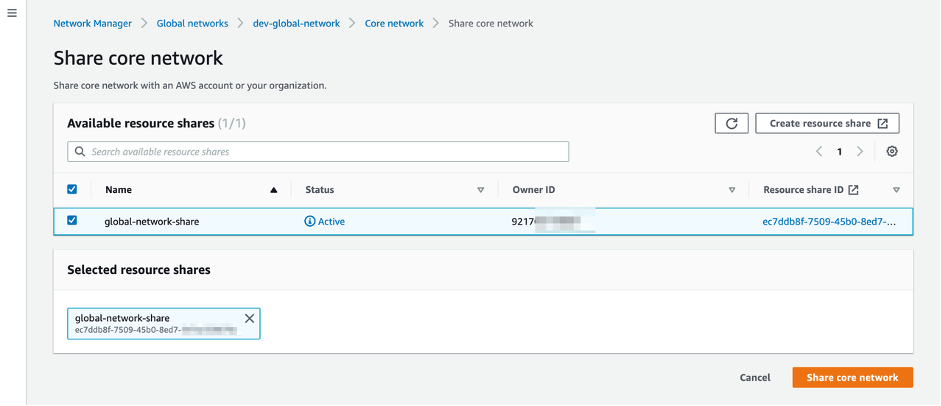
Figure 7: Sharing your core network
Each AWS account you share the core network with must accept the sharing invitation, as per the standard AWS RAM sharing model. We show this in Figure 8 (which again, will be in N. Virginia since it’s a global object).
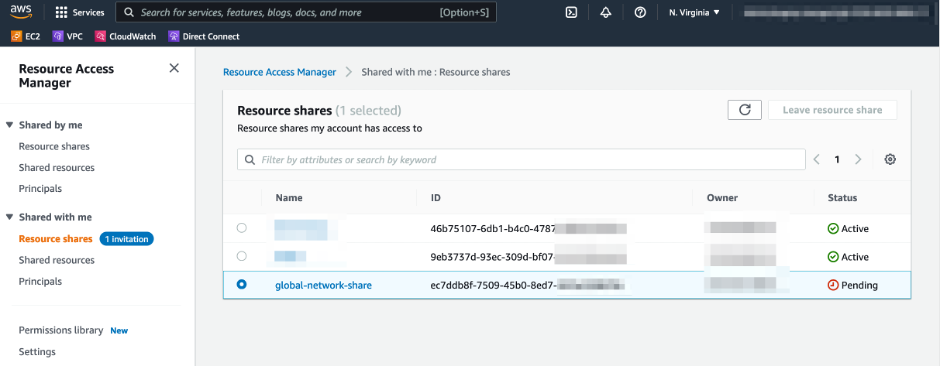
Figure 8: Accepting core network resource share invitation
Network policy and change sets
At this point you have a basic core network shared across your AWS environment and have created several attachments. You can now start modifying your core network and define automation rules, such as attachment policies. Let’s first look at core network policy.
Core network policy, or simply the policy, defines all aspects of your core network configuration. Policy is expressed as JSON template and can be modified using the AWS Console JSON editor, GUI interface, or supplied with an API call. Below is a simple policy that creates a single segment called “mynetwork” and creates a CNE in a single AWS Region (us-east-1). Note: JSON doesn’t support comments, please remove them before attempting to copy the template into your own configuration.
{
  "version": "2021.12",                # Required Policy document version
  "core-network-configuration": {      # Required Core network definition section
      "asn-ranges": ["65500-65510"],   # Required ASNs automatically assigned to CNEs
      "edge-locations": [              # Required Array of CNEs
          {"location": "us-east-1"}    # Single CNE defined
      ]
  },
  "segments": [                        # Required Array of segments
      {"name": "mynetwork"}            # Single segment defined
  ]
}
The preceding policy is the simplest core network you could create. You can create the equivalent during the core network creation wizard in the AWS Console. The policy version ID is set to “1” and is automatically applied. (See the following Figure 9).
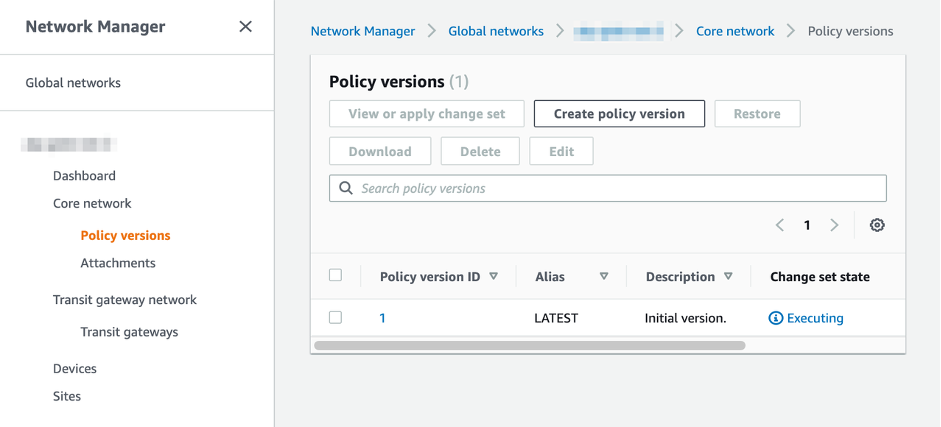
Figure 9: Initial policy describing the core network is created and applied
To demonstrate a lifecycle of your AWS Cloud WAN, consider topology in this diagram (Figure 10).
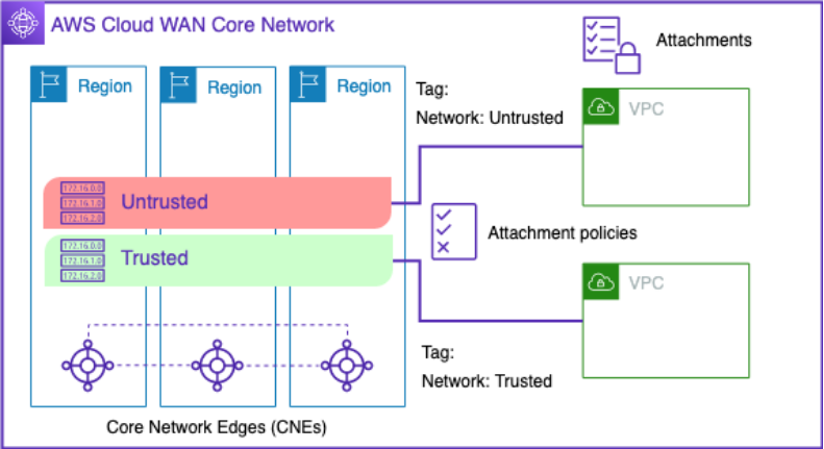
Figure 10: Core network with two segments and attachment policies based on resource tag
As part of the topology change, there are segment changes, new Regions, and new attachment polices based on attachment tags. An “Untrusted” segment allows automatic attachment acceptance (by default, you must manually accept each attachment). We can modify our initial policy (version 1) and add/modify the JSON template as per following:
{
    "version": "2021.12",
    "core-network-configuration": {
        "asn-ranges": ["65500-65510"],
        "edge-locations": [
            {"location": "us-east-1"},
            {"location": "us-west-1"},             # Added CNE
            {"location": "eu-west-1"}              # Added CNE
        ]
    },
    "segments": [
        {"name": "Trusted"},                       # Renamed segment
        {
        "name": "Untrusted",                       # Added new segment
        "require-attachment-acceptance": false     # Added automatically accept attachments into untrusted
        }
    ],
    "attachment-policies": [                       # Added automation policies to associate attachments based on attachment tags
        {
        "rule-number": 100,
        "conditions": [{
            "type": "tag-value",
             "key": "segment",
            "value": "Trusted",
            "operator": "equals"
            }],
            "action": {
            "association-method": "constant",
            "segment": "Trusted"
            }
        },
        {
            "rule-number": 200,
            "conditions": [{
                "type": "tag-value",
                "key": "segment",
                "value": "Untrusted",
                "operator": "equals"
        }],
        "action": {
            "association-method": "constant",
            "segment": "Untrusted"
            }
        }
    ]
}
As you make changes to your core network, a new version of the policy is created. In this example, we call it version 2. You can apply the change set in a controlled manner by selection the version, and clicking “view’ or apply change set” and examine new values (Figure 11).
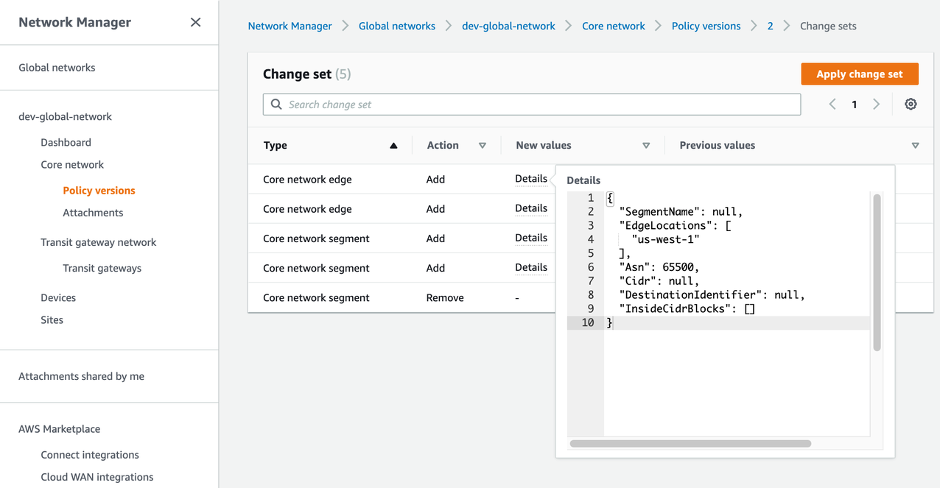
Figure 11: Change set shows new values before the are applied
Applying changes takes about 20 minutes per CNE. The length depends on the complexity of the change. For example, new CNEs take longer because they must establish a full mesh connectivity across all CNEs and start exchanging routes. Keep in mind that core network doesn’t update VPC route tables when new networks are added, such as with new CNEs. You must update VPC level static routes towards core network if required. Also, don’t delete all older versions of your policy and keep recent ones as you can use them to rollback if required. To rollback, you select one of the available versions and select or click restore. The action creates a new change set that you can examine and apply just like any other new policy version (shown in Figure 12).
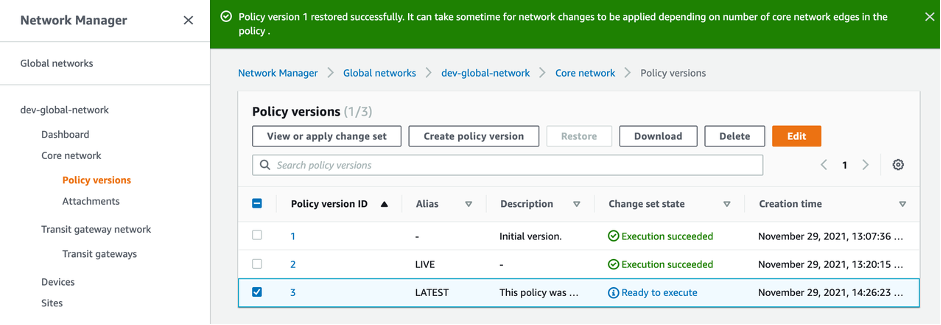
Figure 12: Restored policy change set is ready
If you no longer need your Cloud WAN, you can clean up by first deleting the attachments, and once that finishes, delete the core network.
Topologies
As your requirements change over time and new AWS capabilities are introduced, you can continue to make controlled changes to your policy. For example, you may want to extend your Cloud WAN on premises, and also introduce an inspection point between your segments, as shown in the following diagram (Figure 13).
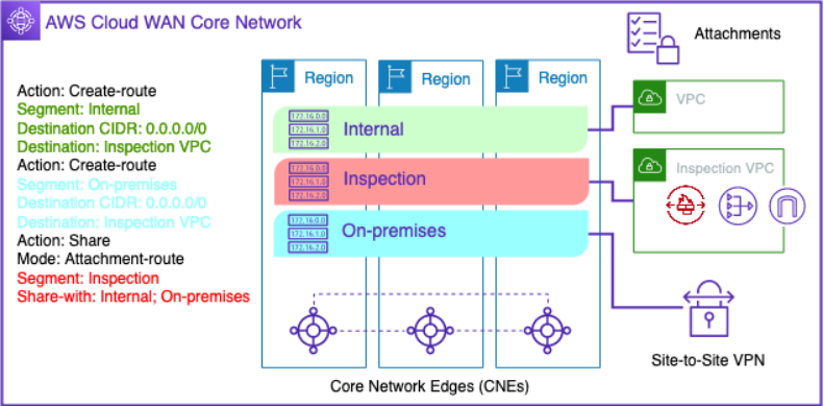
Figure 13: Inter-segment traffic inspection and hybrid connectivity with a Site-to-Site VPN
In this example, you use segment actions that define how routing works between segments. You can create a static route towards your inspection VPC attachments. You can also define sharing that allows attachments in different segments to communicate. By default, attachments can only communicate within the same segment, but you can also choose to isolate attachments from communicating with each other. You can find many more examples of different topologies and corresponding policy examples in the Cloud WAN Policy Examples entry in our documentation.
Note, in the example above, we recommend you have VPN and inspection VPC attachments in every Region. If there is no local attachment, the static route from another Region will dynamically propagate through inter-Region peering connections.
Things to know
- We do not recommend Cloud WAN for production use cases during the public preview.
- CNEs inherit many Transit Gateway characteristics, for example, 50 Gbps throughput per VPC attachment. Contact AWS Support if you require a higher throughput.
- Only enable CNEs in AWS Regions required, as each CNE has an associated hourly cost.
- Cloud WAN pricing details are available here.
- Cloud WAN quotas are listed in the documentation.
- Cloud WAN supports both IPv4 and IPv6.
- If you want to more tightly control access to the core network from a VPC, you can put attachments in a dedicated subnet. Before creating a VPC attachment, create a /28 subnet per AZ for core network attachment. Keep the inbound and outbound network ACLs associated with the core network attachment subnets open.
- Route 53 Resolver does not resolve private IP DNS based names over core network attachments from other VPCs.
- You can optionally define internal CIDR blocks that are used by CNEs for Connect attachments (SD-WAN and virtual routers peered with CNEs). Each CNE uses a /24 so allocate a large enough supernet for future growth. As example, /20 would be enough for 16 CNEs in your core network.
- AWS Transit Gateway and AWS Direct Connect attachment types are not supported during the public preview, but are planned.
- For large networks with many changes, consider creating a separate development and testing global network where you can validate changes.
Cleanup
To avoid unnecessary charges after the preview has finished, please delete the resources created during the testing. Start by deleting various attachments, and any corresponding resources. Delete any RAM resource shares to stop core network sharing. Finally delete the core network itself, and also delete the parent global network.
Conclusion
In this blog post, we introduced AWS Cloud WAN—a managed wide area networking (WAN) service that makes it easy to build, manage, and monitor a unified global network that connects resources running across your cloud and on-premises environments. It provides a central dashboard for attaching the connections you use to reach your branch offices, data centers, and Amazon VPCs to the AWS global network in just a few clicks. You can use simple network policies to centrally configure and automate network management and security tasks and get a complete view of your global network. Cloud WAN is available in public preview today in the following AWS Regions: US East (N. Virginia), US West (N. California), Africa (Cape Town), Asia Pacific (Mumbai), Asia Pacific (Singapore), Asia Pacific (Sydney), Asia Pacific (Tokyo), Europe (Ireland), and Europe (Frankfurt). To learn more about Cloud WAN, please visit our documentation and the FAQ page.

Nick Matthews
Nick is a Principal Product Manager on the Amazon VPC team, and has been working on cloud networking stuff for over six years at AWS. Nick has helps customers and partners build better networking architectures on AWS, including contributions to industry events and as an author the AWS Certified Networking Specialty Certification Guide. Nick generally likes networking stuff, and is on twitter occasionally talking about networking @nickpowpow.

Evgeny Vaganov
Evgeny Vaganov is a Head of Networking SAs across Asia Pacific and Japan (APJ) region. Prior to this role, Evgeny supported customers across Australia and New Zealand adopting Cloud. Passionate about learning and experimenting, he has a goal of making Cloud networking simpler for everyone.