AWS Public Sector Blog
Securely accessing external accounts with AWS IAM Identity Center
Researchers, software vendors, and government agencies often need to access external Amazon Web Services (AWS) accounts—such as those sponsored through the Open Data Sponsorship Program—to manage datasets or resources hosted in those environments. This becomes particularly relevant when organizations have established AWS Organizations with AWS IAM Identity Center enabled and need to extend secure access to AWS accounts that exist outside their organizational boundary. Maintaining strict security controls and alignment with organizational policies is crucial when integrating these external accounts. In this technical post, we walk you through the step-by-step process of securely integrating an external AWS account with AWS IAM Identity Center to enable single sign-on access.
Solution overview
Building upon your existing AWS Organizations and IAM Identity Center setup, this solution uses IAM Identity Center to provide secure, single sign-on access to external AWS accounts. It involves creating a SAML identity provider in the external AWS account and configuring the necessary AWS Identity and Access Management (IAM) roles and policies. The following architectural diagram illustrates the integration.
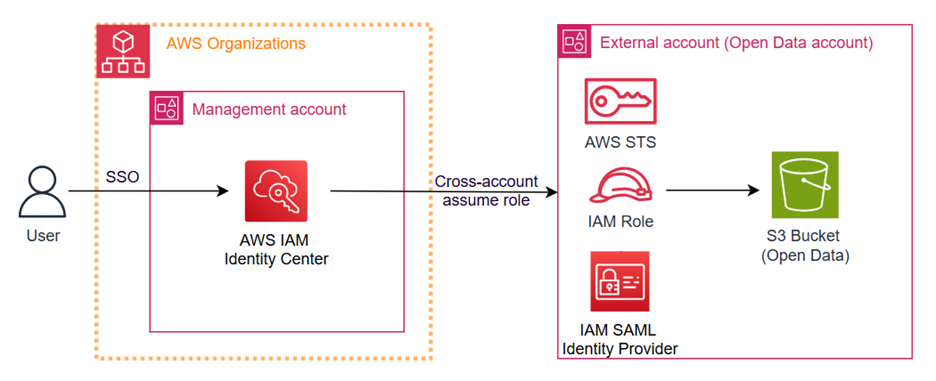
Figure 1: IAM Identity Center single sign-on integration with external AWS account
The solution’s core components work together to establish secure cross-account access. AWS IAM Identity Center—which integrates seamlessly with AWS Organizations—serves as the central authentication service, enabling unified user management and access control. It integrates with the external AWS account through SAML 2.0 federation, where an IAM SAML provider establishes the trust relationship between the two environments. IAM roles and policies in the external account define the precise permissions and access boundaries for users to maintain the principle of least privilege.
This architecture provides several benefits. Users can access the external AWS account through a single set of credentials managed by IAM Identity Center, eliminating the need for separate access keys or passwords. The SAML-based federation provides secure authentication, while granular IAM policies enable fine-grained access control.
To implement this solution successfully, several key requirements must be met.
Prerequisites
Before proceeding with the implementation, you need the following:
- An existing AWS Organizations with IAM Identity Center enabled and configured
- Administrator access to IAM Identity Center in the AWS Organizations management account
- Administrator access to the external AWS account you want to integrate
- Basic familiarity with IAM roles and policies
With these prerequisites in place, the implementation begins with configuring the IAM Identity Center application.
Configuring the IAM Identity Center application
In the AWS Organizations management account where IAM Identity Center is enabled, create a custom application and obtain its SAML metadata file. This metadata file establishes the trust relationship between IAM Identity Center and the external AWS account.
- Navigate to the IAM Identity Center console of the management account of your AWS Organizations.
- In the navigation pane, under Application assignments, choose Applications.
- On the Applications page, choose Add applications.
- In the Setup preference section, choose I want to select an application from the catalog.
- In the Application catalog section, search and choose External AWS Account, as shown in the following screenshot. Choose Next.
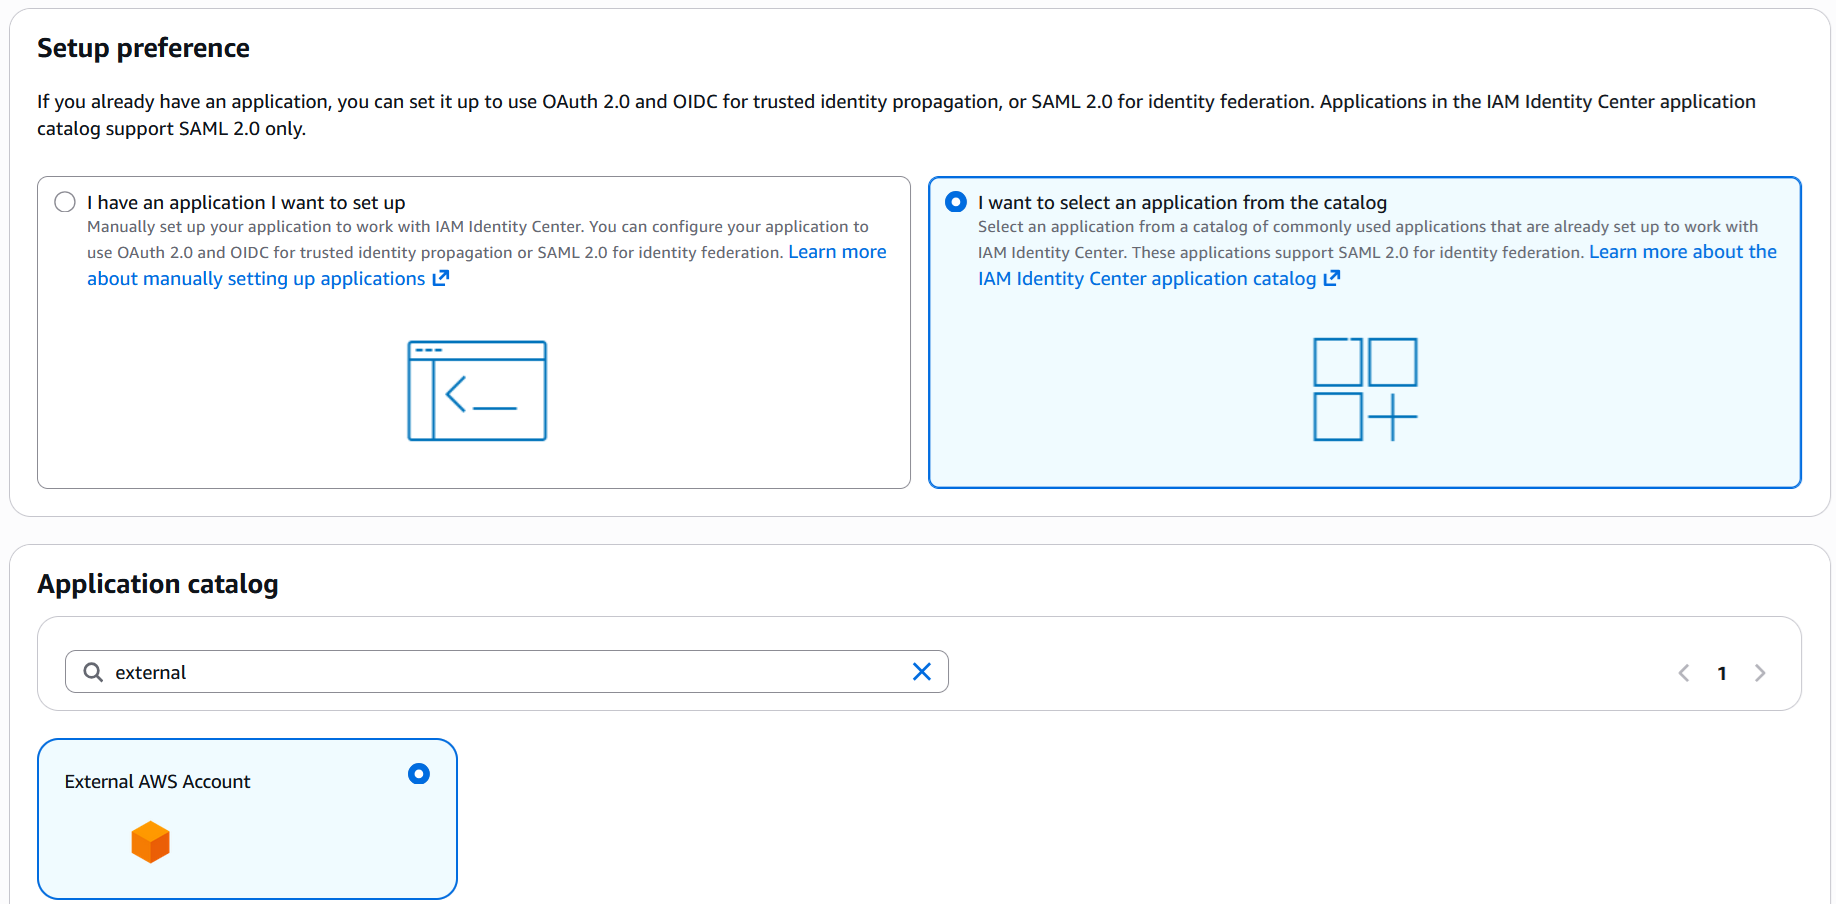
Figure 2: Search and choose External AWS Account as the application type
- In the Configure application section, provide a display name and an optional description for the application.
- In the IAM Identity Center metadata section, download the IAM Identity Center SAML metadata file and save it because you need to upload this file to the external AWS account later. The following screenshot shows where to download this metadata file.
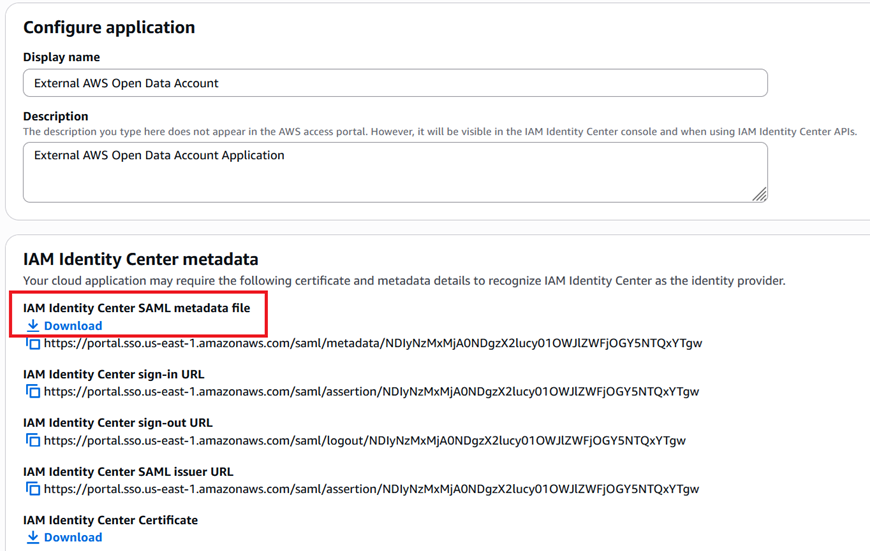
Figure 3: Download IAM Identity Center SAML metadata file
- Keep the default value in other fields. Choose Submit to create the application.
Creating the SAML identity provider in the external AWS account
After confirming the IAM Identity Center application is in Active status and obtaining the SAML metadata file, the next step is to establish the trust relationship in the external AWS account. This involves creating a SAML identity provider. Follow these steps:
- Sign in to the external AWS account and navigate to the IAM console.
- In the navigation pane, under Access management, choose Identity providers.
- Choose Add provider.
- For Provider type, choose SAML.
- Give the identity provider a name.
- Under Metadata document, choose Choose file and upload the IAM Identity Center SAML metadata file that you downloaded earlier.
- Choose Add provider.
The following screenshot shows the configuration page for adding a SAML identity provider in the IAM console.
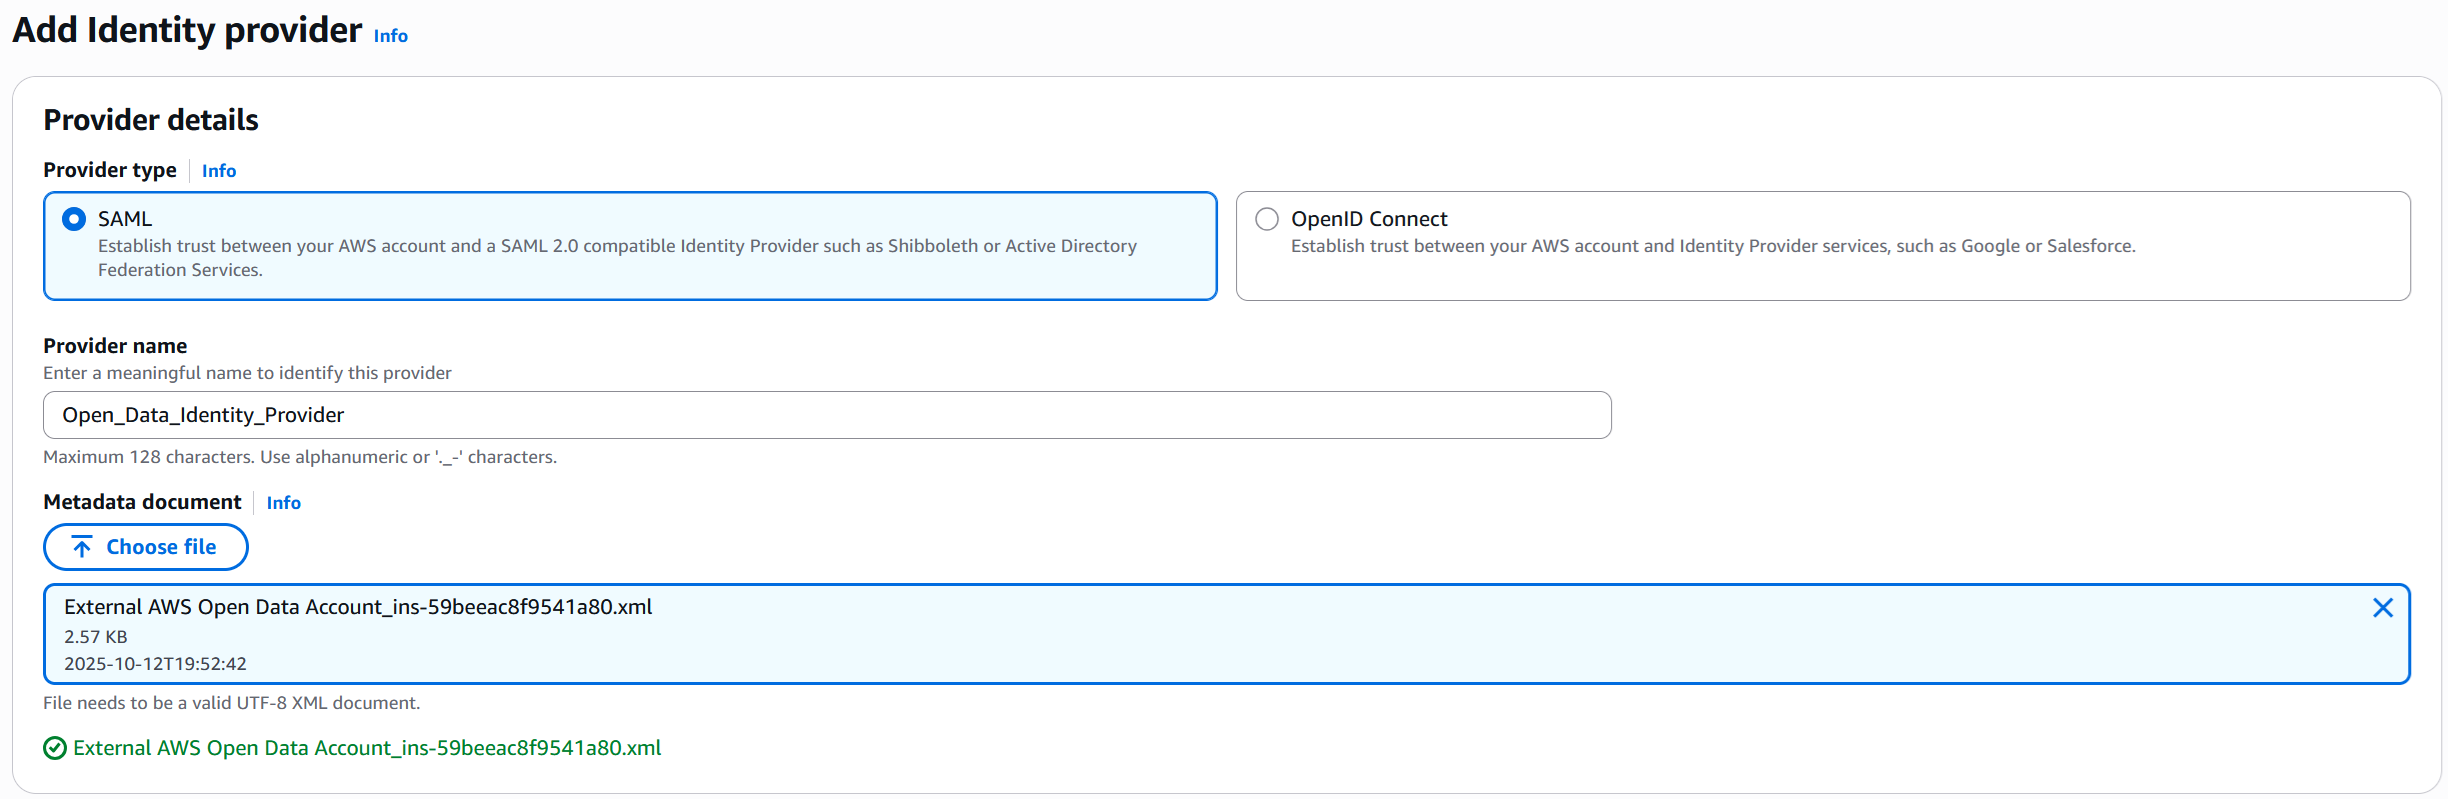
Figure 4: Add identity provider in external AWS account
After creating the identity provider, navigate to its details page and note these two attributes:
- Identity provider’s Amazon Resource Name (ARN), which follows this format:
arn:aws:iam::[ACCOUNT_ID]:saml-provider/[NAME_OF_IDENTITY_PROVIDER]
- Sign-in URL, found in the Metadata document section
These provider attributes are required for configuring the attribute mappings in IAM Identity Center. You can find both attributes in the identity provider details page, as shown in the following screenshot.
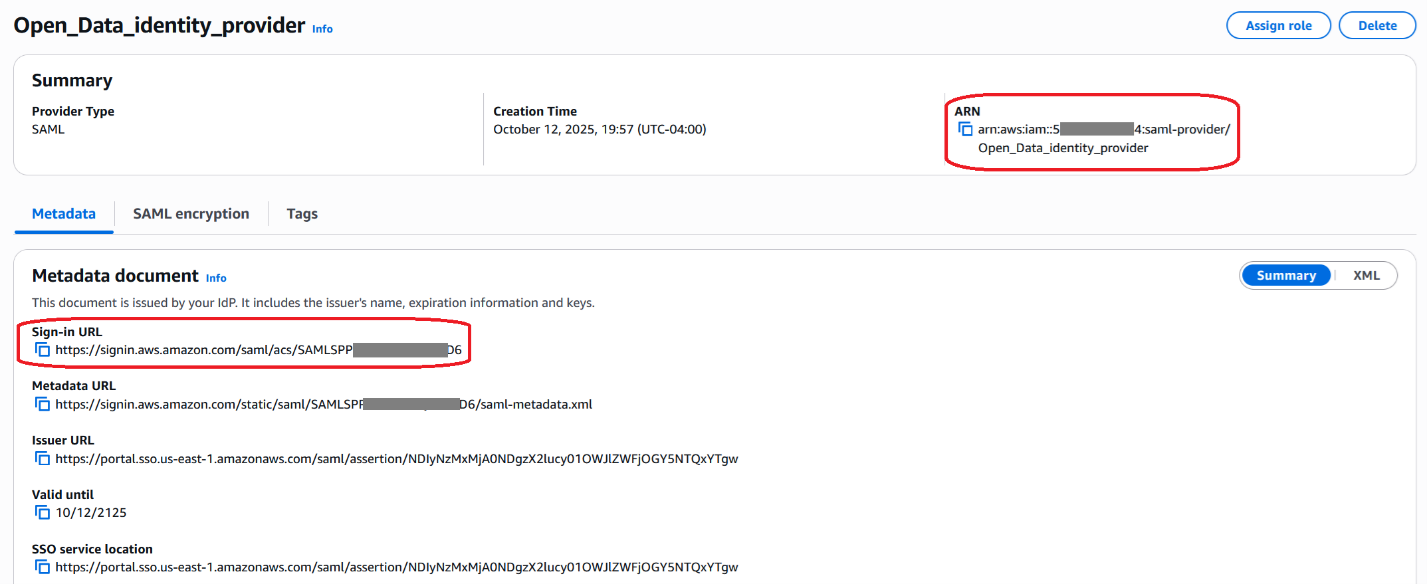
Figure 5: IAM identity provider attributes
Creating the IAM role for SAML federation
After establishing the SAML identity provider, the next step is to create an IAM role that defines what actions users can perform in the external account. This role is assumed by users when they access the account through IAM Identity Center.
First, create an IAM policy in the external account to define the required permissions. For example, if data providers need to access their sponsored data in the Open Data Sponsorship Program, the policy should include specific Amazon Simple Storage Service (Amazon S3) permissions for the relevant data buckets. For detailed instructions on creating IAM policies, refer to the AWS documentation on creating IAM policies.
Then, create an IAM role in the external account with the following configuration:
- In the IAM console navigation pane, under Access management, choose Roles.
- On the Roles page, choose Create role.
- For Trusted entity type, choose SAML 2.0 federation.
- In SAML 2.0-based provider, choose the identity provider created earlier.
- For Access to be allowed, choose an appropriate value based on the user’s need. For example, choose Allow programmatic and AWS Management Console access.
- For Sign-in endpoint type, choose Non-Regional endpoint.The following screenshot shows an example of the Select trusted entity configuration.
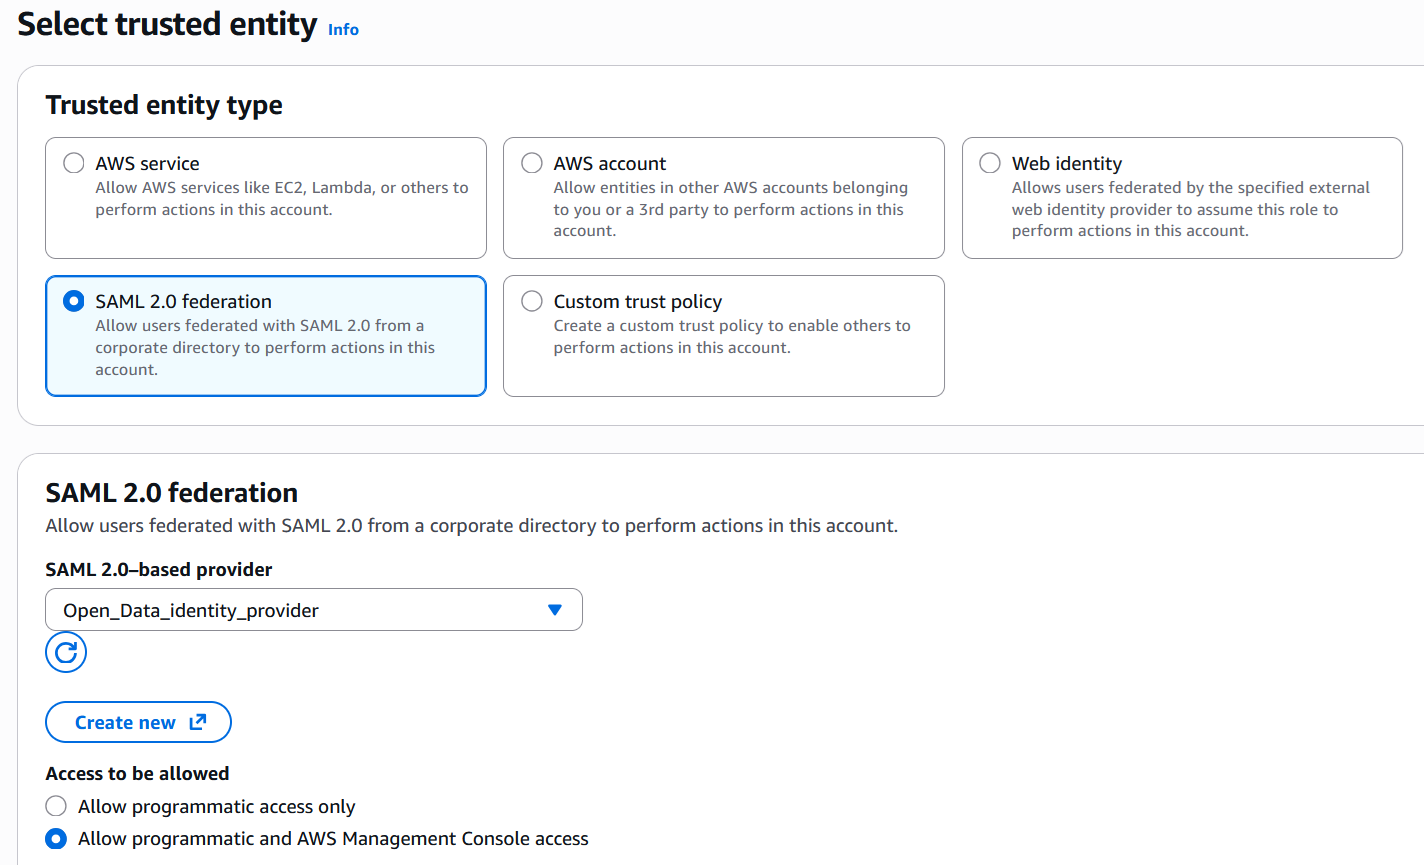
Figure 6: Select trusted entity configuration for the SAML federation IAM role
- For Sign-in URLs to include unique identifiers, keep the default setting With unique identifiers.
- Choose Next to proceed.
- On the Add permissions page, attach the policies needed for this role:
– Add the IAM policy you created earlier, for example the AWS Open Data S3 access policy.
– Attach any necessary AWS managed policies.
– Choose Next. - Provide a name and description for the role.
- Review the role configuration and choose Create role to finalize the SAML federation IAM role.
After creating the IAM role, note its ARN, which follows this format:
arn:aws:iam::[ACCOUNT_ID]:role/[NAME_OF_ROLE]
This ARN is required when configuring the attribute mappings in IAM Identity Center.
Mapping attributes in IAM Identity Center application
After configuring the SAML federation components in the external account, switch back to the AWS Organizations management account where IAM Identity Center is enabled. The next step is to configure attribute mappings that link the IAM Identity Center application to the IAM role created in the external account.
- Navigate to the IAM Identity Center console of your AWS Organizations management account.
- In the navigation pane, under Application assignments, choose Applications.
- On the Customer managed tab, choose and open the application created previously.
- On the Actions dropdown menu, choose Edit attribute mappings.
- Choose Add new attribute mapping.
- Under the User attribute in the application column, enter the following value:
https://aws.amazon.com/SAML/Attributes/Role - Under the Maps to this string value or user attribute in IAM Identity Center column, enter two ARNs separated by a comma:
– First ARN: The identity provider ARN noted in the “Creating the SAML identity provider in external AWS account” section.
– Second ARN: The IAM role ARN noted in the “Creating the IAM role for SAML federation” section.
arn:aws:iam::[ACCOUNT_ID]:saml-
provider/[NAME_OF_IDENTITY_PROVIDER],arn:aws:iam::[ACCOUNT_ID]:role/[NAME_OF_ROLE]
- Under the Format column, keep the value of unspecified.
- Choose Save changes.
The IAM Identity Center application supports only one IAM role attribute mapping per application instance. Organizations requiring multiple roles can create separate IAM Identity Center application instances for each role mapping.
The following screenshot demonstrates how to configure the SAML attribute mappings for the IAM Identity Center application, showing the required role attribute configuration.
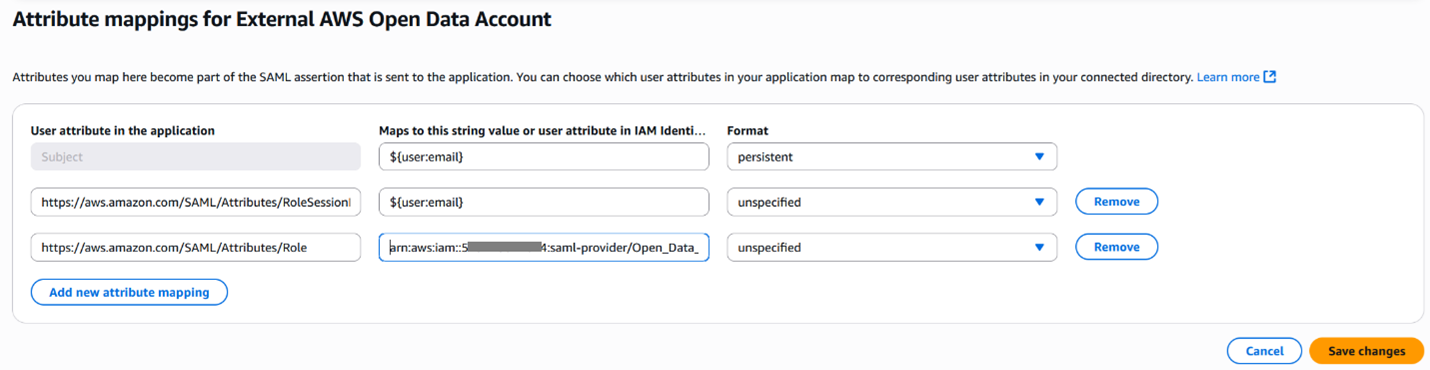
Figure 7: SAML attribute mappings for IAM Identity Center application
- Still on the IAM Identity Center application page, on the Actions dropdown menu, choose Edit configuration.
- In the Application metadata section, locate the Application ACS URL field and replace the default value with the sign-in URL noted in the “Creating the SAML identity provider in the external AWS account” section. This URL is crucial for establishing the correct endpoint for SAML assertions.
- Choose Submit to save changes.
The following screenshot shows the Application ACS URL setting in the IAM Identity Center application configuration.

Figure 8: Application ACS URL configuration in the IAM Identity Center application
Assigning users and verifying the integration
With the SAML federation and attribute mappings configured, the final steps are to assign users to the application and verify the integration works as expected.
If necessary, add users to your Identity Center directory. These users will assume the IAM role you created earlier to access the external AWS account.
Assigning users to the application:
- Navigate to the IAM Identity Center console of your AWS Organizations management account.
- In the navigation pane, under Application assignments, choose Applications.
- Under Customer managed tab, choose and open the application created previously.
- Choose Assign users and groups.
- Search and select the users or groups to assign access to the external account.
Verifying the integration:
- In the AWS Organizations management account, note the AWS access portal URL. This can be found in the Settings summary section of the IAM Identity Center Dashboard.
- Sign out of both IAM Identity Center and the external AWS account.
- Navigate to your organization’s AWS access portal URL.
- Sign in with the credentials of a user assigned to the application.
- Under the Applications tab, select the external AWS account application.The following screenshot shows the external AWS account application on the AWS access portal.
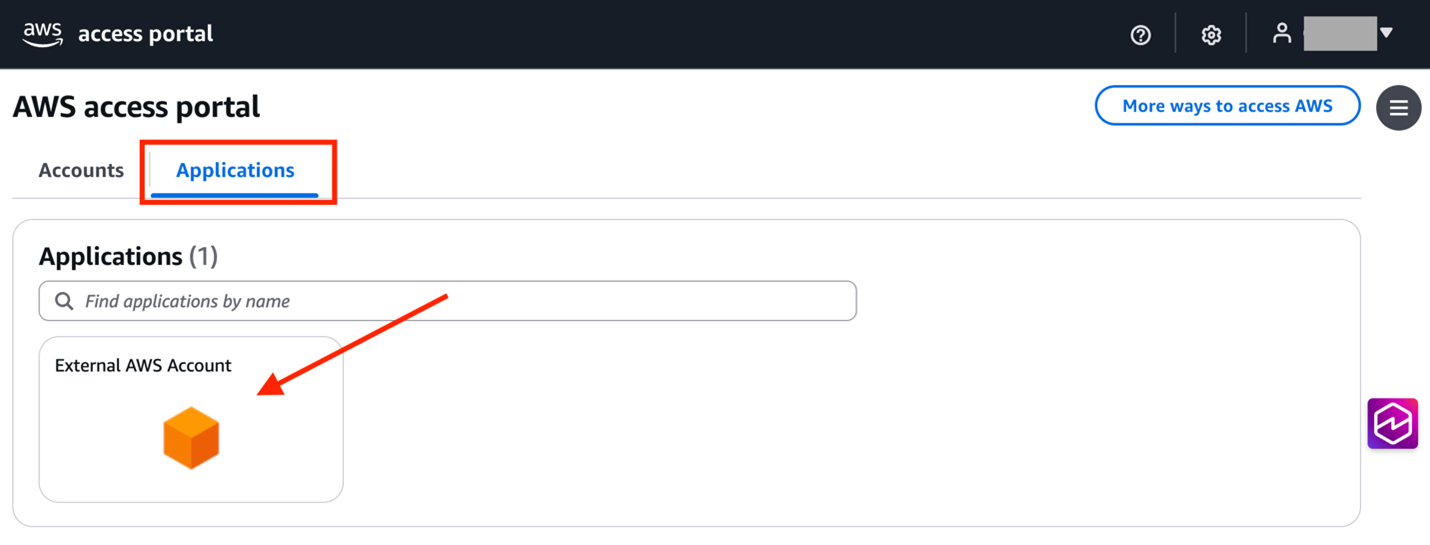
Figure 9: External AWS account application selection
- Verify that you’re successfully federated into the external AWS account with the expected permissions, for example, accessing the AWS Open Data S3 bucket successfully.
After you’ve verified successful access to the external AWS account, the implementation is complete. Users assigned to the application can now access the external account’s resources through the AWS access portal using their IAM Identity Center credentials. This implementation provides several key benefits: centralized user management through IAM Identity Center, secure access without the need for long-term access keys, and fine-grained access control through IAM roles and policies.
Next steps
With the IAM Identity Center federation to the external AWS account now in place, you’ve established a secure and manageable access solution. To maintain and enhance this setup’s effectiveness and security over time, consider the following actions:
- Review the IAM Identity Center Documentation for additional features and best practices.
- Check the Open Data on AWS program for periodic updates and news.
- Review the AWS Open Data samples GitHub repository for guidance and how-to documentation.
- Learn more about SAML identity providers in IAM.
- Understand IAM role best practices.
Conclusion
The integration of external AWS accounts with IAM Identity Center offers a robust solution for secure, streamlined access to critical resources. This approach is particularly valuable for research institutions, educational organizations, and government agencies using public datasets through programs such as Open Data on AWS. By implementing this solution, organizations can achieve centralized authentication, enhanced security without long-term access keys, and granular access control through IAM roles and policies. Whether accessing scientific datasets, collaborating on public sector initiatives, or managing academic projects, this framework provides a secure and efficient way to manage external AWS account access, balancing the needs of researchers and IT administrators alike.