AWS Security Blog
Enabling serverless security analytics using AWS WAF full logs, Amazon Athena, and Amazon QuickSight
September 9, 2021: Amazon Elasticsearch Service has been renamed to Amazon OpenSearch Service. See details.
Traditionally, analyzing data logs required you to extract, transform, and load your data before using a number of data warehouse and business intelligence tools to derive business intelligence from that data—on top of maintaining the servers that ran behind these tools.
This blog post will show you how to analyze AWS Web Application Firewall (AWS WAF) logs and quickly build multiple dashboards, without booting up any servers. With the new AWS WAF full logs feature, you can now log all traffic inspected by AWS WAF into Amazon Simple Storage Service (Amazon S3) buckets by configuring Amazon Kinesis Data Firehose. In this walkthrough, you’ll create an Amazon Kinesis Data Firehose delivery stream to which AWS WAF full logs can be sent, and you’ll enable AWS WAF logging for a specific web ACL. Then you’ll set up an AWS Glue crawler job and an Amazon Athena table. Finally, you’ll set up Amazon QuickSight dashboards to help you visualize your web application security. You can use these same steps to build additional visualizations to draw insights from AWS WAF rules and the web traffic traversing the AWS WAF layer. Security and operations teams can monitor these dashboards directly, without needing to depend on other teams to analyze the logs.
The following architecture diagram highlights the AWS services used in the solution:
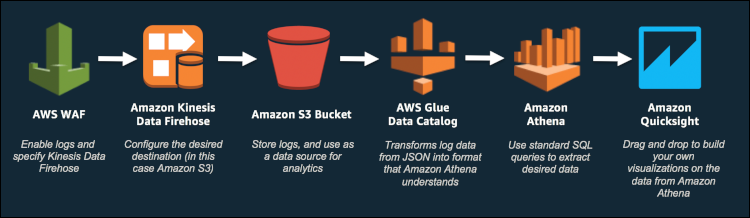
Figure 1: Architecture diagram
AWS WAF is a web application firewall that lets you monitor HTTP and HTTPS requests that are forwarded to an Amazon API Gateway API, to Amazon CloudFront or to an Application Load Balancer. AWS WAF also lets you control access to your content. Based on conditions that you specify—such as the IP addresses from which requests originate, or the values of query strings—API Gateway, CloudFront, or the Application Load Balancer responds to requests either with the requested content or with an HTTP 403 status code (Forbidden). You can also configure CloudFront to return a custom error page when a request is blocked.
Amazon Kinesis Data Firehose is a fully managed service for delivering real-time streaming data to destinations such as Amazon S3, Amazon Redshift, Amazon Elasticsearch Service, and Splunk. With Kinesis Data Firehose, you don’t need to write applications or manage resources. You configure your data producers to send data to Kinesis Data Firehose, and it automatically delivers the data to the destination that you specified. You can also configure Kinesis Data Firehose to transform your data before delivering it.
AWS Glue can be used to run serverless queries against your Amazon S3 data lake. AWS Glue can catalog your S3 data, making it available for querying with Amazon Athena and Amazon Redshift Spectrum. With crawlers, your metadata stays in sync with the underlying data (more details about crawlers later in this post). Amazon Athena and Amazon Redshift Spectrum can directly query your Amazon S3 data lake by using the AWS Glue Data Catalog. With AWS Glue, you access and analyze data through one unified interface without loading it into multiple data silos.
Amazon Athena is an interactive query service that makes it easy to analyze data directly in Amazon S3 using standard SQL. Athena is serverless, so there is no infrastructure to manage, and you pay only for the queries that you run.
Amazon QuickSight is a business analytics service you can use to build visualizations, perform one-off analysis, and get business insights from your data. It can automatically discover AWS data sources and also works with your data sources. Amazon QuickSight enables organizations to scale to hundreds of thousands of users and delivers responsive performance by using a robust in-memory engine called SPICE.
SPICE stands for Super-fast, Parallel, In-memory Calculation Engine. SPICE supports rich calculations to help you derive insights from your analysis without worrying about provisioning or managing infrastructure. Data in SPICE is persisted until it is explicitly deleted by the user. SPICE also automatically replicates data for high availability and enables Amazon QuickSight to scale to hundreds of thousands of users who can all simultaneously perform fast interactive analysis across a wide variety of AWS data sources.
Step one: Set up a new Amazon Kinesis Data Firehose delivery stream
- In the AWS Management Console, open the Amazon Kinesis Data Firehose service and choose the button to create a new stream.
- In the Delivery stream name field, enter a name for your new stream that starts with aws-waf-logs- as shown in the screenshot below. AWS WAF filters all streams starting with the keyword aws-waf-logs when it displays the delivery streams. Note the name of your stream since you’ll need it again later in the walkthrough.
- For Source, choose Direct PUT, since AWS WAF logs will be the source in this walkthrough.

Figure 2: Select the delivery stream name and source
- Next, you have the option to enable AWS Lambda if you need to transform your data before transferring it to your destination. (You can learn more about data transformation in the Amazon Kinesis Data Firehose documentation.) In this walkthrough, there are no transformations that need to be performed, so for Record transformation, choose Disabled.

Figure 3: Select “Disabled” for record transformations
- You’ll have the option to convert the JSON object to Apache Parquet or Apache ORC format for better query performance. In this example, you’ll be reading the AWS WAF logs in JSON format, so for Record format conversion, choose Disabled.

Figure 4: Choose “Disabled” to not convert the JSON object
- You’ll have the option to convert the JSON object to Apache Parquet or Apache ORC format for better query performance. In this example, you’ll be reading the AWS WAF logs in JSON format, so for Record format conversion, choose Disabled.
- On the Select destination screen, for Destination, choose Amazon S3.

Figure 5: Choose the destination
- For the S3 destination, you can either enter the name of an existing S3 bucket or create a new S3 bucket. Note the name of the S3 bucket since you’ll need the bucket name in a later step in this walkthrough.
- For Source record S3 backup, choose Disabled, because the destination in this walkthrough is an S3 bucket.

Figure 6: Enter the S3 bucket name, and select “Disabled” for the source record S3 backup
- On the next screen, leave the default conditions for Buffer size, Buffer interval, S3 compression and S3 encryption as they are. However, we recommend that you set Error logging to Enabled initially, for troubleshooting purposes.
- For IAM role, select Create new or choose. This opens up a new window that will prompt you to create firehose_delivery_role, as shown in the following screenshot. Choose Allow in this window to accept the role creation. This grants the Kinesis Data Firehose service access to the S3 bucket.

Figure 7: Select “Allow” to create the IAM role “firehose_delivery_role”
- For IAM role, select Create new or choose. This opens up a new window that will prompt you to create firehose_delivery_role, as shown in the following screenshot. Choose Allow in this window to accept the role creation. This grants the Kinesis Data Firehose service access to the S3 bucket.
- On the last step of configuration, review all the options you’ve chosen, and then select Create delivery stream. This will cause the delivery stream to display as “Creating” under Status. In a couple of minutes, the status will change to “Active,” as shown in the below screenshot.

Figure 8: Review the options you selected
Step two: Enable AWS WAF logging for a specific Web ACL
- From the AWS Management Console, open the AWS WAF service and choose Web ACLs. Open your Web ACL resource, which can either be deployed on a CloudFront distribution or on an Application Load Balancer.
- Choose the Web ACL for which you want to enable logging. (In the below screenshot, we’ve selected a Web ACL in the US East Region.)
- On the Logging tab, choose Enable Logging.

Figure 9: Choose “Enable Logging”
- The next page displays all the delivery streams that start with aws-waf-logs. Choose the Amazon Kinesis Data Firehose delivery stream that you created for AWS WAF logs at the start of this walkthrough. (In the screenshot below, our example stream name is “aws-waf-logs-us-east-1)
- You can also choose to redact certain fields that you wish to exclude from being captured in the logs. In this walkthrough, you don’t need to choose any fields to redact.
- Select Create.

Figure 10: Choose your delivery stream, and select “Create”
After a couple of minutes, you’ll be able to inspect the S3 bucket that you defined in the Kinesis Data Firehose delivery stream. The log files are created in directories by year, month, day, and hour.
Step three: Set up an AWS Glue crawler job and Amazon Athena table
The purpose of a crawler within your Data Catalog is to traverse your data stores (such as S3) and extract the metadata fields of the files. The output of the crawler consists of one or more metadata tables that are defined in your Data Catalog. When the crawler runs, the first classifier in your list to successfully recognize your data store is used to create a schema for your table. AWS Glue provides built-in classifiers to infer schemas from common files with formats that include JSON, CSV, and Apache Avro.
- In the AWS Management Console, open the AWS Glue service and choose Crawler to setup a crawler job.
- Choose Add crawler to launch a wizard to setup the crawler job. For Crawler name, enter a relevant name. Then select Next.

Figure 11: Enter “Crawler name,” and select “Next”
- For Choose a data store, select S3 and include the path of the S3 bucket that stores your AWS WAF logs, which you made note of in step 1.3. Then choose Next.

Figure 12: Choose a data store
- When you’re given the option to add another data store, choose No.
- Then, choose Create an IAM role and enter a name. The role grants access to the S3 bucket for the AWS Glue service to access the log files.

Figure 13: Choose “Create an IAM role,” and enter a name
- Next, set the frequency to Run on demand. You can also schedule the crawler to run periodically to make sure any changes in the file structure are reflected in your data catalog.

Figure 14: Set the “Frequency” to “Run on demand”
- For output, choose the database in which the Athena table is to be created and add a prefix to identify your table name easily. Select Next.

Figure 15: Choose the database, and enter a prefix
- Review all the options you’ve selected for the crawler job and complete the wizard by selecting the Finish button.
- Now that the crawler job parameters are set up, on the left panel of the console, choose Crawlers to select your job and then choose Run crawler. The job creates an Amazon Athena table. The duration depends on the size of the log files.

Figure 16: Choose “Run crawler” to create an Amazon Athena table
- To see the Amazon Athena table created by the AWS Glue crawler job, from the AWS Management Console, open the Amazon Athena service. You can filter by your table name prefix.
-
- To view the data, choose Preview table. This displays the table data with certain fields showing data in JSON object structure.

Figure 17: Choose “Preview table” to view the data
-
Step four: Create visualizations using Amazon QuickSight
- From the AWS Management Console, open Amazon QuickSight.
- In the Amazon QuickSight window, in the top left, choose New Analysis. Choose New Data set, and for the data source choose Athena. Enter an appropriate name for the data source name and choose Create data source.

Figure 18: Enter the “Data source name,” and choose “Create data source”
- Next, choose Use custom SQL to extract all the fields in the JSON object using the following SQL query:
- To extract individual fields, copy the previous SQL query and paste it in the New custom SQL box, then choose Edit/Preview data.

Figure 19: Paste the SQL query in “New custom SQL query”
- In the Edit/Preview data view, for Data source, choose SPICE, then choose Finish.

Figure 20: Choose “Spice” and then “Finish”
- In the Edit/Preview data view, for Data source, choose SPICE, then choose Finish.
- Back in the Amazon Quicksight console, under the Fields section, select the drop-down menu and change the data type to Date.

Figure 21: In the Amazon Quicksight console, change the data type to “Date”
- After you see the Date column appear, enter an appropriate name for the visualizations at the top of the page, then choose Save.

Figure 22: Enter the name for the visualizations, and choose “Save”
- You can now create various visualization dashboards with multiple visual types by using the drag-and-drop feature. You can drag and drop combinations of fields such as Action, Client IP, Country, Httpmethod, and User Agents. You can also add filters on Date to view dashboards for a specific timeline. Here are some sample screenshots:

Figure 23a: Visualization dashboard samples

Figure 23b: Visualization dashboard samples

Figure 23c: Visualization dashboard samples

Figure 23d: Visualization dashboard samples
Conclusion
You can enable AWS WAF logs to Amazon S3 buckets and analyze the logs while they are being streamed by configuring Amazon Kinesis Data Firehose. You can further enhance this solution by automating the streaming of data and using AWS Lambda for any data transformations based on your specific requirements. Using Amazon Athena and Amazon QuickSight makes it easy to analyze logs and build visualizations and dashboards for executive leadership teams. Using these solutions, you can go serverless and let AWS do the heavy lifting for you.