AWS Security Blog
Hands-on walkthrough of the AWS Network Firewall flexible rules engine – Part 1
AWS Network Firewall is a managed service that makes it easy to provide fine-grained network protections for all of your Amazon Virtual Private Clouds (Amazon VPCs) to ensure that your traffic is inspected, monitored, and logged. The firewall scales automatically with your network traffic, and offers built-in redundancies designed to provide high availability.
AWS Network Firewall offers a flexible rules engine that gives you the ability to write thousands of firewall rules for granular policy enforcement. It supports inbound and outbound web filtering for unencrypted web traffic. For encrypted web traffic, AWS Network Firewall inspects the domain name provided by the Server Name Indicator (SNI) during the Transport Layer Security (TLS) handshake. Also, it offers an intrusion prevention system (IPS), which provides active traffic flow inspection to help you identify and block vulnerability exploits.
By following this blog post, part 1 in a 2-part series, you will deploy a demo AWS Network Firewall within your AWS account to interact, first-hand, with its rules engine. In part 2 of this series, we will discuss how you can incorporate stateful rule groups with strict rule order and ability to set one or more default actions.
Solution overview
The solution in this post uses route tables to send all network traffic to a firewall endpoint, as shown in Figure 1.
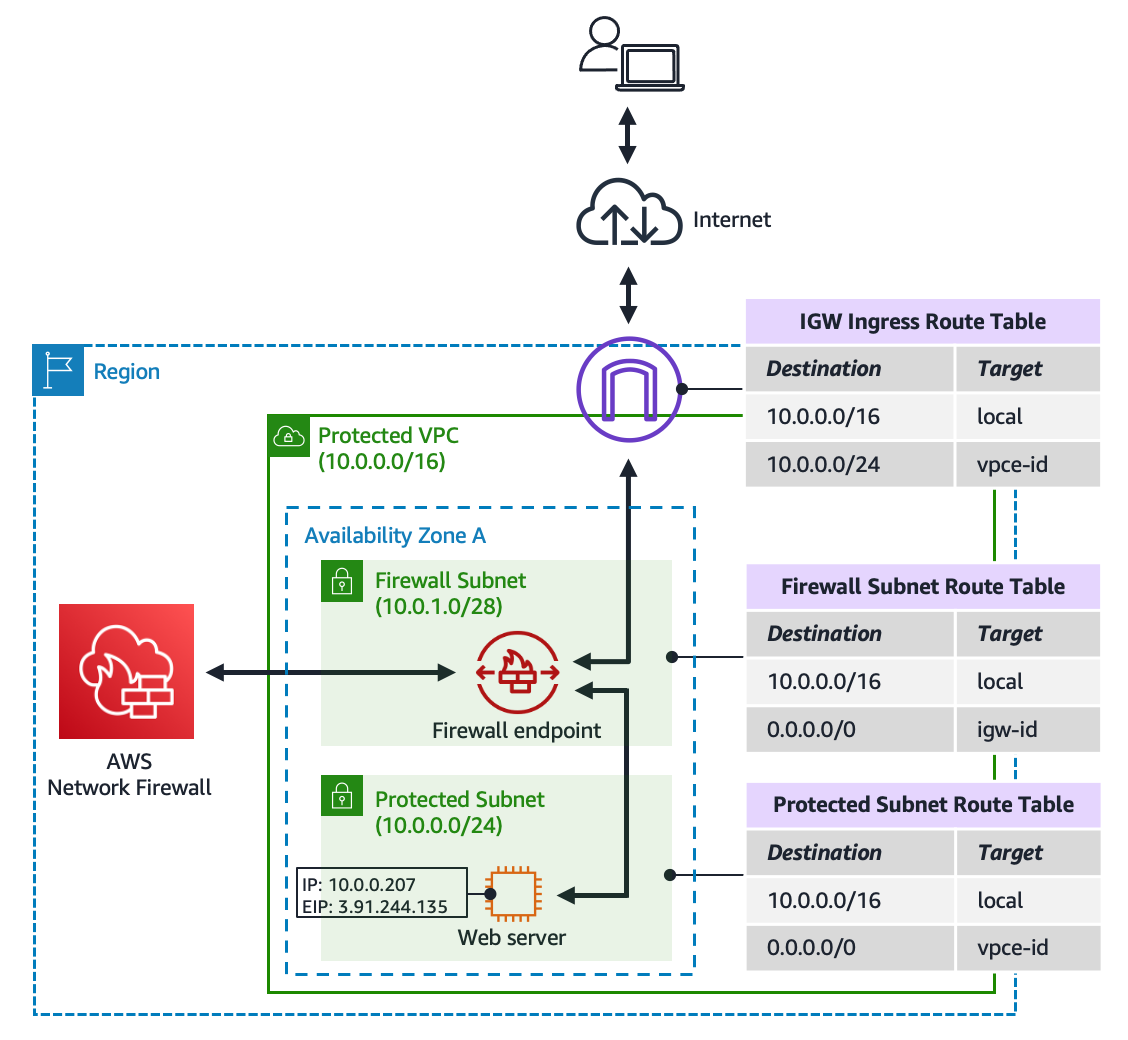
Figure 1: Solution overview
During the walkthrough, you’ll add firewall rules to influence traffic flows to and from a web server running on Amazon Elastic Compute Cloud (Amazon EC2) in a protected subnet. Additionally, the demo firewall is configured to send alert logs to Amazon CloudWatch, so you’ll see the filtering done by stateful rule groups.
How does this work?
The AWS Network Firewall uses a rules engine that processes rules differently depending on whether you are performing stateless or stateful inspection.
When performing stateless inspection, all individual packets in a flow are evaluated against each rule present in your policy. Rules are processed in strict order based on the priority assigned to them, with lower numbered rules (for example, 1) taking precedence over higher numbered rules (for example, 100).
Stateless rules inspect each packet in isolation, without regard to factors such as the direction of traffic, or whether the packet is part of an existing, approved connection. This has performance benefits, because the security policy makes a decision sooner. However, it also means that the policy cannot take the greater context of a flow into consideration before making a decision. For example, if you need to automatically allow return traffic, this is not something a stateless policy is best suited for.
Stateful rule inspection works differently. The stateful rules engine processes your rules in the order of their action setting, with pass rules processed first, then drop, then alert. The engine stops processing when it finds a match. The firewall also takes into consideration the order that the rules appear in the rule group, and the priority assigned to the rule, if any.
For example, a pass rule with a priority of 1 will be processed prior to a pass rule with a priority of 2. However, a drop rule with a priority of 1 will always be processed after all pass rules have been evaluated, including those with a lower priority. For more information about rule order evaluation, see Rule actions in AWS Network Firewall in the AWS Network Firewall Developer Guide.
Stateful rules take into context the entire flow from start to finish, which affects how your rules are evaluated.
For example, consider the following IPS rule:
The firewall will recognize a match at the start of the TCP handshake as shown in Figure 2, and immediately drop that traffic, and all the subsequent traffic.
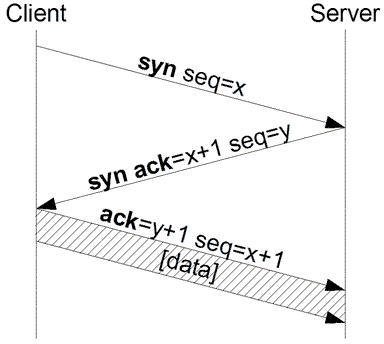
Figure 2: The three-way handshake used by TCP
This is because the stateful engine is making a decision for the entire flow, not just for individual packets. After the flow is dropped, no other rules are evaluated for that flow. This behavior means rules that only match during later parts of a flow will not be evaluated.
Let’s take a look at another example:
As written, the first rule will never match because the TCP protocol is the first protocol that will appear in the initial flow, starting with the TCP handshake. Therefore, when the flow starts, while the first rule will be evaluated, there will be no TLS protocol to match, so the drop rule will match instead and drop all of the traffic to aws.amazon.com. To avoid this, you should write rules that only evaluate after a session has been established using the flow keyword, for example:
Now, when your request to aws.amazon.com is made, the firewall will let the TCP handshake complete before evaluating the TCP drop rule. At this point, the rule action order will take precedence and the pass rule will match, allowing the rest of the traffic through for that flow.
To summarize, when writing stateful rules for AWS Network Firewall, you’ll want to keep in mind the rule action, the priority (if any), and whether the rule is intended to match upstream or downstream for a given network flow.
Important: The code template provided to support the walkthrough activity below is intended for deployment within a development environment. We have provided some security hardening measures within our code, but further refinements will be required prior to deploying this solution within a production environment. For more information, see Best Practices for Security, Identity, & Compliance.
Walkthrough prerequisites
- An AWS account with required permissions. If you do not have an AWS account, create and activate one.
Perform initial deployment steps
You use AWS CloudFormation automated infrastructure as code (IaC) to deploy the initial architecture required for this demo.
To initiate the deployment
- Using your device’s command line interface (CLI), check out the AWS Git repository used for this demo to a local directory on your device: git clone https://github.com/aws-samples/aws-network-firewall-demo. If you don’t have a Git client on your device, download the following file and extract it locally: https://github.com/aws-samples/aws-network-firewall-demo/archive/main.zip.
- Log in to the AWS Management Console and select the AWS Region where you’d like to deploy the demo. See the AWS Regional Services List to make sure that AWS Network Firewall is available in your selected Region. In the example, we selected US East (N. Virginia).
- In the search box in the navigation bar, enter CloudFormation, then in the search results, choose CloudFormation.
- Choose Create Stack, choose Template is ready, choose Upload a template file. Choose File to select AWS-Network-Firewall-demo.yaml that you saved locally.
- Choose Next. Enter a stack name (for the example, we used MyFirewallStack), then choose Next.
- On the subsequent screens, leave the defaults, and continue to select Next until you arrive at Step 4 – Review.
- Under Capabilities, select the check box I acknowledge that AWS CloudFormation might create IAM resources with custom names, then choose Create stack.
- The stack status is initially CREATE_IN_PROGRESS. Choose the Refresh button periodically to refresh the status. Upon completion, the status changes to CREATE_COMPLETE.
Make network connections to the web server
Now that the demo environment is deployed, you’ll make network connections to and from the web server in the protected subnet through the AWS Network Firewall.
To make network connections to the web server
- In the AWS CloudFormation console, navigate to your firewall stack’s Outputs tab. On the value for the WebServerURL open the context (right-click) menu, and choose Open Link in New Tab, as shown in Figure 3.

Figure 3: Firewall stack’s outputs tab
You will see a Hello World response from the web server in a new browser tab, as shown in Figure 4.

Figure 4: Web server’s Hello World page
- To send Internet Control Message Protocol (ICMP) echo requests to the web server, in your device’s command line enter ping web server’s public DNS name (replacing web server’s public DNS name with the firewall stack’s WebServerURL output, without the http:// prefix). You will see successful echo replies from the web server, as shown in Figure 5.

Figure 5: Successful echo replies from the web server
- In the AWS Management Console, go to Services and choose EC2.
- In EC2 console, in the left navigation pane, choose Instances.
- Select the WebServer instance and choose Connect.
- Select Session Manager and then Connect. This will securely access the instance without using SSH keys or a bastion host. Note that private Session Manager access was configured when you launched the AWS CloudFormation template during the initial deployment steps.
- In the Session Manager console, validate that the web server is able to retrieve web content from aws.amazon.com by using the cURL tool. Enter curl https://aws.amazon.com, as shown in Figure 6.

Figure 6: Retrieving web content from aws.amazon.com
You will see the Session Manager console populated with multiple pages of HTML content, as shown in Figure 7.

Figure 7: Successfully retrieved web content from aws.amazon.com
- Repeat the previous step to confirm that you are able retrieve content from other websites as well. For example, enter curl https://www.amazon.com.
Create firewall rules
Now that you’ve verified making network connections to and from the web server, this indicates that the AWS Network Firewall is not restricting any traffic. You’ll now create firewall rules to restrict these connections. While this can be accomplished with AWS CloudFormation, for this particular demo you’ll create the rules directly in the AWS Management Console.
To create firewall rules
- In the AWS Management Console, in the search box in the navigation bar, enter VPC, then in the search results, choose VPC.
- In the left navigation pane, choose Network Firewall rule groups. Choose the StatelessRuleGroup firewall rule group.
- To add a rule that blocks Ping by dropping all ICMP traffic, in the Rules section, select Edit rules.
- Select Add rule, and enter the following values, as shown in Figure 8:
- For Priority, enter 5.
- For Protocol, select ICMP and clear the All check box.
- For Source and Destination, choose Any IPv4 address.
- For Action, select Drop.
- Choose Add, then choose Save.

Figure 8: New rule that drops ICMP traffic
- In the left navigation pane, select Network Firewall rule groups. Select the StatefulRuleGroup firewall rule group.
- Next, you will add three sample Suricata compatible IPS rules:
- one to permit inbound HTTP access to the EC2-based web server
- one to permit outbound HTTPS access to aws.amazon.com
- one to deny all other TCP traffic
These particular rules work by matching specific keywords in a packet’s payload. Select Edit rules. Replace the contents of the text box with the following:
- Select Save rule group.
Verify the effectiveness of the firewall rules
To verify that the firewall is restricting traffic based on the rules that you created, go through these steps.
To verify the effectiveness of the firewall rules
- Confirm that you’re still able to browse the web server’s Hello World page (by browsing to firewall stack’s WebServerURL).
- From a command prompt on your device, send ICMP echo requests to the web server by entering ping web server’s public DNS name. Because the firewall is filtering ICMP, notice that the requests are now timing out, as shown in Figure 9.

Figure 9: The web server no longer responds to ICMP echo requests
- Connect to the web server’s console using Session Manager. To verify that the web server is still able to retrieve web content from aws.amazon.com, enter curl https://aws.amazon.com.
- Try to retrieve content from other websites, as well. For example, enter curl https://www.amazon.com. You’ll notice that the request now times out.
View the firewall’s alert logs
When you launched the AWS CloudFormation template during the initial deployment steps, the firewall was pre-configured to send alert logs to Amazon CloudWatch Logs. You can see any filtering done by its stateful rule groups. The AWS Network Firewall can also be set up to use other logging destinations, such as Amazon Simple Storage Service (Amazon S3) and Amazon Kinesis Data Firehose.
To view the firewall’s alert logs
- In the search box in the navigation bar, enter CloudWatch, then in the search results select CloudWatch.
- On the left navigation bar, select Insights to interactively search and analyze your log data.
- In the Select log group(s) drop down list, select the check box for the log group that starts with MyFirewallStack-AWSNetworkFirewallLogGroup, as shown in Figure 10. Choose Run query.

Figure 10: Run a query against the firewall’s log group
- Scroll down to see a list of records, and select one of them to see its contents. As there’s a small delay for the firewall to send its logs to CloudWatch, if you don’t see a list of records, wait a few minutes and re-run the query. You see information about the alert’s action, associated signature, and TLS SNI, as shown in Figure 11.

Figure 11: Viewing one of the firewall’s log records
This concludes the walkthrough. You can continue to experiment with the AWS Network Firewall rules engine, and also explore its logging capabilities.
Cleanup
Terminate the resources that were deployed for this walkthrough to avoid unnecessary costs.
To delete your demo stacks
- If you’ve manually created any additional firewall rule groups and added them to the firewall policy, delete them from the firewall policy.
- Navigate to the CloudFormation service and select the stack you created earlier, such as MyFirewallStack.
- Choose Delete, then choose Delete Stack.
- The stack status is initially DELETE_IN_PROGRESS. Choose the Refresh button periodically to refresh its status. The status changes to DELETE_COMPLETE after finished and the stack name no longer appears in your list of active stacks.
Conclusion
By following the walkthrough in this blog post, you deployed an example AWS Network Firewall within your AWS account and experimented with its rules engine. This included interacting with the firewall’s flexible rules engine to drop ICMP traffic and restrict access to certain web content. AWS Network Firewall has fine-grained control that can serve a multitude of other use cases, such as blocking outbound Server Message Block (SMB) requests to prevent the spread of malicious activity.
If you’d like to learn more about managing these rules across accounts, see the blog post Enforce your AWS Network Firewall protections at scale with AWS Firewall Manager.
In part 2 of this series, we will discuss how you can incorporate stateful rule groups with strict rule order and ability to set one or more default actions.
If you have feedback about this post, submit comments in the Comments section below. If you have questions about this post, start a new thread on the AWS Network Firewall forum or contact AWS Support.
Want more AWS Security how-to content, news, and feature announcements? Follow us on Twitter.