AWS Security Blog
How to automate SAML federation to multiple AWS accounts from Microsoft Azure Active Directory
September 12, 2022: This blog post has been updated to reflect the new name of AWS Single Sign-On (SSO) – AWS IAM Identity Center. Read more about the name change here.
December 2, 2019: Since the author wrote this post, AWS Single Sign On (AWS IAM Identity Center) has launched native features that simplify using Azure Active Directory as an identity provider. Therefore, AWS IAM Identity Center is now the recommended solution for enabling SAML federation using Azure AD. See this blog post for details.
You can use federation to centrally manage access to multiple AWS accounts using credentials from your corporate directory. Federation is the practice of establishing trust between a system acting as an identity provider and other systems, often called service providers, that accept authentication tokens from that identity provider. Amazon Web Services (AWS) supports open federation standards, including Security Assertion Markup Language (SAML) 2.0, to make it easier for the systems and service providers to interact. Here, I’m going to explain how to automate federation between AWS Identity and Access Management (IAM) in multiple AWS accounts and Microsoft Azure Active Directory (Azure AD). I’ll be following the same general patterns that allow SAML federation to AWS from any other identity provider that supports SAML 2.0, but I’m also adding some automation that is specific to Azure AD. I’ll show you how to perform the initial configuration, and then how to automatically keep Azure AD in sync with your AWS IAM roles.
AWS supports any SAML 2.0-compliant identity provider. If you’re interested in configuring federated access using an identity provider other than Azure AD, these links might be useful:
- AWS IAM Identity Center is a managed service that makes it easier to centrally manage IAM Identity Center access to multiple AWS accounts and business applications. As an identity provider, it also supports SAML 2.0 and can be integrated with Microsoft Active Directory on-premises.
- Choose Your Own SAML Adventure: A Self-Directed Journey to AWS Identity Federation Mastery is a workshop that demonstrates AWS federation best practices using your choice of identity provider.
- Integrating Third-Party SAML Solution Providers with AWS is documentation that helps you configure third-party SAML 2.0 identity provider solutions to work with AWS federation.
In this post, I’m going to focus on the nuances of using Azure AD as a SAML identity provider for AWS. The approach covered here gives you a solution that makes this option easier and adheres to AWS best practices. The primary objectives of this step-by-step walkthrough, along with the accompanying packaged solution, are:
- Support any number of AWS accounts and roles, making it easier to scale.
- Keep configuration of both sides updated automatically.
- Use AWS short-term credentials so you don’t have to store your credentials with your application. This enhances your security posture because these credentials are dynamically generated, securely delivered, naturally expire after their limited lifetime, and are automatically rotated for you.
Solution overview
I’ll discuss:
- How to configure Microsoft Azure Active Directory and show the steps needed to prepare it for federation with AWS.
- How to configure AWS IAM Identity Providers and Roles, and explain the steps you need to carry out in your AWS accounts.
- How to automatically import your AWS configuration into the Azure AD IAM Identity Center app for AWS.
The following diagram shows the high-level flow of SAML authentication and how your users will be federated into the AWS Management console:
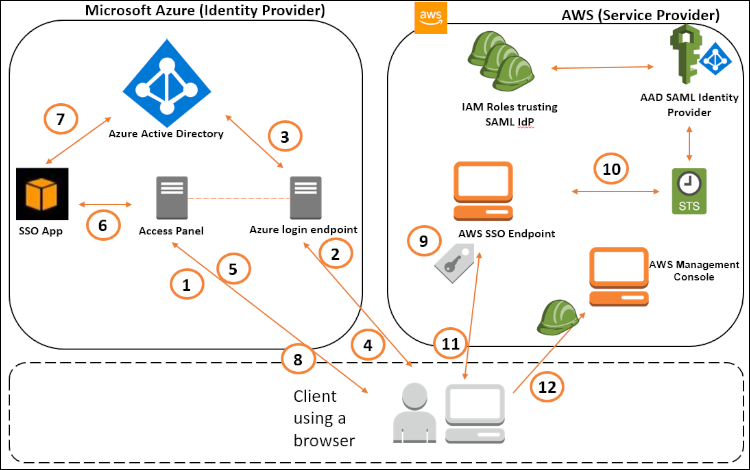
Figure 1: SAML federation between Azure AD and AWS
Key to the interactions in the diagram
- User opens a browser and navigates to Azure AD MyApps access panel (myapps.microsoft.com).
- If the user isn’t authenticated, she’ll be redirected to the login endpoint for authentication.
- User enters her credentials and the login endpoint will verify them against Azure AD tenant.
- Upon successful login, user will be redirected back to the access panel.
- User will see the list of available applications, including the AWS Console app, and will select the AWS Console app icon.
- The access panel redirects the user to the federated application endpoint, passing the application ID of the AWS IAM Identity Center app.
- The AWS IAM Identity Center application queries Azure AD and generates a SAML assertion, including all the AWS IAM roles assigned to the user.
- SAML assertion is sent back to the user.
- User is redirected to AWS federation endpoint, presenting the SAML assertion. The AWS federation endpoint verifies the SAML assertion. The user will choose which of their authorized roles they currently want to operate in. Note: If there’s only one role included, the selection is automatic.
- The AWS federation endpoint invokes the AssumeRoleWithSAML API of AWS Security Token Service (STS) and exchanges the SAML token with temporary AWS IAM credentials.
- Temporary IAM credentials are used to formulate a specific AWS Console URL that’s passed back to the client browser.
- User is redirected to AWS Management Console with permissions of the assumed role.
Automated solution components and flow
At the core of this automated solution, there’s a Docker container that runs inside an AWS ECS Fargate task. The container includes a number of PowerShell scripts that iterate through your IAM Roles, find roles that are associated with the Identity Provider of Azure AD, and update the Azure AD IAM Identity Center app manifest with the necessary values.
The Fargate task is invoked through an AWS Lambda function that’s scheduled through a CloudWatch Rule to run with the frequency you specify during setup.
All of these components require a number of parameters to run correctly, and you provide these parameters through the setup.ps1 script. The setup.ps1 script is run once and acquires all required parameters from you. It then stores these parameters with encryption inside the SSM Parameter Store. Azure credentials are stored in AWS Secrets Manager. This means you could even go another step further and use Secrets Manager lifecycle management capabilities to automatically rotate your Azure credentials. For encryption of Azure credentials, the template creates a new KMS key, exclusive to this application. If you prefer to use an existing key or a Customer Managed Key (CMK), you can modify the CloudFormation template, or simply pass your own key name to the setup.ps1 script.
The following diagram shows all components of the solution:
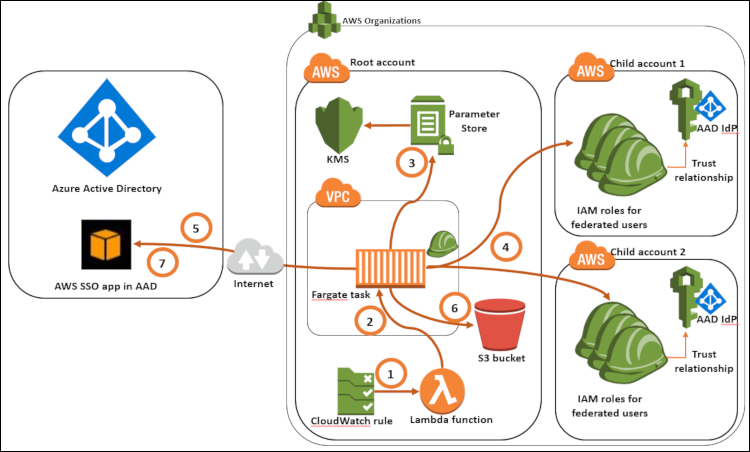
Figure 2: Solution architecture
- You’ll want any ongoing changes in AWS IAM roles to be replicated into Azure AD. Therefore, you need to have the update task run periodically. A CloudWatch Rule triggers an event and an AWS Lambda Function starts running as a result of this event.
- The Lambda Function runs an ECS Fargate Task.
- The ECS Task is associated with a Task Role with permission to fetch parameters from Systems Manager (SSM) Parameter Store and Secrets Manager. The task will request parameters from SSM PS, and SSM PS decrypts parameter values using the associated key in AWS Key Management Service (KMS). Azure credentials are securely stored in AWS Secrets Manager.
- Fargate Task queries AWS Organizations and gets a list of child accounts. It then constructs cross-account role ARNs. The ECS Task then assumes those cross-account roles and iterates through all IAM roles in each account to find those associated with your IdP for Azure AD.
- The ECS Task connects to the Azure AD IAM Identity Center application and retrieves the existing manifest. Notice that, although you manually retrieved the manifest file during setup, it still needs to be fetched again every time to make sure it’s the latest version. The one you manually downloaded is used to retrieve parameters needed for setup, such as the application identifier or entity ID.
- ECS Task stores the existing manifest as a backup in a highly-durable S3 bucket. In case anything goes wrong, the last working state of the application manifest is always available in the S3 bucket. These files are stored with the exact time of their retrieval as their file name. You can find the correct version based on the point in time it was retrieved.
- The ECS Task generates a new manifest based on your AWS account/roles as inspected in the preceding steps. It uses the Azure AD credentials retrieved from AWS Secrets Manager and uses them to update the Azure AD IAM Identity Center app with the new manifest. It also creates any required Azure AD Groups according to the specified custom naming convention. This makes it easier for the Azure AD administrator to map Azure AD users to AWS roles and entitle them to assume those roles.
Prerequisites
To start, download a copy of the sample code package.
You must have AWS Organizations enabled on all of your accounts to take advantage of this solution’s automation. Using AWS Organizations, you can configure one of your accounts as the root account and all other accounts will join your organization as child accounts. The root account will be trusted by all child accounts, so you can manage your child account resources from your root account. This trust is enabled using a role in each of your child accounts. AWS Organizations creates a default role with full permissions on child accounts that are directly created using AWS Organizations. Best practice is to delete this default role and create one with privileges restricted to your requirements. A sample role, named AWSCloudFormationStackSetExecutionRole, is included in cross-account-role-cfn.json
of my code package. You should modify this template based on your requirements.
Setup steps
In following sections, I’ll show the steps to setup federation and deploy the automation package. First, I’ll show the steps to prepare Azure Active Directory for federation. After that, you’ll see how you can configure all of your AWS accounts from a central place, regardless of the number of your accounts. The last step is to deploy the automation package in your master AWS account to automatically handle ongoing changes as you go.
Step 1: Configure Microsoft Azure Active Directory
You need to create two resources on your Azure AD tenant: a User and an Enterprise Application.
First thing you need for accessing Azure AD is an Azure AD user. In following the principle of least privilege, you want a user that can only manipulate the IAM Identity Center application. Azure AD users with the directory role of User will only have access to resources they “own.” Therefore, you can create a new user specifically for this purpose and assign it as the owner of your IAM Identity Center app. This user will be used by the automation to access Azure AD and update the IAM Identity Center app.
Here’s how you can create a user with the directory role of User (default):
- Open Azure Portal.
- Open Azure Active Directory.
- In the left pane, select Users.
- In the Manage pane, select All users.
- Select New user.
- Enter values for the Name and User name fields.
- Select the Show Password box and note the auto-generated password for this user. You will need it when you change the password.
- Select Create.
- Open a browser window and go to https://login.microsoftonline.com.
- Log in with the new user. You’ll be prompted to change your password. Note the new password so you don’t forget it.
Next, create an Enterprise Application from the Azure AD application gallery:
-
- Open Azure Portal.
- Open Azure Active Directory.
- In the Manage pane, select Enterprise applications.
- Select New application.
- In the gallery text box, type AWS.
- You’ll see an option with the name Amazon Web Services (AWS). Select that application. Make sure you don’t choose the other option with the name “AWS Console.” That option uses an alternate integration method that isn’t relevant to this post.
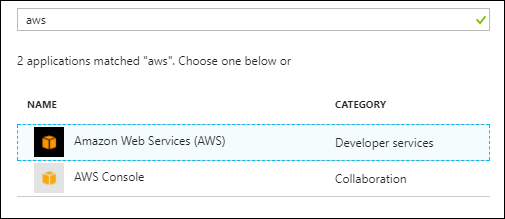
Figure 3: Select “Amazon Web Services (AWS)
- Select Add. You can change the name to any name you would prefer.
- Open the application using this path: Azure Portal > Azure Active Directory > Enterprise Applications > All Applications > your application name (for example, “Amazon Web Services (AWS)”).
- From left pane, select IAM Identity Center, and then set IAM Identity Center mode to SAML-based Sign-on.
- The first instance of the app is pre-integrated with Azure AD and requires no mandatory URL settings. However, if you previously created a similar application, you’ll see this:
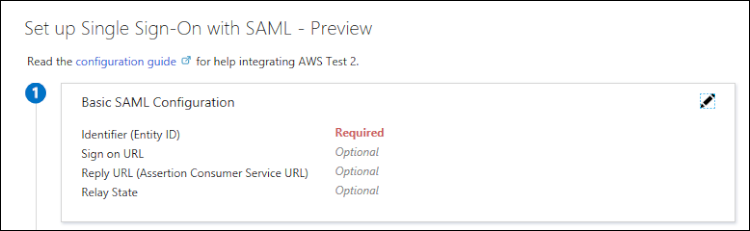
Figure 4: Azure AD Application Identifier
- If you see the red “Required” value in the Identifier field, select the Edit button and enter a value for it. This can be any value you prefer (the default is https://signin.aws.amazon.com/saml), but it has to be unique within your Azure AD tenant. If you don’t see the Identifier field, it means it’s already prepopulated and you can proceed with the default value. However, if for any reason you prefer to have a custom Identifier value, you can select the Show advanced URL settings checkbox and enter the preferred value.
- In the User Attributes section, select the Edit button.
- You need to tell Azure AD what SAML attributes and values are expected and accepted on the AWS side. AWS requires two mandatory attributes in any incoming SAML assertion. The Role attribute defines which roles the federated user is allowed to assume. The RoleSessionName attribute defines the specific, traceable attribute for the user that will appear in AWS CloudTrail logs. Role and RoleSessionName are mandatory attributes. You can also use the optional attribute of SessionDuration to specify how long each session will be valid until the user is requested to get a new token. Add the following attributes to the User Attributes & Claims section in the Azure AD IAM Identity Center application. You can also remove existing default attributes, if you want, because they’ll be ignored by AWS:
Name (case-sensitive) Value Namespace (case-sensitive) Required or optional? RoleSessionName user.userprincipalname
(this will show logged in user ID in AWS portal, if you want user name, replace it with user.displayName)https://aws.amazon.com/SAML/Attributes Required Role user.assignedroles https://aws.amazon.com/SAML/Attributes Required SessionDuration An integer between 900 seconds (15 minutes) and 43200 seconds (12 hours). https://aws.amazon.com/SAML/Attributes Optional Note: I assume that you use users that are directly created within your Azure AD tenant. If you’re using an external user such as a Hotmail, Live, or Gmail account for proof-of-concept purposes, RoleSessionName should be set to user.mail instead.
- As a good practice, when it approaches its expiration date, you can rotate your SAML certificate. For this purpose, Azure AD allows you to create additional certificates, but only one certificate can be active at a time. In the SAML Signing Certificate section, make sure the status of this certificate is Active, and then select Federation Metadata XML to download the XML document.
- Download the Metadata XML file and save it in the setup directory of the package you downloaded in the beginning of this walkthrough. Make sure you save it with file extension of .xml.
- Open Azure Portal > Azure Active Directory > App Registrations > your application name (for example, “Amazon Web Services (AWS)”). If you don’t see your application in the list on the App Registrations page, select All apps from the drop-down list on top of that page and search for it.
- Select Manifest. All Azure AD applications are described as a JavaScript Object Notification (JSON) document called manifest. For AWS, this manifest defines all AWS to Azure AD role mappings. Later, we’ll be using automation to generate updates to this file.

Figure 5: Azure AD Application Manifest
- Select Download to download the app manifest JSON file. Save it in the setup directory of the package you downloaded in the beginning of this walkthrough. Make sure you save it with file extension of .json.
- Now, back on your registered app, select Settings.
- In the Settings pane, select Owners.

Figure 6: Application Owner
- Select Add owner and add the user you created previously as owner of this application. Adding the Azure AD user as owner enables the user to manipulate this object. Since this application is the only Azure AD resource owned by our user, it means we’re enforcing the principle of least privilege on Azure AD side.
At this point, we’re done with the initial configuration of Azure AD. All remaining steps will be performed in your AWS accounts.
Step 2: Configure AWS IAM Identity Providers and Roles
In the previous section, I showed how to configure the Azure AD side represented in the Solution architecture in Figure 1. This section explains the AWS side.
As seen in Figure 1, enabling SAML federation in any AWS account requires two types of AWS IAM resources:
- A SAML 2.0 Identity Provider (IdP)
- One or more IAM Roles that have a trust relationship with your SAML IdP
You’ll have to create these two resources in all of your AWS accounts participating in SAML federation. There are various options for doing this. You can:
- Manually create IAM IdP and Roles using AWS Management Console. For one or two accounts, this might be the easiest way. But as the number of your AWS accounts and roles increase, this method becomes more difficult.
- Use AWS CLI or AWS Tools for PowerShell. You can use these tools to write automation scripts and simplify both creation and maintenance of your roles.
- Use AWS CloudFormation. CloudFormation templates enable structured definition of all resources and minimize the effort required to create and maintain them.
Here, I’m going to use CloudFormation and show how it can help you create up to thousands of roles in your organization, if you need that many.
Managing multiple AWS accounts from a root account
AWS CloudFormation simplifies provisioning and management on AWS. You can create templates for the service or application architectures you want and have AWS CloudFormation use those templates for quick and reliable provisioning of the services or applications (called “stacks“). You can also easily update or replicate the stacks as needed. Each stack is deployed in a single AWS account and a specific AWS Region. For example, you can write a template that defines your organization roles in AWS IAM and deploy it in your first AWS account and US East (N.Virginia) region.
But if you have hundreds of accounts, it wouldn’t be easy, and if you have time or budget constraints, sometimes not even possible to manually deploy your template in all accounts. Ideally, you’d want to manage all your accounts from a central place. AWS Organizations is the service that gives you this capability.
In my GitHub package there is a CloudFormation template named cross-account-roles-cfn.json. It’s located under the cfn directory. This template includes two cross-account roles. The first one is a role for cross-account access with the minimum required privileges for this solution that trusts your AWS Organizations master account. This role is used to deploy AWS IAM Identity Provider (IdP) for Azure AD and all SAML federation roles, trusting that IdP within all of your AWS child accounts. The second one is used by the automation to inspect your AWS accounts (through describe calls) and keep the Azure AD IAM Identity Center application updated. I’ve created two roles to ensure that each component executes with the least privilege required. To recap, you’ll have two cross account roles for two different purposes:
- A role with full IAM access and Lambda execution permissions. This one is used for creation and maintenance of SAML IdP and associated IAM roles in all accounts.
- A role with IAM read-only access. This one is used by the update task to read and detect any changes in your federation IAM roles so it can update Azure AD IAM Identity Center app with those changes.
You can deploy CloudFormation templates in your child accounts using CloudFormation StackSets. Log in to your root account, go to the CloudFormation console, and select StackSets.
Select Template is ready, select Upload a template file, and then select the cross-account-roles-cfn.json template to deploy it in all of your accounts. AWS IAM is a global service, so it makes no difference which region you choose for this template. You can select any region, such as us-east-1.
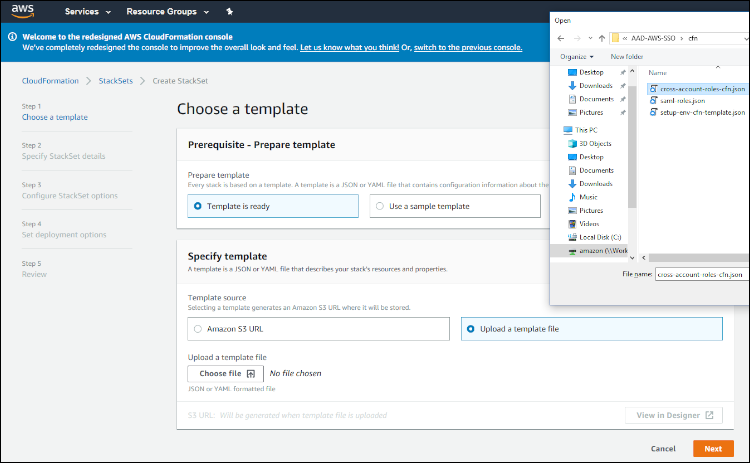
Figure 7: Upload template to StackSets console
This template includes a parameter prompting you to enter root account number. For instructions to find your account number, see this page.
If you create your child accounts through AWS Organizations, you’ll be able to directly deploy StackSets in those child accounts. But, if you add existing accounts to you organization, you have to first manually deploy
cross-account-roles-cfn.json in your existing accounts. This template includes the IAM role and policies needed to enable your root account to execute StackSets on it.
Configure the SAML Identity Provider and Roles
A sample template to create your organization roles as SAML federation IAM roles is included in the saml-roles.json file in the same cfn directory. This template includes the SAML IdP and three sample roles trusting that IdP. The IdP is implemented as an AWS Lambda-backed CloudFormation custom resource. Included roles are samples using AWS IAM Job Functions for Administrator, Observer, and DBA. Modify this template by adding or removing roles as needed in your organization.
If you need different roles in some of your accounts, you’ll have to create separate copies of this template and modify them accordingly. From the CloudFormation StackSets console, you can choose the accounts to which your template should be deployed.
The last modification to make is on the IdentityProvider custom resource. It includes a <Metadata> property. Its value is defined as <MetadataDocument>. You’d have to replace the value with the content of the SAML certificate metadata XML document that you previously saved in the setup directory (see the Configure Microsoft Azure Active Directory section above). You’ll need to escape all of the quotation marks (“) in the XML string with a backslash (\). If you don’t want to do this manually, you can copy the saml-roles.json template file in the setup directory and as you follow the remainder of instructions in this post, my setup script will do that for you.
Step 3: Updating Azure AD from the root AWS account
The third and last template in the cfn directory is setup-env-cfn-template.json. You have to deploy this template only in your root account. This template creates all the components in your root account, as shown in Figure 8. These are resources needed to run the update task and keep Azure AD IAM Identity Center App updated with your IAM roles. In addition, it also creates a temporary EC2 instance for initial configuration of that update task. The update task uses AWS Fargate, a serverless service that allows you to run Docker containers in AWS. You have to deploy the setup-env-cfn-template.json template in a region where Fargate is available. Check the AWS Region Table to make sure Fargate is available in your target region. Follow these steps to deploy the stack:
- Log in to your root account and open the CloudFormation console page.
- Select Create Stack, upload the setup-env-cfn-template.json file, and then select Next.
- Enter a stack name, such as iam-aws-aad. The stack name must be all lowercase letters. The template uses the stack name to create an S3 bucket, and because S3 does not allow capital letters, if you choose a stack name containing capital letters, the stack creation will fail. The stack name is also used as the appName parameter in all scripts, and all Parameter Store parameter names are prefixed with it.
- Enter and select values for the following parameters:
- azureADTenantName: You can get the Azure Active Directory Tenant Name from Azure Portal. Go to the Azure Active Directory Overview page and the tenant name should appear at the top of the page. During setup, this is used as the value for the parameter.
- ExecFrequency is the time period for the update task to run. For example, if you enter 30, every 30 minutes Azure AD will be updated with any changes in IAM roles of your AWS accounts.
- KeyName is a key pair that is used for login and accessing the EC2 instance. You’ll need to have a key pair created before deploying this template. To create a key pair, follow these instructions: Amazon EC2 Key Pairs. Also, for more convenience, if you’re using a MAC or Linux, you can copy your private key in the setup directory. Don’t forget to run chmod 600 <key name> to change the permissions on the key.
- NamingConvention is used to map AWS IAM roles to Azure AD roles. The default naming convention is: “AWS {0} – {1}”. The value of {0} is your account number. The value of {1} is the name of your IAM Role.
- SSHLocation is used in a Security Group that restricts access to the setup EC2 instance. You only need this instance for initial setup; therefore, the best practice and most secure option is to change this value to your specific IP address. In any case, make sure you only allow access to your internal IP address range.
- Subnet is the VPC subnet in which you want the update task to run. This subnet must have egress (outgoing) internet connectivity. The update task needs this to reach Azure AD Graph API endpoints.
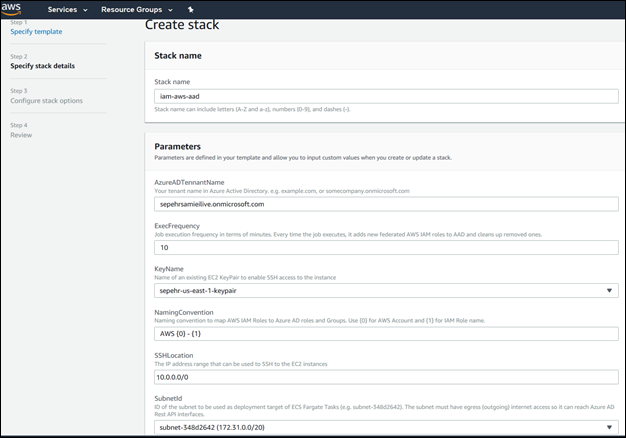
Figure 8: Enter parameters for automation stack
Once you deploy this template in CloudFormation and the associated stack is successfully created, you can get the IP address of the setup EC2 instance from the Output tab in CloudFormation. Now, follow the steps below to complete the setup.
Note: At this point, in addition to all the files already included in the original package, you have two additional, modified files in the setup directory:
- The SAML Certificate XML file from Azure AD
- The App Manifest JSON file from Azure AD
Make sure you have following information handy. This info is required in some of the steps:
- Azure User Name: This is the user name of the Azure user you created in step 1 in the Configure Microsoft Azure Active Directory section above.
- Azure Password: This is the password for the same user.
Now, follow these steps to complete the setup:
- If you’re using Mac, Linux, or UNIX, run the initiate_setup.sh script in the setup directory and, when prompted, provide the IP address from the previous procedure. It will copy all the required files to the target setup EC2 instance and automatically take you to the setup.ps1 script. Now, skip to step 3 below.
- If you’re using Windows on your local computer, use your favorite tool (such as WinSCP) to copy both setup and docker directories from your local computer to the /home/ec2-user/scripts directory on the target EC2 instance.
- Once copied, use your favorite SSH tool to log in to the target setup EC2 instance. For example, you can use PuTTY for this purpose. As soon as you log in, Setup.ps1 will automatically run for you.
- Setup.ps1 is interactive. It will prompt for the path to the three files you saved in the setup directory, and also for your Azure AD user credentials. Use the credentials of the user you created in step 1 of the Configure Microsoft Azure Active Directory section. The script will perform following tasks:
- Store Azure AD credentials securely in AWS Secrets Manager. The script also extracts necessary values out of the three input files and stores them as additional parameters in AWS Systems Manager (SSM) Parameter Store.
Important: The credentials of your Azure user will be stored in AWS Secrets Manager. You must make sure that access to Secrets Manager is restricted to users who are also authorized to retrieve these credentials.
- Create a Docker image and push it into an AWS Elastic Container Registry (ECR) repository that’s created as part of the CloudFormation template.
- The script checks if saml-roles.json is available in setup directory. If it’s available, the script will replace the value of the Metadata property in the IdP custom resource with content of the SAML metadata XML file. It also generates a text file containing a comma-separated list of all your child accounts, extracting account numbers from cross-account-roles-cfn.json. Both of these are copied to the S3 bucket that is created as part of the template. You can use these at any time to deploy, maintain, and manage your SAML roles in child accounts using CloudFormation StackSets.
- If saml-roles.json is available, the script will prompt whether you want it to deploy your roles on your behalf. If you select yes (“y“), it will immediately deploy the template in all child accounts. You can also select no (“n“), if you prefer to do this at another time, or if you need different templates and roles in some accounts.
- Store Azure AD credentials securely in AWS Secrets Manager. The script also extracts necessary values out of the three input files and stores them as additional parameters in AWS Systems Manager (SSM) Parameter Store.
- Once the script executes and successfully completes, you should terminate the setup EC2 instance.
You’ve now completed setting up federation on both sides. All AWS IAM roles that trust an IdP with the SAML certificate of your Azure AD (the Metadata XML file) will now automatically be replicated into your Azure AD tenant. This will take place with the frequency you have defined. Therefore, if you have set the ExecFrequency parameter to “30“, after 30 minutes you’ll see the roles replicated in Azure AD.
But to enable your users to use this federation, you have to entitle them to assume roles, which is what I’ll cover in the next section.
Entitling Azure AD users to assume AWS Roles
- Open Azure Portal > Azure Active Directory >
Enterprise applications > All applications > (your application name) > Users and groups. - Select Add user.
- In the Users and groups pane, select one of your Azure AD users (or groups), and then select Select.
- Select the Select role pane and, on the right hand side, you should now see your AWS roles listed.
You can add and map Azure AD users or groups to AWS IAM roles this way. By adding users to these groups, you’re giving them access to those roles in AWS through pre-established trust. In the case of Groups, any Azure AD users inside that Group will have IAM Identity Center access to the AWS Console and permitted to assume AWS roles/accounts associated with their Azure AD Group. Azure AD users who are authenticated against login.microsoftonline.com can go to their Access Panel (myapps.microsoft.com) and select the AWS app icon.
Application maintenance
Most of the time, you will not need to do anything else because the Fargate task will execute on each interval and keep the Azure AD manifest aligned with your AWS accounts and roles. However, there are two situations that might require you to take action:
- If you rotate your Azure AD SAML certificate
- If you rotate the Azure user credentials used for synchronization
You can use AWS Secrets Manager lifecycle management capabilities to automate the process for the second case. Otherwise, in the event of either of these two situations, you can modify the corresponding values using the AWS Systems Manager Parameter Store and Secrets Manager consoles. Open the Parameter Store console and find parameters having names prefixed with your setup-env-cfn-template.json stack name (you entered this name when you were creating the stack). In case you rotate your Azure AD SAML certificate, you should also update all of your IdP resources in AWS accounts to use the new resource. Here again, StackSets can do the heavy-lifting for you. Use the same saml-roles.json template to update all of your Stack Instances through CloudFormation. You’ll have to replace the Metadata property value with content of the new certificate, and replace quotation mark characters (“) with escaped quotes (\”).
Summary
I’ve demonstrated how to set up and configure SAML federation and IAM Identity Center using Azure Active Directory to AWS Console following these principles and requirements:
- Using security best practices to keep both sides of federation (AWS and Azure) secure
- Saving time and effort by automating the manual effort needed to synchronize two sides of federation
- Keeping operation cost to a minimum through a serverless solution
If you have feedback about this blog post, submit comments in the Comments section below. If you have questions about this blog post, start a new thread in the forums.
Want more AWS Security how-to content, news, and feature announcements? Follow us on Twitter.